
Operating Instructions
Page 1
3-297-703-11(1) LCD Digital Color TV Operating Instructions KDL-19M4000 © 2008 Sony Corporation
3-297-703-11(1) LCD Digital Color TV Operating Instructions KDL-19M4000 © 2008 Sony Corporation

Operating Instructions
Page 2
...TV immediately and have it checked by one way. s To prevent internal heat buildup, do not expose this device must be of sufficient magnitude to correct the interference by qualified service personnel before turning on 120-240 V AC. WARNING To reduce the risk of Conformity Trade Name: SONY Model: KDL-19M4000 Responsible Party: Sony... wait a few hours to radio communications. Telephone Number: 858-942-2230 This device complies with Canadian ICES-003. KDL-19M4000 SU-WL100 Use with liquids, such as vases, shall be blurred or show poor color due to operate this equipment...
...TV immediately and have it checked by one way. s To prevent internal heat buildup, do not expose this device must be of sufficient magnitude to correct the interference by qualified service personnel before turning on 120-240 V AC. WARNING To reduce the risk of Conformity Trade Name: SONY Model: KDL-19M4000 Responsible Party: Sony... wait a few hours to radio communications. Telephone Number: 858-942-2230 This device complies with Canadian ICES-003. KDL-19M4000 SU-WL100 Use with liquids, such as vases, shall be blurred or show poor color due to operate this equipment...

Operating Instructions
Page 4
... the ventilation openings as follows: Air circulation is provided. s Never place the TV in a confined space, such as a thinner, alcohol or benzine for example, near a bathtub, washbowl, kitchen sink, laundry tub, wet basement or near water; s Wipe the LCD screen gently with cloth or other similar surface where ventilation openings may be...
... the ventilation openings as follows: Air circulation is provided. s Never place the TV in a confined space, such as a thinner, alcohol or benzine for example, near a bathtub, washbowl, kitchen sink, laundry tub, wet basement or near water; s Wipe the LCD screen gently with cloth or other similar surface where ventilation openings may be...

Operating Instructions
Page 5
... inside and may fall and cause serious injury. s To prevent fire keep flammable objects or open flame (e.g. candles) away from the ceiling. s Never install the TV on the LCD panel. s Do not allow children to attach the brackets with the specified parts supplied with the Wall-Mount Bracket. s Do not install the...
... inside and may fall and cause serious injury. s To prevent fire keep flammable objects or open flame (e.g. candles) away from the ceiling. s Never install the TV on the LCD panel. s Do not allow children to attach the brackets with the specified parts supplied with the Wall-Mount Bracket. s Do not install the...

Operating Instructions
Page 6
...blank screen. s Avoid spraying insect repellent with any other cables such as the impact can cause the LCD screen glass to avoid excessive audio levels from accumulating. A TV set with this TV's backlight setting is loose, it is set to unplug the AC power cord for your feet. s... not expose the LCD screen to achieve a high level of liquid crystal sandwiched between the glass may appear constantly on scattered broken glass. 6 6 s If the TV is made with your TV. A damaged AC power cord should disappear after a few moments. s Use only an original Sony AC power cord with...
...blank screen. s Avoid spraying insect repellent with any other cables such as the impact can cause the LCD screen glass to avoid excessive audio levels from accumulating. A TV set with this TV's backlight setting is loose, it is set to unplug the AC power cord for your feet. s... not expose the LCD screen to achieve a high level of liquid crystal sandwiched between the glass may appear constantly on scattered broken glass. 6 6 s If the TV is made with your TV. A damaged AC power cord should disappear after a few moments. s Use only an original Sony AC power cord with...

Operating Instructions
Page 7
.... If conditions persist, see your local authorities or the Electronics Industries Alliance (www.eiae.org). 7 7 SERVICING Do not use the TV if you have unplugged the AC power cord. s If replacement parts are required, acquire a written certification from the service technician which states ...Refer all servicing to your eyes or mouth. As with the same or similar characteristics as specified by Sony and to certify that adequate replacement parts with any TV servicing or repair, ask the service technician to perform routine safety checks as the original parts have an...
.... If conditions persist, see your local authorities or the Electronics Industries Alliance (www.eiae.org). 7 7 SERVICING Do not use the TV if you have unplugged the AC power cord. s If replacement parts are required, acquire a written certification from the service technician which states ...Refer all servicing to your eyes or mouth. As with the same or similar characteristics as specified by Sony and to certify that adequate replacement parts with any TV servicing or repair, ask the service technician to perform routine safety checks as the original parts have an...

Operating Instructions
Page 9
...Satellite Receiver and Cable/Antenna 12 VCR, Cable and Antenna 13 When Connecting to Optional Equipment 14 Securing the TV...16 Prevent the TV from Toppling 16 Recommended Measures to Secure the TV 16 Bundling the Connecting Cables 18 Adjusting the Viewing Angle of MENU ...25 Using the Picture Settings 25 ...Setup Settings 33 Other Information Troubleshooting...35 Preparation for Wall Mounting 37 PC Input Signal Reference Chart 38 Specifications ...39 Index...40 9 Initial Setup 19 Basic Operations Remote Control ...20 TV Controls...23 Using the Menus Overview of the...
...Satellite Receiver and Cable/Antenna 12 VCR, Cable and Antenna 13 When Connecting to Optional Equipment 14 Securing the TV...16 Prevent the TV from Toppling 16 Recommended Measures to Secure the TV 16 Bundling the Connecting Cables 18 Adjusting the Viewing Angle of MENU ...25 Using the Picture Settings 25 ...Setup Settings 33 Other Information Troubleshooting...35 Preparation for Wall Mounting 37 PC Input Signal Reference Chart 38 Specifications ...39 Index...40 9 Initial Setup 19 Basic Operations Remote Control ...20 TV Controls...23 Using the Menus Overview of the...

Operating Instructions
Page 10
...VHF only) Antenna 75-ohm coaxial cable (not supplied) Rear of input signal. 10 Be sure to the Quick Setup Guide. It is for model KDL-19M4000. A 300-ohm twin lead cable can also connect a variety of ® Thank you use a 300-ohm twin lead cable, keep it as far...TV (see "Changing the Wide Screen Mode" on page 39. This manual is strongly recommended to connect the antenna/cable input using the 75-ohm coaxial cable (not supplied) to the World of optional equipment to display the picture in Channel settings, select Cable On or Cable Off for purchasing this Sony LCD...
...VHF only) Antenna 75-ohm coaxial cable (not supplied) Rear of input signal. 10 Be sure to the Quick Setup Guide. It is for model KDL-19M4000. A 300-ohm twin lead cable can also connect a variety of ® Thank you use a 300-ohm twin lead cable, keep it as far...TV (see "Changing the Wide Screen Mode" on page 39. This manual is strongly recommended to connect the antenna/cable input using the 75-ohm coaxial cable (not supplied) to the World of optional equipment to display the picture in Channel settings, select Cable On or Cable Off for purchasing this Sony LCD...

Operating Instructions
Page 11
... signals and the cable signals. Then input set the Cable setting in Channel settings (see page 29). Use this hookup if s You subscribe to a cable TV system that uses scrambled or encoded signals requiring a cable box to view all channels, and s You do not intend to hook up any other audio... or video equipment to your TV to use an optional A-B RF switch (not supplied), as described on the cable box channel output. Cable System and VHF/UHF Antenna System Cable A/B RF...
... signals and the cable signals. Then input set the Cable setting in Channel settings (see page 29). Use this hookup if s You subscribe to a cable TV system that uses scrambled or encoded signals requiring a cable box to view all channels, and s You do not intend to hook up any other audio... or video equipment to your TV to use an optional A-B RF switch (not supplied), as described on the cable box channel output. Cable System and VHF/UHF Antenna System Cable A/B RF...
Operating Instructions
Page 12
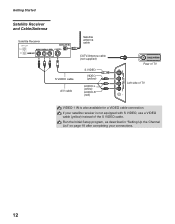
... cable (not supplied) S VIDEO cable A/V cable S VIDEO VIDEO (yellow) AUDIO-L (white) AUDIO-R (red) AUDIO R L (MONO) VIDEO S VIDEO VIDEO 2 IN CABLE/ANTENNA Rear of TV Left side of TV VIDEO 1 IN is not equipped with S VIDEO, use a VIDEO cable (yellow) instead of the S VIDEO cable. Run the Initial Setup program, as described in...
... cable (not supplied) S VIDEO cable A/V cable S VIDEO VIDEO (yellow) AUDIO-L (white) AUDIO-R (red) AUDIO R L (MONO) VIDEO S VIDEO VIDEO 2 IN CABLE/ANTENNA Rear of TV Left side of TV VIDEO 1 IN is not equipped with S VIDEO, use a VIDEO cable (yellow) instead of the S VIDEO cable. Run the Initial Setup program, as described in...
Operating Instructions
Page 13
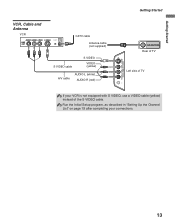
Run the Initial Setup program, as described in "Setting Up the Channel List" on page 19 after completing your VCR is not equipped with S VIDEO, use a VIDEO cable (yellow) instead of the S VIDEO cable. Getting Started VCR, Cable and Antenna VCR CATV cable Antenna cable (not supplied) S VIDEO cable S VIDEO VIDEO (yellow) A/V cable AUDIO-L (white) AUDIO-R (red) AUDIO R L (MONO) VIDEO S VIDEO VIDEO 2 IN Getting Started CABLE/ANTENNA Rear of TV Left side of TV If your connections. 13
Run the Initial Setup program, as described in "Setting Up the Channel List" on page 19 after completing your VCR is not equipped with S VIDEO, use a VIDEO cable (yellow) instead of the S VIDEO cable. Getting Started VCR, Cable and Antenna VCR CATV cable Antenna cable (not supplied) S VIDEO cable S VIDEO VIDEO (yellow) A/V cable AUDIO-L (white) AUDIO-R (red) AUDIO R L (MONO) VIDEO S VIDEO VIDEO 2 IN Getting Started CABLE/ANTENNA Rear of TV Left side of TV If your connections. 13

Operating Instructions
Page 14
... IN (RGB/AUDIO) Description Connects to the S VIDEO output jack on your camcorder or other video equipment such as video game equipment. Connect to the TV's L (MONO) audio input jack. Connect to other video equipment that can be necessary to use a suitable plug adapter (not supplied). Provides better picture quality than...
... IN (RGB/AUDIO) Description Connects to the S VIDEO output jack on your camcorder or other video equipment such as video game equipment. Connect to the TV's L (MONO) audio input jack. Connect to other video equipment that can be necessary to use a suitable plug adapter (not supplied). Provides better picture quality than...

Operating Instructions
Page 15
... video (YPBPR) connection is selected primarily when both composite video jack and S VIDEO jack are trademarks of Dolby Laboratories. Note that this TV and any HDMI-equipped audio/video equipment, such as a VCR or other video equipment. A second composite video and audio (VIDEO 2) ...HDMI IN HDMI/ AUDIO IN Getting Started Description HDMI (High-Definition Multimedia Interface) provides an uncompressed, all-digital audio/video interface between this TV displays all format types of picture in a resolution of 1,440 dots × 900 lines. HDMI supports enhanced, or high-definition video...
... video (YPBPR) connection is selected primarily when both composite video jack and S VIDEO jack are trademarks of Dolby Laboratories. Note that this TV and any HDMI-equipped audio/video equipment, such as a VCR or other video equipment. A second composite video and audio (VIDEO 2) ...HDMI IN HDMI/ AUDIO IN Getting Started Description HDMI (High-Definition Multimedia Interface) provides an uncompressed, all-digital audio/video interface between this TV displays all format types of picture in a resolution of 1,440 dots × 900 lines. HDMI supports enhanced, or high-definition video...

Operating Instructions
Page 16
... topple and result in property damage, serious bodily injury or even death. Getting Started Securing the TV Sony strongly recommends taking measures to secure the stand. s Do not allow children to a wall and/or stand. Prevent the TV from toppling over . s Route all AC power cords and connecting cables so that can adequately...
... topple and result in property damage, serious bodily injury or even death. Getting Started Securing the TV Sony strongly recommends taking measures to secure the stand. s Do not allow children to a wall and/or stand. Prevent the TV from toppling over . s Route all AC power cords and connecting cables so that can adequately...

Operating Instructions
Page 17
...1(800)488-7669 or visit: www.sony.com/accessories - Anchor bolts Wall-mount holes Rope or chain Wallanchor Measure 2 provides minimal protection against the TV toppling over. An alternative way to obtain the optional Support Belt Kit by providing your TV model name. - Anchor bolt Screw hole... States call : 1-877-899-7669 3 Anchor the TV to the Wall. mount holes located on the TV's stand Screw Contact Sony Customer Support to secure the TV is with an optional Sony Support Belt Kit. Getting Started Getting Started 2 Secure the TV to tighten at approximately 1.5 N·m {15 kgf...
...1(800)488-7669 or visit: www.sony.com/accessories - Anchor bolts Wall-mount holes Rope or chain Wallanchor Measure 2 provides minimal protection against the TV toppling over. An alternative way to obtain the optional Support Belt Kit by providing your TV model name. - Anchor bolt Screw hole... States call : 1-877-899-7669 3 Anchor the TV to the Wall. mount holes located on the TV's stand Screw Contact Sony Customer Support to secure the TV is with an optional Sony Support Belt Kit. Getting Started Getting Started 2 Secure the TV to tighten at approximately 1.5 N·m {15 kgf...

Operating Instructions
Page 18
Getting Started Bundling the Connecting Cables You can be adjusted within the angles shown below . Adjust the angle up and down (tilt) 5° When adjusting the angle, hold the lower left corner with one hand and the upper right side frame with other to avoid slipping or tipping the TV. Do not bundle the AC power cord with the other connecting cables. Avoid holding the upper right corner or pressing buttons on the top of the TV This TV can bundle the connecting cables as illustrated below . Adjusting the Viewing Angle of the TV. 18
Getting Started Bundling the Connecting Cables You can be adjusted within the angles shown below . Adjust the angle up and down (tilt) 5° When adjusting the angle, hold the lower left corner with one hand and the upper right side frame with other to avoid slipping or tipping the TV. Do not bundle the AC power cord with the other connecting cables. Avoid holding the upper right corner or pressing buttons on the top of the TV This TV can bundle the connecting cables as illustrated below . Adjusting the Viewing Angle of the TV. 18

Operating Instructions
Page 19
... automatically sets up the channels at a later time ❑ Use the Auto Program feature as described on the TV. If you can do not want to turn on pages 21 and 27. 19 The Initial Setup screen appears. 2 Press V/v to scan cable channels, you want to highlight the desired language.... 3 The message "First please connect cable or antenna. Start auto program now? Initial Setup Please select your TV for the first time.
... automatically sets up the channels at a later time ❑ Use the Auto Program feature as described on the TV. If you can do not want to turn on pages 21 and 27. 19 The Initial Setup screen appears. 2 Press V/v to scan cable channels, you want to highlight the desired language.... 3 The message "First please connect cable or antenna. Start auto program now? Initial Setup Please select your TV for the first time.

Operating Instructions
Page 20
...repeatedly until Off appears. The picture modes can store up to remain on before shutting off. See "Overview of TV inputs will turn on page 25. Use them as a reference when operating the TV. Your Favorites list of MENU" on and off after a few seconds. Press to go back to enter 2.1,...You can be cleared each time you run Auto Program (see page 34. To change or customize CC Display, see pages 19 and 29 for Auto Program). Use with TV functions and settings. Press to display the current channel number, channel label, and program remaining time. Press to display the ...
...repeatedly until Off appears. The picture modes can store up to remain on before shutting off. See "Overview of TV inputs will turn on page 25. Use them as a reference when operating the TV. Your Favorites list of MENU" on and off after a few seconds. Press to go back to enter 2.1,...You can be cleared each time you run Auto Program (see page 34. To change or customize CC Display, see pages 19 and 29 for Auto Program). Use with TV functions and settings. Press to display the current channel number, channel label, and program remaining time. Press to display the ...

Operating Instructions
Page 21
... 27. Press to jump back and forth between the current channel and the last channel that is associated with your current input: Analog TV, Digital TV or external inputs (see page 27 for details) 4:3 Original source 16:9 Original source Standard definition source High definition source m Wide Zoom...mode is not available Normal This mode is displayed. Press repeatedly to display the Tools Menu that was selected. (Continued) 21 The TV alternates between two channels. The Wide Mode settings can be also accessed in the Screen settings. Press to toggle through the Wide Mode ...
... 27. Press to jump back and forth between the current channel and the last channel that is associated with your current input: Analog TV, Digital TV or external inputs (see page 27 for details) 4:3 Original source 16:9 Original source Standard definition source High definition source m Wide Zoom...mode is not available Normal This mode is displayed. Press repeatedly to display the Tools Menu that was selected. (Continued) 21 The TV alternates between two channels. The Wide Mode settings can be also accessed in the Screen settings. Press to toggle through the Wide Mode ...

Operating Instructions
Page 23
...this may indicate the display unit needs servicing (see contacting Sony information of the back cover). 8 POWER LED Lights up the Label Video Inputs, including the Skip feature. In the MENU screen, these buttons serve as up in green when the TV is set. In the MENU screen, these buttons serve ...as confirming the selection or setting. 3 - Lights up in orange when the timer is turned on setting up in red when your TV is See page 33 on . (Continued) 23 If the LED blinks in PC power saving mode. CHANNEL + 5 POWER 6 TIMER LED 7 STANDBY LED Press ...
...this may indicate the display unit needs servicing (see contacting Sony information of the back cover). 8 POWER LED Lights up the Label Video Inputs, including the Skip feature. In the MENU screen, these buttons serve as up in green when the TV is set. In the MENU screen, these buttons serve ...as confirming the selection or setting. 3 - Lights up in orange when the timer is turned on setting up in red when your TV is See page 33 on . (Continued) 23 If the LED blinks in PC power saving mode. CHANNEL + 5 POWER 6 TIMER LED 7 STANDBY LED Press ...


