

Operating Instructions
Page 14
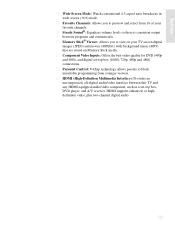
..., utilizing Sony's proprietary algorithm to provide a crisp and clear picture; • IFP (Image Format Processor): The Digital Texture Enhancer function of any NTSC source (DVD, VHS, DBS, Cable, etc.), to create a picture that will appear clearer and more realistic color expression by...while maintaining image sharpness. • New Panel Driver LSI: This drive provides a more natural-looking. The CableCARD™, which enhances input signal to digitally encrypted cable channels - s CineMotion®: Provides an optimized display by your cable TV company, is precise and finer in the...
..., utilizing Sony's proprietary algorithm to provide a crisp and clear picture; • IFP (Image Format Processor): The Digital Texture Enhancer function of any NTSC source (DVD, VHS, DBS, Cable, etc.), to create a picture that will appear clearer and more realistic color expression by...while maintaining image sharpness. • New Panel Driver LSI: This drive provides a more natural-looking. The CableCARD™, which enhances input signal to digitally encrypted cable channels - s CineMotion®: Provides an optimized display by your cable TV company, is precise and finer in the...
Operating Instructions
Page 15
HDMI supports enhanced, or highdefinition video, plus two-channel digital audio. 13 s Component Video Inputs: Offers the best video quality for DVD (480p and 480i), and digital set -top box, DVD player, and A/V receiver. Welcome s Wide Screen Mode: Watch ...): Provides an uncompressed, all-digital audio/video interface between programs and commercials. s Steady Sound®: Equalizes volume levels so there is consistent output between this TV and any HDMI-equipped audio/video component, such as a set -top box (1080i, 720p, 480p and 480i) connections. s Memory Stick® Viewer: Allows...
HDMI supports enhanced, or highdefinition video, plus two-channel digital audio. 13 s Component Video Inputs: Offers the best video quality for DVD (480p and 480i), and digital set -top box, DVD player, and A/V receiver. Welcome s Wide Screen Mode: Watch ...): Provides an uncompressed, all-digital audio/video interface between programs and commercials. s Steady Sound®: Equalizes volume levels so there is consistent output between this TV and any HDMI-equipped audio/video component, such as a set -top box (1080i, 720p, 480p and 480i) connections. s Memory Stick® Viewer: Allows...
Operating Instructions
Page 19
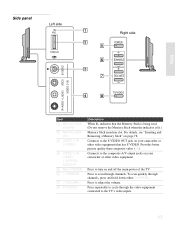
To scan quickly through the video equipment connected to the TV's video inputs. 17 Press repeatedly to the composite A/V output jacks on your camcorder or other video equipment that the Memory Stick is being read. (Do not remove ... the S VIDEO OUT jack on your camcorder or other video equipment. Provides better picture quality than composite video (4). Setup Side panel Left side PRO STD/DUO Right side POWER CHANNEL VOLUME TV/VIDEO R AUDIO L(MONO) VIDEO S VIDEO VIDEO 2 IN Item 1 Memory Stick indicator 2 Memory Stick slot 3 VIDEO 2 IN S VIDEO 4 VIDEO 2 IN VIDEO...
To scan quickly through the video equipment connected to the TV's video inputs. 17 Press repeatedly to the composite A/V output jacks on your camcorder or other video equipment that the Memory Stick is being read. (Do not remove ... the S VIDEO OUT jack on your camcorder or other video equipment. Provides better picture quality than composite video (4). Setup Side panel Left side PRO STD/DUO Right side POWER CHANNEL VOLUME TV/VIDEO R AUDIO L(MONO) VIDEO S VIDEO VIDEO 2 IN Item 1 Memory Stick indicator 2 Memory Stick slot 3 VIDEO 2 IN S VIDEO 4 VIDEO 2 IN VIDEO...
Operating Instructions
Page 20
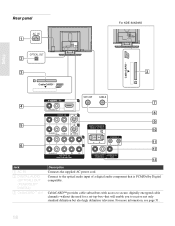
Rear panel AC IN OPTICAL OUT For KDE-50XS955 Setup CableCARD CableCARD R-AUDIO -L VIDEO IN VHF/UHF 6 CABLE 1 3 R-AUDIO -L (MONO) VIDEO S VIDEO 4 CENTER SPEAKER IN 180W (6 ) MAX CONTROL S IN OUT 5 R-AUDIO -L Y PB PR HD/... (PCM/DOLBY* DIGITAL) 3 CableCARD™ slot Description Connects the supplied AC power cord. For more information, see page 51. 18 Connect to the optical audio input of a digital audio component that will enable you to secure, digitally encrypted cable channels-without the need for a set-top-box-that is PCM/Dolby...
Rear panel AC IN OPTICAL OUT For KDE-50XS955 Setup CableCARD CableCARD R-AUDIO -L VIDEO IN VHF/UHF 6 CABLE 1 3 R-AUDIO -L (MONO) VIDEO S VIDEO 4 CENTER SPEAKER IN 180W (6 ) MAX CONTROL S IN OUT 5 R-AUDIO -L Y PB PR HD/... (PCM/DOLBY* DIGITAL) 3 CableCARD™ slot Description Connects the supplied AC power cord. For more information, see page 51. 18 Connect to the optical audio input of a digital audio component that will enable you to secure, digitally encrypted cable channels-without the need for a set-top-box-that is PCM/Dolby...
Operating Instructions
Page 21
...definition video, plus two-channel digital audio. 5 VIDEO 1/3 IN Connect to your TV's audio through your VCR or other Sony infrared-controlled audio or video equipment that has S VIDEO. A third VIDEO/ composite A/V input jack (VIDEO 2) is located on your stereo system. * "Dolby", "Pro ...) Connect to the left side panel of Dolby Pro Logic* system decoder amplifier. Setup Jack Description 4 VIDEO 6 IN HDMI (High-Definition Multimedia Interface) provides an uncompressed, all-digital HDMI IN/R-AUDIO-L audio/video interface between this TV and any HDMI-equipped audio/video...
...definition video, plus two-channel digital audio. 5 VIDEO 1/3 IN Connect to your TV's audio through your VCR or other Sony infrared-controlled audio or video equipment that has S VIDEO. A third VIDEO/ composite A/V input jack (VIDEO 2) is located on your stereo system. * "Dolby", "Pro ...) Connect to the left side panel of Dolby Pro Logic* system decoder amplifier. Setup Jack Description 4 VIDEO 6 IN HDMI (High-Definition Multimedia Interface) provides an uncompressed, all-digital HDMI IN/R-AUDIO-L audio/video interface between this TV and any HDMI-equipped audio/video...

Operating Instructions
Page 22
... plug holder (supplied) to the AC power cord (supplied). 2 Clip on to the AC IN jack until the screw is stabilized. AC IN (Power supply input) jack of the TV. 2 Secure the AC power plug to a wall outlet.
... plug holder (supplied) to the AC power cord (supplied). 2 Clip on to the AC IN jack until the screw is stabilized. AC IN (Power supply input) jack of the TV. 2 Secure the AC power plug to a wall outlet.

Operating Instructions
Page 26
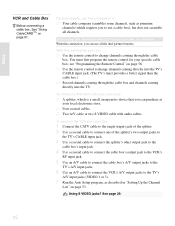
Switch the TV's input between the TV's VHF/UHF and CABLE inputs. 24 If not, noise may appear on Using This Connection To Do This ... Setup Cable or Antenna For best results, use this connection if you ...
Switch the TV's input between the TV's VHF/UHF and CABLE inputs. 24 If not, noise may appear on Using This Connection To Do This ... Setup Cable or Antenna For best results, use this connection if you ...
Operating Instructions
Page 27
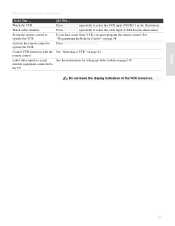
...Picture (Twin View, etc.) Features With this connection, you can: s Use the remote control to change channels coming directly into the TV's VHF/UHF input jack. When using the cable box, you to use all channels. For best results, use this connection you can use the cable... Remote Control" on Using This Connection To Do This ... Do not leave the display indication of TV channels Switch the TV's input between the TV's VHF/UHF (scrambled channels) and CABLE (unscrambled) inputs. Use the cable box Set up the remote control to operate the cable box Activate the remote ...
...Picture (Twin View, etc.) Features With this connection, you can: s Use the remote control to change channels coming directly into the TV's VHF/UHF input jack. When using the cable box, you to use all channels. For best results, use this connection you can use the cable... Remote Control" on Using This Connection To Do This ... Do not leave the display indication of TV channels Switch the TV's input between the TV's VHF/UHF (scrambled channels) and CABLE (unscrambled) inputs. Use the cable box Set up the remote control to operate the cable box Activate the remote ...
Operating Instructions
Page 28
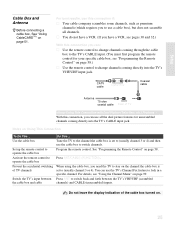
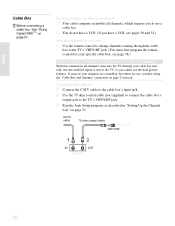
... connection you can: s Use the remote control to change channels coming through the cable box to the TV's VHF/UHF jack. (You must first program the remote control for your specific cable box, see page..., etc.) Features With this connection if: s Your cable company scrambles all channels come into the TV through your channels are scrambled, but others are not, consider using the "Cable Box and Antenna" connection... on page 25 instead. If some of TV VHF/UHF IN OUT Cable Box 26 To connect the cable box 1 Connect the CATV cable to the cable box's input jack. 2 Use the 75-ohm coaxial cable...
... connection you can: s Use the remote control to change channels coming through the cable box to the TV's VHF/UHF jack. (You must first program the remote control for your specific cable box, see page..., etc.) Features With this connection if: s Your cable company scrambles all channels come into the TV through your channels are scrambled, but others are not, consider using the "Cable Box and Antenna" connection... on page 25 instead. If some of TV VHF/UHF IN OUT Cable Box 26 To connect the cable box 1 Connect the CATV cable to the cable box's input jack. 2 Use the 75-ohm coaxial cable...
Operating Instructions
Page 30
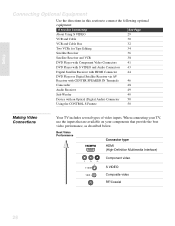
When connecting your TV, use the inputs that are available on your components that provide the best video performance, as described below. Best Video Performance Connector type HDMI (High-Definition Multimedia Interface) Y ... Receiver via AV Receiver with CENTER SPEAKER IN Terminals 46 Camcorder 48 Audio Receiver 49 Sub Woofer 49 Device with an Optical (Digital Audio) Connector 50 Using the CONTROL S Feature 50 Making Video Connections Your TV includes several types of video inputs.
When connecting your TV, use the inputs that are available on your components that provide the best video performance, as described below. Best Video Performance Connector type HDMI (High-Definition Multimedia Interface) Y ... Receiver via AV Receiver with CENTER SPEAKER IN Terminals 46 Camcorder 48 Audio Receiver 49 Sub Woofer 49 Device with an Optical (Digital Audio) Connector 50 Using the CONTROL S Feature 50 Making Video Connections Your TV includes several types of video inputs.
Operating Instructions
Page 32
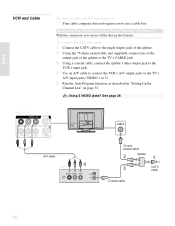
... VCR CABLE 75-ohm coaxial cable Splitter Coaxial cable CATV cable 30 Rear of the splitter to the TV's CABLE jack. 3 Using a coaxial cable, connect the splitter's other output jack to the VCR's input jack. 4 Use an A/V cable to connect the VCR's A/V output jacks to use all the dual picture features. About... require you can use a cable box. See page 29. Using S VIDEO jacks? Setup VCR and Cable For best results, use this connection, you to the TV's A/V input jacks (VIDEO 1 or 3). 5 Run the Auto Program function, as described in "Setting Up the Channel List" on page 53.
... VCR CABLE 75-ohm coaxial cable Splitter Coaxial cable CATV cable 30 Rear of the splitter to the TV's CABLE jack. 3 Using a coaxial cable, connect the splitter's other output jack to the VCR's input jack. 4 Use an A/V cable to connect the VCR's A/V output jacks to use all the dual picture features. About... require you can use a cable box. See page 29. Using S VIDEO jacks? Setup VCR and Cable For best results, use this connection, you to the TV's A/V input jacks (VIDEO 1 or 3). 5 Run the Auto Program function, as described in "Setting Up the Channel List" on page 53.
Operating Instructions
Page 33
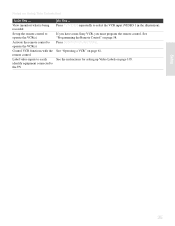
...Labels on page 105. See "Programming the Remote Control" on page 61. See "Operating a VCR" on page 58. Press TV/VIDEO repeatedly to select the cable input (CABLE in the illustration). Press DVD/VCR (FUNCTION). See the instructions for setting up the remote control to operate the VCR... equipment connected to select the VCR input (VIDEO 1 in the illustration). Notes on . Press TV/VIDEO repeatedly to the TV Do This ... Do not leave the display indication of the VCR turned on Using This Connection To Do This ... If you have a non-Sony VCR, you must program the remote...
...Labels on page 105. See "Programming the Remote Control" on page 61. See "Operating a VCR" on page 58. Press TV/VIDEO repeatedly to select the cable input (CABLE in the illustration). Press DVD/VCR (FUNCTION). See the instructions for setting up the remote control to operate the VCR... equipment connected to select the VCR input (VIDEO 1 in the illustration). Notes on . Press TV/VIDEO repeatedly to the TV Do This ... Do not leave the display indication of the VCR turned on Using This Connection To Do This ... If you have a non-Sony VCR, you must program the remote...
Operating Instructions
Page 34
... store. see "Programming the Remote Control" on page 53. s Use the remote control to change channels coming directly into the TV's CABLE input jack. (The TV's tuner provides a better signal than the cable box.) s Record channels coming through the cable box and channels coming through the cable...to connect the cable box's output jack to the VCR's RF input jack. 5 Use an A/V cable to connect the cable box's A/V output jacks to the TV's A/V input jacks. 6 Use an A/V cable to connect the VCR's A/V output jacks to the TV's A/V input jacks (VIDEO 1 or 3). 7 Run the Auto Setup program, ...
... store. see "Programming the Remote Control" on page 53. s Use the remote control to change channels coming directly into the TV's CABLE input jack. (The TV's tuner provides a better signal than the cable box.) s Record channels coming through the cable box and channels coming through the cable...to connect the cable box's output jack to the VCR's RF input jack. 5 Use an A/V cable to connect the cable box's A/V output jacks to the TV's A/V input jacks. 6 Use an A/V cable to connect the VCR's A/V output jacks to the TV's A/V input jacks (VIDEO 1 or 3). 7 Run the Auto Setup program, ...

Operating Instructions
Page 35
... TV CABLE Setup VIDEO IN 1 3 R-AUDIO -L (MONO) VIDEO S VIDEO VCR Coaxial cable Cable Box Coaxial cable A/V cable Coaxial cable A/V cable Splitter CATV cable Notes on page 105. Use the cable box to select the VCR input (VIDEO 1 in the illustration). If you have a non-Sony ...equipment connected to select the VCR input (VIDEO 1 in the illustration). For the cable box, press SAT/CABLE (FUNCTION). See "Operating a Cable Box" on page 60 and "Operating a VCR" on . 33 Press TV/VIDEO repeatedly to (usually channel 3 or 4). Press TV/VIDEO repeatedly to change channels....
... TV CABLE Setup VIDEO IN 1 3 R-AUDIO -L (MONO) VIDEO S VIDEO VCR Coaxial cable Cable Box Coaxial cable A/V cable Coaxial cable A/V cable Splitter CATV cable Notes on page 105. Use the cable box to select the VCR input (VIDEO 1 in the illustration). If you have a non-Sony ...equipment connected to select the VCR input (VIDEO 1 in the illustration). For the cable box, press SAT/CABLE (FUNCTION). See "Operating a Cable Box" on page 60 and "Operating a VCR" on . 33 Press TV/VIDEO repeatedly to (usually channel 3 or 4). Press TV/VIDEO repeatedly to change channels....
Operating Instructions
Page 36
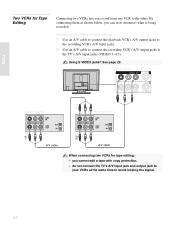
...editing 1 Use an A/V cable to connect the playback VCR's A/V output jacks to the recording VCR's A/V input jacks. 2 Use an A/V cable to connect the recording VCR's A/V output jacks to the TV's A/V input jacks (VIDEO 1 or 3). To connect two VCRs for Tape Editing Connecting two VCRs lets you record from one... VCR Recording VCR A/V cable A/V cable When connecting two VCRs for tape editing; - See page 29. Using S VIDEO jacks? do not connect the TV's A/V input jack and output jack to your VCRs at the same time to the other. By connecting them as shown below, you cannot edit a tape with...
...editing 1 Use an A/V cable to connect the playback VCR's A/V output jacks to the recording VCR's A/V input jacks. 2 Use an A/V cable to connect the recording VCR's A/V output jacks to the TV's A/V input jacks (VIDEO 1 or 3). To connect two VCRs for Tape Editing Connecting two VCRs lets you record from one... VCR Recording VCR A/V cable A/V cable When connecting two VCRs for tape editing; - See page 29. Using S VIDEO jacks? do not connect the TV's A/V input jack and output jack to your VCRs at the same time to the other. By connecting them as shown below, you cannot edit a tape with...
Operating Instructions
Page 37
...what is being recorded Set up Video Labels on page 61. Press TV/VIDEO repeatedly to the TV Do This ... See "Programming the Remote Control" on Using This Connection To Do This ... Notes on page 58. If you have a non-Sony VCR, you must program the remote control. See the instructions for ...the remote control to operate the VCR(s) Activate the remote control to operate the VCR(s) Control VCR functions with the remote control Label video inputs to easily identify equipment connected to select the VCR input (VIDEO 1 in the illustration). See "Operating a VCR" on page 105.
...what is being recorded Set up Video Labels on page 61. Press TV/VIDEO repeatedly to the TV Do This ... See "Programming the Remote Control" on Using This Connection To Do This ... Notes on page 58. If you have a non-Sony VCR, you must program the remote control. See the instructions for ...the remote control to operate the VCR(s) Activate the remote control to operate the VCR(s) Control VCR functions with the remote control Label video inputs to easily identify equipment connected to select the VCR input (VIDEO 1 in the illustration). See "Operating a VCR" on page 105.
Operating Instructions
Page 38
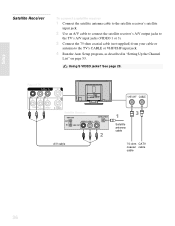
... Receiver To connect a satellite receiver 1 Connect the satellite antenna cable to the satellite receiver's satellite input jack. 2 Use an A/V cable to connect the satellite receiver's A/V output jacks to the TV's A/V input jacks (VIDEO 1 or 3). 3 Connect the 75-ohm coaxial cable (not supplied) from your cable... or antenna to the TV's CABLE or VHF/UHF input jack. 4 Run the Auto Setup program, as described in "Setting ...
... Receiver To connect a satellite receiver 1 Connect the satellite antenna cable to the satellite receiver's satellite input jack. 2 Use an A/V cable to connect the satellite receiver's A/V output jacks to the TV's A/V input jacks (VIDEO 1 or 3). 3 Connect the 75-ohm coaxial cable (not supplied) from your cable... or antenna to the TV's CABLE or VHF/UHF input jack. 4 Run the Auto Setup program, as described in "Setting ...
Operating Instructions
Page 39
... control to easily identify equipment See the instructions for setting up the remote control to select the satellite receiver input (VIDEO 1 in the illustration). Label video inputs to operate the satellite receiver Press SAT/CABLE (FUNCTION). See "Programming the Remote Control" on page 60....on page 58. Do This ... Watch the satellite receiver Press TV/VIDEO repeatedly to operate the satellite If you have a non-Sony satellite receiver, you must program the receiver remote control. connected to the TV Do not leave the Electronic Program Guide and display indication turned ...
... control to easily identify equipment See the instructions for setting up the remote control to select the satellite receiver input (VIDEO 1 in the illustration). Label video inputs to operate the satellite receiver Press SAT/CABLE (FUNCTION). See "Programming the Remote Control" on page 60....on page 58. Do This ... Watch the satellite receiver Press TV/VIDEO repeatedly to operate the satellite If you have a non-Sony satellite receiver, you must program the receiver remote control. connected to the TV Do not leave the Electronic Program Guide and display indication turned ...

Operating Instructions
Page 40
... connect a satellite receiver and VCR 1 Connect the CATV cable to the single (input) jack of the splitter. 2 Use the 75-ohm coaxial cable to connect one of the splitter's two output jacks to the TV's CABLE jack. 3 Use the 75-ohm coaxial cable to connect the splitter's .... 4 Connect the satellite antenna cable to the satellite receiver's satellite input jack. 5 Use an A/V cable to connect the satellite receiver's A/V output jacks to the VCR's A/V input jacks. 6 Use an A/V cable to connect the VCR's A/V output jacks to the TV's A/V input jacks (VIDEO 1 or 3). 7 Run Auto Program, as described in "...
... connect a satellite receiver and VCR 1 Connect the CATV cable to the single (input) jack of the splitter. 2 Use the 75-ohm coaxial cable to connect one of the splitter's two output jacks to the TV's CABLE jack. 3 Use the 75-ohm coaxial cable to connect the splitter's .... 4 Connect the satellite antenna cable to the satellite receiver's satellite input jack. 5 Use an A/V cable to connect the satellite receiver's A/V output jacks to the VCR's A/V input jacks. 6 Use an A/V cable to connect the VCR's A/V output jacks to the TV's A/V input jacks (VIDEO 1 or 3). 7 Run Auto Program, as described in "...
Operating Instructions
Page 42
...to operate the satellite receiver or VCR Control satellite receiver and VCR functions with the remote control Label video inputs to easily identify equipment connected to the satellite receiver input. Do not leave the Electronic Program Guide and display indication turned on Using This Connection To Do This ... a Satellite Receiver" on page 60 and "Operating a VCR" on page 58. Press TV/VIDEO repeatedly to be turned on page 105. See "Programming the Remote Control" on page 61. If you have a non-Sony VCR or satellite receiver, you must program the remote control. The VCR may need to...
...to operate the satellite receiver or VCR Control satellite receiver and VCR functions with the remote control Label video inputs to easily identify equipment connected to the satellite receiver input. Do not leave the Electronic Program Guide and display indication turned on Using This Connection To Do This ... a Satellite Receiver" on page 60 and "Operating a VCR" on page 58. Press TV/VIDEO repeatedly to be turned on page 105. See "Programming the Remote Control" on page 61. If you have a non-Sony VCR or satellite receiver, you must program the remote control. The VCR may need to...
