Operating Instructions
Page 5
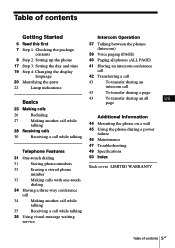
... US page 23 Making calls 26 Redialing 27 Making another call while talking 28 Receiving calls 30 Receiving a call while talking Telephone Features 31 One-touch dialing 31 Storing phone numbers 33 Erasing a stored phone number 33 Making calls with one-touch dialing 34 Having a three-way conference call 34 Making another call while talking...
... US page 23 Making calls 26 Redialing 27 Making another call while talking 28 Receiving calls 30 Receiving a call while talking Telephone Features 31 One-touch dialing 31 Storing phone numbers 33 Erasing a stored phone number 33 Making calls with one-touch dialing 34 Having a three-way conference call 34 Making another call while talking...

Operating Instructions
Page 6
...and time" on page 19. 6US Getting Started Step 2 (pages 8 to 16) Next, you need to do four things to set up your phone, you use your phone: Steps 1 and 2. For changing the display language, follow the procedure in "Step 4 Changing the display language" on page 17. Getting Started ...Read this first Before you must first set up the phone, including finding the best location for the phone. Here's a quick way to set it ! Step 1 (page 7) First, unpack the phone and the supplied accessories.
...and time" on page 19. 6US Getting Started Step 2 (pages 8 to 16) Next, you need to do four things to set up your phone, you use your phone: Steps 1 and 2. For changing the display language, follow the procedure in "Step 4 Changing the display language" on page 17. Getting Started ...Read this first Before you must first set up the phone, including finding the best location for the phone. Here's a quick way to set it ! Step 1 (page 7) First, unpack the phone and the supplied accessories.
Operating Instructions
Page 7
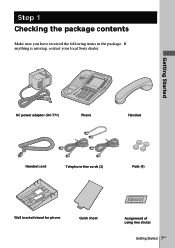
If anything is missing, contact your local Sony dealer. Getting Started AC power adaptor (AC-T71) Phone Handset Handset cord Telephone line cords (3) Pads (4) Wall bracket/stand for phone Quick sheet Assignment of using line sticker Getting Started 7US Step 1 Checking the package contents Make sure you have received the following items in the package.
If anything is missing, contact your local Sony dealer. Getting Started AC power adaptor (AC-T71) Phone Handset Handset cord Telephone line cords (3) Pads (4) Wall bracket/stand for phone Quick sheet Assignment of using line sticker Getting Started 7US Step 1 Checking the package contents Make sure you have received the following items in the package.
Operating Instructions
Page 8
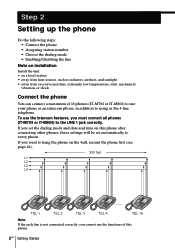
...cannot use the intercom features, you set automatically to every phone. To use the functions of 16 phones (IT-M704 or IT-M804) to use your phone as an intercom phone, in addition to the LINE 1 jack correctly. If you must connect all phones (IT-M704 or IT-M804) to using as the 4-line telephone.... Step 2 Setting up the phone Do the following steps: • Connect the phone • ...
...cannot use the intercom features, you set automatically to every phone. To use the functions of 16 phones (IT-M704 or IT-M804) to use your phone as an intercom phone, in addition to the LINE 1 jack correctly. If you must connect all phones (IT-M704 or IT-M804) to using as the 4-line telephone.... Step 2 Setting up the phone Do the following steps: • Connect the phone • ...
Operating Instructions
Page 9
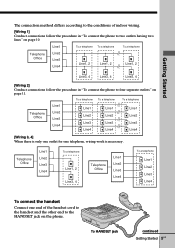
...wiring work is only one outlet for one end of indoor wiring. [Wiring 1] Conduct connections follow the procedure in "To connect the phone to two outlets having two lines" on page 10. To HANDSET jack continued Getting Started 9US To a telephone To a telephone To...[Wiring 3, 4] When there is necessary. Getting Started The connection method differs according to the conditions of the handset cord to the handset and the other end to the HANDSET jack on the phone. Line1 To a telephone To a telephone To a telephone Telephone Office Line2 Line3 Line4 Line1, 2 Line1, 2 Line1...
...wiring work is only one outlet for one end of indoor wiring. [Wiring 1] Conduct connections follow the procedure in "To connect the phone to two outlets having two lines" on page 10. To HANDSET jack continued Getting Started 9US To a telephone To a telephone To...[Wiring 3, 4] When there is necessary. Getting Started The connection method differs according to the conditions of the handset cord to the handset and the other end to the HANDSET jack on the phone. Line1 To a telephone To a telephone To a telephone Telephone Office Line2 Line3 Line4 Line1, 2 Line1, 2 Line1...
Operating Instructions
Page 10
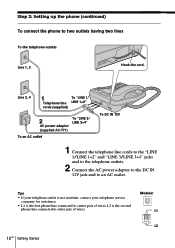
... modular, contact your telephone service company for assistance. • L1 is the second phone line connected to an AC outlet. Step 2: Setting up the phone (continued) To connect the phone to center pair of wires. Line 3, 4 1 To "LINE 1/ Telephone line LINE 1+2" cords (supplied) 2 AC power adaptor (supplied AC-T71) To "LINE 3/ LINE 3+4" To an...
... modular, contact your telephone service company for assistance. • L1 is the second phone line connected to an AC outlet. Step 2: Setting up the phone (continued) To connect the phone to center pair of wires. Line 3, 4 1 To "LINE 1/ Telephone line LINE 1+2" cords (supplied) 2 AC power adaptor (supplied AC-T71) To "LINE 3/ LINE 3+4" To an...
Operating Instructions
Page 11
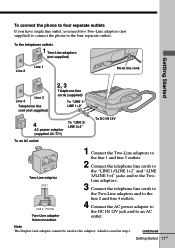
... Started Line 4 Line 3 Telephone line cord (not supplied) 2, 3 Telephone line cords (supplied) To "LINE 1/ LINE 1+2" 4 AC power adaptor (supplied AC-T71) To "LINE 3/ LINE 3+4" To an AC outlet To DC IN 12V LINE 2 PHONE Two-Line adaptor LINE 1 LINE 2 PHONE Two-Line adaptor interconnection 1 Connect the ...Two-Line adaptors to the line 1 and line 3 outlets. 2 Connect the telephone line cords to the "LINE 1/LINE 1+2" and "LINE 3/LINE 3+4" jacks and...
... Started Line 4 Line 3 Telephone line cord (not supplied) 2, 3 Telephone line cords (supplied) To "LINE 1/ LINE 1+2" 4 AC power adaptor (supplied AC-T71) To "LINE 3/ LINE 3+4" To an AC outlet To DC IN 12V LINE 2 PHONE Two-Line adaptor LINE 1 LINE 2 PHONE Two-Line adaptor interconnection 1 Connect the ...Two-Line adaptors to the line 1 and line 3 outlets. 2 Connect the telephone line cords to the "LINE 1/LINE 1+2" and "LINE 3/LINE 3+4" jacks and...
Operating Instructions
Page 12
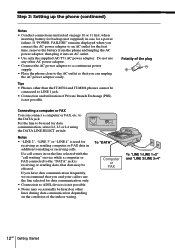
...of the indoor wiring. If you have data communication frequently, we recommend that you and your callers use any other than the IT-M704 and IT-M804 phones cannot be heard on other lines during data communication depending on the condition of the plug Connecting a computer or FAX You can ... a computer or FAX, etc. To "DATA" Computer or FAX To "LINE 1/LINE 1+2" and "LINE 3/LINE 3+4" 12US Getting Started Step 2: Setting up the phone (continued) Notes • Conduct connections instructed on page 10 or 11 first, when inserting battery for backup (not supplied) in case for the first time...
...of the indoor wiring. If you have data communication frequently, we recommend that you and your callers use any other than the IT-M704 and IT-M804 phones cannot be heard on other lines during data communication depending on the condition of the plug Connecting a computer or FAX You can ... a computer or FAX, etc. To "DATA" Computer or FAX To "LINE 1/LINE 1+2" and "LINE 3/LINE 3+4" 12US Getting Started Step 2: Setting up the phone (continued) Notes • Conduct connections instructed on page 10 or 11 first, when inserting battery for backup (not supplied) in case for the first time...
Operating Instructions
Page 13
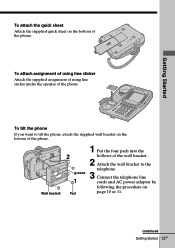
... you want to the telephone. 3 Connect the telephone line cords and AC power adaptor by following the procedure on page 10 or 11. To attach the quick sheet Attach the supplied quick sheet on the bottom of the phone. Wall bracket 2 groove 1 Pad 1 Put the four pads into the hollows of the... wall bracket. 2 Attach the wall bracket to tilt the phone, attach the supplied wall bracket on the bottom of the phone. To attach assignment of using line sticker Attach the supplied assignment of using line sticker under the speaker of the...
... you want to the telephone. 3 Connect the telephone line cords and AC power adaptor by following the procedure on page 10 or 11. To attach the quick sheet Attach the supplied quick sheet on the bottom of the phone. Wall bracket 2 groove 1 Pad 1 Put the four pads into the hollows of the... wall bracket. 2 Attach the wall bracket to tilt the phone, attach the supplied wall bracket on the bottom of the phone. To attach assignment of using line sticker Attach the supplied assignment of using line sticker under the speaker of the...

Operating Instructions
Page 14
... number (01 to 16 is set correctly, make an intercom call one another. Enter the different number. 14US Getting Started See "Talking between the phones" on page 37. 1 Press (PROGRAM). 2 Press b(*) or (#)B until "STATION #" appears on the display. 3 Press (PROGRAM). Note If the number... already used for other phone or a number except for 01 to 16) by pressing the dialing keys. 5 Press (PROGRAM). Step 2: Setting up the phone (continued) Assigning station number Ensure to connect all phones (IT-M704 or IT-M804) to LINE 1 jack correctly, and then ...
... number (01 to 16 is set correctly, make an intercom call one another. Enter the different number. 14US Getting Started See "Talking between the phones" on page 37. 1 Press (PROGRAM). 2 Press b(*) or (#)B until "STATION #" appears on the display. 3 Press (PROGRAM). Note If the number... already used for other phone or a number except for 01 to 16) by pressing the dialing keys. 5 Press (PROGRAM). Step 2: Setting up the phone (continued) Assigning station number Ensure to connect all phones (IT-M704 or IT-M804) to LINE 1 jack correctly, and then ...

Operating Instructions
Page 15
... ("TONE" or "PULSE"), and then press (PROGRAM). continued Getting Started 15US TONE PULSE 4 Press b(*) or (#)B to connect the phones beforehand, and set to "TONE". When other phones (IT-M704 or IT-M804) are connected to the LINE 1 jack, the same dialing mode is ; Notes • Do not allow more ...than 20 seconds to all the phones. otherwise, set for every line. Getting Started Choose the dialing mode For the telephone ...
... ("TONE" or "PULSE"), and then press (PROGRAM). continued Getting Started 15US TONE PULSE 4 Press b(*) or (#)B to connect the phones beforehand, and set to "TONE". When other phones (IT-M704 or IT-M804) are connected to the LINE 1 jack, the same dialing mode is ; Notes • Do not allow more ...than 20 seconds to all the phones. otherwise, set for every line. Getting Started Choose the dialing mode For the telephone ...

Operating Instructions
Page 16
... unused line for other line setting, if necessary. To end the setting, press (ERASE/CLEAR). 16US Getting Started This setting can be set up the phone (continued) Enabling/disabling the line When you may not use all four lines, you need to work properly. LINE2 4 Press b(*) or (#)B to choose ..."ENABLE" or "DISABLE", and then press (PROGRAM). Step 2: Setting up at each phone separately. 1 Press (PROGRAM). (ERASE/CLEAR) 2 Press b(*) or (#)B until "DISABLE LINE" appears on the display. 3 Press (PROGRAM).
... unused line for other line setting, if necessary. To end the setting, press (ERASE/CLEAR). 16US Getting Started This setting can be set up the phone (continued) Enabling/disabling the line When you may not use all four lines, you need to work properly. LINE2 4 Press b(*) or (#)B to choose ..."ENABLE" or "DISABLE", and then press (PROGRAM). Step 2: Setting up at each phone separately. 1 Press (PROGRAM). (ERASE/CLEAR) 2 Press b(*) or (#)B until "DISABLE LINE" appears on the display. 3 Press (PROGRAM).

Operating Instructions
Page 17
...) by pressing the dialing keys. 5 Press (PROGRAM). continued Getting Started 17US Be sure to connect the phones beforehand, and set to all the phones. Getting Started Step 3 Setting the day and time When other phones (IT-M704 or IT-M804) are connected to the LINE 1 jack, the day and time is automatically set the...
...) by pressing the dialing keys. 5 Press (PROGRAM). continued Getting Started 17US Be sure to connect the phones beforehand, and set to all the phones. Getting Started Step 3 Setting the day and time When other phones (IT-M704 or IT-M804) are connected to the LINE 1 jack, the day and time is automatically set the...
Operating Instructions
Page 20
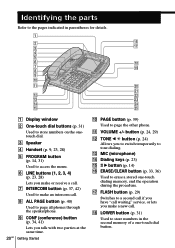
... FLASH button (p. 29) Switches to a second call if you have "call . PAGE button (p. 39) Used to page all phones through the speakerphone. 9 CONF (conference) button (p. 34, 41) Lets you talk with two parties at the same time. 20US Getting Started q; wa qs ws qd... wd qf wf qg wg 1 Display window 2 One-touch dial buttons (p. 31) Used to store numbers on the onetouch dial. 3 Speaker 4 Handset (p. 9, 23, 28) 5 PROGRAM button (p. 14, 31) Used to access the menu. 6 LINE buttons (1, 2, 3, 4) (p. 23, 28) Lets you make or receive a call. 7 INTERCOM button (p. 37, 42) Used to...
... FLASH button (p. 29) Switches to a second call if you have "call . PAGE button (p. 39) Used to page all phones through the speakerphone. 9 CONF (conference) button (p. 34, 41) Lets you talk with two parties at the same time. 20US Getting Started q; wa qs ws qd... wd qf wf qg wg 1 Display window 2 One-touch dial buttons (p. 31) Used to store numbers on the onetouch dial. 3 Speaker 4 Handset (p. 9, 23, 28) 5 PROGRAM button (p. 14, 31) Used to access the menu. 6 LINE buttons (1, 2, 3, 4) (p. 23, 28) Lets you make or receive a call. 7 INTERCOM button (p. 37, 42) Used to...
Operating Instructions
Page 22
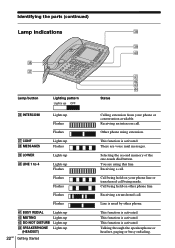
...transferred call . Talking through the speakerphone or headset, paging or busy redialing. This function is used by other phone line. Call being held on your phone or conversation available. This function is activated. This function is activated. Receiving an intercom call . Selecting the ...second memory of the one-touch dial button. Receiving a call being held on other phone. Identifying the parts (continued) Lamp indications eh ej Lamp/button Lighting pattern Lights up OFF eh ...
...transferred call . Talking through the speakerphone or headset, paging or busy redialing. This function is used by other phone line. Call being held on your phone or conversation available. This function is activated. This function is activated. Receiving an intercom call . Selecting the ...second memory of the one-touch dial button. Receiving a call being held on other phone. Identifying the parts (continued) Lamp indications eh ej Lamp/button Lighting pattern Lights up OFF eh ...
Operating Instructions
Page 23
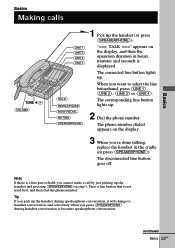
... connected line button lights up . 2 Dial the phone number. Note If there is a line put on hold, you press (SPEAKERPHONE) during speakerphone conversation, it becomes speakerphone conversation. Press a line button that is displayed. The phone number dialed appears on the display, and then the... operation duration in hours, minutes and seconds is not used first, and then dial the phone number. When you 're done talking, replace the handset in the cradle (or press (SPEAKERPHONE)). Basics Basics Making calls TONE b(*) (VOLUME) (LINE 1) ...
... connected line button lights up . 2 Dial the phone number. Note If there is a line put on hold, you press (SPEAKERPHONE) during speakerphone conversation, it becomes speakerphone conversation. Press a line button that is displayed. The phone number dialed appears on the display, and then the... operation duration in hours, minutes and seconds is not used first, and then dial the phone number. When you 're done talking, replace the handset in the cradle (or press (SPEAKERPHONE)). Basics Basics Making calls TONE b(*) (VOLUME) (LINE 1) ...
Operating Instructions
Page 24
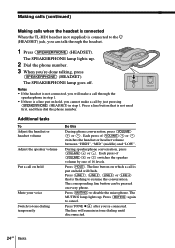
... goes off. The corresponding line button can talk through the speakerphone in step 1. • If there is a line put on every phone. Making calls (continued) Making calls when the headset is connected When the TL-HD1 headset (not supplied) is connected to disable the ...microphone. Press (HOLD). Press a line button that is not used first, and then dial the phone number. Each press of (VOLUME)(+) or (--) switches the speaker volume by just pressing (SPEAKERPHONE) (HEADSET) in tone dialing until disconnected. Press (...
... goes off. The corresponding line button can talk through the speakerphone in step 1. • If there is a line put on every phone. Making calls (continued) Making calls when the headset is connected When the TL-HD1 headset (not supplied) is connected to disable the ...microphone. Press (HOLD). Press a line button that is not used first, and then dial the phone number. Each press of (VOLUME)(+) or (--) switches the speaker volume by just pressing (SPEAKERPHONE) (HEADSET) in tone dialing until disconnected. Press (...
Operating Instructions
Page 25
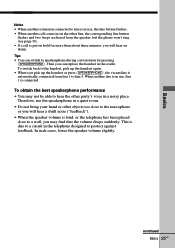
..., you may not be able to hear the other line, the corresponding line button flashes and two beeps are heard from the speaker, but the phone won't ring. (see page 30). • If a call comes in on hold for more than about three minutes, you will hear an alarm. In such...
..., you may not be able to hear the other line, the corresponding line button flashes and two beeps are heard from the speaker, but the phone won't ring. (see page 30). • If a call comes in on hold for more than about three minutes, you will hear an alarm. In such...
Operating Instructions
Page 26
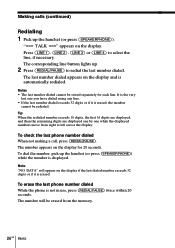
Notes • The last number dialed cannot be erased from right to left across the display. To erase the last phone number dialed While the phone is erased, the number cannot be redialed. The number appears on the display. It is the very last one while the displayed ...in use, press (REDIAL/PAUSE) twice within 20 seconds. The corresponding line button lights up the handset (or press (SPEAKERPHONE)). To check the last phone number dialed When not making a call, press (REDIAL/PAUSE). Note "NO DATA" will be stored separately for 20 seconds. Tip When the redialed number...
Notes • The last number dialed cannot be erased from right to left across the display. To erase the last phone number dialed While the phone is erased, the number cannot be redialed. The number appears on the display. It is the very last one while the displayed ...in use, press (REDIAL/PAUSE) twice within 20 seconds. The corresponding line button lights up the handset (or press (SPEAKERPHONE)). To check the last phone number dialed When not making a call, press (REDIAL/PAUSE). Note "NO DATA" will be stored separately for 20 seconds. Tip When the redialed number...

Operating Instructions
Page 27
... the same time using two lines, see "Having a three-way conference call is put on hold and the LINE 1 button flashes slowly. 2 Press (LINE 2). 3 Dial a phone number for more than about three minutes, you will hear an alarm. The line 1 is put on hold for the second party. The BUSY REDIAL...; If the last number dialed exceeds 32 digits or if it is connected. Basics Busy redialing If the other line you called is busy, the phone will automatically redial the last number dialed up and the last number dialed appears on the display. Notes • Busy redialing is canceled when you...
... the same time using two lines, see "Having a three-way conference call is put on hold and the LINE 1 button flashes slowly. 2 Press (LINE 2). 3 Dial a phone number for more than about three minutes, you will hear an alarm. The line 1 is put on hold for the second party. The BUSY REDIAL...; If the last number dialed exceeds 32 digits or if it is connected. Basics Busy redialing If the other line you called is busy, the phone will automatically redial the last number dialed up and the last number dialed appears on the display. Notes • Busy redialing is canceled when you...
