Instruction Manual
Page 15
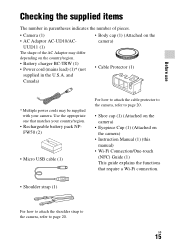
... Cup (1) (Attached on the country/region. • Battery charger BC-TRW (1) • Power cord (mains lead) (1)* (not supplied in the U.S.A. GB 15 and Canada) • Body cap (1) (Attached on the camera) • Cable Protector (1) * Multiple power cords may differ depending on the camera) • Instruction Manual (1) (this manual) • Wi-Fi...
... Cup (1) (Attached on the country/region. • Battery charger BC-TRW (1) • Power cord (mains lead) (1)* (not supplied in the U.S.A. GB 15 and Canada) • Body cap (1) (Attached on the camera) • Cable Protector (1) * Multiple power cords may differ depending on the camera) • Instruction Manual (1) (this manual) • Wi-Fi...

Instruction Manual
Page 54
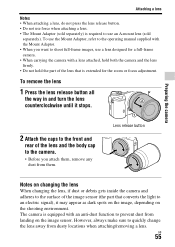
Attaching a lens Set the power switch of the camera to OFF before you attach or remove the lens. 1 Remove the body cap from the camera and the rear lens cap from the rear of the lens. • When changing the lens, quickly change the lens away ...from the front of the lens. Front lens cap Body cap Rear lens cap 2 Mount the lens by aligning the white index marks (mounting indexes) on the lens and camera. • Hold the camera with...
Attaching a lens Set the power switch of the camera to OFF before you attach or remove the lens. 1 Remove the body cap from the camera and the rear lens cap from the rear of the lens. • When changing the lens, quickly change the lens away ...from the front of the lens. Front lens cap Body cap Rear lens cap 2 Mount the lens by aligning the white index marks (mounting indexes) on the lens and camera. • Hold the camera with...
Instruction Manual
Page 55
... any dust from dusty locations when attaching/removing a lens. Preparing the camera 2 Attach the caps to the front and rear of the lens and the body cap to the camera. • Before you want to shoot full-frame images, use an A-mount lens (sold separately) is required to use a lens designed...
... any dust from dusty locations when attaching/removing a lens. Preparing the camera 2 Attach the caps to the front and rear of the lens and the body cap to the camera. • Before you want to shoot full-frame images, use an A-mount lens (sold separately) is required to use a lens designed...
Instruction Manual
Page 59
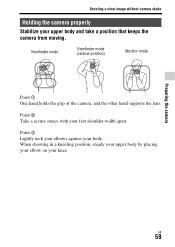
When shooting in a kneeling position, steady your upper body by placing your elbow on your body. Viewfinder mode Viewfinder mode (vertical position) Monitor mode Point 1 One hand holds the grip of the camera, and the other hand supports the lens. Point 3 Lightly tuck your elbows against your knee. Point 2 Take a secure stance with your upper body and take a position that keeps the camera from moving. Shooting a clear image without camera shake Holding the camera properly Stabilize your feet shoulder-width apart. Preparing the camera GB 59
When shooting in a kneeling position, steady your upper body by placing your elbow on your body. Viewfinder mode Viewfinder mode (vertical position) Monitor mode Point 1 One hand holds the grip of the camera, and the other hand supports the lens. Point 3 Lightly tuck your elbows against your knee. Point 2 Take a secure stance with your upper body and take a position that keeps the camera from moving. Shooting a clear image without camera shake Holding the camera properly Stabilize your feet shoulder-width apart. Preparing the camera GB 59

Instruction Manual
Page 91
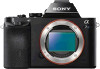
... × 3 3/4 inches × 1 15/16 inches) (W/H/D, excluding protrusions) Mass: Approx. 489 g (1 lb 1.2 oz) (with battery and Memory Stick PRO Duo media) Approx. 446 g (15.7 oz) (body only) Operating temperature: 0°C to 40°C (32°F to change without notice. PSK Connection method: WPS (Wi-Fi Protected Setup)/Manual Access method: Infrastructure...
... × 3 3/4 inches × 1 15/16 inches) (W/H/D, excluding protrusions) Mass: Approx. 489 g (1 lb 1.2 oz) (with battery and Memory Stick PRO Duo media) Approx. 446 g (15.7 oz) (body only) Operating temperature: 0°C to 40°C (32°F to change without notice. PSK Connection method: WPS (Wi-Fi Protected Setup)/Manual Access method: Infrastructure...