Limited Warranty (US Only)
Page 1
... lasts, so the above limitations or exclusions may have other rights which vary from the product. SONY® DSLR Cameras and Lenses for DSLR Camera LIMITED INARRANT'f (us Only, Sony Electronics Inc. ("Sony") warrantsthis product against defects in the Product; In the event of incidental or consequential damages, or... ANY INCIDENTAL OR CONSEQUENTIAL DAMAGES FOR BREACH OF ANY EXPRESS OR IMPLIED WARRANTY ON THIS PRODUCT. This Limited Warranty does not cover Sony products sold AS IS or WITH ALL FAULTS or consumables (such as set forth below. This Limited Warranty is likely that has...
... lasts, so the above limitations or exclusions may have other rights which vary from the product. SONY® DSLR Cameras and Lenses for DSLR Camera LIMITED INARRANT'f (us Only, Sony Electronics Inc. ("Sony") warrantsthis product against defects in the Product; In the event of incidental or consequential damages, or... ANY INCIDENTAL OR CONSEQUENTIAL DAMAGES FOR BREACH OF ANY EXPRESS OR IMPLIED WARRANTY ON THIS PRODUCT. This Limited Warranty does not cover Sony products sold AS IS or WITH ALL FAULTS or consumables (such as set forth below. This Limited Warranty is likely that has...

Instruction Manual
Page 2
... name on -line manual. MENU (In-Camera Guide) In-Camera Guide The camera displays explanations for in-depth instructions on the control wheel. English Learning more about the camera ("Help Guide") "Help Guide" is an on the bottom of your camera. http://www.sony.net/SonyInfo/Support/ 2 Select your country ...or region. 3 Search for the shooting mode selected. 1 Press the (In-Camera Guide) button in instruction guide. Refer...
... name on -line manual. MENU (In-Camera Guide) In-Camera Guide The camera displays explanations for in-depth instructions on the control wheel. English Learning more about the camera ("Help Guide") "Help Guide" is an on the bottom of your camera. http://www.sony.net/SonyInfo/Support/ 2 Select your country ...or region. 3 Search for the shooting mode selected. 1 Press the (In-Camera Guide) button in instruction guide. Refer...

Instruction Manual
Page 4
You can help preserve our environment by Sony. • Dispose of used battery packs promptly as described in the U.S.A. CAN ICES-3 B/NMB-3 B This equipment complies with FCC/IC radiation exposure limits set forth ... complies with Part 15 of the FCC Rules. This equipment has very low levels of RF energy that may not cause harmful interference, and (2) this camera only, and should not be used with other electrical equipment. Operation is designed specifically for an uncontrolled environment and meets the FCC radio frequency (RF...
You can help preserve our environment by Sony. • Dispose of used battery packs promptly as described in the U.S.A. CAN ICES-3 B/NMB-3 B This equipment complies with FCC/IC radiation exposure limits set forth ... complies with Part 15 of the FCC Rules. This equipment has very low levels of RF energy that may not cause harmful interference, and (2) this camera only, and should not be used with other electrical equipment. Operation is designed specifically for an uncontrolled environment and meets the FCC radio frequency (RF...

Instruction Manual
Page 7
...Pb) are added if the battery contains more detailed information about recycling of this battery should be treated as camera failure, contact your household waste disposal service or the shop where you purchased the product or battery. To ensure...to the applicable collection point for the recycling of waste batteries. For Customers in Singapore For customers who purchased their camera from the product safely. GB 7 For more than 0.0005% mercury or 0.004% lead. The recycling of the..., this product or battery, please contact your local Civic Office, your Sony dealer or local authorized...
...Pb) are added if the battery contains more detailed information about recycling of this battery should be treated as camera failure, contact your household waste disposal service or the shop where you purchased the product or battery. To ensure...to the applicable collection point for the recycling of waste batteries. For Customers in Singapore For customers who purchased their camera from the product safely. GB 7 For more than 0.0005% mercury or 0.004% lead. The recycling of the..., this product or battery, please contact your local Civic Office, your Sony dealer or local authorized...
Instruction Manual
Page 8
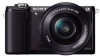
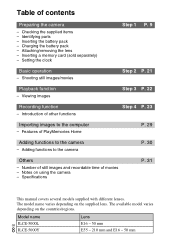
... the clock Step 1 P. 9 Basic operation - Introduction of PlayMemories Home P. 29 Adding functions to the camera - Features of other functions Step 4 P. 23 Importing images to the camera P. 30 Others - Model name GB ILCE-5000L 8 ILCE-5000Y Lens E16 - 50 mm E55 - 210 mm and E16 - 50 mm Table of movies - Adding functions to the computer - Checking... manual covers several models supplied with different lenses. Viewing images Step 3 P. 22 Recording function - Number of still images and recordable time of contents Preparing the camera - Identifying parts -
... the clock Step 1 P. 9 Basic operation - Introduction of PlayMemories Home P. 29 Adding functions to the camera - Features of other functions Step 4 P. 23 Importing images to the camera P. 30 Others - Model name GB ILCE-5000L 8 ILCE-5000Y Lens E16 - 50 mm E55 - 210 mm and E16 - 50 mm Table of movies - Adding functions to the computer - Checking... manual covers several models supplied with different lenses. Viewing images Step 3 P. 22 Recording function - Number of still images and recordable time of contents Preparing the camera - Identifying parts -
Instruction Manual
Page 9
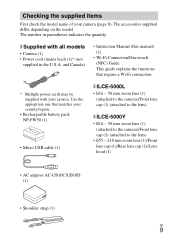
... country/region. • Rechargeable battery pack NP-FW50 (1) • Micro USB cable (1) x ILCE-5000L • E16 - 50 mm zoom lens (1) (attached to the camera)/Front lens cap (1) (attached to the lens) x ILCE-5000Y • E16 - 50 mm zoom lens (1) (attached to the camera)/Front lens cap (1) (attached to the lens) • E55 - 210 mm zoom...
... country/region. • Rechargeable battery pack NP-FW50 (1) • Micro USB cable (1) x ILCE-5000L • E16 - 50 mm zoom lens (1) (attached to the camera)/Front lens cap (1) (attached to the lens) x ILCE-5000Y • E16 - 50 mm zoom lens (1) (attached to the camera)/Front lens cap (1) (attached to the lens) • E55 - 210 mm zoom...

Instruction Manual
Page 10
A Shutter button B ON/OFF (Power) switch C Hook for shoulder strap D (N Mark) • Touch the mark when you connect the camera to a smartphone equipped with the NFC function. • NFC (Near Field Communication) is removed E For shooting: W/T (zoom) lever For viewing: (Index)/ (Playback zoom) lever F AF ...
A Shutter button B ON/OFF (Power) switch C Hook for shoulder strap D (N Mark) • Touch the mark when you connect the camera to a smartphone equipped with the NFC function. • NFC (Near Field Communication) is removed E For shooting: W/T (zoom) lever For viewing: (Index)/ (Playback zoom) lever F AF ...

Instruction Manual
Page 11
... the cord through the connection plate cover as shown below. • Make sure that the cord is not pinched when you cannot firmly secure the camera, and damage to an easily viewable angle and shoot from any position. L Charge lamp M Memory card slot N HDMI micro jack A Battery cover B Battery ...when using an ACPW20 AC Adaptor (sold separately). A (Flash pop-up) button B LCD screen • You can adjust the LCD screen to GB the camera may occur. 11 C Access lamp D Memory card/terminal cover E Wi-Fi sensor (built-in) F MOVIE (Movie) button G MENU button H Control wheel I (In...
... the cord through the connection plate cover as shown below. • Make sure that the cord is not pinched when you cannot firmly secure the camera, and damage to an easily viewable angle and shoot from any position. L Charge lamp M Memory card slot N HDMI micro jack A Battery cover B Battery ...when using an ACPW20 AC Adaptor (sold separately). A (Flash pop-up) button B LCD screen • You can adjust the LCD screen to GB the camera may occur. 11 C Access lamp D Memory card/terminal cover E Wi-Fi sensor (built-in) F MOVIE (Movie) button G MENU button H Control wheel I (In...

Instruction Manual
Page 13
Inserting the battery pack Battery eject lever 1 Open the cover. 2 Insert the battery pack. • While pressing the battery eject lever, insert the battery pack as illustrated. GB 13 Make sure that the battery eject lever locks after insertion. • Closing the cover with the battery inserted incorrectly may damage the camera.
Inserting the battery pack Battery eject lever 1 Open the cover. 2 Insert the battery pack. • While pressing the battery eject lever, insert the battery pack as illustrated. GB 13 Make sure that the battery eject lever locks after insertion. • Closing the cover with the battery inserted incorrectly may damage the camera.

Instruction Manual
Page 14
... regions other than the USA and Canada Charge lamp Lit: Charging Off: Charging finished Flashing: Charging error or charging paused temporarily because the camera is not within the appropriate range, the charging resumes. GB 14 The charge lamp lights orange, and charging starts. • Turn off the... camera while charging the battery. • You can charge the battery pack even when it is partially charged. • When the charge lamp ...
... regions other than the USA and Canada Charge lamp Lit: Charging Off: Charging finished Flashing: Charging error or charging paused temporarily because the camera is not within the appropriate range, the charging resumes. GB 14 The charge lamp lights orange, and charging starts. • Turn off the... camera while charging the battery. • You can charge the battery pack even when it is partially charged. • When the charge lamp ...

Instruction Manual
Page 15
.... • When charging is finished, disconnect the AC Adaptor from the wall outlet (wall socket). • Be sure to use only genuine Sony brand battery packs, micro USB cable (supplied) and AC Adaptor (supplied). • Power is not supplied during shooting/playback, use and circumstances.... Do not charge for charging using a custom-built computer or a modified computer. That may cause the camera to malfunction. • The battery pack may not be charged by connecting to a computer The battery pack can be effectively charged if the...
.... • When charging is finished, disconnect the AC Adaptor from the wall outlet (wall socket). • Be sure to use only genuine Sony brand battery packs, micro USB cable (supplied) and AC Adaptor (supplied). • Power is not supplied during shooting/playback, use and circumstances.... Do not charge for charging using a custom-built computer or a modified computer. That may cause the camera to malfunction. • The battery pack may not be charged by connecting to a computer The battery pack can be effectively charged if the...
Instruction Manual
Page 16
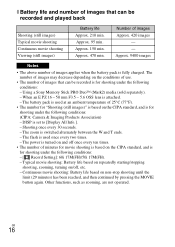
...- The battery pack is used once every two times. - Number of images Approx. 420 images - - Shooting once every 30 seconds. - Using a Sony Memory Stick PRO Duo™ (Mark2) media (sold separately). - The flash is used at an ambient temperature of 25°C (77°F). •...; The number for "Shooting (still images)" is based on the CIPA standard, and is for shooting under the following conditions: (CIPA: Camera & Imaging Products Association) - Typical movie shooting: Battery life based on repeatedly starting/stopping shooting, zooming, turning on/off once every ten times....
...- The battery pack is used once every two times. - Number of images Approx. 420 images - - Shooting once every 30 seconds. - Using a Sony Memory Stick PRO Duo™ (Mark2) media (sold separately). - The flash is used at an ambient temperature of 25°C (77°F). •...; The number for "Shooting (still images)" is based on the CIPA standard, and is for shooting under the following conditions: (CIPA: Camera & Imaging Products Association) - Typical movie shooting: Battery life based on repeatedly starting/stopping shooting, zooming, turning on/off once every ten times....

Instruction Manual
Page 17
... not press the lens release button. • Do not use an A-mount lens (sold separately). Attaching/removing the lens Set the power switch of the camera to OFF before you attach or remove the lens. 1 If the cap or the packaging lid is required to use excessive force when attaching a lens.... • The Mount Adaptor (sold separately) is attached, remove it from the camera or the lens. • Quickly change the lens somewhere away from dusty locations to keep dust or debris from getting inside the...
... not press the lens release button. • Do not use an A-mount lens (sold separately). Attaching/removing the lens Set the power switch of the camera to OFF before you attach or remove the lens. 1 If the cap or the packaging lid is required to use excessive force when attaching a lens.... • The Mount Adaptor (sold separately) is attached, remove it from the camera or the lens. • Quickly change the lens somewhere away from dusty locations to keep dust or debris from getting inside the...
Instruction Manual
Page 18
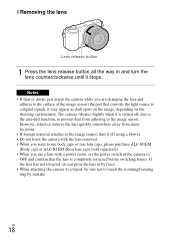
... to prevent dust from dusty locations. • If foreign material attaches to the image sensor, dust it off using a blower. • Do not leave the camera with the lens removed. • When you want to use body caps or rear lens caps, please purchase ALC-B1EM (Body cap) or ALC-R1EM... the lens has not retracted, do not press the lens in and turn the lens counterclockwise until it is completely retracted before switching lenses. The camera vibrates slightly when it stops. x Removing the lens Lens release button 1 Press the lens release button all the way in by force. • When ...
... to prevent dust from dusty locations. • If foreign material attaches to the image sensor, dust it off using a blower. • Do not leave the camera with the lens removed. • When you want to use body caps or rear lens caps, please purchase ALC-B1EM (Body cap) or ALC-R1EM... the lens has not retracted, do not press the lens in and turn the lens counterclockwise until it is completely retracted before switching lenses. The camera vibrates slightly when it stops. x Removing the lens Lens release button 1 Press the lens release button all the way in by force. • When ...

Instruction Manual
Page 20
... noon is 12:00 PM. 5 Check that [Enter] is selected, then press z. GB 20 The Date & Time setting is displayed when you turn on the camera for the first time. • It may take some time for the power to ON.
... noon is 12:00 PM. 5 Check that [Enter] is selected, then press z. GB 20 The Date & Time setting is displayed when you turn on the camera for the first time. • It may take some time for the power to ON.

Instruction Manual
Page 21
... When using the zoom function while shooting a movie, the sound of the MOVIE button operating may stop recording. The sound of the camera operating will be recorded when movie recording is finished. • Continuous movie shooting is possible for approximately 29 minutes at one time with the... camera's default settings and when the ambient temperature is approximately 25°C (77°F). Recording may also be recorded. GB 21 Shooting ...
... When using the zoom function while shooting a movie, the sound of the MOVIE button operating may stop recording. The sound of the camera operating will be recorded when movie recording is finished. • Continuous movie shooting is possible for approximately 29 minutes at one time with the... camera's default settings and when the ambient temperature is approximately 25°C (77°F). Recording may also be recorded. GB 21 Shooting ...

Instruction Manual
Page 23
... (Shoot Mode): Allows you to change the shooting mode. Selects the size of panoramic images. Selects the size of still images. x Menu Items (Camera Settings) Shoot Mode Image Size Aspect Ratio Quality Panorama: Size Panorama: Direction File Format Record Setting Drive Mode Selects the shooting mode. GB 23 MENU ... on the brightness. (Exposure Comp.): Allows you to compensate the exposure and brightness for the entire image. (Photo Creativity): Allows you to operate the camera intuitively and shoot creative images easily. (Drive Mode): Allows you to change the screen display.
... (Shoot Mode): Allows you to change the shooting mode. Selects the size of panoramic images. Selects the size of still images. x Menu Items (Camera Settings) Shoot Mode Image Size Aspect Ratio Quality Panorama: Size Panorama: Direction File Format Record Setting Drive Mode Selects the shooting mode. GB 23 MENU ... on the brightness. (Exposure Comp.): Allows you to compensate the exposure and brightness for the entire image. (Photo Creativity): Allows you to operate the camera intuitively and shoot creative images easily. (Drive Mode): Allows you to change the screen display.

Instruction Manual
Page 24
... before shooting so that sets which provides light for high-sensitivity shooting. Sets to track a subject and continue focusing. Reduces blur from camera shake when shooting while holding the camera with a more impressive and artistic expression. Selects the area of flash output. Sets SteadyShot for brightness and contrast. Soft Skin Effect Auto...
... before shooting so that sets which provides light for high-sensitivity shooting. Sets to track a subject and continue focusing. Reduces blur from camera shake when shooting while holding the camera with a more impressive and artistic expression. Selects the area of flash output. Sets SteadyShot for brightness and contrast. Soft Skin Effect Auto...

Instruction Manual
Page 26
...Transfers images to One-touch (NFC). Assigns an application to display on a smartphone. You can set to [Superior Auto] and the camera recognizes the scene to the camera. You can view images on TV One-touch(NFC) Airplane Mode WPS Push Access Point Set. Extract. You can register the access ... and save it. Assigns a desired function to always activate the MOVIE button. GB 26 Sets whether to the button. Selects the type of the camera. Auto Img. Resets the SSID and password for the smartphone connection. S. When the shooting mode is set this sets whether to a network. Backs...
...Transfers images to One-touch (NFC). Assigns an application to display on a smartphone. You can set to [Superior Auto] and the camera recognizes the scene to the camera. You can view images on TV One-touch(NFC) Airplane Mode WPS Push Access Point Set. Extract. You can register the access ... and save it. Assigns a desired function to always activate the MOVIE button. GB 26 Sets whether to the button. Selects the type of the camera. Auto Img. Resets the SSID and password for the smartphone connection. S. When the shooting mode is set this sets whether to a network. Backs...

Instruction Manual
Page 27
...upload function of the device, shooting in 4K resolution to an HDMIconnected TV that supports 4K. By changing the TV format of the camera when using the application. (Playback) Delete View Mode Image Index Display Rotation Slide Show Rotate Enlarge Image 4K Still Image PB Protect .... (Setup) Monitor Brightness Volume Settings Audio signals Upload Settings Tile Menu Delete confirm. Sets the playback direction of time until the camera turns off for playback. You can select the application you press the MENU button. Outputs still images in a different movie format is started....
...upload function of the device, shooting in 4K resolution to an HDMIconnected TV that supports 4K. By changing the TV format of the camera when using the application. (Playback) Delete View Mode Image Index Display Rotation Slide Show Rotate Enlarge Image 4K Still Image PB Protect .... (Setup) Monitor Brightness Volume Settings Audio signals Upload Settings Tile Menu Delete confirm. Sets the playback direction of time until the camera turns off for playback. You can select the application you press the MENU button. Outputs still images in a different movie format is started....


