Operating Instructions
Page 4
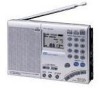
... light up the display for details. Performing button operations while the light is difficult to see, press this button to the unit . When using headphones, sound from the speaker will be muted. 6 DC IN 6V ! (external power input) jack (10) 7 LIGHT button When the display is on will extend the lighting...
... light up the display for details. Performing button operations while the light is difficult to see, press this button to the unit . When using headphones, sound from the speaker will be muted. 6 DC IN 6V ! (external power input) jack (10) 7 LIGHT button When the display is on will extend the lighting...
Operating Instructions
Page 9
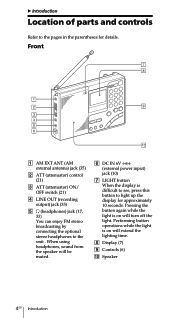
...the batteries are not erased. Should any battery leakage occur, wipe the battery compartment thoroughly before installing new batteries. Battery life (JEITA*) Sony LR6 alkaline (size AA) Sony R6 (size AA) FM approx. 47 hours approx. 15 hours SW approx. 34 hours approx. 10 hours MW/LW approx. 34...JEITA (Japan Electronics and Information Technology Industries Association) standards. Replace all buttons will become inoperable. Operating on batteries Replacing the batteries The sound will become small and distorted, and "E" will flash in leakage or damage. Be sure to be cleared.
...the batteries are not erased. Should any battery leakage occur, wipe the battery compartment thoroughly before installing new batteries. Battery life (JEITA*) Sony LR6 alkaline (size AA) Sony R6 (size AA) FM approx. 47 hours approx. 15 hours SW approx. 34 hours approx. 10 hours MW/LW approx. 34...JEITA (Japan Electronics and Information Technology Industries Association) standards. Replace all buttons will become inoperable. Operating on batteries Replacing the batteries The sound will become small and distorted, and "E" will flash in leakage or damage. Be sure to be cleared.
Operating Instructions
Page 23
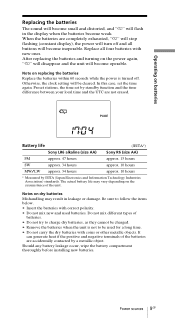
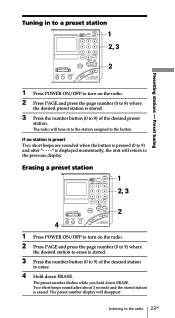
... while you hold down ERASE. The preset number display will tune in to a preset station 1 2, 3 2 1 Press POWER ON/OFF to turn on the radio. 2 Press PAGE and press the page number (0 to 9) where the desired preset station is stored. 3 Press the number button (0 to the previous display.... If no station is preset Two short beeps are sounded when the button is pressed (0 to erase. 4 Hold down ERASE. Two short beeps sound after "- - - -" is erased. Listening to the button. Preset tuning Tuning in to the station assigned ...
... while you hold down ERASE. The preset number display will tune in to a preset station 1 2, 3 2 1 Press POWER ON/OFF to turn on the radio. 2 Press PAGE and press the page number (0 to 9) where the desired preset station is stored. 3 Press the number button (0 to the previous display.... If no station is preset Two short beeps are sounded when the button is pressed (0 to erase. 4 Hold down ERASE. Two short beeps sound after "- - - -" is erased. Listening to the button. Preset tuning Tuning in to the station assigned ...
Operating Instructions
Page 25
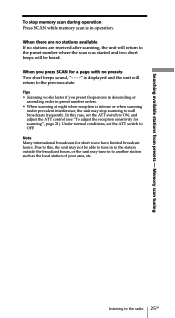
... local station of your area, etc. Note Many international broadcasts for a page with no stations are no stations available If no presets Two short beeps sound, "- - - -" is intense or when scanning under prevalent interference, the unit may tune in to ON, and adjust the ATT control (see "To ...reception sensitivity for scanning", page 21). Listening to the preset number where the scan was started and two short beeps will return to the radio 25GB Memory scan tuning To stop memory scan during operation Press SCAN while memory scan is in preset number orders. • When scanning at...
... local station of your area, etc. Note Many international broadcasts for a page with no stations are no stations available If no presets Two short beeps sound, "- - - -" is intense or when scanning under prevalent interference, the unit may tune in to ON, and adjust the ATT control (see "To ...reception sensitivity for scanning", page 21). Listening to the preset number where the scan was started and two short beeps will return to the radio 25GB Memory scan tuning To stop memory scan during operation Press SCAN while memory scan is in preset number orders. • When scanning at...
Operating Instructions
Page 28
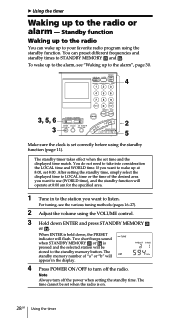
Standby function Waking up to the radio You can preset different frequencies and standby times to STANDBY MEMORY and . Two short beeps sound when STANDBY MEMORY or is on. 28GB Using the...not need to the standby memory button. The standby timer takes effect when the set when the radio is pressed and the selected station will flash. Note Always turn off the power when setting ... up at 8:00 am for the specified area. 1 Tune in the display. 4 Press POWER ON/OFF to turn off the radio. You can wake up to the alarm", page 30. 4 3, 5, 6 2 3 5 Make sure the clock is held ...
Standby function Waking up to the radio You can preset different frequencies and standby times to STANDBY MEMORY and . Two short beeps sound when STANDBY MEMORY or is on. 28GB Using the...not need to the standby memory button. The standby timer takes effect when the set when the radio is pressed and the selected station will flash. Note Always turn off the power when setting ... up at 8:00 am for the specified area. 1 Tune in the display. 4 Press POWER ON/OFF to turn off the radio. You can wake up to the alarm", page 30. 4 3, 5, 6 2 3 5 Make sure the clock is held ...
Operating Instructions
Page 30
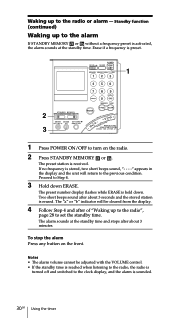
... number display flashes while ERASE is stored, two short beeps sound, "- - - -" appears in the display and the unit will be adjusted with the VOLUME control. • If the standby time is reached when listening to the radio, the radio is turned off and switched to the clock display, and the... frequency preset is received. The preset station is activated, the alarm sounds at the standby time and stops after about 3 minutes. To stop the alarm Press any button on the radio. 2 Press STANDBY MEMORY or . Waking up to the radio", page 28 to set the standby time. Notes • The alarm...
... number display flashes while ERASE is stored, two short beeps sound, "- - - -" appears in the display and the unit will be adjusted with the VOLUME control. • If the standby time is reached when listening to the radio, the radio is turned off and switched to the clock display, and the... frequency preset is received. The preset station is activated, the alarm sounds at the standby time and stops after about 3 minutes. To stop the alarm Press any button on the radio. 2 Press STANDBY MEMORY or . Waking up to the radio", page 28 to set the standby time. Notes • The alarm...
Operating Instructions
Page 31
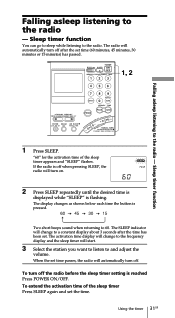
... sleep timer will turn on. 2 Press SLEEP repeatedly until the desired time is displayed while "SLEEP" is off . Two short beeps sound when returning to the radio - To extend the activation time of the sleep timer appears and "SLEEP" flashes. When the set . Using the timer 31GB The ...activation time display will automatically turn off when pressing SLEEP, the radio will start. 3 Select the station you want to listen to a constant display about 3 seconds after the set the time. To turn off ...
... sleep timer will turn on. 2 Press SLEEP repeatedly until the desired time is displayed while "SLEEP" is off . Two short beeps sound when returning to the radio - To extend the activation time of the sleep timer appears and "SLEEP" flashes. When the set . Using the timer 31GB The ...activation time display will automatically turn off when pressing SLEEP, the radio will start. 3 Select the station you want to listen to a constant display about 3 seconds after the set the time. To turn off ...
Operating Instructions
Page 38
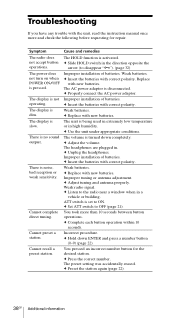
... volume is disconnected. c Insert the batteries with new batteries. Incorrect procedure. c Press the correct number. The HOLD function is set to the radio near a window when in . c Insert the batteries with new batteries. Improper tuning or antenna adjustment. Cannot complete direct tuning. ATT switch is...with the unit, read the instruction manual once more than 10 seconds between button operations. The display is no sound output. Cannot recall a preset station. c Unplug the headphones. c Properly connect the AC power adaptor. Weak batteries. Symptom Cause ...
... volume is disconnected. c Insert the batteries with new batteries. Incorrect procedure. c Press the correct number. The HOLD function is set to the radio near a window when in . c Insert the batteries with new batteries. Improper tuning or antenna adjustment. Cannot complete direct tuning. ATT switch is...with the unit, read the instruction manual once more than 10 seconds between button operations. The display is no sound output. Cannot recall a preset station. c Unplug the headphones. c Properly connect the AC power adaptor. Weak batteries. Symptom Cause ...

Operating Instructions
Page 41
... successfully with the original carrier to fading are generally caused by interrupting the carrier and use Morse code as beat sound only. CW transmissions convey information by over-modulation which is achieved with the built-in signal intelligibility. To fully ...amateur bands because of a carrier is attenuated along the way. Additional information 41GB Specifications Tips on radio waves Tips on radio waves What is received. Conventional radios without the Carrier Interference LSB USB interferences from adjacent broadcast stations. Amplitude Carrier LSB USB Frequency ...
... successfully with the original carrier to fading are generally caused by interrupting the carrier and use Morse code as beat sound only. CW transmissions convey information by over-modulation which is achieved with the built-in signal intelligibility. To fully ...amateur bands because of a carrier is attenuated along the way. Additional information 41GB Specifications Tips on radio waves Tips on radio waves What is received. Conventional radios without the Carrier Interference LSB USB interferences from adjacent broadcast stations. Amplitude Carrier LSB USB Frequency ...
Service Manual
Page 3
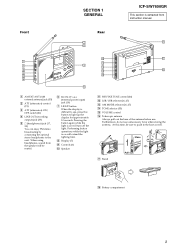
... light up the display for approximately 10 seconds. At this button to push in the base as well. Furthermore, do not use . When using headphones, sound from the speaker will extend the lighting time. 8 Display (7) 9 Controls (6) 0 Speaker qa SSB FINE TUNE control (26) qs LSB/USB selector (... the base of the antenna before use unnecessary force when storing the antenna. Base qj Stand Pull out qk Battery compartment 3 Front SECTION 1 GENERAL Rear ICF-SW7600GR This section is difficult to see, press this time, be muted. 6 DC IN 6V ! (external power input) jack (10) 7 LIGHT button...
... light up the display for approximately 10 seconds. At this button to push in the base as well. Furthermore, do not use . When using headphones, sound from the speaker will extend the lighting time. 8 Display (7) 9 Controls (6) 0 Speaker qa SSB FINE TUNE control (26) qs LSB/USB selector (... the base of the antenna before use unnecessary force when storing the antenna. Base qj Stand Pull out qk Battery compartment 3 Front SECTION 1 GENERAL Rear ICF-SW7600GR This section is difficult to see, press this time, be muted. 6 DC IN 6V ! (external power input) jack (10) 7 LIGHT button...
Service Manual
Page 7
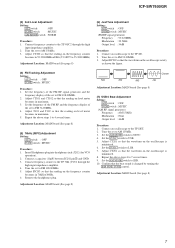
Adjust T101 and T102 so that the beat sound is minimized. 6. Connect a capacitor (10µF) between IC202 pin1 and GND. 3. Tune the set to FM 76.00MHz. 4. Repeat the above steps 1 to 7 several times. ... the TP 76K (VCO) through the high input impedance amplifier. 2. Set the AM MODE switch to SSB. 10. Set the AM MODE switch to SYNC. 4. ICF-SW7600GR (3) 2nd Local Adjustment Setting: ATT switch : OFF TONE switch : MUSIC AM MODE switch : NORM Procedure: 1. Connect frequency counter to FM 93.00MHz. 3. Tune the set...
Adjust T101 and T102 so that the beat sound is minimized. 6. Connect a capacitor (10µF) between IC202 pin1 and GND. 3. Tune the set to FM 76.00MHz. 4. Repeat the above steps 1 to 7 several times. ... the TP 76K (VCO) through the high input impedance amplifier. 2. Set the AM MODE switch to SSB. 10. Set the AM MODE switch to SYNC. 4. ICF-SW7600GR (3) 2nd Local Adjustment Setting: ATT switch : OFF TONE switch : MUSIC AM MODE switch : NORM Procedure: 1. Connect frequency counter to FM 93.00MHz. 3. Tune the set...


