
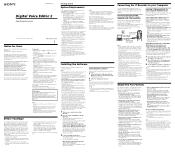
Digital Voice Editor 2 Operating Instructions
Page 1
...manual describes how to connect your Sony IC recorder ICD-S series, ICD-ST series, ICD-SX series, ICD-MS series, ICD-BM series, ICD-BP series, and ICD-P series to your identification with a USB connector. CD-ROM drive/"Memory Stick" drive*1 - Note on Windows as a user name belonging to...software before installing the "Digital Voice Editor" software. • When installing or uninstalling the software in Windows® XP Professional/Home Edition, log on the Sony IC recorder ICD-BP100/ BPx20 series equipped with a USB connector. Memory Stick Reader/Writer (ex. Installing the Software...
...manual describes how to connect your Sony IC recorder ICD-S series, ICD-ST series, ICD-SX series, ICD-MS series, ICD-BM series, ICD-BP series, and ICD-P series to your identification with a USB connector. CD-ROM drive/"Memory Stick" drive*1 - Note on Windows as a user name belonging to...software before installing the "Digital Voice Editor" software. • When installing or uninstalling the software in Windows® XP Professional/Home Edition, log on the Sony IC recorder ICD-BP100/ BPx20 series equipped with a USB connector. Memory Stick Reader/Writer (ex. Installing the Software...
Digital Voice Editor 2 Operating Instructions
Page 2
... the folder, the insertion line is displayed. The automatic saving starts. or the details, see the online help file: • Click [Start], [Programs], [Sony Digital Voice Editor 2], and then [Help]. • After starting up the software, select [Help Topics] in the [Help] menu. • After starting ... a VOICE folder, the dialog box to ask you start Windows. 2 Connect the IC recorder to the Computer You can save the messages as a new folder (ICD-MS/ BM series only) Notes • When a message is added to the IC recorder, its alarm setting will be added to save the entire...
... the folder, the insertion line is displayed. The automatic saving starts. or the details, see the online help file: • Click [Start], [Programs], [Sony Digital Voice Editor 2], and then [Help]. • After starting up the software, select [Help Topics] in the [Help] menu. • After starting ... a VOICE folder, the dialog box to ask you start Windows. 2 Connect the IC recorder to the Computer You can save the messages as a new folder (ICD-MS/ BM series only) Notes • When a message is added to the IC recorder, its alarm setting will be added to save the entire...
Operating Instructions (primary manual)
Page 3
...are trademarks of a separate user license agreement. • This software is for Windows and cannot be governed by ScanSoft, Inc. Trademarks • "LPEC" and " " are the trademarks of Sony Corporation. • IBM and PC/AT are registered trademarks of International Business Machines ... connecting cable is for users Program © 1999, 2000, 2001, 2002, 2003, 2004 Sony Corporation Documentation ©2004 Sony Corporation All rights reserved. Notice for the IC recorder ICD-ST25 only. and other trademarks and registered trademarks are trademarks of their respective holders...
...are trademarks of a separate user license agreement. • This software is for Windows and cannot be governed by ScanSoft, Inc. Trademarks • "LPEC" and " " are the trademarks of Sony Corporation. • IBM and PC/AT are registered trademarks of International Business Machines ... connecting cable is for users Program © 1999, 2000, 2001, 2002, 2003, 2004 Sony Corporation Documentation ©2004 Sony Corporation All rights reserved. Notice for the IC recorder ICD-ST25 only. and other trademarks and registered trademarks are trademarks of their respective holders...
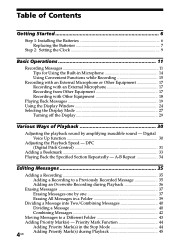
Operating Instructions (primary manual)
Page 4
... Dividing a Message into Two/Combining Messages 40 Dividing a Message 40 Combining Messages 42 Moving Messages to a Previously Recorded Message 35 Adding an Overwrite Recording during Playback 45 4GB Table of Contents Getting Started 6 Step 1: Installing the Batteries 6 Replacing the Batteries 7 Step...Using Convenient Functions while Recording 15 Recording with an External Microphone or Other Equipment 17 Recording with an External Microphone 17 Recording from Other Equipment 17 Recording with Other Equipment 18 Playing Back Messages 19 Using the Display Window 24 Selecting the ...
... Dividing a Message into Two/Combining Messages 40 Dividing a Message 40 Combining Messages 42 Moving Messages to a Previously Recorded Message 35 Adding an Overwrite Recording during Playback 45 4GB Table of Contents Getting Started 6 Step 1: Installing the Batteries 6 Replacing the Batteries 7 Step...Using Convenient Functions while Recording 15 Recording with an External Microphone or Other Equipment 17 Recording with an External Microphone 17 Recording from Other Equipment 17 Recording with Other Equipment 18 Playing Back Messages 19 Using the Display Window 24 Selecting the ...
Operating Instructions (primary manual)
Page 7
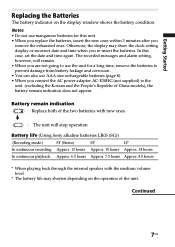
... display or incorrect date and time when you re-insert the batteries. Continued 7GB Battery life (Using Sony alkaline batteries LR03 (SG)) (Recording mode:) ST (Stereo) SP LP In continuous recording: Approx. 13 hours Approx. 15 hours Approx. 18 hours In continuous playback: Approx. 6.5 hours... Approx. 7.5 hours Approx. 8.5 hours * When playing back through the internal speaker with new ones. Otherwise, the display may shorten depending on the display window shows ...
... display or incorrect date and time when you re-insert the batteries. Continued 7GB Battery life (Using Sony alkaline batteries LR03 (SG)) (Recording mode:) ST (Stereo) SP LP In continuous recording: Approx. 13 hours Approx. 15 hours Approx. 18 hours In continuous playback: Approx. 6.5 hours... Approx. 7.5 hours Approx. 8.5 hours * When playing back through the internal speaker with new ones. Otherwise, the display may shorten depending on the display window shows ...
Operating Instructions (primary manual)
Page 8
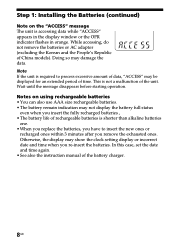
... If the unit is not a malfunction of the unit. Notes on the "ACCESS" message The unit is accessing data while "ACCESS" appears in the display window or the OPR indicator flashes in orange. Doing so may show the clock setting display or incorrect date and time when you remove the exhausted...
... If the unit is not a malfunction of the unit. Notes on the "ACCESS" message The unit is accessing data while "ACCESS" appears in the display window or the OPR indicator flashes in orange. Doing so may show the clock setting display or incorrect date and time when you remove the exhausted...
Operating Instructions (primary manual)
Page 9
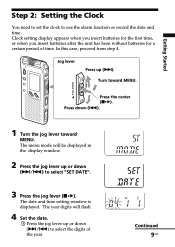
.... Continued 9GB Press down (>/.) to select the digits of time. The year digits will be displayed in the display window. 2 Press the jog lever up or down (>/.) to use the alarm function or record the date and time. In this case, proceed from step 4. Clock setting display appears when you insert batteries...
.... Continued 9GB Press down (>/.) to select the digits of time. The year digits will be displayed in the display window. 2 Press the jog lever up or down (>/.) to use the alarm function or record the date and time. In this case, proceed from step 4. Clock setting display appears when you insert batteries...

Operating Instructions (primary manual)
Page 10
... jog lever toward MENU. The month digits will flash. 3 Set the month and day in the stop mode after the clock is cancelled and the window will show the current time (page 27). 10GB The menu mode will return to select the digits of the hour. 2 Press the jog lever (x•...
... jog lever toward MENU. The month digits will flash. 3 Set the month and day in the stop mode after the clock is cancelled and the window will show the current time (page 27). 10GB The menu mode will return to select the digits of the hour. 2 Press the jog lever (x•...
Operating Instructions (primary manual)
Page 13
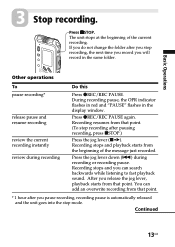
... after you pause recording, recording pause is automatically released and the unit goes into the stop recording, the next time you record you stop mode. You can search backwards while listening to fast playback sound. Press xSTOP. Recording stops and playback starts from that point. * 1 hour after you will record in the display window. Press the jog...
... after you pause recording, recording pause is automatically released and the unit goes into the stop recording, the next time you record you stop mode. You can search backwards while listening to fast playback sound. Press xSTOP. Recording stops and playback starts from that point. * 1 hour after you will record in the display window. Press the jog...
Operating Instructions (primary manual)
Page 15
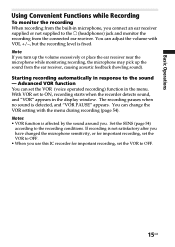
.... Set the SENS (page 54) according to ON, recording starts when the recorder detects sound, and "VOR" appears in the display window. Basic Operations Using Convenient Functions while Recording To monitor the recording When recording from the built-in microphone, you use this IC recorder for important recording, set the VOR to OFF. • When you connect an...
.... Set the SENS (page 54) according to ON, recording starts when the recorder detects sound, and "VOR" appears in the display window. Basic Operations Using Convenient Functions while Recording To monitor the recording When recording from the built-in microphone, you use this IC recorder for important recording, set the VOR to OFF. • When you connect an...

Operating Instructions (primary manual)
Page 16
... be displayed with an alarm sound. When the memory is full, recording automatically stops and "FULL" will flash in the display window regardless of the messages (page 37). When the remaining recording time reaches 5 minutes, the remaining memory indication flashes. To continue recording, first erase some of the display mode (page 27). Note When...
... be displayed with an alarm sound. When the memory is full, recording automatically stops and "FULL" will flash in the display window regardless of the messages (page 37). When the remaining recording time reaches 5 minutes, the remaining memory indication flashes. To continue recording, first erase some of the display mode (page 27). Note When...
Operating Instructions (primary manual)
Page 24
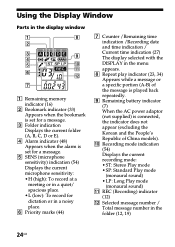
... not appear (excluding the Korean and the People's Republic of China models). Using the Display Window Parts in the display window 1 Remaining memory indicator (16) 2 Bookmark indicator (33) Appears when the bookmark is set... for a message. 3 Folder indication Displays the current folder (A, B, C, D or E). 4 Alarm indicator (48) Appears when the alarm is set for a message. 5 SENS (microphone sensitivity) indication (54) Displays the current microphone sensitivity: •H (high): To record...
... not appear (excluding the Korean and the People's Republic of China models). Using the Display Window Parts in the display window 1 Remaining memory indicator (16) 2 Bookmark indicator (33) Appears when the bookmark is set... for a message. 3 Folder indication Displays the current folder (A, B, C, D or E). 4 Alarm indicator (48) Appears when the alarm is set for a message. 5 SENS (microphone sensitivity) indication (54) Displays the current microphone sensitivity: •H (high): To record...

Operating Instructions (primary manual)
Page 25
... playback In an ordinary recording or playback mode, the message number, recording mode and microphone sensitivity of all 21 messages in the folder A in the window. In alarm or clock setting, the date and time setting display appears. You can change the setting while it is being recorded as overwrite recording, AB repeat playback, or...
... playback In an ordinary recording or playback mode, the message number, recording mode and microphone sensitivity of all 21 messages in the folder A in the window. In alarm or clock setting, the date and time setting display appears. You can change the setting while it is being recorded as overwrite recording, AB repeat playback, or...

Operating Instructions (primary manual)
Page 26
Using the Display Window (continued) xRemain indications When the battery or memory runs out, the remain indications flash in the display. When an access error occurs When an error number is displayed 26GB Display examples When the remain time becomes shorter than 1 minute xError messages The error messages or error numbers will be displayed (page 62, 63).
Using the Display Window (continued) xRemain indications When the battery or memory runs out, the remain indications flash in the display. When an access error occurs When an error number is displayed 26GB Display examples When the remain time becomes shorter than 1 minute xError messages The error messages or error numbers will be displayed (page 62, 63).

Operating Instructions (primary manual)
Page 27
... be displayed. The display setting window will be displayed. 4 Press the jog lever up or down (>/.) to select the display mode. Basic Operations x•B . 2 Press the jog lever up or down (>/.) to select "DISP". 3 Press the jog lever (x•B). The display modes changes in the stop , recording and playback modes. > 1 Turn the...
... be displayed. The display setting window will be displayed. 4 Press the jog lever up or down (>/.) to select the display mode. Basic Operations x•B . 2 Press the jog lever up or down (>/.) to select "DISP". 3 Press the jog lever (x•B). The display modes changes in the stop , recording and playback modes. > 1 Turn the...

Operating Instructions (primary manual)
Page 29
To turn on the window, which almost will flash for three seconds and then the display turns off the Display The unit is not equipped with the power button. "HOLD" will not influence the battery life. To turn off the display, slide the HOLD switch in the direction of the arrow in the opposite direction. HOLD Basic Operations 29GB Turning off in the window. The display always appears on the display, slide the HOLD switch in the stop mode.
To turn on the window, which almost will flash for three seconds and then the display turns off the Display The unit is not equipped with the power button. "HOLD" will not influence the battery life. To turn off the display, slide the HOLD switch in the direction of the arrow in the opposite direction. HOLD Basic Operations 29GB Turning off in the window. The display always appears on the display, slide the HOLD switch in the stop mode.

Operating Instructions (primary manual)
Page 36
...the menu is set in the recording pause mode. 2 While the "REC" and "ADD" are flashing, press zREC/REC PAUSE. Adding an Overwrite Recording during Playback When REC-OP in a recorded message. The "REC" is displayed. "OVER" flashes on the display window. The "REC" is displayed ...and "ADD" flashes for 3 seconds on the display window and the OPR indicator flashes in Message 2 1...
...the menu is set in the recording pause mode. 2 While the "REC" and "ADD" are flashing, press zREC/REC PAUSE. Adding an Overwrite Recording during Playback When REC-OP in a recorded message. The "REC" is displayed. "OVER" flashes on the display window. The "REC" is displayed ...and "ADD" flashes for 3 seconds on the display window and the OPR indicator flashes in Message 2 1...

Operating Instructions (primary manual)
Page 44
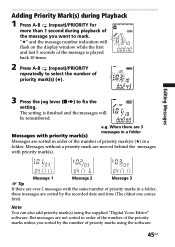
... when the priority mark(s) (#) light(s) steadily in the order of their priority. "#" and the message number indication will flash on the display window. 3 Press A-B (repeat)/PRIORITY repeatedly to mark. 2 Press A-B (repeat)/PRIORITY for more than 1 second. By adding priority marks (#) to... important messages, you want to select the number of recording. xSTOP Jog lever (x•B) A-B (repeat)/PRIORITY Adding Priority Mark(s) in the Stop Mode 1 Select the message you can add priority marks...
... when the priority mark(s) (#) light(s) steadily in the order of their priority. "#" and the message number indication will flash on the display window. 3 Press A-B (repeat)/PRIORITY repeatedly to mark. 2 Press A-B (repeat)/PRIORITY for more than 1 second. By adding priority marks (#) to... important messages, you want to select the number of recording. xSTOP Jog lever (x•B) A-B (repeat)/PRIORITY Adding Priority Mark(s) in the Stop Mode 1 Select the message you can add priority marks...
Operating Instructions (primary manual)
Page 45
...folder. Note You can also add priority mark(s) using the software. 45GB The setting is finished and the messages will flash on the display window while the first and last 5 seconds of the message is played back 10 times. 2 Press A-B (repeat)/PRIORITY repeatedly to select the ...Message 3 1 Tip If there are over 2 messages with priority mark(s). But messages are sorted by the number of the message you sorted by the recorded date and time (The oldest one comes first). Adding Priority Mark(s) during Playback 1 Press A-B (repeat)/PRIORITY for more than 1 second during playback ...
...folder. Note You can also add priority mark(s) using the software. 45GB The setting is finished and the messages will flash on the display window while the first and last 5 seconds of the message is played back 10 times. 2 Press A-B (repeat)/PRIORITY repeatedly to select the ...Message 3 1 Tip If there are over 2 messages with priority mark(s). But messages are sorted by the number of the message you sorted by the recorded date and time (The oldest one comes first). Adding Priority Mark(s) during Playback 1 Press A-B (repeat)/PRIORITY for more than 1 second during playback ...

Operating Instructions (primary manual)
Page 46
... a selected message at a desired time. If the alarm has been already set the alarm. Note When the clock is not set or no messages are recorded, you want to play back. BOther Functions Playing Back a Message at a Desired Time with an Alarm You can sound an alarm and start playback of... Back Messages" on page 19. 2 Enter the alarm setting mode. 1Press the jog lever toward MENU. The menu mode will be displayed in the display window. 2Press the jog lever up or down (>/.) to "ON", "ALARM ON" will be displayed. 46GB You can have the message played back at a specified date...
... a selected message at a desired time. If the alarm has been already set the alarm. Note When the clock is not set or no messages are recorded, you want to play back. BOther Functions Playing Back a Message at a Desired Time with an Alarm You can sound an alarm and start playback of... Back Messages" on page 19. 2 Enter the alarm setting mode. 1Press the jog lever toward MENU. The menu mode will be displayed in the display window. 2Press the jog lever up or down (>/.) to "ON", "ALARM ON" will be displayed. 46GB You can have the message played back at a specified date...


