Operating Instructions
Page 1
Refer to these numbers whenever you call upon your Sony dealer regarding this product. Record the serial number in the space provided below. ICD-BM1/BM1PRO Serial No. Model No. 3-258-853-13 (1) IC Recorder Operating Instructions Owner's Record The model number and the serial number are located on the back of the unit. ICD-BM1/BM1PRO ©2003 Sony Corporation
Refer to these numbers whenever you call upon your Sony dealer regarding this product. Record the serial number in the space provided below. ICD-BM1/BM1PRO Serial No. Model No. 3-258-853-13 (1) IC Recorder Operating Instructions Owner's Record The model number and the serial number are located on the back of the unit. ICD-BM1/BM1PRO ©2003 Sony Corporation
Operating Instructions
Page 3
...any modification to any time without prior written approval from Sony Corporation. Furthermore, "™" and "®" are trademarks of Apple Computer Inc., registered in this manual or the information contained herein at any machine readable form without notice. The "Digital Voice Editor" uses software modules as shown below: Microsoft®... or reduced to this manual. You cannot connect other countries. and other trademarks and registered trademarks are trademarks owned by the terms of Sony Corporation. • "LPEC" is for the IC recorder ICD-BM1/BM1PRO only.
...any modification to any time without prior written approval from Sony Corporation. Furthermore, "™" and "®" are trademarks of Apple Computer Inc., registered in this manual or the information contained herein at any machine readable form without notice. The "Digital Voice Editor" uses software modules as shown below: Microsoft®... or reduced to this manual. You cannot connect other countries. and other trademarks and registered trademarks are trademarks owned by the terms of Sony Corporation. • "LPEC" is for the IC recorder ICD-BM1/BM1PRO only.
Operating Instructions
Page 4
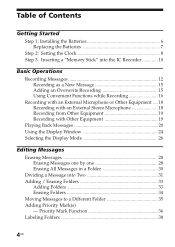
... 8 Step 3: Inserting a "Memory Stick" into the IC Recorder 10 Basic Operations Recording Messages 12 Recording as a New Message 15 Adding an Overwrite Recording 15 Using Convenient Functions while Recording 16 Recording with an External Microphone or Other Equipment .... 18 Recording with an External Stereo Microphone 18 Recording from Other Equipment 19 Recording with Other Equipment 19 Playing Back Messages...
... 8 Step 3: Inserting a "Memory Stick" into the IC Recorder 10 Basic Operations Recording Messages 12 Recording as a New Message 15 Adding an Overwrite Recording 15 Using Convenient Functions while Recording 16 Recording with an External Microphone or Other Equipment .... 18 Recording with an External Stereo Microphone 18 Recording from Other Equipment 19 Recording with Other Equipment 19 Playing Back Messages...
Operating Instructions
Page 5
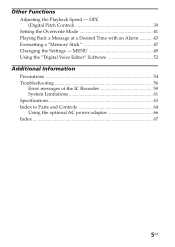
MENU 49 Using the "Digital Voice Editor" Software 52 Additional Information Precautions 54 Troubleshooting 56 Error messages of the IC Recorder 59 System Limitations 61 Specifications 63 Index to Parts and Controls 64 Using the optional AC power adaptor 66 Index ...67 5GB Other Functions Adjusting the Playback Speed - DPC (Digital Pitch Control 39 Setting the Overwrite Mode 41 Playing Back a Message at a Desired Time with an Alarm 43 Formatting a "Memory Stick 47 Changing the Settings -
MENU 49 Using the "Digital Voice Editor" Software 52 Additional Information Precautions 54 Troubleshooting 56 Error messages of the IC Recorder 59 System Limitations 61 Specifications 63 Index to Parts and Controls 64 Using the optional AC power adaptor 66 Index ...67 5GB Other Functions Adjusting the Playback Speed - DPC (Digital Pitch Control 39 Setting the Overwrite Mode 41 Playing Back a Message at a Desired Time with an Alarm 43 Formatting a "Memory Stick 47 Changing the Settings -
Operating Instructions
Page 7
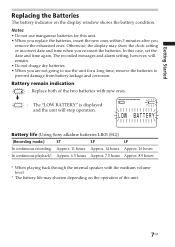
...; When you replace the batteries, insert the new ones within 3 minutes after you remove the exhausted ones. Battery life (Using Sony alkaline batteries LR03 (SG)) (Recording mode:) ST SP LP In continuous recording: Approx. 11 hours Approx. 14 hours Approx. 16 hours In continuous playback*: Approx. 6.5 hours Approx. 7.5 hours Approx. 8.5 hours * When playing...
...; When you replace the batteries, insert the new ones within 3 minutes after you remove the exhausted ones. Battery life (Using Sony alkaline batteries LR03 (SG)) (Recording mode:) ST SP LP In continuous recording: Approx. 11 hours Approx. 14 hours Approx. 16 hours In continuous playback*: Approx. 6.5 hours Approx. 7.5 hours Approx. 8.5 hours * When playing...

Operating Instructions
Page 8
Clock setting display appears when you insert battery for the first time, or when you insert battery after the unit has been without battery for a certain period of time. Press down (>/ .) to select "DATE&TIME". 8GB MENU ENTER CANCEL POWER Jog lever Press up or down (.). 1 Slide POWER to use the alarm function or record the date and time. The IC recorder is turned on. 2 Press MENU. The menu mode will be displayed in the display window. 3 Press the jog lever up (>). Step 2: Setting the Clock You need to set the clock to ON. In this case, proceed from step 4.
Clock setting display appears when you insert battery for the first time, or when you insert battery after the unit has been without battery for a certain period of time. Press down (>/ .) to select "DATE&TIME". 8GB MENU ENTER CANCEL POWER Jog lever Press up or down (.). 1 Slide POWER to use the alarm function or record the date and time. The IC recorder is turned on. 2 Press MENU. The menu mode will be displayed in the display window. 3 Press the jog lever up (>). Step 2: Setting the Clock You need to set the clock to ON. In this case, proceed from step 4.
Operating Instructions
Page 10
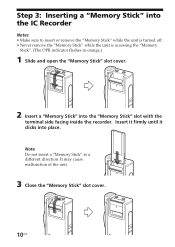
Step 3: Inserting a "Memory Stick" into the IC Recorder Notes • Make sure to insert or remove the "Memory Stick" while the unit is turned off. • Never remove the "Memory Stick" while the ...". (The OPR indicator flashes in a different direction. Insert it firmly until it clicks into the "Memory Stick" slot with the terminal side facing inside the recorder. Note Do not insert a "Memory Stick" in orange.) 1 Slide and open the "Memory Stick" slot cover. 2 Insert a "Memory Stick" into place. It may cause malfunction...
Step 3: Inserting a "Memory Stick" into the IC Recorder Notes • Make sure to insert or remove the "Memory Stick" while the unit is turned off. • Never remove the "Memory Stick" while the ...". (The OPR indicator flashes in a different direction. Insert it firmly until it clicks into the "Memory Stick" slot with the terminal side facing inside the recorder. Note Do not insert a "Memory Stick" in orange.) 1 Slide and open the "Memory Stick" slot cover. 2 Insert a "Memory Stick" into place. It may cause malfunction...
Operating Instructions
Page 11
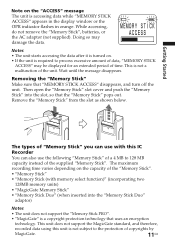
...message The unit is accessing data while "MEMORY STICK ACCESS" appears in the display window or the OPR indicator flashes in orange. The maximum recording time varies depending on the capacity of the "Memory Stick". • "Memory Stick" • "Memory Stick (with this unit is ...not subject to the protection of copyrights by MagicGate. 11GB This unit does not support the MagicGate standard, and therefore, recorded data using this IC Recorder You can use with memory select function)" (incorporating two 128MB memory units) • "MagicGate Memory Stick" • "Memory Stick...
...message The unit is accessing data while "MEMORY STICK ACCESS" appears in the display window or the OPR indicator flashes in orange. The maximum recording time varies depending on the capacity of the "Memory Stick". • "Memory Stick" • "Memory Stick (with this unit is ...not subject to the protection of copyrights by MagicGate. 11GB This unit does not support the MagicGate standard, and therefore, recorded data using this IC Recorder You can use with memory select function)" (incorporating two 128MB memory units) • "MagicGate Memory Stick" • "Memory Stick...
Operating Instructions
Page 12
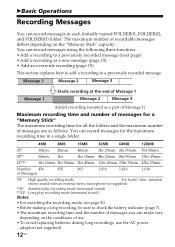
... depending on the "Memory Stick" capacity. Message 1 Message 2 Message 3 Message 1 Starts recording at the end of Message 1 Message 2 Message 3 Added recording (counted as a part of Message 1) Maximum recording time and number of messages for a "Memory Stick" The maximum recording time for the maximum recording time in each (initially named FOLDER01, FOLDER02, and FOLDER03) folder. You...
... depending on the "Memory Stick" capacity. Message 1 Message 2 Message 3 Message 1 Starts recording at the end of Message 1 Message 2 Message 3 Added recording (counted as a part of Message 1) Maximum recording time and number of messages for a "Memory Stick" The maximum recording time for the maximum recording time in each (initially named FOLDER01, FOLDER02, and FOLDER03) folder. You...

Operating Instructions
Page 13
Jog lever 1 Press FOLDER. 2 Press the jog lever up or down (>/ .) to display the folder in which you wish to select the folder. To cancel the selection, press CANCEL. Continued 13GB FOLDER ENTER Selected folder 3 Press ENTER to record messages. Slide POWER to ON. To add a new folder, see page 33. 1 Turn on the power. POWER Basic Operations 2 Select the folder.
Jog lever 1 Press FOLDER. 2 Press the jog lever up or down (>/ .) to display the folder in which you wish to select the folder. To cancel the selection, press CANCEL. Continued 13GB FOLDER ENTER Selected folder 3 Press ENTER to record messages. Slide POWER to ON. To add a new folder, see page 33. 1 Turn on the power. POWER Basic Operations 2 Select the folder.
Operating Instructions
Page 14
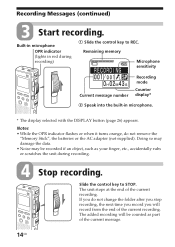
..., do not change the folder after you stop recording, the next time you record you will be recorded if an object, such as part of the current message. 14GB The added recording will record from the end of the current recording. Built-in microphone OPR indicator (lights in microphone...appears. The unit stops at the end of the current recording. Slide the control key to REC. Remaining memory Microphone sensitivity Current message number Recording mode Counter display* 2 Speak into the built-in red during recording. 4 Stop recording. Doing so may damage the data. • Noise ...
..., do not change the folder after you stop recording, the next time you record you will be recorded if an object, such as part of the current message. 14GB The added recording will record from the end of the current recording. Built-in microphone OPR indicator (lights in microphone...appears. The unit stops at the end of the current recording. Slide the control key to REC. Remaining memory Microphone sensitivity Current message number Recording mode Counter display* 2 Speak into the built-in red during recording. 4 Stop recording. Doing so may damage the data. • Noise ...
Operating Instructions
Page 15
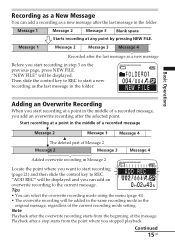
...and then slide the control key to REC. Basic Operations Adding an Overwrite Recording When you start recording at a point in the middle of Message 2 Message 2 Message 3 Message 4 Added overwrite recording in Message 2 Locate the point where you want to the current message... in the folder. Message 1 Message 2 Message 3 Blank space Starts recording at a point in the middle of a recorded message Message 2 Message 3 Message 4 The deleted part of a recorded message, you add an overwrite recording after the last message as a new message Before you stopped playback. Continued...
...and then slide the control key to REC. Basic Operations Adding an Overwrite Recording When you start recording at a point in the middle of Message 2 Message 2 Message 3 Message 4 Added overwrite recording in Message 2 Locate the point where you want to the current message... in the folder. Message 1 Message 2 Message 3 Blank space Starts recording at a point in the middle of a recorded message Message 2 Message 3 Message 4 The deleted part of a recorded message, you add an overwrite recording after the last message as a new message Before you stopped playback. Continued...
Operating Instructions
Page 16
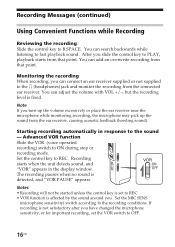
...PLAY, playback starts from that point. You can connect an ear receiver supplied or not supplied to B.SPACE. Notes • Recording will not be started unless the control key is affected by the sound around you slide the control key to REC. &#...window. Monitoring the recording When recording, you turn up the volume excessively or place the ear receiver near the microphone while monitoring recording, the microphone may pick up the sound from the ear receiver, causing acoustic feedback (howling sound). Advanced VOR function Slide the VOR (voice operated recording) switch to the...
...PLAY, playback starts from that point. You can connect an ear receiver supplied or not supplied to B.SPACE. Notes • Recording will not be started unless the control key is affected by the sound around you slide the control key to REC. &#...window. Monitoring the recording When recording, you turn up the volume excessively or place the ear receiver near the microphone while monitoring recording, the microphone may pick up the sound from the ear receiver, causing acoustic feedback (howling sound). Advanced VOR function Slide the VOR (voice operated recording) switch to the...
Operating Instructions
Page 17
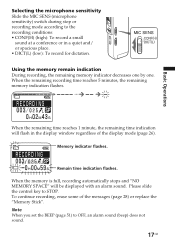
...remaining time indication will be displayed with an alarm sound. Remain time indication flashes. To continue recording, erase some of the display mode (page 26). When the remaining recording time reaches 5 minutes, the remaining memory indication flashes. Note When you set the BEEP (.... Basic Operations Selecting the microphone sensitivity Slide the MIC SENS (microphone sensitivity) switch during stop or recording mode according to the recording conditions: • CONF(H) (high): To record a small sound at a conference or in the display window regardless of the messages (page 28)...
...remaining time indication will be displayed with an alarm sound. Remain time indication flashes. To continue recording, erase some of the display mode (page 26). When the remaining recording time reaches 5 minutes, the remaining memory indication flashes. Note When you set the BEEP (.... Basic Operations Selecting the microphone sensitivity Slide the MIC SENS (microphone sensitivity) switch during stop or recording mode according to the recording conditions: • CONF(H) (high): To record a small sound at a conference or in the display window regardless of the messages (page 28)...
Operating Instructions
Page 18
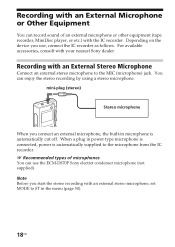
... types of an external microphone or other equipment (tape recorder, MiniDisc player, or etc.) with your nearest Sony dealer. You can use , connect the IC recorder as follows. mini-plug (stereo) Stereo microphone When you use the ECM-DS70P Sony electret condenser microphone (not supplied). Depending on the device you connect an external microphone...
... types of an external microphone or other equipment (tape recorder, MiniDisc player, or etc.) with your nearest Sony dealer. You can use , connect the IC recorder as follows. mini-plug (stereo) Stereo microphone When you use the ECM-DS70P Sony electret condenser microphone (not supplied). Depending on the device you connect an external microphone...
Operating Instructions
Page 19
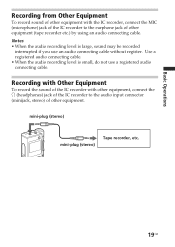
... recorder, etc. 19GB Recording with Other Equipment To record the sound of the IC recorder with the IC recorder, connect the MIC (microphone) jack of the IC recorder to the audio input connector (minijack, stereo) of other equipment. Basic Operations Recording from Other Equipment To record ...sound of other equipment with other equipment, connect the i (headphones) jack of the IC recorder to the earphone jack of other equipment (tape recorder etc.) by using an audio connecting cable...
... recorder, etc. 19GB Recording with Other Equipment To record the sound of the IC recorder with the IC recorder, connect the MIC (microphone) jack of the IC recorder to the audio input connector (minijack, stereo) of other equipment. Basic Operations Recording from Other Equipment To record ...sound of other equipment with other equipment, connect the i (headphones) jack of the IC recorder to the earphone jack of other equipment (tape recorder etc.) by using an audio connecting cable...

Operating Instructions
Page 20
... cancel the selection, press CANCEL. Select the message number. Playing Back Messages When playing back a previously recorded message, start from Step 1. Press down (.): for next message number. When playing back a message you have just finished recording, start from Step 3. 1 Select the folder. 1 Press FOLDER. 2 Press the jog lever up or down (>/.) to...
... cancel the selection, press CANCEL. Select the message number. Playing Back Messages When playing back a previously recorded message, start from Step 1. Press down (.): for next message number. When playing back a message you have just finished recording, start from Step 3. 1 Select the folder. 1 Press FOLDER. 2 Press the jog lever up or down (>/.) to...
Operating Instructions
Page 21
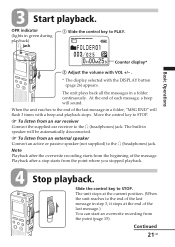
... the message. Note Playback after a stop starts from the point (page 15). Continued 21GB Playback after the overwrite recording starts from the beginning of the last message.) You can start an overwrite recording from the point where you stopped playback. 4 Stop playback. The unit plays back all the messages in green during...
... the message. Note Playback after a stop starts from the point (page 15). Continued 21GB Playback after the overwrite recording starts from the beginning of the last message.) You can start an overwrite recording from the point where you stopped playback. 4 Stop playback. The unit plays back all the messages in green during...

Operating Instructions
Page 23
... in the menu, you can play back to OFF in the menu. 23GB END" flashes 3 times with a beep and the OPR indicator lights in a long recording. Basic Operations 1 When you play back a message repeatedly. To resume normal playback, set to STOP.
... in the menu, you can play back to OFF in the menu. 23GB END" flashes 3 times with a beep and the OPR indicator lights in a long recording. Basic Operations 1 When you play back a message repeatedly. To resume normal playback, set to STOP.
Operating Instructions
Page 24
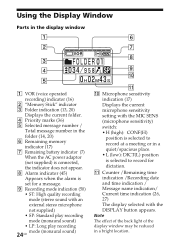
...window may be reduced in a quiet/spacious place. • L (low): DICT(L) position is selected to record for dictation. qa Counter /Remaining time indication /Recording date and time indication / Message name indication/ Current time indication (26, 27) The display selected with the...MIC SENS (microphone sensitivity) switch: • H (high): CONF(H) position is selected to record at a meeting or in a bright location. Using the Display Window Parts in the display window 1 VOR (voice operated recording) indicator (16) 2 "Memory Stick" indicator 3 Folder indication (13, 20) Displays the ...
...window may be reduced in a quiet/spacious place. • L (low): DICT(L) position is selected to record for dictation. qa Counter /Remaining time indication /Recording date and time indication / Message name indication/ Current time indication (26, 27) The display selected with the...MIC SENS (microphone sensitivity) switch: • H (high): CONF(H) position is selected to record at a meeting or in a bright location. Using the Display Window Parts in the display window 1 VOR (voice operated recording) indicator (16) 2 "Memory Stick" indicator 3 Folder indication (13, 20) Displays the ...


