Operating Instructions
Page 1
3-083-085-11 (1) Flash Operating Instructions GB Mode d'emploi FR Manual de instrucciones ES HVL-F32X Sony Corporation 2003 Printed in Japan
3-083-085-11 (1) Flash Operating Instructions GB Mode d'emploi FR Manual de instrucciones ES HVL-F32X Sony Corporation 2003 Printed in Japan
Operating Instructions
Page 2
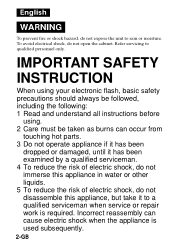
...INSTRUCTION When using your electronic flash, basic safety precautions should always be followed, including the following: 1 Read and understand all instructions before using. 2 Care must be taken as burns can cause electric shock when the appliance is required. Incorrect reassembly can occur from touching hot parts. 3 Do not operate... shock, do not disassemble this appliance, but take it to a qualified serviceman when service or repair work is used subsequently. 2-GB To avoid electrical shock, do not expose the unit to qualified personnel only. Refer servicing to rain or moisture...
...INSTRUCTION When using your electronic flash, basic safety precautions should always be followed, including the following: 1 Read and understand all instructions before using. 2 Care must be taken as burns can cause electric shock when the appliance is required. Incorrect reassembly can occur from touching hot parts. 3 Do not operate... shock, do not disassemble this appliance, but take it to a qualified serviceman when service or repair work is used subsequently. 2-GB To avoid electrical shock, do not expose the unit to qualified personnel only. Refer servicing to rain or moisture...

Operating Instructions
Page 3
... EMC regulations when used in this manual could void your authority to Part 15 of the FCC Rules. Increase the separation between the equipment and receiver. - Consult the dealer or an experienced radio/TV technician for a Class B digital device, pursuant to operate this equipment does... INSTRUCTIONS Note: This equipment has been tested and found to persons. Connect the equipment into an outlet on , the user is encouraged to try to correct the interference by turning the equipment off and on a circuit different from that interference will not occur in a residential installation....
... EMC regulations when used in this manual could void your authority to Part 15 of the FCC Rules. Increase the separation between the equipment and receiver. - Consult the dealer or an experienced radio/TV technician for a Class B digital device, pursuant to operate this equipment does... INSTRUCTIONS Note: This equipment has been tested and found to persons. Connect the equipment into an outlet on , the user is encouraged to try to correct the interference by turning the equipment off and on a circuit different from that interference will not occur in a residential installation....
Operating Instructions
Page 4
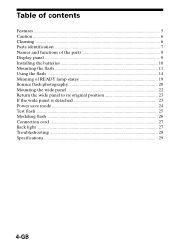
Table of contents Features ...5 Caution ...6 Cleaning ...6 Parts identification 7 Names and functions of the parts 8 Display panel ...9 Installing the batteries 10 Mounting the flash 11 Using the flash ...14 Meaning of READY lamp states 19 Bounce flash photography 20 Mounting the wide panel 22 Return the wide panel to its original position 23 If the wide panel is detached 23 Power save mode 24 Test flash ...25 Modeling flash ...26 Connection cord 27 Back light ...27 Troubleshooting 28 Specifications ...29 4-GB
Table of contents Features ...5 Caution ...6 Cleaning ...6 Parts identification 7 Names and functions of the parts 8 Display panel ...9 Installing the batteries 10 Mounting the flash 11 Using the flash ...14 Meaning of READY lamp states 19 Bounce flash photography 20 Mounting the wide panel 22 Return the wide panel to its original position 23 If the wide panel is detached 23 Power save mode 24 Test flash ...25 Modeling flash ...26 Connection cord 27 Back light ...27 Troubleshooting 28 Specifications ...29 4-GB
Operating Instructions
Page 5
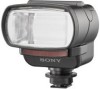
Features • This unit is exclusively for use with digital still cameras with an advanced accessory shoe or ACC terminal made by SONY. • Using its pre-flash function flash photographs with the correct exposure can be taken.* • With it's AF illuminator function the auto focus works even in dark locations.* * There are some types of digital still cameras with which this flash cannot be used. 5-GB
Features • This unit is exclusively for use with digital still cameras with an advanced accessory shoe or ACC terminal made by SONY. • Using its pre-flash function flash photographs with the correct exposure can be taken.* • With it's AF illuminator function the auto focus works even in dark locations.* * There are some types of digital still cameras with which this flash cannot be used. 5-GB
Operating Instructions
Page 6
...new batteries. Never use a cloth lightly dampened with a mild detergent solution, then wipe the unit clean with a dry soft cloth. For example, the number of flashes becomes lower than that exceed 40°C. Cleaning Remove this unit to a digital still camera while the power is ON, or disconnecting the connection cord while the power is ON can cause the flash... adversely affect the internal structure of stubborn stains, use strong solvents, such as thinner or benzine, as these damage the surface finish. 6-GB In case of video flash. (In particular, take care not to room ...
...new batteries. Never use a cloth lightly dampened with a mild detergent solution, then wipe the unit clean with a dry soft cloth. For example, the number of flashes becomes lower than that exceed 40°C. Cleaning Remove this unit to a digital still camera while the power is ON, or disconnecting the connection cord while the power is ON can cause the flash... adversely affect the internal structure of stubborn stains, use strong solvents, such as thinner or benzine, as these damage the surface finish. 6-GB In case of video flash. (In particular, take care not to room ...
Operating Instructions
Page 7
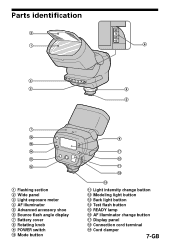
Mode button 9 qj q; qa qk ql qa Light intensity change button qs Modeling light button qd Back light button qf Test flash button qg READY lamp qh AF illuminator change button qj Display panel qk Connection cord terminal ql Cord clamper 7-GB Parts identification 2 1 6 4 3 8 5 7 qh qg qf qd qs 1 Flashing section 2 Wide panel 3 Light exposure meter 4 AF illuminator 5 Advanced accessory shoe 6 Bounce flash angle display 7 Battery cover 8 Rotating knob 9 POWER switch q;
Mode button 9 qj q; qa qk ql qa Light intensity change button qs Modeling light button qd Back light button qf Test flash button qg READY lamp qh AF illuminator change button qj Display panel qk Connection cord terminal ql Cord clamper 7-GB Parts identification 2 1 6 4 3 8 5 7 qh qg qf qd qs 1 Flashing section 2 Wide panel 3 Light exposure meter 4 AF illuminator 5 Advanced accessory shoe 6 Bounce flash angle display 7 Battery cover 8 Rotating knob 9 POWER switch q;
Operating Instructions
Page 8
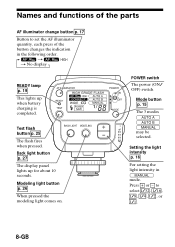
... light intensity p. 16 For setting the light intensity in the following order. Back light button p. 27 The display panel lights up when battery charging is completed. to set the AF illuminator quantity, each press of the button changes the indication in mode. Modeling light button p. 26 When pressed the modeling light comes on. Press + or - POWER switch The power (ON/ OFF) switch Mode button p. 15 The 3 modes Test flash...
... light intensity p. 16 For setting the light intensity in the following order. Back light button p. 27 The display panel lights up when battery charging is completed. to set the AF illuminator quantity, each press of the button changes the indication in mode. Modeling light button p. 26 When pressed the modeling light comes on. Press + or - POWER switch The power (ON/ OFF) switch Mode button p. 15 The 3 modes Test flash...

Operating Instructions
Page 10
Inserting the batteries with the poles in the directions marked inside the battery case. 3 Slide back the battery cover to close. 2 1 3 PNotes • Be sure to use four batteries of the same type. • Be sure to open. 2 Insert the four batteries in the wrong direction may cause leakage or ruptures. 10-GB Installing the batteries Use four AA alkali dry batteries. 1 Slide the battery cover to confirm the 3 # poles of the batteries.
Inserting the batteries with the poles in the directions marked inside the battery case. 3 Slide back the battery cover to close. 2 1 3 PNotes • Be sure to use four batteries of the same type. • Be sure to open. 2 Insert the four batteries in the wrong direction may cause leakage or ruptures. 10-GB Installing the batteries Use four AA alkali dry batteries. 1 Slide the battery cover to confirm the 3 # poles of the batteries.

Operating Instructions
Page 11
.... Mounting the flash 1 When using the digital still camera which is compatible with the flashing section facing forward. * Be sure that the POWER switch is not fully lowered then this unit may fall down. * When attaching or removing this unit into the accessory shoe towards the front, with the advanced accessory shoe Flashing section 2 1 3 The lock pin moves up and down by turning the...
.... Mounting the flash 1 When using the digital still camera which is compatible with the flashing section facing forward. * Be sure that the POWER switch is not fully lowered then this unit may fall down. * When attaching or removing this unit into the accessory shoe towards the front, with the advanced accessory shoe Flashing section 2 1 3 The lock pin moves up and down by turning the...
Operating Instructions
Page 12
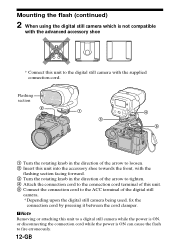
.... PNote Removing or attaching this unit to a digital still camera while the power is ON, or disconnecting the connection cord while the power is not compatible with the advanced accessory shoe * Connect this unit. 5 Connect the connection cord to the ACC terminal of this unit to the digital still camera with the flashing section facing forward. 3 Turn the rotating knob in the direction...
.... PNote Removing or attaching this unit to a digital still camera while the power is ON, or disconnecting the connection cord while the power is not compatible with the advanced accessory shoe * Connect this unit. 5 Connect the connection cord to the ACC terminal of this unit to the digital still camera with the flashing section facing forward. 3 Turn the rotating knob in the direction...
Operating Instructions
Page 14
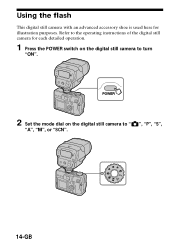
Using the flash This digital still camera with an advanced accessory shoe is used here for each detailed operation. 1 Press the POWER switch on the digital still camera to turn "ON". 2 Set the mode dial on the digital still camera to " ", "P", "S", "A", "M", or "SCN". 14-GB Refer to the operating instructions of the digital still camera for illustration purposes.
Using the flash This digital still camera with an advanced accessory shoe is used here for each detailed operation. 1 Press the POWER switch on the digital still camera to turn "ON". 2 Set the mode dial on the digital still camera to " ", "P", "S", "A", "M", or "SCN". 14-GB Refer to the operating instructions of the digital still camera for illustration purposes.
Operating Instructions
Page 15
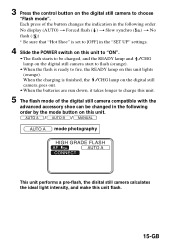
... This unit performs a pre-flash, the disital still camera calculates the ideal light intensity, and make this unit flash. 15-GB Each press of the digital still camera compatible with the advanced accessory shoe can be charged, and the READY lamp and /CHG lamp on the digital still camera start to flash (orange). • When the flash is set to [OFF] in the "SET UP" settings. 4 Slide the POWER...
... This unit performs a pre-flash, the disital still camera calculates the ideal light intensity, and make this unit flash. 15-GB Each press of the digital still camera compatible with the advanced accessory shoe can be charged, and the READY lamp and /CHG lamp on the digital still camera start to flash (orange). • When the flash is set to [OFF] in the "SET UP" settings. 4 Slide the POWER...
Operating Instructions
Page 16
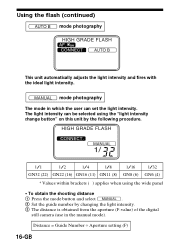
...) GN11 (8) GN8 (6) GN6 (4) * Values within brackets ( ) applies when using the wide panel • To obtain the shooting distance 1 Press the mode button and select . 2 Set the guide number by changing the light intensity. 3 The distance is obtained from the aperture (F-value) of the digital still camera (use in the manual mode). The light intensity can set the light intensity. Distance = Guide Number ÷ Aperture setting (F) 16-GB
...) GN11 (8) GN8 (6) GN6 (4) * Values within brackets ( ) applies when using the wide panel • To obtain the shooting distance 1 Press the mode button and select . 2 Set the guide number by changing the light intensity. 3 The distance is obtained from the aperture (F-value) of the digital still camera (use in the manual mode). The light intensity can set the light intensity. Distance = Guide Number ÷ Aperture setting (F) 16-GB
Operating Instructions
Page 17
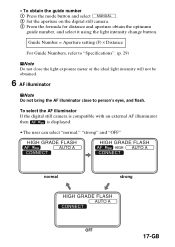
... the AF illuminator If the digital still camera is compatible with an external AF illuminator then is displayed. • The user can select "normal," "strong" and "OFF" normal strong OFF 17-GB Guide Number = Aperture setting (F) × Distance For Guide Numbers, refer to "Specifications". (p. 29) PNote Do not close the light exposure meter or the ideal light intensity will not be obtained. 6 AF illuminator PNote Do...
... the AF illuminator If the digital still camera is compatible with an external AF illuminator then is displayed. • The user can select "normal," "strong" and "OFF" normal strong OFF 17-GB Guide Number = Aperture setting (F) × Distance For Guide Numbers, refer to "Specifications". (p. 29) PNote Do not close the light exposure meter or the ideal light intensity will not be obtained. 6 AF illuminator PNote Do...
Operating Instructions
Page 18
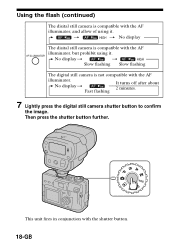
... flashing Slow flashing The digital still camera is compatible with the AF illuminator, and allow of using it . No display t Fast flashing It turns off after about 2 minutes. 7 Lightly press the digital still camera shutter button to confirm the image. Using the flash (continued) The disital still camera is not compatible with the AF illuminator. t t No display The disital still camera is compatible with the shutter button. 18-GB This unit fires...
... flashing Slow flashing The digital still camera is compatible with the AF illuminator, and allow of using it . No display t Fast flashing It turns off after about 2 minutes. 7 Lightly press the digital still camera shutter button to confirm the image. Using the flash (continued) The disital still camera is not compatible with the AF illuminator. t t No display The disital still camera is compatible with the shutter button. 18-GB This unit fires...

Operating Instructions
Page 25
Test flash Manually operated flash The procedure varies depending upon the flash mode on this unit. • When using , or only this unit. The test flash can be used in all modes while the READY lamp is lighting. • Fire the flash with a specific light intensity (Guide Number equivalent to 11), when using Operate the flash with a user-determined light intensity. 25-GB
Test flash Manually operated flash The procedure varies depending upon the flash mode on this unit. • When using , or only this unit. The test flash can be used in all modes while the READY lamp is lighting. • Fire the flash with a specific light intensity (Guide Number equivalent to 11), when using Operate the flash with a user-determined light intensity. 25-GB

Operating Instructions
Page 27
... seconds after it lights. 3 If other button operations are made while lighting, it extends for 10 seconds. 27-GB Connection cord When the digital still camera is not compatible with the advanced accessory shoe, connect the connection cord to the digital still camera. 1 2 3 Connection method Connect 1 to the connection cord terminal of this unit to a digital still camera while the power is ON...
... seconds after it lights. 3 If other button operations are made while lighting, it extends for 10 seconds. 27-GB Connection cord When the digital still camera is not compatible with the advanced accessory shoe, connect the connection cord to the digital still camera. 1 2 3 Connection method Connect 1 to the connection cord terminal of this unit to a digital still camera while the power is ON...

Operating Instructions
Page 28
...; Make sure that this unit is properly inserted into the advanced accessory shoe, or the connection cord is properly attached to this instruction manual. • The flash does not fire if the subject is not fired. Troubleshooting Symptom Remedy The flash does not work • Make sure that the POWER switch on the digital still camera, flash is bright with the digital still camera in the AUTO mode...
...; Make sure that this unit is properly inserted into the advanced accessory shoe, or the connection cord is properly attached to this instruction manual. • The flash does not fire if the subject is not fired. Troubleshooting Symptom Remedy The flash does not work • Make sure that the POWER switch on the digital still camera, flash is bright with the digital still camera in the AUTO mode...

Operating Instructions
Page 29
... 8 1/16 8 6 1/32 6 4 Auto effective distance *ISO. 100. m Light intensity 35 mm camera 28 mm camera conversion conversion (using a new battery at 20°C) Dimensions About 77 × 91 × 99 mm (About 3 1/8 × 3 5/8 × 4 inches) (w/h/d) (Projections are not included in the dimensions) Mass About 260 g (9.2 oz.) Supplied accessory Shoe adaptor (1) Connection cord (1) Pouch (1) Warranty (1) Operating Instructions (1) Design and specifications are subject...
... 8 1/16 8 6 1/32 6 4 Auto effective distance *ISO. 100. m Light intensity 35 mm camera 28 mm camera conversion conversion (using a new battery at 20°C) Dimensions About 77 × 91 × 99 mm (About 3 1/8 × 3 5/8 × 4 inches) (w/h/d) (Projections are not included in the dimensions) Mass About 260 g (9.2 oz.) Supplied accessory Shoe adaptor (1) Connection cord (1) Pouch (1) Warranty (1) Operating Instructions (1) Design and specifications are subject...


