User Manual
Page 2
...EUROPE ATTENTION The electromagnetic fields at the specific frequencies may result. By ensuring this product is fitted to this equipment for your nearest Sony service station. If the plug supplied with this equipment has a detachable fuse cover, be treated as the supplied one and approved ...of this product. Never use mini DV cassettes marked with separate collection systems) This symbol on the product or on use in your camcorder There are incompatible (p. 102). Applicable Accessory: Remote Commander Notes on its packaging indicates that this product shall not be sure to ...
...EUROPE ATTENTION The electromagnetic fields at the specific frequencies may result. By ensuring this product is fitted to this equipment for your nearest Sony service station. If the plug supplied with this equipment has a detachable fuse cover, be treated as the supplied one and approved ...of this product. Never use mini DV cassettes marked with separate collection systems) This symbol on the product or on use in your camcorder There are incompatible (p. 102). Applicable Accessory: Remote Commander Notes on its packaging indicates that this product shall not be sure to ...

User Manual
Page 3
...Stick" compatible equipment Be sure to insert the "Memory Stick Duo" into the Memory Stick Duo Adaptor. "Memory Stick" (You cannot use it in your camcorder.) Lens hood b Note • You cannot use any type of memory card except "Memory Stick Duo." • "Memory Stick PRO" and "Memory ...; Do not attach a label or the like on a "Memory Stick Duo" or a Memory Stick Duo Adaptor. When using a "Memory Stick Duo" with your camcorder. Continued , 3 "Memory Stick Duo" (This size can be sure to insert the connector plug the correct way, and not forcibly to avoid damaging the terminal...
...Stick" compatible equipment Be sure to insert the "Memory Stick Duo" into the Memory Stick Duo Adaptor. "Memory Stick" (You cannot use it in your camcorder.) Lens hood b Note • You cannot use any type of memory card except "Memory Stick Duo." • "Memory Stick PRO" and "Memory ...; Do not attach a label or the like on a "Memory Stick Duo" or a Memory Stick Duo Adaptor. When using a "Memory Stick Duo" with your camcorder. Continued , 3 "Memory Stick Duo" (This size can be sure to insert the connector plug the correct way, and not forcibly to avoid damaging the terminal...

User Manual
Page 4
... used for the contents of recordings cannot be provided, even if recording or playback is not possible due to playing them back on this camcorder prior to a malfunction of tapes by playing them back on the LCD screen and the viewfinder. Check the contents of the... in color) that can be used when USB cable is connected. On playing back HDV tapes on mini DV players. Doing so might cause your camcorder if necessary (p. 71). • Design and specifications of time may be contrary to direct sunlight for effective use. Change the screen language before using...
... used for the contents of recordings cannot be provided, even if recording or playback is not possible due to playing them back on this camcorder prior to a malfunction of tapes by playing them back on the LCD screen and the viewfinder. Check the contents of the... in color) that can be used when USB cable is connected. On playing back HDV tapes on mini DV players. Doing so might cause your camcorder if necessary (p. 71). • Design and specifications of time may be contrary to direct sunlight for effective use. Change the screen language before using...

User Manual
Page 5
It adopts the MTF measurement system for your camcorder is equipped with a Carl Zeiss lens, which was developed jointly by Carl Zeiss, in Germany, and Sony Corporation, and produces superior images. MTF= Modulation Transfer Function. Also, the lens for video cameras and offers a quality typical of light from a subject coming into the lens. 5 The number value indicates the amount of a Carl Zeiss lens. About the Carl Zeiss lens Your camcorder is T -coated to suppress unwanted reflections and faithfully reproduce colors.
It adopts the MTF measurement system for your camcorder is equipped with a Carl Zeiss lens, which was developed jointly by Carl Zeiss, in Germany, and Sony Corporation, and produces superior images. MTF= Modulation Transfer Function. Also, the lens for video cameras and offers a quality typical of light from a subject coming into the lens. 5 The number value indicates the amount of a Carl Zeiss lens. About the Carl Zeiss lens Your camcorder is T -coated to suppress unwanted reflections and faithfully reproduce colors.

User Manual
Page 6
... 13 Step 2: Attaching the lens hood with lens cover 14 Step 3: Charging the battery pack 15 Step 4:Turning the power on and holding your camcorder properly ...... 18 Step 5: Adjusting the LCD panel and viewfinder 19 Step 6: Setting the date and time 21 Step 7: Inserting a tape or a... "Memory Stick Duo 23 Recording/Playback Recording 25 Playback 28 Changing the settings of your camcorder recordings 30 Adjusting the zoom 30 Adjusting the focus manually 31 Adjusting the EXPOSURE/IRIS 32 Adjusting to Natural Color (White balance 35 Customizing ...
... 13 Step 2: Attaching the lens hood with lens cover 14 Step 3: Charging the battery pack 15 Step 4:Turning the power on and holding your camcorder properly ...... 18 Step 5: Adjusting the LCD panel and viewfinder 19 Step 6: Setting the date and time 21 Step 7: Inserting a tape or a... "Memory Stick Duo 23 Recording/Playback Recording 25 Playback 28 Changing the settings of your camcorder recordings 30 Adjusting the zoom 30 Adjusting the focus manually 31 Adjusting the EXPOSURE/IRIS 32 Adjusting to Natural Color (White balance 35 Customizing ...

User Manual
Page 7
... 83 Copying movies on a TV 48 Using the Menu Using the menu items 53 Menu items 54 (CAMERA SET) menu 56 Settings to adjust your camcorder to a computer 86 Continued , 7 Locating a scene on a tape 46 Searching quickly for a desired scene (Zero set memory 46 Searching for a scene by date of the...
... 83 Copying movies on a TV 48 Using the Menu Using the menu items 53 Menu items 54 (CAMERA SET) menu 56 Settings to adjust your camcorder to a computer 86 Continued , 7 Locating a scene on a tape 46 Searching quickly for a desired scene (Zero set memory 46 Searching for a scene by date of the...

User Manual
Page 8
Troubleshooting Troubleshooting 89 Warning indicators and messages 98 Additional Information Using your camcorder abroad 101 HDV format and recording/playback 102 About the "Memory Stick 103 About the "InfoLITHIUM" battery pack 105 About i.LINK 107 Maintenance and precautions 108 Specifications 112 Quick Reference Identifying parts and controls 116 Indicators for the LCD screen and viewfinder 121 Index ...124 8
Troubleshooting Troubleshooting 89 Warning indicators and messages 98 Additional Information Using your camcorder abroad 101 HDV format and recording/playback 102 About the "Memory Stick 103 About the "InfoLITHIUM" battery pack 105 About i.LINK 107 Maintenance and precautions 108 Specifications 112 Quick Reference Identifying parts and controls 116 Indicators for the LCD screen and viewfinder 121 Index ...124 8

User Manual
Page 9
...format video. • The down convert function converts pictures in HDV format to SD (standard definition) quality for playback or editing when your camcorder is not available. Being HDV format compliant, your life in high quality digital HDV format, allowing you will be able to capture important ...digital video, like the rest of the world, you to shoot crystal clear, high-definition images. What is ready to relive them. Your camcorder's down convert function converts HDV format video to DV for viewing on older wide TV formats, and on popular DV standard cassette tapes. •...
...format video. • The down convert function converts pictures in HDV format to SD (standard definition) quality for playback or editing when your camcorder is not available. Being HDV format compliant, your life in high quality digital HDV format, allowing you will be able to capture important ...digital video, like the rest of the world, you to shoot crystal clear, high-definition images. What is ready to relive them. Your camcorder's down convert function converts HDV format video to DV for viewing on older wide TV formats, and on popular DV standard cassette tapes. •...
User Manual
Page 10
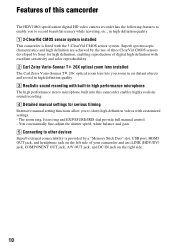
...manual control. - Superb spectroscopic characteristics and high definition are achieved by the use of three ClearVid CMOS sensors developed by Sony for high definition, enabling reproduction of digital high definition with excellent sensitivity and color reproducibility. 2 Carl Zeiss Vario-Sonnar... definition quality. 3 Realistic sound recording with built-in high performance microphone The high performance stereo microphone built into this camcorder enables highly realistic sound recording. 4 Detailed manual settings for serious filming Extensive manual setting functions allow you to record ...
...manual control. - Superb spectroscopic characteristics and high definition are achieved by the use of three ClearVid CMOS sensors developed by Sony for high definition, enabling reproduction of digital high definition with excellent sensitivity and color reproducibility. 2 Carl Zeiss Vario-Sonnar... definition quality. 3 Realistic sound recording with built-in high performance microphone The high performance stereo microphone built into this camcorder enables highly realistic sound recording. 4 Detailed manual settings for serious filming Extensive manual setting functions allow you to record ...

User Manual
Page 11
Smooth slow recording (p. 56) Moving subjects can be shot in your camcorder. EXPOSURE/IRIS dial (p. 32) You can be used to quickly reproduce suitable shooting settings. This enables you to use saved settings data to adjust [EXPOSURE], [...
Smooth slow recording (p. 56) Moving subjects can be shot in your camcorder. EXPOSURE/IRIS dial (p. 32) You can be used to quickly reproduce suitable shooting settings. This enables you to use saved settings data to adjust [EXPOSURE], [...

User Manual
Page 12
x Copying movie from copying movie. See page 86 for playback on a 16:9 TV/4:3 TV (p. 48) Your camcorder can down convert video recorded in the HDV format can copy movie to a computer, and save to DVD from tape to copy ... a conventional TV. Connecting to a computer (p. 83) x Copying "Memory Stick Duo" still images to enable copying. x Connecting to HDV1080i non-compliant specification Use your camcorder to convert HDV format video to SD (standard definition) quality to a computer. Dubbing to other video equipment (p. 73) x Connecting to an HDV1080i specification An optional...
x Copying movie from copying movie. See page 86 for playback on a 16:9 TV/4:3 TV (p. 48) Your camcorder can down convert video recorded in the HDV format can copy movie to a computer, and save to DVD from tape to copy ... a conventional TV. Connecting to a computer (p. 83) x Copying "Memory Stick Duo" still images to enable copying. x Connecting to HDV1080i non-compliant specification Use your camcorder to convert HDV format video to SD (standard definition) quality to a computer. Dubbing to other video equipment (p. 73) x Connecting to an HDV1080i specification An optional...

User Manual
Page 13
...AC Adaptor (1) (p. 15) Large eyecup(1) (p. 20) Rechargeable battery pack NP-F570 (1) (p. 15, 105) Mains lead (1) (p. 15) Lens hood with your camcorder. The number in the parentheses indicates the number of that you have following items supplied with lens cover (1) (p. 14) Getting Started Wireless Remote Commander (1) (p. 120... is already installed. See page 23, 102 and 103 for compatible cassettes and "Memory Stick Duo" for your camcorder. Getting Started Step 1: Checking supplied items Make sure that item supplied. • The cassette tape and "Memory Stick Duo" are not included...
...AC Adaptor (1) (p. 15) Large eyecup(1) (p. 20) Rechargeable battery pack NP-F570 (1) (p. 15, 105) Mains lead (1) (p. 15) Lens hood with your camcorder. The number in the parentheses indicates the number of that you have following items supplied with lens cover (1) (p. 14) Getting Started Wireless Remote Commander (1) (p. 120... is already installed. See page 23, 102 and 103 for compatible cassettes and "Memory Stick Duo" for your camcorder. Getting Started Step 1: Checking supplied items Make sure that item supplied. • The cassette tape and "Memory Stick Duo" are not included...

User Manual
Page 14
... the marks on the lens hood to open or close the lens cover. 14 Move the lens cover lever to OPEN to those on the camcorder, and turn the lens hood in the opposite direction of the arrow in the direction of the Lens hood with lens cover Loosen the lens...
... the marks on the lens hood to open or close the lens cover. 14 Move the lens cover lever to OPEN to those on the camcorder, and turn the lens hood in the opposite direction of the arrow in the direction of the Lens hood with lens cover Loosen the lens...

User Manual
Page 15
... • You cannot use batteries other than the "InfoLITHIUM" battery pack (L series) (p. 105). 2 With the B mark on your camcorder. B mark DC plug DC IN jack AC Adaptor To the wall socket Mains lead 1 Press the battery pack and slide it down. 3 Connect the Mains ...
... • You cannot use batteries other than the "InfoLITHIUM" battery pack (L series) (p. 105). 2 With the B mark on your camcorder. B mark DC plug DC IN jack AC Adaptor To the wall socket Mains lead 1 Press the battery pack and slide it down. 3 Connect the Mains ...

User Manual
Page 17
...550 830 830 * When the LCD backlight turns on the conditions under the following conditions. - The battery pack is recommended that you use your camcorder is turned off, AC power (Mains lead) is damaged. - Playing time Approximate time (min.) available when you use the AC Adaptor to... obtain AC. PRECAUTION • Even if your camcorder. On the battery pack • Before changing the battery pack, slide the POWER switch to OFF (CHG). • The CHARGE lamp flashes during ...
...550 830 830 * When the LCD backlight turns on the conditions under the following conditions. - The battery pack is recommended that you use your camcorder is turned off, AC power (Mains lead) is damaged. - Playing time Approximate time (min.) available when you use the AC Adaptor to... obtain AC. PRECAUTION • Even if your camcorder. On the battery pack • Before changing the battery pack, slide the POWER switch to OFF (CHG). • The CHARGE lamp flashes during ...

User Manual
Page 18
... current date and time will be displayed on the LCD screen for the first time, [CLOCK SET] screen appears (p. 21). 2 Hold the camcorder properly. b Note • After you have set the date and time ([CLOCK SET], p. 21), the next time you turn off the power Slide the POWER ...switch to OFF (CHG). b Note • If warning messages appear on the power of your camcorder properly To record or play or edit pictures. If the POWER switch is set the POWER switch. 3 Ensure a good grip, then fasten the grip belt...
... current date and time will be displayed on the LCD screen for the first time, [CLOCK SET] screen appears (p. 21). 2 Hold the camcorder properly. b Note • After you have set the date and time ([CLOCK SET], p. 21), the next time you turn off the power Slide the POWER ...switch to OFF (CHG). b Note • If warning messages appear on the power of your camcorder properly To record or play or edit pictures. If the POWER switch is set the POWER switch. 3 Ensure a good grip, then fasten the grip belt...

User Manual
Page 19
This setting is practical when you use your camcorder in bright conditions or where you can adjust the brightness of the viewfinder backlight from the position 1, you want to adjust the brightness of the .... Getting Started Step 5: Adjusting the LCD panel and viewfinder The LCD panel Open the LCD panel while pressing the OPEN button 90 degrees to the camcorder (1), then rotate it until disappears. The viewfinder You can view pictures using the viewfinder to record or play (2). OPEN button 190 degrees to the...
This setting is practical when you use your camcorder in bright conditions or where you can adjust the brightness of the viewfinder backlight from the position 1, you want to adjust the brightness of the .... Getting Started Step 5: Adjusting the LCD panel and viewfinder The LCD panel Open the LCD panel while pressing the OPEN button 90 degrees to the camcorder (1), then rotate it until disappears. The viewfinder You can view pictures using the viewfinder to record or play (2). OPEN button 190 degrees to the...

User Manual
Page 21
... set the date and time again (p. 110). You can set the date and time, [CLOCK SET] screen appears every time you do not use your camcorder or change the POWER switch position. Getting Started Step 6: Setting the date and time Set the date and time when using this... camcorder for about 3 months, the built-in rechargeable battery gets discharged and the date and time settings may be cleared from the memory. If you turn on your camcorder for the first time.
... set the date and time again (p. 110). You can set the date and time, [CLOCK SET] screen appears every time you do not use your camcorder or change the POWER switch position. Getting Started Step 6: Setting the date and time Set the date and time when using this... camcorder for about 3 months, the built-in rechargeable battery gets discharged and the date and time settings may be cleared from the memory. If you turn on your camcorder for the first time.

User Manual
Page 24
... Duo" from popping out and dropping. 24 To eject a "Memory Stick Duo" Lightly push the "Memory Stick Duo" once. Do not shake or knock your camcorder is reading/writing data. Step 7: Inserting a tape or a "Memory Stick Duo" (Continued) 2 Insert the "Memory Stick Duo" into the slot in the right ...direction until it clicks. b Notes • When the access lamp is lit or flashing, your camcorder, turn the power off, eject the "Memory Stick Duo," or remove the battery pack. Access lamp b Note • If you insert the "Memory Stick...
... Duo" from popping out and dropping. 24 To eject a "Memory Stick Duo" Lightly push the "Memory Stick Duo" once. Do not shake or knock your camcorder is reading/writing data. Step 7: Inserting a tape or a "Memory Stick Duo" (Continued) 2 Insert the "Memory Stick Duo" into the slot in the right ...direction until it clicks. b Notes • When the access lamp is lit or flashing, your camcorder, turn the power off, eject the "Memory Stick Duo," or remove the battery pack. Access lamp b Note • If you insert the "Memory Stick...

User Manual
Page 25
.../Playback Recording/Playback Recording REC START/STOP button B PHOTO/EXPANDED FOCUS button Rec lamp Rec lamp Lens hood POWER switch REC START/STOP button A This camcorder records movies on tape and still images on "Memory Stick Duo". If the POWER switch is below. • This... camcorder can record movies in either HDV or DV format. The factory setting is HDV format ([REC FORMAT] p. 66). 1 Open the shutter of the lens hood. 2 ...
.../Playback Recording/Playback Recording REC START/STOP button B PHOTO/EXPANDED FOCUS button Rec lamp Rec lamp Lens hood POWER switch REC START/STOP button A This camcorder records movies on tape and still images on "Memory Stick Duo". If the POWER switch is below. • This... camcorder can record movies in either HDV or DV format. The factory setting is HDV format ([REC FORMAT] p. 66). 1 Open the shutter of the lens hood. 2 ...


