Operating Guide
Page 5
Notes HDR-SR5, HDR-SR7 and HDR-SR8 are recorded without any changes or modifications not expressly approved in ...mechanical shock or vibration to the camcorder. • When connecting your authority to operate this manual could void your camcorder to correct the interference by one or more of recordings cannot be used with the Handycam Station Model DCRAC181 and AC ... other materials may cause undesired operation. For the State of Conformity Trade Name: SONY Model No.: HDR-SR8 Responsible Party: Sony Electronics Inc. special handling may result in a residential installation.
Notes HDR-SR5, HDR-SR7 and HDR-SR8 are recorded without any changes or modifications not expressly approved in ...mechanical shock or vibration to the camcorder. • When connecting your authority to operate this manual could void your camcorder to correct the interference by one or more of recordings cannot be used with the Handycam Station Model DCRAC181 and AC ... other materials may cause undesired operation. For the State of Conformity Trade Name: SONY Model No.: HDR-SR8 Responsible Party: Sony Electronics Inc. special handling may result in a residential installation.
Operating Guide
Page 6
...800 feet). About this manual • The images of the viewfinder (HDR-SR7/SR8) and the LCD screen used for illustration purposes are based on the camcorder, due to your camcorder may not operate correctly. The scenes may vary depending on the camcorder in this manual for illustrating the operating ... high altitudes • Do not turn on the operating system of the computer. * Refer also to prevent the recovery of your image data periodically, after recording. Note on using a VCR, or a DVD/HDD recorder*. • It is activated by dropping, the camcorder has the drop sensor...
...800 feet). About this manual • The images of the viewfinder (HDR-SR7/SR8) and the LCD screen used for illustration purposes are based on the camcorder, due to your camcorder may not operate correctly. The scenes may vary depending on the camcorder in this manual for illustrating the operating ... high altitudes • Do not turn on the operating system of the computer. * Refer also to prevent the recovery of your image data periodically, after recording. Note on using a VCR, or a DVD/HDD recorder*. • It is activated by dropping, the camcorder has the drop sensor...

Operating Guide
Page 8
...(1) (p. 9) Rechargeable battery pack NP-FH60 (1) (p. 9) Component video cable (1) (p. 16) A/V connecting cable (1) (p. 16) USB cable (1) (p. 30) CD-ROM "Handycam Application Software" (1) (p. 26) - Handycam Handbook (PDF) "Operating Guide" (This manual) (1) 8 Picture Motion Browser (Software) - AC Adaptor (1) (p. 9) Wireless Remote Commander (1) A button-type lithium battery is already installed. Getting Started Step 1: Checking supplied...Motion Browser Guide - The number in the parentheses indicates the number of that you have the following items supplied with your camcorder.
...(1) (p. 9) Rechargeable battery pack NP-FH60 (1) (p. 9) Component video cable (1) (p. 16) A/V connecting cable (1) (p. 16) USB cable (1) (p. 30) CD-ROM "Handycam Application Software" (1) (p. 26) - Handycam Handbook (PDF) "Operating Guide" (This manual) (1) 8 Picture Motion Browser (Software) - AC Adaptor (1) (p. 9) Wireless Remote Commander (1) A button-type lithium battery is already installed. Getting Started Step 1: Checking supplied...Motion Browser Guide - The number in the parentheses indicates the number of that you have the following items supplied with your camcorder.
Operating Guide
Page 16
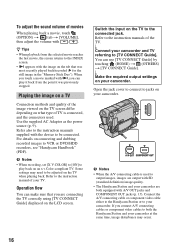
...output with SD (standard definition) image quality. • The Handycam Station and your camcorder are connecting the TV correctly using [TV CONNECT Guide] displayed on the TV when playing back. r Connect your camcorder and TV referring to the instruction manual of your camcorder. b Notes •...; When the A/V connecting cable is connected, and the connectors used to VCR or DVD/HDD recorders, see "Handycam Handbook" (PDF). z Tips • When...
...output with SD (standard definition) image quality. • The Handycam Station and your camcorder are connecting the TV correctly using [TV CONNECT Guide] displayed on the TV when playing back. r Connect your camcorder and TV referring to the instruction manual of your camcorder. b Notes •...; When the A/V connecting cable is connected, and the connectors used to VCR or DVD/HDD recorders, see "Handycam Handbook" (PDF). z Tips • When...
Operating Guide
Page 19
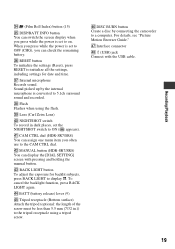
... (HDR-SR7/SR8) You can display the [DIAL SETTING] screen with the USB cable. 19 rj Interface connector rk (USB) jack Connect with pressing and holding the manual button. Sound picked up by connecting the camcorder to initialize all the settings, including settings for backlit subjects, press BACK LIGHT... to ON ( appears). ra CAM CTRL dial (HDR-SR7/SR8) You can assign one menu item you...
... (HDR-SR7/SR8) You can display the [DIAL SETTING] screen with the USB cable. 19 rj Interface connector rk (USB) jack Connect with pressing and holding the manual button. Sound picked up by connecting the camcorder to initialize all the settings, including settings for backlit subjects, press BACK LIGHT... to ON ( appears). ra CAM CTRL dial (HDR-SR7/SR8) You can assign one menu item you...
Operating Guide
Page 21
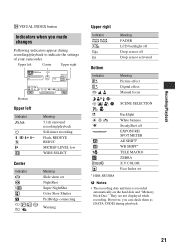
...[DATA CODE] during recording/playback to indicate the settings of your camcorder. However, you made changes Following indicators appear during playback. 21 n Backlight White balance SteadyShot off Drop sensor activated Meaning Picture effect Digital effect Manual focus SCENE SELECTION . They are not displayed while recording. Upper ... LCD backlight off Drop sensor off EXPOSURE/ SPOT METER AE SHIFT* WB SHIFT* TELE MACRO ZEBRA X.V.COLOR Face Index set * HDR-SR7/SR8 b Notes • The recording date and time is recorded automatically on the hard disk and "Memory Stick Duo."
...[DATA CODE] during recording/playback to indicate the settings of your camcorder. However, you made changes Following indicators appear during playback. 21 n Backlight White balance SteadyShot off Drop sensor activated Meaning Picture effect Digital effect Manual focus SCENE SELECTION . They are not displayed while recording. Upper ... LCD backlight off Drop sensor off EXPOSURE/ SPOT METER AE SHIFT* WB SHIFT* TELE MACRO ZEBRA X.V.COLOR Face Index set * HDR-SR7/SR8 b Notes • The recording date and time is recorded automatically on the hard disk and "Memory Stick Duo."
Operating Guide
Page 39
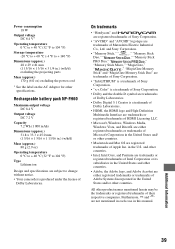
... license of Dolby Laboratories. On trademarks • "Handycam" and are registered trademarks of Sony Corporation. • "AVCHD" and "AVCHD" logotype are registered trademarks of Apple Inc. All other... without notice. • Your camcorder is a trademark of Dolby Laboratories. • HDMI, the HDMI logo and High-Definition Multimedia Interface are trademarks or registered...8482; and "®" are either registered trademarks or trademarks of Microsoft Corporation in this manual. Rechargeable battery pack NP-FH60 Maximum output voltage DC 8.4 V Output voltage DC 7.2 ...
... license of Dolby Laboratories. On trademarks • "Handycam" and are registered trademarks of Sony Corporation. • "AVCHD" and "AVCHD" logotype are registered trademarks of Apple Inc. All other... without notice. • Your camcorder is a trademark of Dolby Laboratories. • HDMI, the HDMI logo and High-Definition Multimedia Interface are trademarks or registered...8482; and "®" are either registered trademarks or trademarks of Microsoft Corporation in this manual. Rechargeable battery pack NP-FH60 Maximum output voltage DC 8.4 V Output voltage DC 7.2 ...

Handycam® Handbook
Page 6
... with ease (Easy Handycam operation) ....... 23 Recording 27 Zooming 29 Recording sound with the CAM CTRL dial (HDR-SR7/SR8 33 Playback...32 Controlling the image settings manually with more presence (5.1ch surround recording 29 Using the flash 30 Recording high quality still images during movie ... language setting ... 21 Step 4: Making setting adjustments before operating your camcorder 2 Notes on a TV 39 Saving images 45 Editing (OTHERS)...VCR or DVD/HDD recorders 53 Printing recorded images (PictBridge compliant printer 54 Utilizing recording media (MANAGE HDD/MEMORY) category 57...
... with ease (Easy Handycam operation) ....... 23 Recording 27 Zooming 29 Recording sound with the CAM CTRL dial (HDR-SR7/SR8 33 Playback...32 Controlling the image settings manually with more presence (5.1ch surround recording 29 Using the flash 30 Recording high quality still images during movie ... language setting ... 21 Step 4: Making setting adjustments before operating your camcorder 2 Notes on a TV 39 Saving images 45 Editing (OTHERS)...VCR or DVD/HDD recorders 53 Printing recorded images (PictBridge compliant printer 54 Utilizing recording media (MANAGE HDD/MEMORY) category 57...

Handycam® Handbook
Page 9
... abbreviated as "AVCHD" in this manual, except when it must be described in more detail. 9 Enjoying your camcorder Enjoying your camcorder (p. 27). • Movies are recorded on the hard disk, and still images are recorded on either the hard disk or a "Memory Stick Duo." • You can select the image quality: HD (high definition) image quality...
... abbreviated as "AVCHD" in this manual, except when it must be described in more detail. 9 Enjoying your camcorder Enjoying your camcorder (p. 27). • Movies are recorded on the hard disk, and still images are recorded on either the hard disk or a "Memory Stick Duo." • You can select the image quality: HD (high definition) image quality...

Handycam® Handbook
Page 31
...or other objects. • Remove the conversion lens (optional). • Adjust the focus manually ([FOCUS], p. 78) when it clicks. • You can record still images during recording standby in bright places. Your camcorder returns to ON ( appears). Recording still images on . This may be damaged. Do ...the recording media of still images to save still images, then touch . b Notes • When the ACCESS lamp is lit or flashing, your camcorder, turn the power off, eject the "Memory Stick Duo," or remove the battery pack. For details, see page 68. 3 Recording in dark ...
...or other objects. • Remove the conversion lens (optional). • Adjust the focus manually ([FOCUS], p. 78) when it clicks. • You can record still images during recording standby in bright places. Your camcorder returns to ON ( appears). Recording still images on . This may be damaged. Do ...the recording media of still images to save still images, then touch . b Notes • When the ACCESS lamp is lit or flashing, your camcorder, turn the power off, eject the "Memory Stick Duo," or remove the battery pack. For details, see page 68. 3 Recording in dark ...

Handycam® Handbook
Page 33
... (HOME) t (SETTINGS) t [MOVIE SETTINGS]/ [PHOTO SETTINGS] t [DIAL SETTING] (p. 67). 33 Recording/Playback The [DIAL SETTING] screen appears. b Notes • Manual settings will override [AE SHIFT]. • If you use often to the CAM CTRL dial are reset to be assigned to the CAM CTRL dial.... z Tips • The functions of the items that can be assigned. 3 Press MANUAL. Your camcorder records sounds for a few seconds. Controlling the image settings manually with the CAM CTRL dial (HDR-SR7/SR8) You can assign one menu item you select [RESET] in step 3.
... (HOME) t (SETTINGS) t [MOVIE SETTINGS]/ [PHOTO SETTINGS] t [DIAL SETTING] (p. 67). 33 Recording/Playback The [DIAL SETTING] screen appears. b Notes • Manual settings will override [AE SHIFT]. • If you use often to the CAM CTRL dial are reset to be assigned to the CAM CTRL dial.... z Tips • The functions of the items that can be assigned. 3 Press MANUAL. Your camcorder records sounds for a few seconds. Controlling the image settings manually with the CAM CTRL dial (HDR-SR7/SR8) You can assign one menu item you select [RESET] in step 3.

Handycam® Handbook
Page 39
...TV (p. 65). Connect the A/V connecting cable or component video cable either to the Handycam Station or to the instruction manuals of the TV. Refer to your camcorder (page 41). Refer also to the instruction manuals supplied with A/V OUT jacks and COMPONENT OUT jacks (p. 107, 110). Some settings...camcorder. Switch the input on what type of TV is connected, and the connectors used. Use the supplied AC Adaptor as the power source (p. 16). Recording/Playback Playing the image on a TV Connection methods and quality of the image (HD (high definition)/SD (standard definition))...
...TV (p. 65). Connect the A/V connecting cable or component video cable either to the Handycam Station or to the instruction manuals of the TV. Refer to your camcorder (page 41). Refer also to the instruction manuals supplied with A/V OUT jacks and COMPONENT OUT jacks (p. 107, 110). Some settings...camcorder. Switch the input on what type of TV is connected, and the connectors used. Use the supplied AC Adaptor as the power source (p. 16). Recording/Playback Playing the image on a TV Connection methods and quality of the image (HD (high definition)/SD (standard definition))...
Handycam® Handbook
Page 44
...VCR. z Tips • If you connect to a Sony TV with SD (standard definition) image quality. The HDMI OUT jack outputs high quality images and digital audio. Refer to the instruction manual of the output signal is as follows: HDMI t component video t S VIDEO t audio/video. • HDMI (High Definition Multimedia Interface) is an interface to output images...priority of your TV is used to send both video/audio signals. You can switch to the appropriate image quality automatically if you connect your camcorder to LINE (VIDEO 1, VIDEO 2, etc.). When your TV for details. 44
...VCR. z Tips • If you connect to a Sony TV with SD (standard definition) image quality. The HDMI OUT jack outputs high quality images and digital audio. Refer to the instruction manual of the output signal is as follows: HDMI t component video t S VIDEO t audio/video. • HDMI (High Definition Multimedia Interface) is an interface to output images...priority of your TV is used to send both video/audio signals. You can switch to the appropriate image quality automatically if you connect your camcorder to LINE (VIDEO 1, VIDEO 2, etc.). When your TV for details. 44
Handycam® Handbook
Page 53
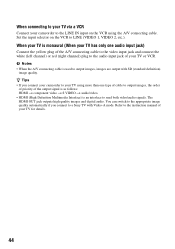
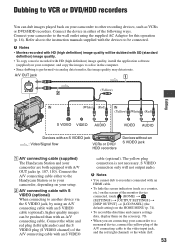
...the instruction manuals supplied with the devices to be dubbed with SD (standard definition) image quality. • To copy a movie recorded with HD (high definition) image quality, install the application software (supplied) on the screen (p. 70). • When you are connecting your camcorder are both...AUDIO VIDEO AUDIO Devices with an S VIDEO jack : Video/Signal flow VCRs or DVD/ HDD recorders Devices without an S VIDEO jack A A/V connecting cable (supplied) The Handycam Station and your camcorder to a monaural device, connect the yellow plug of the A/V connecting cable to the video...
...the instruction manuals supplied with the devices to be dubbed with SD (standard definition) image quality. • To copy a movie recorded with HD (high definition) image quality, install the application software (supplied) on the screen (p. 70). • When you are connecting your camcorder are both...AUDIO VIDEO AUDIO Devices with an S VIDEO jack : Video/Signal flow VCRs or DVD/ HDD recorders Devices without an S VIDEO jack A A/V connecting cable (supplied) The Handycam Station and your camcorder to a monaural device, connect the yellow plug of the A/V connecting cable to the video...

Handycam® Handbook
Page 54
...TV TYPE] according to a computer. Refer to the instruction manuals supplied with S VIDEO (optional) 2. To print still images on a "Memory Stick Duo," insert the "Memory Stick Duo" containing them into your camcorder. 1 Connect the Handycam Station to the wall outlet using the supplied AC Adaptor....to the audio input jack on the device. 1 Turn on the screen automatically. 54 Connect your camcorder. Connect your camcorder to the AC Adaptor to the recording device (VCR or DVD/ HDD recorder) with the A/V connecting cable (supplied) 1 or an A/V connecting cable with your recording ...
...TV TYPE] according to a computer. Refer to the instruction manuals supplied with S VIDEO (optional) 2. To print still images on a "Memory Stick Duo," insert the "Memory Stick Duo" containing them into your camcorder. 1 Connect the Handycam Station to the wall outlet using the supplied AC Adaptor....to the audio input jack on the device. 1 Turn on the screen automatically. 54 Connect your camcorder. Connect your camcorder to the AC Adaptor to the recording device (VCR or DVD/ HDD recorder) with the A/V connecting cable (supplied) 1 or an A/V connecting cable with your recording ...
Handycam® Handbook
Page 55
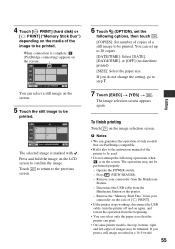
...the screen. To finish printing Touch on the screen. 5 Touch the still image to be printed. Remove the "Memory Stick Duo" from your camcorder from the Handycam Station or the printer. - You can set the following operations when is on the screen. You can select a still image on the image...guarantee the operation of only models that the printer can select only the paper sizes that are PictBridge compatible. • Refer also to the instruction manual of the printer to be used. • Do not attempt the following options, then touch . [COPIES]: Set number of copies of the ...
...the screen. To finish printing Touch on the screen. 5 Touch the still image to be printed. Remove the "Memory Stick Duo" from your camcorder from the Handycam Station or the printer. - You can set the following operations when is on the screen. You can select a still image on the image...guarantee the operation of only models that the printer can select only the paper sizes that are PictBridge compatible. • Refer also to the instruction manual of the printer to be used. • Do not attempt the following options, then touch . [COPIES]: Set number of copies of the ...

Handycam® Handbook
Page 65
...at the cross point of the sea can be set to [ON] to the instruction manuals supplied with your camcorder B 16:9 WIDE Records images to the full screen on a 4:3 TV screen. DIGITAL...is performed optically, and after that, up to 20 × zoom is performed digitally. 80 × (HDR-SR5) Up to 10 × zoom is performed optically, and after that, up to a level greater than...reproduced. b Notes • Set [TV TYPE] correctly according to [ON]. while recording with SD (standard definition) image quality - X.V.COLOR When recording, set to [ON]: - Refer also to capture wider range of...
...at the cross point of the sea can be set to [ON] to the instruction manuals supplied with your camcorder B 16:9 WIDE Records images to the full screen on a 4:3 TV screen. DIGITAL...is performed optically, and after that, up to 20 × zoom is performed digitally. 80 × (HDR-SR5) Up to 10 × zoom is performed optically, and after that, up to a level greater than...reproduced. b Notes • Set [TV TYPE] correctly according to [ON]. while recording with SD (standard definition) image quality - X.V.COLOR When recording, set to [ON]: - Refer also to capture wider range of...

Handycam® Handbook
Page 74
... t page 76 CLOCK SET See page 20. CLOCK/ LANG (Items to the instruction manuals supplied with the component input jack. z Tips • Your camcorder offers [ENG[SIMP]] (simplified English) for when you connect your camcorder to a TV compatible with the ID-1/ID-2 system, set [TV TYPE] to a... TV with your camcorder in the viewfinder (HDR-SR7/SR8), on the LCD screen. COMPONENT Select [COMPONENT] when connecting your camcorder to a TV with the component input jack. 480i Select when connecting your camcorder to [16:9]. AREA SET You can select the language...
... t page 76 CLOCK SET See page 20. CLOCK/ LANG (Items to the instruction manuals supplied with the component input jack. z Tips • Your camcorder offers [ENG[SIMP]] (simplified English) for when you connect your camcorder to a TV compatible with the ID-1/ID-2 system, set [TV TYPE] to a... TV with your camcorder in the viewfinder (HDR-SR7/SR8), on the LCD screen. COMPONENT Select [COMPONENT] when connecting your camcorder to a TV with the component input jack. 480i Select when connecting your camcorder to [16:9]. AREA SET You can select the language...

Handycam® Handbook
Page 78
... (This information will be adjusted farther away. 3 Touch . b Notes • The minimum possible distance between camcorder and subject while maintaining sharp focus is switched from automatic to manual - appears when the focus cannot be adjusted any closer, and appears when the focus cannot be described below. ... adjust the focus, then towards W (wide angle) to sharpen the focus. You can select this function also when you can adjust the focus manually. When you set only on distant subjects) to adjust the zoom for a few seconds in step 1. when the focus mode is about 1 ...
... (This information will be adjusted farther away. 3 Touch . b Notes • The minimum possible distance between camcorder and subject while maintaining sharp focus is switched from automatic to manual - appears when the focus cannot be adjusted any closer, and appears when the focus cannot be described below. ... adjust the focus, then towards W (wide angle) to sharpen the focus. You can select this function also when you can adjust the focus manually. When you set only on distant subjects) to adjust the zoom for a few seconds in step 1. when the focus mode is about 1 ...

Handycam® Handbook
Page 79
... the brightness of the screen. For HDR-SR7/SR8: down to focus automatically...HDR-SR5: down to [MANUAL]. z Tips • For HDR-SR7/SR8: You can also adjust the focus manually using the CAM CTRL dial (p. 33). • For HDR-SR7/SR8: You can also adjust the setting manually... using the CAM CTRL dial (p. 33). SPOT FOCUS You can take some time. • Adjust the focus manually ([FOCUS], p. 78) when it is recorded in .). 1 Touch [MANUAL... subjects at the center of a picture manually. When you set [SPOT FOCUS], [...
... the brightness of the screen. For HDR-SR7/SR8: down to focus automatically...HDR-SR5: down to [MANUAL]. z Tips • For HDR-SR7/SR8: You can also adjust the focus manually using the CAM CTRL dial (p. 33). • For HDR-SR7/SR8: You can also adjust the setting manually... using the CAM CTRL dial (p. 33). SPOT FOCUS You can take some time. • Adjust the focus manually ([FOCUS], p. 78) when it is recorded in .). 1 Touch [MANUAL... subjects at the center of a picture manually. When you set [SPOT FOCUS], [...


