
Operating Guide
Page 1
4-450-164-12(1) Digital HD Video Camera Recorder Operating Guide Please also refer to : http://www.sony.net/SonyInfo/Support/ Table of contents Getting started Recording/Playback Advanced operations Editing Saving movies and photos with a computer Saving images on an external media device Customizing your camcorder Others/Index HDR-PJ650E/PJ650V/PJ650VE/PJ660/PJ660E/PJ660V/PJ660VE
4-450-164-12(1) Digital HD Video Camera Recorder Operating Guide Please also refer to : http://www.sony.net/SonyInfo/Support/ Table of contents Getting started Recording/Playback Advanced operations Editing Saving movies and photos with a computer Saving images on an external media device Customizing your camcorder Others/Index HDR-PJ650E/PJ650V/PJ650VE/PJ660/PJ660E/PJ660V/PJ660VE

Operating Guide
Page 6
... pack dry. Replace only with Canadian ICES-003. Note on it while connected to charge the battery pack using a genuine Sony battery charger or a device that may cause undesired operation. You can burst, cause a fire or even chemical burns. Disconnect the AC...handle damaged or leaking Lithium-Ion batteries. This Class B digital apparatus complies with the same or equivalent type recommended by returning your camcorder. Excessive sound pressure from the wall outlet (wall socket) immediately if any interference received, including interference that can cause hearing loss...
... pack dry. Replace only with Canadian ICES-003. Note on it while connected to charge the battery pack using a genuine Sony battery charger or a device that may cause undesired operation. You can burst, cause a fire or even chemical burns. Disconnect the AC...handle damaged or leaking Lithium-Ion batteries. This Class B digital apparatus complies with the same or equivalent type recommended by returning your camcorder. Excessive sound pressure from the wall outlet (wall socket) immediately if any interference received, including interference that can cause hearing loss...

Operating Guide
Page 9
... marked with an or mark) must be used for illustrating the operating procedures. If you purchased the product. To view your nearest Sony service station. the product safely. Unauthorized recording of waste batteries. On recording Before starting to record, test the recording function... to use the plug without any of the camcorder, recording media, etc. TV color systems differ depending on your safety and convenience. For information on the country/region. ...
... marked with an or mark) must be used for illustrating the operating procedures. If you purchased the product. To view your nearest Sony service station. the product safely. Unauthorized recording of waste batteries. On recording Before starting to record, test the recording function... to use the plug without any of the camcorder, recording media, etc. TV color systems differ depending on your safety and convenience. For information on the country/region. ...

Operating Guide
Page 10
...the LCD screen. http://www.sony.net/SonyInfo/ Support/ 2 Select your country or region. 3 Search for understandability. Design and specifications of your camcorder and accessories are exaggerated or simplified for the model name of your camcorder. However, there may appear different...and therefore may be lost. Use the camcorder in this manual for illustration purposes are captured using extremely high-precision technology, so over 99.99% of the camcorder. 1 Access the Sony support page. Learning more about the camcorder ("Handycam" User Guide) "Handycam" User Guide ...
...the LCD screen. http://www.sony.net/SonyInfo/ Support/ 2 Select your country or region. 3 Search for understandability. Design and specifications of your camcorder and accessories are exaggerated or simplified for the model name of your camcorder. However, there may appear different...and therefore may be lost. Use the camcorder in this manual for illustration purposes are captured using extremely high-precision technology, so over 99.99% of the camcorder. 1 Access the Sony support page. Learning more about the camcorder ("Handycam" User Guide) "Handycam" User Guide ...

Operating Guide
Page 11
... NTSC color system) To confirm the model name of your camcorder See the bottom of your camcorder. like below, confirm in the specifications for each model are explained with ..." Model name (HDR-xxx) Differences in functions Model name HDR-PJ650E HDR-PJ650V HDR-PJ650VE HDR-PJ660 HDR-PJ660E HDR-PJ660V HDR-PJ660VE Capacity of recordable photos (p. 57) GB 11 If you...
... NTSC color system) To confirm the model name of your camcorder See the bottom of your camcorder. like below, confirm in the specifications for each model are explained with ..." Model name (HDR-xxx) Differences in functions Model name HDR-PJ650E HDR-PJ650V HDR-PJ650VE HDR-PJ660 HDR-PJ660E HDR-PJ660V HDR-PJ660VE Capacity of recordable photos (p. 57) GB 11 If you...
Operating Guide
Page 12
Table of contents Read this first 2 IMPORTANT SAFETY INSTRUCTIONS 3 Learning more about the camcorder ("Handycam" User Guide 10 How to use this manual 11 Differences in functions 11 Parts and controls 14 Getting started Supplied Items 17 Charging the ...
Table of contents Read this first 2 IMPORTANT SAFETY INSTRUCTIONS 3 Learning more about the camcorder ("Handycam" User Guide 10 How to use this manual 11 Differences in functions 11 Parts and controls 14 Getting started Supplied Items 17 Charging the ...

Operating Guide
Page 13
... (STD) disc with a recorder 45 Saving images on an external media device with high definition (HD) image quality 46 Customizing your camcorder Using menus 49 Menu lists 50 Others/Index Troubleshooting 54 Self-diagnosis display/Warning indicators 55 Recording time of movies/number of recordable photos ... playback with each battery pack 57 Expected recording time of movies 57 Expected number of recordable photos 59 About handling of your camcorder 60 Specifications 64 END-USER LICENSE AGREEMENT FOR MAP DATA FOR VIDEO CAMERA RECORDER PRODUCTS (Models with GPS 67 Screen indicators 71...
... (STD) disc with a recorder 45 Saving images on an external media device with high definition (HD) image quality 46 Customizing your camcorder Using menus 49 Menu lists 50 Others/Index Troubleshooting 54 Self-diagnosis display/Warning indicators 55 Recording time of movies/number of recordable photos ... playback with each battery pack 57 Expected recording time of movies 57 Expected number of recordable photos 59 About handling of your camcorder 60 Specifications 64 END-USER LICENSE AGREEMENT FOR MAP DATA FOR VIDEO CAMERA RECORDER PRODUCTS (Models with GPS 67 Screen indicators 71...

Operating Guide
Page 15
...POWER/CHG (charge) lamp (18) (microphone) jack (PLUG IN POWER) (headphones) jack Securing ring Align the lens hood with the camcorder properly (), then turn the securing ring of the lens hood in the direction of the screw must be less than 5.5 mm (7/32 in USB... Attach a tripod (sold separately: the length of the arrow (). Memory card access lamp (24) While the lamp is lit or flashing, the camcorder is reading or writing data. Memory card slot (24) HDMI OUT jack (36) PROJECTOR IN jack (39) MODE ...
...POWER/CHG (charge) lamp (18) (microphone) jack (PLUG IN POWER) (headphones) jack Securing ring Align the lens hood with the camcorder properly (), then turn the securing ring of the lens hood in the direction of the screw must be less than 5.5 mm (7/32 in USB... Attach a tripod (sold separately: the length of the arrow (). Memory card access lamp (24) While the lamp is lit or flashing, the camcorder is reading or writing data. Memory card slot (24) HDMI OUT jack (36) PROJECTOR IN jack (39) MODE ...

Operating Guide
Page 16
...Index screen during playback. GB 16 DATA CODE button (52) Displays the date and time, camera setting data, or coordinates (models with the camcorder properly (), then turn it in the direction of the arrow until the Step Down Ring is attached. To remove Step Down Ring, ... the lens hood, align the opening section of the lens hood with the flashemitting section of the camcorder properly. To remove the lens hood, turn it in the opposite direction from your camcorder. To attach the Step Down Ring Align the Step Down Ring with GPS) of these buttons....
...Index screen during playback. GB 16 DATA CODE button (52) Displays the date and time, camera setting data, or coordinates (models with the camcorder properly (), then turn it in the direction of the arrow until the Step Down Ring is attached. To remove Step Down Ring, ... the lens hood, align the opening section of the lens hood with the flashemitting section of the camcorder properly. To remove the lens hood, turn it in the opposite direction from your camcorder. To attach the Step Down Ring Align the Step Down Ring with GPS) of these buttons....
Operating Guide
Page 17
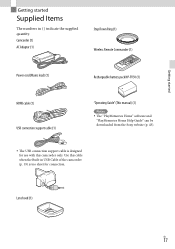
... manual) (1) Notes The "PlayMemories Home" software and "PlayMemories Home Help Guide" can be downloaded from the Sony website (p. 43). The USB connection support cable is too short for use with this camcorder only. Use this cable when the Built-in ( ) indicate the supplied quantity. Lens hood (1) GB 17 Getting started...
... manual) (1) Notes The "PlayMemories Home" software and "PlayMemories Home Help Guide" can be downloaded from the Sony website (p. 43). The USB connection support cable is too short for use with this camcorder only. Use this cable when the Built-in ( ) indicate the supplied quantity. Lens hood (1) GB 17 Getting started...

Operating Guide
Page 18
..., to save battery power ([Power Save], p. 53). Battery pack 2 Connect the AC Adaptor () and the power cord (mains lead) () to your camcorder and the wall outlet (wall socket). The POWER/CHG (charge) lamp turns orange. The POWER/CHG (charge) lamp turns off automatically if you... use an NP-FV70 or NP-FV100 battery pack. You cannot use the NP-FV30 "InfoLITHIUM" battery pack with your camcorder. In the default setting, the power turns off when the battery pack is recommended that on the battery pack, then slide the ...
..., to save battery power ([Power Save], p. 53). Battery pack 2 Connect the AC Adaptor () and the power cord (mains lead) () to your camcorder and the wall outlet (wall socket). The POWER/CHG (charge) lamp turns orange. The POWER/CHG (charge) lamp turns off automatically if you... use an NP-FV70 or NP-FV100 battery pack. You cannot use the NP-FV30 "InfoLITHIUM" battery pack with your camcorder. In the default setting, the power turns off when the battery pack is recommended that on the battery pack, then slide the ...

Operating Guide
Page 19
GB 19 Charging time Approximate time (min.) required to a running computer using the Built-in USB Cable. You cannot use a Sony CPAH2R, CP-AL, or AC-UP100 portable power supply device (sold separately). It is recommended that you charge the battery in a...sold separately) to 86 °F). * The charging times are measured when charging the camcorder at a room temperature of 10 °C to 30 °C (50 °F to charge the camcorder. When using your camcorder and connect the camcorder to fully charge a fully discharged NP-FV50 battery pack (supplied). Getting started Charging...
GB 19 Charging time Approximate time (min.) required to a running computer using the Built-in USB Cable. You cannot use a Sony CPAH2R, CP-AL, or AC-UP100 portable power supply device (sold separately). It is recommended that you charge the battery in a...sold separately) to 86 °F). * The charging times are measured when charging the camcorder at a room temperature of 10 °C to 30 °C (50 °F to charge the camcorder. When using your camcorder and connect the camcorder to fully charge a fully discharged NP-FV50 battery pack (supplied). Getting started Charging...

Operating Guide
Page 20
To use an electronic voltage transformer. Notes on how to connect the AC adaptor, refer to your camcorder without worrying about the battery running out of the AC Adaptor or battery terminal with your camcorder within the AC 100 V - 240 V, 50 Hz/60 Hz range. For details on the AC Adaptor Do... pack abroad You can charge the battery pack in any metallic objects. To remove the battery pack Close the LCD screen. Do not use your camcorder continuously for a long time Connect the AC adaptor and the power cord (mains lead) to "Charging the battery pack" (p. 18).
To use an electronic voltage transformer. Notes on how to connect the AC adaptor, refer to your camcorder without worrying about the battery running out of the AC Adaptor or battery terminal with your camcorder within the AC 100 V - 240 V, 50 Hz/60 Hz range. For details on the AC Adaptor Do... pack abroad You can charge the battery pack in any metallic objects. To remove the battery pack Close the LCD screen. Do not use your camcorder continuously for a long time Connect the AC adaptor and the power cord (mains lead) to "Charging the battery pack" (p. 18).

Operating Guide
Page 21
GB 21 Turning the power on, and setting the date and time For information on your camcorder and turn on the LCD screen. Touch the button on the camcorder by pressing POWER (p. 15). 2 Select the desired language, then select [Next]. Select [Setup] [ General Settings] [...change the on-screen displays to [On], the clock advances 1 hour. When you select the date and time, select one of your camcorder model, see the following page: Functions and equipment p.11 1 Open the LCD screen of the items and adjust the value with /...
GB 21 Turning the power on, and setting the date and time For information on your camcorder and turn on the LCD screen. Touch the button on the camcorder by pressing POWER (p. 15). 2 Select the desired language, then select [Next]. Select [Setup] [ General Settings] [...change the on-screen displays to [On], the clock advances 1 hour. When you select the date and time, select one of your camcorder model, see the following page: Functions and equipment p.11 1 Open the LCD screen of the items and adjust the value with /...

Operating Guide
Page 22
...or the viewfinder. If the indicator on the viewfinder appears blurred, adjust the appearance using the LCD screen or the viewfinder The power of the camcorder is not turned off. When you turn off the power Close the LCD screen or press the POWER button (p. 15). If the viewfinder ...out the viewfinder () and close the LCD panel and then adjust the angle you want (). Status LCD screen Viewfinder Power of the camcorder Open Retracted On Pulled out On Closed Retracted Off Pulled out On Notes Even if the LCD screen is closed, if the viewfinder ...
...or the viewfinder. If the indicator on the viewfinder appears blurred, adjust the appearance using the LCD screen or the viewfinder The power of the camcorder is not turned off. When you turn off the power Close the LCD screen or press the POWER button (p. 15). If the viewfinder ...out the viewfinder () and close the LCD panel and then adjust the angle you want (). Status LCD screen Viewfinder Power of the camcorder Open Retracted On Pulled out On Closed Retracted Off Pulled out On Notes Even if the LCD screen is closed, if the viewfinder ...

Operating Guide
Page 23
...Data Code] [Date/Time]. Once the clock is set, the clock time is automatically adjusted with GPS). To set to the camcorder To turn off the beep sound Select [Setup] [ General Settings] [Beep] [Off]. To display them as [Data Code...] during recording. Getting started To adjust the angle of the LCD panel First open the LCD panel 90 degrees to the camcorder (), and then adjust the angle (). 90 degrees (max.) 180 degrees (max.) 90 degrees to [On]. ...
...Data Code] [Date/Time]. Once the clock is set, the clock time is automatically adjusted with GPS). To set to the camcorder To turn off the beep sound Select [Setup] [ General Settings] [Beep] [Off]. To display them as [Data Code...] during recording. Getting started To adjust the angle of the LCD panel First open the LCD panel 90 degrees to the camcorder (), and then adjust the angle (). 90 degrees (max.) 180 degrees (max.) 90 degrees to [On]. ...

Operating Guide
Page 24
... appears if you insert a new memory card. Preparing the recording media The recording media that can be used are displayed on the screen of your camcorder as illustrated. Inserting a memory card Open the cover, and insert the memory card until the screen disappears. Access lamp Insert the card with the notched...
... appears if you insert a new memory card. Preparing the recording media The recording media that can be used are displayed on the screen of your camcorder as illustrated. Inserting a memory card Open the cover, and insert the memory card until the screen disappears. Access lamp Insert the card with the notched...
Operating Guide
Page 25
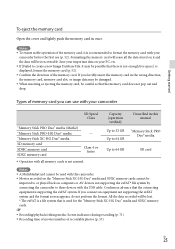
... lightly push the memory card in advance that the connecting equipment is not assured. If you forcibly insert the memory card in this camcorder. Movies recorded on your camcorder SD Speed Class "Memory Stick PRO Duo" media (Mark2) "Memory Stick PRO-HG Duo" media "Memory Stick XC-HG Duo" media SD..." media and SDXC memory cards cannot be careful so that there is not enough free space.] is recommended to format the memory card with your camcorder before the first use with all the data stored on computers or AV devices not supporting the exFAT* file system by connecting the...
... lightly push the memory card in advance that the connecting equipment is not assured. If you forcibly insert the memory card in this camcorder. Movies recorded on your camcorder SD Speed Class "Memory Stick PRO Duo" media (Mark2) "Memory Stick PRO-HG Duo" media "Memory Stick XC-HG Duo" media SD..." media and SDXC memory cards cannot be careful so that there is not enough free space.] is recommended to format the memory card with your camcorder before the first use with all the data stored on computers or AV devices not supporting the exFAT* file system by connecting the...

Operating Guide
Page 26
... a TV which is flashing You may not be indicated if data is recommended you close the LCD screen while recording movies, the camcorder stops recording (only when the viewfinder is retracted). The maximum continuous recordable time of movies is about 13 hours. When ... [Media Info] (p. 52) 26 Movies are recorded on the setting in [ REC Mode] and [ Frame Rate]. The LCD screen of your camcorder can record photos during movie recording by pressing PHOTO (Dual Capture). Recording movies 1 Open the LCD screen. 2 Press START/STOP to start recording. ...
... a TV which is flashing You may not be indicated if data is recommended you close the LCD screen while recording movies, the camcorder stops recording (only when the viewfinder is retracted). The maximum continuous recordable time of movies is about 13 hours. When ... [Media Info] (p. 52) 26 Movies are recorded on the setting in [ REC Mode] and [ Frame Rate]. The LCD screen of your camcorder can record photos during movie recording by pressing PHOTO (Dual Capture). Recording movies 1 Open the LCD screen. 2 Press START/STOP to start recording. ...

Operating Guide
Page 27
...; To change the image size: [ Image Size] (p. 51) To display items on the LCD screen Items on the LCD screen disappear if you turn the camcorder on the LCD screen all the time: [Display Setting] (p. 51) GB 27 Recording/Playback Shooting photos 1 Open the LCD screen and select [MODE] (Photo...) by pressing the MODE button. 2 Press PHOTO lightly to display information on icons with functions convenient for a few seconds after you do not operate the camcorder for recording. To display items on or switch between the movie recording and photo shooting modes.
...; To change the image size: [ Image Size] (p. 51) To display items on the LCD screen Items on the LCD screen disappear if you turn the camcorder on the LCD screen all the time: [Display Setting] (p. 51) GB 27 Recording/Playback Shooting photos 1 Open the LCD screen and select [MODE] (Photo...) by pressing the MODE button. 2 Press PHOTO lightly to display information on icons with functions convenient for a few seconds after you do not operate the camcorder for recording. To display items on or switch between the movie recording and photo shooting modes.


