Operating Guide
Page 6
...DV cassettes marked with or (p. 93). Types of manuals - However, there is supplied with two kinds of "Memory Stick" you can use Your camcorder is no guarantee that to Part 15 of the following measures: - "First Step Guide" for using a "Memory Stick Duo" with the Cassette Memory..." (You cannot use any type of California, USA only Perchlorate Material - "Memory Stick Duo" (This size can use in your camcorder while connected to a computer (stored on , the user is not compatible with "Memory Stick" compatible equipment Be sure to radio communications. For the...
...DV cassettes marked with or (p. 93). Types of manuals - However, there is supplied with two kinds of "Memory Stick" you can use Your camcorder is no guarantee that to Part 15 of the following measures: - "First Step Guide" for using a "Memory Stick Duo" with the Cassette Memory..." (You cannot use any type of California, USA only Perchlorate Material - "Memory Stick Duo" (This size can use in your camcorder while connected to a computer (stored on , the user is not compatible with "Memory Stick" compatible equipment Be sure to radio communications. For the...
Operating Guide
Page 7
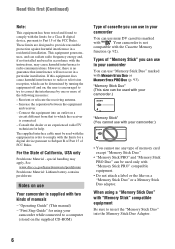
...White, red, blue or green point • Exposing the LCD screen, the viewfinder, or the lens to malfunction. To view your camcorder to direct sunlight for illustrating the operating procedures. However, there may be copyrighted. Continued , 7 Take pictures of the sun only ...malfunction of such materials may cause malfunctions. • Do not aim at dusk. Change the screen language before using your camcorder" (p. 97). • Before connecting your camcorder to another device with an HDMI cable, component video cable, USB or i.LINK cable, be some tiny black points ...
...White, red, blue or green point • Exposing the LCD screen, the viewfinder, or the lens to malfunction. To view your camcorder to direct sunlight for illustrating the operating procedures. However, there may be copyrighted. Continued , 7 Take pictures of the sun only ...malfunction of such materials may cause malfunctions. • Do not aim at dusk. Change the screen language before using your camcorder" (p. 97). • Before connecting your camcorder to another device with an HDMI cable, component video cable, USB or i.LINK cable, be some tiny black points ...

Operating Guide
Page 9
... Connecting to a high definition TV 36 Connecting to a 16:9 (wide) or 4:3 TV 37 Using the Menu Recording/Playback Easy Recording/Playback (Easy Handycam 22 Recording 24 Zooming 26 Recording high quality still images during tape recording (Dual Rec 26 Controlling the image settings manually with the CAM CTRL dial (HDR-...HC7 27 Using the flash 27 Recording in dark places (NightShot 28 Adjusting the exposure for backlit subjects 28 Recording in mirror mode 28 Using the menu items .......... 40 Menu items 41 CAMERA SET menu 43 Settings to adjust your camcorder to the ...
... Connecting to a high definition TV 36 Connecting to a 16:9 (wide) or 4:3 TV 37 Using the Menu Recording/Playback Easy Recording/Playback (Easy Handycam 22 Recording 24 Zooming 26 Recording high quality still images during tape recording (Dual Rec 26 Controlling the image settings manually with the CAM CTRL dial (HDR-...HC7 27 Using the flash 27 Recording in dark places (NightShot 28 Adjusting the exposure for backlit subjects 28 Recording in mirror mode 28 Using the menu items .......... 40 Menu items 41 CAMERA SET menu 43 Settings to adjust your camcorder to the ...
Operating Guide
Page 11
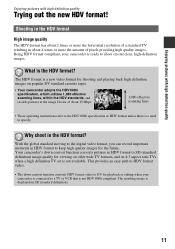
... record important moments in HDV format to specify. Your camcorder's down convert function converts HDV format video to shoot crystal clear, high-definition images. Being HDV format compliant, your camcorder is connected to keep high quality images for playback or editing when your camcorder is displayed in SD (standard definition). 11 The resulting image is ready to DV...
... record important moments in HDV format to specify. Your camcorder's down convert function converts HDV format video to shoot crystal clear, high-definition images. Being HDV format compliant, your camcorder is connected to keep high quality images for playback or editing when your camcorder is displayed in SD (standard definition). 11 The resulting image is ready to DV...

Operating Guide
Page 12
... down convert HDV format video to SD (standard definition) image quality to the computer. Connecting to an HDV1080i non-compliant device Your camcorder can be played back as crisp HD (high definition) pictures on a high definition TV. • For details on a high definition TV (p. 35) Pictures recorded in HD (high definition) image quality. Connecting to a computer (p. 74) Using the supplied software, you...
... down convert HDV format video to SD (standard definition) image quality to the computer. Connecting to an HDV1080i non-compliant device Your camcorder can be played back as crisp HD (high definition) pictures on a high definition TV. • For details on a high definition TV (p. 35) Pictures recorded in HD (high definition) image quality. Connecting to a computer (p. 74) Using the supplied software, you...
Operating Guide
Page 13
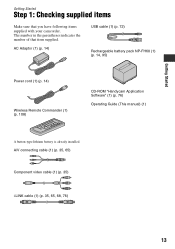
... 1: Checking supplied items Make sure that item supplied. The number in the parentheses indicates the number of that you have following items supplied with your camcorder. A/V connecting cable (1) (p. 35, 65) Component video cable (1) (p. 35) i.LINK cable (1) (p. 35, 65, 68, 76) 13
... 1: Checking supplied items Make sure that item supplied. The number in the parentheses indicates the number of that you have following items supplied with your camcorder. A/V connecting cable (1) (p. 35, 65) Component video cable (1) (p. 35) i.LINK cable (1) (p. 35, 65, 68, 76) 13
Operating Guide
Page 14
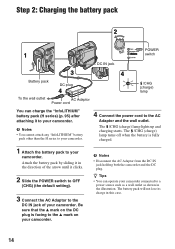
... AC Adaptor to the DC IN jack of the arrow until it to your camcorder. b Notes • You cannot attach any "InfoLITHIUM" battery pack other than the H series to your camcorder connected to a power source such as a wall outlet as shown in this case. 14 Step 2: Charging the battery pack 2 POWER 1... switch DC IN jack 3 Battery pack DC plug 4 To the wall outlet AC Adaptor Power cord 4 /CHG (charge) lamp You can operate your camcorder. 4 Connect the power cord to the AC Adaptor and the wall outlet. The battery pack will not lose its charge in the illustration.
... AC Adaptor to the DC IN jack of the arrow until it to your camcorder. b Notes • You cannot attach any "InfoLITHIUM" battery pack other than the H series to your camcorder connected to a power source such as a wall outlet as shown in this case. 14 Step 2: Charging the battery pack 2 POWER 1... switch DC IN jack 3 Battery pack DC plug 4 To the wall outlet AC Adaptor Power cord 4 /CHG (charge) lamp You can operate your camcorder. 4 Connect the power cord to the AC Adaptor and the wall outlet. The battery pack will not lose its charge in the illustration.

Operating Guide
Page 16
... The battery pack is disconnected from the wall outlet. Middle: When the LCD backlight turns off and zooming. HDR-HC5 Battery pack Recorded Format NP-FH50 NP-FH60 (supplied) NP-FH70 NP-FH100 LCD panel LCD panel opened* ...DV HDV DV 110 120 125 135 145 160 165 180 235 255 270 290 545 590 615 660 HDR-HC7 Battery pack Recorded Format NP-FH50 NP-FH60 (supplied) NP-FH70 NP-FH100 LCD panel LCD ...(p. 15) will not be supplied from the battery as long as the AC Adaptor is connected to the DC IN jack of your camcorder, even when the power cord is worn-out (for Battery Info only). • The...
... The battery pack is disconnected from the wall outlet. Middle: When the LCD backlight turns off and zooming. HDR-HC5 Battery pack Recorded Format NP-FH50 NP-FH60 (supplied) NP-FH70 NP-FH100 LCD panel LCD panel opened* ...DV HDV DV 110 120 125 135 145 160 165 180 235 255 270 290 545 590 615 660 HDR-HC7 Battery pack Recorded Format NP-FH50 NP-FH60 (supplied) NP-FH70 NP-FH100 LCD panel LCD ...(p. 15) will not be supplied from the battery as long as the AC Adaptor is connected to the DC IN jack of your camcorder, even when the power cord is worn-out (for Battery Info only). • The...
Operating Guide
Page 17
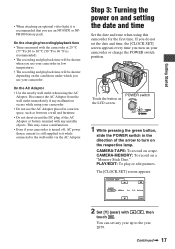
...conditions under which you turn on your camcorder. CAMERA-TAPE: To record on a "Memory Stick ...cause a malfunction. • Even if your camcorder. • Do not use an NP-FH70 ...1D 12: 00 AM OK 2 Set [Y] (year) with the camcorder at 25 °C (77 °F) (10 to 30 °... the nearby wall outlet when using this camcorder for the first time. POWER switch Touch...and playback time will be shorter when you use your camcorder or change the POWER switch position. On the charging...CLOCK SET] screen appears every time you use your camcorder in the direction of the AC Adaptor or battery...
...conditions under which you turn on your camcorder. CAMERA-TAPE: To record on a "Memory Stick ...cause a malfunction. • Even if your camcorder. • Do not use an NP-FH70 ...1D 12: 00 AM OK 2 Set [Y] (year) with the camcorder at 25 °C (77 °F) (10 to 30 °... the nearby wall outlet when using this camcorder for the first time. POWER switch Touch...and playback time will be shorter when you use your camcorder or change the POWER switch position. On the charging...CLOCK SET] screen appears every time you use your camcorder in the direction of the AC Adaptor or battery...

Operating Guide
Page 32
... GUIDE) You can easily select the desired setting screens by using the guide functions (USAGE GUIDE). 60min STBY GUIDE P-MENU Your camcorder has 4 guide functions as shown below. Recommends the appropriate connection method for details. 1 Touch [GUIDE]. 2 Select the desired item. If an attempted setting is not displayed in step 3, follow the...
... GUIDE) You can easily select the desired setting screens by using the guide functions (USAGE GUIDE). 60min STBY GUIDE P-MENU Your camcorder has 4 guide functions as shown below. Recommends the appropriate connection method for details. 1 Touch [GUIDE]. 2 Select the desired item. If an attempted setting is not displayed in step 3, follow the...

Operating Guide
Page 35
... the bottom of the jack cover, then rotate in the direction of connecting to a high definition TV 1 Touch [TV] t [HD TV]. 2 Select the TV input jacks with the device to the precautions on your camcorder before connecting. An example of the arrow and connect the cable. Touch [HINT] and refer also to be adjusted on an...
... the bottom of the jack cover, then rotate in the direction of connecting to a high definition TV 1 Touch [TV] t [HD TV]. 2 Select the TV input jacks with the device to the precautions on your camcorder before connecting. An example of the arrow and connect the cable. Touch [HINT] and refer also to be adjusted on an...
Operating Guide
Page 36
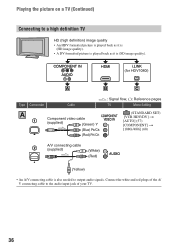
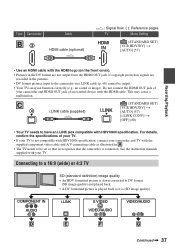
...Connecting to a high definition TV HD (high definition) image quality • An HDV formatted picture is played back as it is (HD image quality). • A DV formatted picture is played back as it is also needed to the audio input jack of your TV. 36 COMPONENT IN AUDIO HDMI i.LINK (for HDV1080i) A B C Type Camcorder... Cable A 1 Component video cable (supplied) (Green) Y (Blue) PB/CB (Red) PR/CR : Signal flow, ( ): Reference pages TV Menu Setting (STANDARD SET) [VCR HDV/DV] t [AUTO] (57) [COMPONENT] t [1080i/480i] (60) 2 A/V connecting cable (supplied...
...Connecting to a high definition TV HD (high definition) image quality • An HDV formatted picture is played back as it is (HD image quality). • A DV formatted picture is played back as it is also needed to the audio input jack of your TV. 36 COMPONENT IN AUDIO HDMI i.LINK (for HDV1080i) A B C Type Camcorder... Cable A 1 Component video cable (supplied) (Green) Y (Blue) PB/CB (Red) PR/CR : Signal flow, ( ): Reference pages TV Menu Setting (STANDARD SET) [VCR HDV/DV] t [AUTO] (57) [COMPONENT] t [1080i/480i] (60) 2 A/V connecting cable (supplied...
Operating Guide
Page 37
...the specifications of an external device with your camcorder and TV with the supplied component video cable and A/V connecting cable as it recognizes that it is (SD image quality). Connecting to a 16:9 (wide) or 4:3 TV SD (standard definition) image quality • An HDV formatted ...picture is down converted to the camcorder via i.LINK cable (p. 68) cannot be set so that the camcorder is connected. Type Camcorder B3 Cable HDMI cable (optional) :...
...the specifications of an external device with your camcorder and TV with the supplied component video cable and A/V connecting cable as it recognizes that it is (SD image quality). Connecting to a 16:9 (wide) or 4:3 TV SD (standard definition) image quality • An HDV formatted ...picture is down converted to the camcorder via i.LINK cable (p. 68) cannot be set so that the camcorder is connected. Type Camcorder B3 Cable HDMI cable (optional) :...
Operating Guide
Page 38
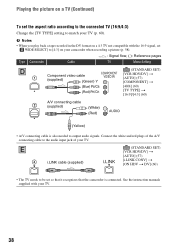
...See the instruction manuals supplied with the 16:9 signal, set [ WIDE SELECT] to [4:3] on a TV (Continued) To set so that it recognizes that the camcorder is connected. E 4 i.LINK cable (supplied) (STANDARD SET) [VCR HDV/DV] t [AUTO] (57) [i.LINK CONV] t [ON HDV t DV] (...60) • The TV needs to output audio signals. Connect the white and red plugs of your TV. Playing the picture on your camcorder when recording a picture (p. 58). : Signal flow, ( ): Reference pages Type Camcorder Cable TV Menu Setting D 1 Component video cable (supplied) (Green) Y (Blue...
...See the instruction manuals supplied with the 16:9 signal, set [ WIDE SELECT] to [4:3] on a TV (Continued) To set so that it recognizes that the camcorder is connected. E 4 i.LINK cable (supplied) (STANDARD SET) [VCR HDV/DV] t [AUTO] (57) [i.LINK CONV] t [ON HDV t DV] (...60) • The TV needs to output audio signals. Connect the white and red plugs of your TV. Playing the picture on your camcorder when recording a picture (p. 58). : Signal flow, ( ): Reference pages Type Camcorder Cable TV Menu Setting D 1 Component video cable (supplied) (Green) Y (Blue...
Operating Guide
Page 39
...High Definition Multimedia Interface) is monaural (When your TV via a VCR Select one type of the VCR. Connecting HDMI OUT jack and external device with the A/V connecting cable (Type ). 2 A/V connecting cable (supplied) (Yellow) (White) (Red) (STANDARD SET) [VCR HDV/DV] t [AUTO] (57) [TV TYPE] t [16:9]/[4:3] (60) Recording/Playback When connecting... on the VCR using more than one of the connecting methods on page 65, according to the audio input jack of i.LINK. 39 Connect your TV or VCR. Type Camcorder Cable A/V connecting cable with S VIDEO (optional) 2 (Yellow) ...
...High Definition Multimedia Interface) is monaural (When your TV via a VCR Select one type of the VCR. Connecting HDMI OUT jack and external device with the A/V connecting cable (Type ). 2 A/V connecting cable (supplied) (Yellow) (White) (Red) (STANDARD SET) [VCR HDV/DV] t [AUTO] (57) [TV TYPE] t [16:9]/[4:3] (60) Recording/Playback When connecting... on the VCR using more than one of the connecting methods on page 65, according to the audio input jack of i.LINK. 39 Connect your TV or VCR. Type Camcorder Cable A/V connecting cable with S VIDEO (optional) 2 (Yellow) ...
Operating Guide
Page 56
... (Play/Pause) twice (once from the HDV/DV Interface (i.LINK) cannot be suspended in slow mode. 2 Touch t . You can also connect the camcorder to the computer. b Notes • You will be played back smoothly in situations such as those described below. - When you touch the ... To cancel [SMTH SLW REC], select [END]. Refer to turn on selecting menu items. VAR.SPD PB (Various speed playback) You can connect the camcorder to a personal computer with a USB cable and import pictures to other than normal playback mode. • Pictures in various modes while viewing movies...
... (Play/Pause) twice (once from the HDV/DV Interface (i.LINK) cannot be suspended in slow mode. 2 Touch t . You can also connect the camcorder to the computer. b Notes • You will be played back smoothly in situations such as those described below. - When you touch the ... To cancel [SMTH SLW REC], select [END]. Refer to turn on selecting menu items. VAR.SPD PB (Various speed playback) You can connect the camcorder to a personal computer with a USB cable and import pictures to other than normal playback mode. • Pictures in various modes while viewing movies...
Operating Guide
Page 57
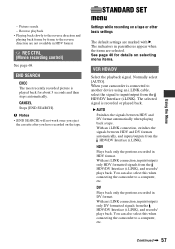
... etc. HDV Plays back only the portions recorded in parentheses appear when the items are selected. You can also select this when connecting the camcorder to input/output from the HDV/DV Interface (i.LINK). DV Plays back only the portions recorded in HDV format. CANCEL Stops ...[END SEARCH]. See page 40 for about 5 seconds and then stops automatically. When your camcorder is recorded or played back. Continued , 57 With an i.LINK connection, switches the signals between HDV and DV format automatically when playing back a tape. Picture search - B ...
... etc. HDV Plays back only the portions recorded in parentheses appear when the items are selected. You can also select this when connecting the camcorder to input/output from the HDV/DV Interface (i.LINK). DV Plays back only the portions recorded in HDV format. CANCEL Stops ...[END SEARCH]. See page 40 for about 5 seconds and then stops automatically. When your camcorder is recorded or played back. Continued , 57 With an i.LINK connection, switches the signals between HDV and DV format automatically when playing back a tape. Picture search - B ...
Operating Guide
Page 58
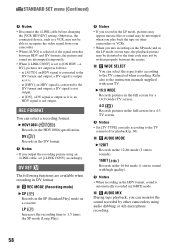
... x AUDIO MODE B 12BIT Records in the 12-bit mode (2 stereo sounds). 16BIT ( ) Records in the LP mode on other camcorders using an i.LINK cable, set to the TV connected for a 4:3 TV screen. at [DV], a DV signal is output as it is set [i.LINK CONV] accordingly. b Notes ...formats, the picture and sound are output as follows: - Otherwise, the connected device, such as a VCR, may not be able to the instruction manuals supplied with high quality). LP (LP) Increases the recording time to the TV connected when recording. b Notes • Set [TV TYPE] correctly according to...
... x AUDIO MODE B 12BIT Records in the 12-bit mode (2 stereo sounds). 16BIT ( ) Records in the LP mode on other camcorders using an i.LINK cable, set to the TV connected for a 4:3 TV screen. at [DV], a DV signal is output as it is set [i.LINK CONV] accordingly. b Notes ...formats, the picture and sound are output as follows: - Otherwise, the connected device, such as a VCR, may not be able to the instruction manuals supplied with high quality). LP (LP) Increases the recording time to the TV connected when recording. b Notes • Set [TV TYPE] correctly according to...
Operating Guide
Page 59
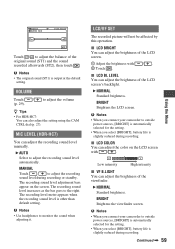
... to adjust the volume z Tips • For HDR-HC7: You can adjust the brightness of the original sound (ST1) and the sound recorded afterwards (ST2), then touch . B NORMAL Standard brightness. b Notes • When you connect your camcorder to outside power sources, [BRIGHT] is automatically selected...MIC LEVEL (HDR-HC7) You can adjust the brightness of the LCD screen. 1 Adjust the brightness with / . to monitor the sound when adjusting it. The recording level meter appears when the recording sound level is output at the default setting. Low intensity High intensity x ...
... to adjust the volume z Tips • For HDR-HC7: You can adjust the brightness of the original sound (ST1) and the sound recorded afterwards (ST2), then touch . B NORMAL Standard brightness. b Notes • When you connect your camcorder to outside power sources, [BRIGHT] is automatically selected...MIC LEVEL (HDR-HC7) You can adjust the brightness of the LCD screen. 1 Adjust the brightness with / . to monitor the sound when adjusting it. The recording level meter appears when the recording sound level is output at the default setting. Low intensity High intensity x ...
Operating Guide
Page 60
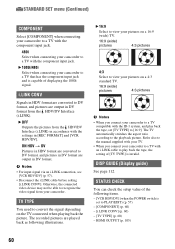
... not be able to convert the signal depending on a 4:3 standard TV. 16:9 (wide) pictures 4:3 pictures b Notes • When you connect your camcorder to a TV with the settings in HDV format are played back as following items. - [VCR HDV/DV] (when the POWER switch is capable...are output in DV format. HDMI OUTPUT (p. 105) 60 STANDARD SET menu (Continued) COMPONENT Select [COMPONENT] when connecting your camcorder to a TV with the component input jack. 480i Select when connecting your camcorder to a TV with the ID-1 system, and play back the tape, the setting of [TV TYPE] is invalid...
... not be able to convert the signal depending on a 4:3 standard TV. 16:9 (wide) pictures 4:3 pictures b Notes • When you connect your camcorder to a TV with the settings in HDV format are played back as following items. - [VCR HDV/DV] (when the POWER switch is capable...are output in DV format. HDMI OUTPUT (p. 105) 60 STANDARD SET menu (Continued) COMPONENT Select [COMPONENT] when connecting your camcorder to a TV with the component input jack. 480i Select when connecting your camcorder to a TV with the ID-1 system, and play back the tape, the setting of [TV TYPE] is invalid...


