
Operating Instructions
Page 2
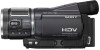
..., or visit http://www.rbrc.org/ Caution: Do not handle damaged or leaking Lithium-Ion batteries. For more information regarding this manual thoroughly, and retain it for future reference. Operation is intended to alert the user to persons. Owner's Record The model and serial...space provided below. Model No. You can help preserve our environment by returning your Sony dealer regarding recycling of important operating and maintenance (servicing) instructions in the literature accompanying the appliance. HDR-HC1 Serial No. WARNING To prevent fire or shock hazard, do not expose...
..., or visit http://www.rbrc.org/ Caution: Do not handle damaged or leaking Lithium-Ion batteries. For more information regarding this manual thoroughly, and retain it for future reference. Operation is intended to alert the user to persons. Owner's Record The model and serial...space provided below. Model No. You can help preserve our environment by returning your Sony dealer regarding recycling of important operating and maintenance (servicing) instructions in the literature accompanying the appliance. HDR-HC1 Serial No. WARNING To prevent fire or shock hazard, do not expose...
Operating Instructions
Page 3
... with Cassette Memory are designed to which can use in your camcorder • There are cautioned that to provide reasonable protection against harmful interference in a residential installation. "Memory Stick Duo" (Size used in a particular installation. For customers in this manual could void your authority to operate this equipment does cause harmful...below is for a digital device pursuant to the following measures: - If you can use "Memory Stick Duo" marked with Part 15 of Conformity Trade Name: SONY Model No.: HDR-HC1 Responsible Party: Sony Electronics Inc.
... with Cassette Memory are designed to which can use in your camcorder • There are cautioned that to provide reasonable protection against harmful interference in a residential installation. "Memory Stick Duo" (Size used in a particular installation. For customers in this manual could void your authority to operate this equipment does cause harmful...below is for a digital device pursuant to the following measures: - If you can use "Memory Stick Duo" marked with Part 15 of Conformity Trade Name: SONY Model No.: HDR-HC1 Responsible Party: Sony Electronics Inc.

Operating Instructions
Page 5
On this manual • The images of tapes by Carl Zeiss, in Germany, and Sony Corporation, and produces superior images. About the Carl Zeiss lens Your camcorder is equipped with the HDV format. MTF= Modulation Transfer Function. The screen appears blue. Check the contents of the LCD screen and the viewfi...
On this manual • The images of tapes by Carl Zeiss, in Germany, and Sony Corporation, and produces superior images. About the Carl Zeiss lens Your camcorder is equipped with the HDV format. MTF= Modulation Transfer Function. The screen appears blue. Check the contents of the LCD screen and the viewfi...
Operating Instructions
Page 6
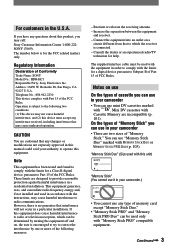
... the exposure for backlit subjects To record in this first 2 Enjoying pictures with high definition quality Trying out the new HDV format 10 Viewing video recorded in the...pack 13 Step 3: Turning the power on the icons used for the DV format only. Read this manual : Features available for the HDV format only. : Features available for recording/playback, etc 26 Recording ...To use zoom To fix the brightness of Contents Note on and holding your camcorder firmly ...........16 Step 4: Adjusting the LCD panel and viewfinder 18 Step 5: ...
... the exposure for backlit subjects To record in this first 2 Enjoying pictures with high definition quality Trying out the new HDV format 10 Viewing video recorded in the...pack 13 Step 3: Turning the power on the icons used for the DV format only. Read this manual : Features available for the HDV format only. : Features available for recording/playback, etc 26 Recording ...To use zoom To fix the brightness of Contents Note on and holding your camcorder firmly ...........16 Step 4: Adjusting the LCD panel and viewfinder 18 Step 5: ...

Operating Instructions
Page 12
Step 1: Checking supplied items Make sure that item supplied. Lens hood (1) (p. 115) Use the lens hood to your camcorder. A/V connecting cable (1) (p. 36, 64) Component video cable (1) (p. 36, 37) AC Adaptor (1) (p. 13) USB cable (1) (p. 73) Power cord (1) (p. 13) Lens... cap (1) Shoulder Strap (1) (p. 114) Rechargeable battery pack NP-FM50 (1) (p. 13, 105) Operating Guide (This manual) (1) Attached to record under strong light, such as under the sun. 12 "Memory Stick Duo" 16MB (1) (p. 22, 103) Memory Stick Duo adaptor (1) (p. 104) ...
Step 1: Checking supplied items Make sure that item supplied. Lens hood (1) (p. 115) Use the lens hood to your camcorder. A/V connecting cable (1) (p. 36, 64) Component video cable (1) (p. 36, 37) AC Adaptor (1) (p. 13) USB cable (1) (p. 73) Power cord (1) (p. 13) Lens... cap (1) Shoulder Strap (1) (p. 114) Rechargeable battery pack NP-FM50 (1) (p. 13, 105) Operating Guide (This manual) (1) Attached to record under strong light, such as under the sun. 12 "Memory Stick Duo" 16MB (1) (p. 22, 103) Memory Stick Duo adaptor (1) (p. 104) ...

Operating Instructions
Page 19
... are listed on the LANGU.) menu (p. 61). (TIME/ Select area for guide. DISP GUIDE END The indicators vary depending on the screen. DISP GUIDE 1/2 FOCUS: MANUAL PROGRAM AE: SPOTLIGHT STEADYSHOT: OFF END To finish the operation Touch [END]. 19 Touch the button on or off. To hide the screen indicators...
... are listed on the LANGU.) menu (p. 61). (TIME/ Select area for guide. DISP GUIDE END The indicators vary depending on the screen. DISP GUIDE 1/2 FOCUS: MANUAL PROGRAM AE: SPOTLIGHT STEADYSHOT: OFF END To finish the operation Touch [END]. 19 Touch the button on or off. To hide the screen indicators...
Operating Instructions
Page 26
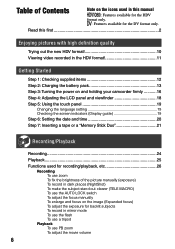
... (p. 27). Press EXPOSURE . Adjust the brightness by fixing the exposure to that of the wall side of a picture manually. appears. Move the lever up or down to make the image darker. • To return to the automatic mode, press EXPOSURE again. • The... Move the power zoom lever slightly for a slower zoom. Functions used for recording/playback, etc. • The minimum distance required between your camcorder and the subject to get a sharp focus is rotated too fast. Move it is about 1 cm (about 1/2 in dark places (NightShot Set the ...
... (p. 27). Press EXPOSURE . Adjust the brightness by fixing the exposure to that of the wall side of a picture manually. appears. Move the lever up or down to make the image darker. • To return to the automatic mode, press EXPOSURE again. • The... Move the power zoom lever slightly for a slower zoom. Functions used for recording/playback, etc. • The minimum distance required between your camcorder and the subject to get a sharp focus is rotated too fast. Move it is about 1 cm (about 1/2 in dark places (NightShot Set the ...

Operating Instructions
Page 27
...the expanded focus, press EXPANDED FOCUS again. • Press [SET] on the image (Expanded focus Set the FOCUS/ZOOM switch to MANUAL in standby mode. Press EXPANDED FOCUS to double the size of the T (Telephoto) side automatically and allows for focusing. • ... to focus automatically. To use the AUTO LOCK switch ...... You can also use these functions in .). infrared port with your camcorder during expanded focus for easier focusing. • The peaking is not recorded on a tape. appears and the zoom moves to the top of...
...the expanded focus, press EXPANDED FOCUS again. • Press [SET] on the image (Expanded focus Set the FOCUS/ZOOM switch to MANUAL in standby mode. Press EXPANDED FOCUS to double the size of the T (Telephoto) side automatically and allows for focusing. • ... to focus automatically. To use the AUTO LOCK switch ...... You can also use these functions in .). infrared port with your camcorder during expanded focus for easier focusing. • The peaking is not recorded on a tape. appears and the zoom moves to the top of...

Operating Instructions
Page 32
...) Super NightShot (47) Color Slow Shutter (47) PictBridge connecting (70) Warning (96) Meaning AE SHIFT (46) WB SHIFT (46) Picture effect (53) Digital effect (52) Manual focus (27) PROGRAM AE (44) Sharpness (45) Backlight (27) White balance (45) SteadyShot off (48) Zebra (47) TELE MACRO (27) CAMERA COLOR (46...
...) Super NightShot (47) Color Slow Shutter (47) PictBridge connecting (70) Warning (96) Meaning AE SHIFT (46) WB SHIFT (46) Picture effect (53) Digital effect (52) Manual focus (27) PROGRAM AE (44) Sharpness (45) Backlight (27) White balance (45) SteadyShot off (48) Zebra (47) TELE MACRO (27) CAMERA COLOR (46...

Operating Instructions
Page 36
...HD (high definition) image quality * i.LINK (for HDV1080i) COMPONENT IN 16:9 TV or 4:3 TV SD (standard definition) image quality * i.LINK COMPONENT IN S VIDEO VIDEO/ AUDIO See page 37 for notes on connection. • Set the menu on your camcorder Open the jack...is equipped with and connectors the TV is played back as the power source (p. 13). Jacks on Connection" and refer also to the instruction manuals supplied with the devices to be connected with . See page 39 for connecting methods. See page 39 for connecting method , and . Connecting to...
...HD (high definition) image quality * i.LINK (for HDV1080i) COMPONENT IN 16:9 TV or 4:3 TV SD (standard definition) image quality * i.LINK COMPONENT IN S VIDEO VIDEO/ AUDIO See page 37 for notes on connection. • Set the menu on your camcorder Open the jack...is equipped with and connectors the TV is played back as the power source (p. 13). Jacks on Connection" and refer also to the instruction manuals supplied with the devices to be connected with . See page 39 for connecting methods. See page 39 for connecting method , and . Connecting to...
Operating Instructions
Page 39
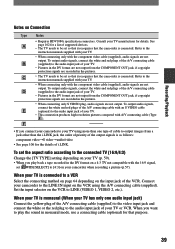
...only S VIDEO plug, audio signals are not output. To set [ WIDE SELECT] to the instruction manuals supplied with your TV. • When connecting only with the component video cable (supplied), audio ... yellow plug of your TV is connected to be set so that it recognizes that the camcorder is connected. To output audio signals, connect the white and red plugs of the A/V ...TV TYPE] setting depending on the input jack of your TV. • This connection produces high resolution pictures compared with the component video cable (supplied), audio signals are not output. Recording/...
...only S VIDEO plug, audio signals are not output. To set [ WIDE SELECT] to the instruction manuals supplied with your TV. • When connecting only with the component video cable (supplied), audio ... yellow plug of your TV is connected to be set so that it recognizes that the camcorder is connected. To output audio signals, connect the white and red plugs of the A/V ...TV TYPE] setting depending on the input jack of your TV. • This connection produces high resolution pictures compared with the component video cable (supplied), audio signals are not output. Recording/...

Operating Instructions
Page 45
... set [WHITE BAL.] to [AUTO]. • When you have changed the battery pack while [AUTO] is selected, select [AUTO] and aim your camcorder at a studio, or under sodium lamps or incandescent-like color lamps ONE PUSH ( ) The white balance will be adjusted according to the ambient light.... - SHARPNESS You can select a shutter speed between 1/10000 second and 1/4 second. Soften Sharpen SHUTTR SPEED You can manually adjust and fix the shutter speed for your camcorder outdoors from inside the house, or vice versa. • To adjust the white balance under the same lighting conditions as...
... set [WHITE BAL.] to [AUTO]. • When you have changed the battery pack while [AUTO] is selected, select [AUTO] and aim your camcorder at a studio, or under sodium lamps or incandescent-like color lamps ONE PUSH ( ) The white balance will be adjusted according to the ambient light.... - SHARPNESS You can select a shutter speed between 1/10000 second and 1/4 second. Soften Sharpen SHUTTR SPEED You can manually adjust and fix the shutter speed for your camcorder outdoors from inside the house, or vice versa. • To adjust the white balance under the same lighting conditions as...

Operating Instructions
Page 46
...SPOT FOCUS You can select and adjust the focal point to aim it to [ON] (the default setting). Use a tripod and adjust the focus manually. • When recording under a discharge tube such as a fluorescent lamp, sodium lamp or mercury lamp, horizontal bands may appear in the... activating the flash before the flash automatically flashes when there is anything other than the default setting. FLASH SET FLASH LEVEL HIGH( ) Makes the flash level higher. NORMAL( ) LOW( ) Makes the flash level lower. REDEYE REDUC You can adjust ...
...SPOT FOCUS You can select and adjust the focal point to aim it to [ON] (the default setting). Use a tripod and adjust the focus manually. • When recording under a discharge tube such as a fluorescent lamp, sodium lamp or mercury lamp, horizontal bands may appear in the... activating the flash before the flash automatically flashes when there is anything other than the default setting. FLASH SET FLASH LEVEL HIGH( ) Makes the flash level higher. NORMAL( ) LOW( ) Makes the flash level lower. REDEYE REDUC You can adjust ...

Operating Instructions
Page 47
.... • The shutter speed of your fingers or other object • Remove the conversion lens (optional). • Adjust the focus manually (p. 27) when it is hard to individual differences and other objects. • Remove the conversion lens (optional). • The maximum shooting...[NS LIGHT], which emits infrared light (invisible), to [ON] (the default setting). • Do not cover the infrared port with your camcorder changes depending on the brightness. HISTOGRAM When you set [HISTOGRAM] to [ON], the [HISTOGRAM] (a graph to display a distribution of NightShot ...
.... • The shutter speed of your fingers or other object • Remove the conversion lens (optional). • Adjust the focus manually (p. 27) when it is hard to individual differences and other objects. • Remove the conversion lens (optional). • The maximum shooting...[NS LIGHT], which emits infrared light (invisible), to [ON] (the default setting). • Do not cover the infrared port with your camcorder changes depending on the brightness. HISTOGRAM When you set [HISTOGRAM] to [ON], the [HISTOGRAM] (a graph to display a distribution of NightShot ...

Operating Instructions
Page 57
... and the sound recorded afterwards (ST2), then touch . • The original sound (ST1) is cropped horizontally. Refer also to the instruction manuals supplied with your camcorder when recording a picture. AUDIO MODE 12BIT Records in the 12-bit mode (2 stereo sounds). 16BIT ( ) Records in... the 16-bit mode (1 stereo sound with high quality). • When recording in the HDV format, sound is automatically recorded in [16BIT] mode...
... and the sound recorded afterwards (ST2), then touch . • The original sound (ST1) is cropped horizontally. Refer also to the instruction manuals supplied with your camcorder when recording a picture. AUDIO MODE 12BIT Records in the 12-bit mode (2 stereo sounds). 16BIT ( ) Records in... the 16-bit mode (1 stereo sound with high quality). • When recording in the HDV format, sound is automatically recorded in [16BIT] mode...
Operating Instructions
Page 58
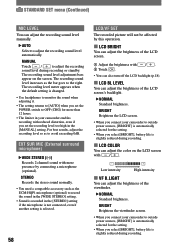
...8226; Use headphones to monitor the sound when adjusting it. • The setting returns to [AUTO] when you set the recording level too high in the [MANUAL] setting. For best results, adjust the recording level so as to OFF (CHG) for more presence by connecting a microphone (optional). BRIGHT ...You can adjust the brightness of the LCD screen. Adjust the brightness with more than 12 hours. • The limiter in your camcorder enables recording with reduced distortion, even if you set the POWER switch to avoid exceeding 0dB. STEREO Records the stereo sound normally. •...
...8226; Use headphones to monitor the sound when adjusting it. • The setting returns to [AUTO] when you set the recording level too high in the [MANUAL] setting. For best results, adjust the recording level so as to OFF (CHG) for more presence by connecting a microphone (optional). BRIGHT ...You can adjust the brightness of the LCD screen. Adjust the brightness with more than 12 hours. • The limiter in your camcorder enables recording with reduced distortion, even if you set the POWER switch to avoid exceeding 0dB. STEREO Records the stereo sound normally. •...

Operating Instructions
Page 59
...not be able to view your pictures on a 4:3 standard TV. HDV format pictures DV format pictures 4:3 Select to recognize the video signal from this camcorder. Refer also to CAMERA-TAPE, this setting is effective only when [AUTO] or [HDV] is selected in [REC FORMAT]. PictBridge PRINT See page ... signal via an S VIDEO jack, and play back the tape, set to PLAY/EDIT, this setting is effective only when [HDV1080i] is set to the manual supplied with your TV. The recorded pictures are played back as following items. - [COMPONENT] (p. 59) - [i.LINK CONV] (p. 59) Continued 59...
...not be able to view your pictures on a 4:3 standard TV. HDV format pictures DV format pictures 4:3 Select to recognize the video signal from this camcorder. Refer also to CAMERA-TAPE, this setting is effective only when [AUTO] or [HDV] is selected in [REC FORMAT]. PictBridge PRINT See page ... signal via an S VIDEO jack, and play back the tape, set to PLAY/EDIT, this setting is effective only when [HDV1080i] is set to the manual supplied with your TV. The recorded pictures are played back as following items. - [COMPONENT] (p. 59) - [i.LINK CONV] (p. 59) Continued 59...

Operating Instructions
Page 64
Refer also to the instruction manuals supplied with S VIDEO (optional) (Red) (White) (Yellow) Do not connect the video plug (...devices The connection method and the image quality will differ depending on your camcorder to a monaural device, connect the yellow plug of connection. *2When connecting your camcorder Open the jack cover and connect the cable. 64 Jacks on the ...video equipment and the connectors used. : Signal flow Camcorder Cable i.LINK cable (optional) i.LINK jack which is compatible with audio/video jacks *2 SD quality...
Refer also to the instruction manuals supplied with S VIDEO (optional) (Red) (White) (Yellow) Do not connect the video plug (...devices The connection method and the image quality will differ depending on your camcorder to a monaural device, connect the yellow plug of connection. *2When connecting your camcorder Open the jack cover and connect the cable. 64 Jacks on the ...video equipment and the connectors used. : Signal flow Camcorder Cable i.LINK cable (optional) i.LINK jack which is compatible with audio/video jacks *2 SD quality...

Operating Instructions
Page 86
...; Even if auto flashing or (Auto redeye reduction) is not turned on a tape. You cannot adjust the exposure manually. • You cannot adjust the exposure manually with : - [PROGRAM AE] - Adjust the focus manually (p. 27). 86 NightShot - [COLOR SLOW S] - [CINEMA EFECT] of the flash is selected, you set to CAMERATAPE. [END SEARCH...
...; Even if auto flashing or (Auto redeye reduction) is not turned on a tape. You cannot adjust the exposure manually. • You cannot adjust the exposure manually with : - [PROGRAM AE] - Adjust the focus manually (p. 27). 86 NightShot - [COLOR SLOW S] - [CINEMA EFECT] of the flash is selected, you set to CAMERATAPE. [END SEARCH...

Operating Instructions
Page 89
...; Adjust [SHARPNESS] to the instruction manuals supplied with your TV. Noises appear and or is displayed on the TV which is a blank section in the HD (high definition) quality on the screen. • The tape was recorded in a TV color system other than 2 minutes, your camcorder (NTSC). Refer to the (soften...
...; Adjust [SHARPNESS] to the instruction manuals supplied with your TV. Noises appear and or is displayed on the TV which is a blank section in the HD (high definition) quality on the screen. • The tape was recorded in a TV color system other than 2 minutes, your camcorder (NTSC). Refer to the (soften...


