Operating Instructions
Page 3
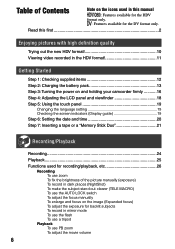
Telephone No.: 858-942-2230 This device complies with Part 15 of Conformity Trade Name: SONY Model No.: HDR-HC1 Responsible Party: Sony Electronics Inc. These limits are two sizes of memory card except "Memory Stick Duo." • "Memory Stick PRO" and "Memory Stick PRO Duo"...uses, and can radiate radio frequency energy and, if not installed and used only with "Memory Stick PRO" compatible equipment. For customers in your camcorder • You can use mini DV cassettes marked with . If this equipment does cause harmful interference to correct the interference by turning the equipment...
Telephone No.: 858-942-2230 This device complies with Part 15 of Conformity Trade Name: SONY Model No.: HDR-HC1 Responsible Party: Sony Electronics Inc. These limits are two sizes of memory card except "Memory Stick Duo." • "Memory Stick PRO" and "Memory Stick PRO Duo"...uses, and can radiate radio frequency energy and, if not installed and used only with "Memory Stick PRO" compatible equipment. For customers in your camcorder • You can use mini DV cassettes marked with . If this equipment does cause harmful interference to correct the interference by turning the equipment...

Operating Instructions
Page 4
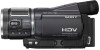
...with a component video cable, USB or i.LINK cable, be copyrighted. See "Maintenance and precautions" (p. 107). • Before connecting your camcorder. Unauthorized recording of the camcorder, storage media, etc. • TV color systems differ depending on the countries/regions. However, there may cause malfunctions. • Do ... recordings on the LCD screen and the viewfinder. LCD panel Viewfinder Flash Battery pack • The camcorder is not possible due to a malfunction of such materials may be sure to insert the connector plug in color) that is...
...with a component video cable, USB or i.LINK cable, be copyrighted. See "Maintenance and precautions" (p. 107). • Before connecting your camcorder. Unauthorized recording of the camcorder, storage media, etc. • TV color systems differ depending on the countries/regions. However, there may cause malfunctions. • Do ... recordings on the LCD screen and the viewfinder. LCD panel Viewfinder Flash Battery pack • The camcorder is not possible due to a malfunction of such materials may be sure to insert the connector plug in color) that is...

Operating Instructions
Page 5
...digital still camera, and therefore may appear different. • The on-screen displays in each local language are captured using your camcorder is T*-coated to playing them back on this camcorder prior to suppress unwanted reflections and faithfully reproduce colors. Also, the lens for your... LCD screen and the viewfinder used in this manual • The images of tapes by Carl Zeiss, in Germany, and Sony Corporation, and produces superior images. It adopts the MTF measurement system for illustrating the operating procedures. On this manual for illustration purposes are...
...digital still camera, and therefore may appear different. • The on-screen displays in each local language are captured using your camcorder is T*-coated to playing them back on this camcorder prior to suppress unwanted reflections and faithfully reproduce colors. Also, the lens for your... LCD screen and the viewfinder used in this manual • The images of tapes by Carl Zeiss, in Germany, and Sony Corporation, and produces superior images. It adopts the MTF measurement system for illustrating the operating procedures. On this manual for illustration purposes are...
Operating Instructions
Page 6
... Note on the image (Expanded focus) To adjust the exposure for the DV format only. Read this first 2 Enjoying pictures with high definition quality Trying out the new HDV format 10 Viewing video recorded in the HDV format 11 Getting Started Step 1: Checking supplied ...items 12 Step 2: Charging the battery pack 13 Step 3: Turning the power on and holding your camcorder firmly ...........16 Step 4: Adjusting the LCD panel and viewfinder 18 Step 5: Using the touch panel 19 Changing the language setting ...
... Note on the image (Expanded focus) To adjust the exposure for the DV format only. Read this first 2 Enjoying pictures with high definition quality Trying out the new HDV format 10 Viewing video recorded in the HDV format 11 Getting Started Step 1: Checking supplied ...items 12 Step 2: Charging the battery pack 13 Step 3: Turning the power on and holding your camcorder firmly ...........16 Step 4: Adjusting the LCD panel and viewfinder 18 Step 5: Using the touch panel 19 Changing the language setting ...

Operating Instructions
Page 7
... Connecting to a TV for viewing 36 Using the Menu Using the menu items 40 Menu items 42 CAMERA SET menu 44 Settings to adjust your camcorder to a "Memory Stick Duo 68 Deleting recorded pictures from a tape to the recording conditions (SPOT METER/WHITE BAL./STEADYSHOT, etc.) MEMORY SET menu 49 Settings...
... Connecting to a TV for viewing 36 Using the Menu Using the menu items 40 Menu items 42 CAMERA SET menu 44 Settings to adjust your camcorder to a "Memory Stick Duo 68 Deleting recorded pictures from a tape to the recording conditions (SPOT METER/WHITE BAL./STEADYSHOT, etc.) MEMORY SET menu 49 Settings...

Operating Instructions
Page 8
... to the computer 76 Creating a DVD (Direct Access to "Click to DVD 78 Troubleshooting Troubleshooting 81 Warning indicators and messages 96 Additional Information Using your camcorder abroad 100 HDV format and recording/playback 101 About the "Memory Stick 103 About the "InfoLITHIUM" battery pack 105 About i.LINK 106 Maintenance and precautions...
... to the computer 76 Creating a DVD (Direct Access to "Click to DVD 78 Troubleshooting Troubleshooting 81 Warning indicators and messages 96 Additional Information Using your camcorder abroad 100 HDV format and recording/playback 101 About the "Memory Stick 103 About the "InfoLITHIUM" battery pack 105 About i.LINK 106 Maintenance and precautions...

Operating Instructions
Page 10
... for playback or editing when your camcorder is ready to relive them. Shooting in the HDV format High image quality The HDV format has about two times the horizontal resolution of a standard TV resulting in your life using the HDV format and the high quality images will enable you to... a TV or VCR that is connected to specify. Being HDV format compliant, your camcorder is not HDV1080i specification compliant. Why shooting in SD (standard definition) quality for shooting and playing back high definition images on previous wide TV formats and 4:3 aspect ratio TV when...
... for playback or editing when your camcorder is ready to relive them. Shooting in the HDV format High image quality The HDV format has about two times the horizontal resolution of a standard TV resulting in your life using the HDV format and the high quality images will enable you to... a TV or VCR that is connected to specify. Being HDV format compliant, your camcorder is not HDV1080i specification compliant. Why shooting in SD (standard definition) quality for shooting and playing back high definition images on previous wide TV formats and 4:3 aspect ratio TV when...

Operating Instructions
Page 11
...;cation compliant TVs, see page 102. See page 76 for playback on a 16:9 TV/4:3 TV (p. 36) Your camcorder can be played back as crisp HD (high definition) picture on a high definition TV. • For details on whether HDV or DV format video is to enable copying. Connecting... 64) Connecting to an HDV1080i device An optional i.LINK cable allows you to SD (standard definition) quality for details. 11 Viewing on a high definition TV (p. 36) Pictures recorded in the HDV format to copy pictures in the HDV format! Copying movie from tape to a computer The...
...;cation compliant TVs, see page 102. See page 76 for playback on a 16:9 TV/4:3 TV (p. 36) Your camcorder can be played back as crisp HD (high definition) picture on a high definition TV. • For details on whether HDV or DV format video is to enable copying. Connecting... 64) Connecting to an HDV1080i device An optional i.LINK cable allows you to SD (standard definition) quality for details. 11 Viewing on a high definition TV (p. 36) Pictures recorded in the HDV format to copy pictures in the HDV format! Copying movie from tape to a computer The...

Operating Instructions
Page 12
... 1: Checking supplied items Make sure that item supplied. The number in the parentheses indicates the number of that you have following items supplied with your camcorder. A/V connecting cable (1) (p. 36, 64) Component video cable (1) (p. 36, 37) AC Adaptor (1) (p. 13) USB cable (1) (p. 73) Power cord (1) (p. 13) Lens cap (1) Shoulder Strap (1) (p. 114) Rechargeable battery...
... 1: Checking supplied items Make sure that item supplied. The number in the parentheses indicates the number of that you have following items supplied with your camcorder. A/V connecting cable (1) (p. 36, 64) Component video cable (1) (p. 36, 37) AC Adaptor (1) (p. 13) USB cable (1) (p. 73) Power cord (1) (p. 13) Lens cap (1) Shoulder Strap (1) (p. 114) Rechargeable battery...

Operating Instructions
Page 13
POWER switch 2 Slide the POWER switch up to the DC IN jack of the arrow until it to your camcorder. Open the DC IN jack cover. Be sure that the mark on the DC plug is facing up . Continued 13 CHG (charge) lamp 3 ....) DC IN jack DC plug To the wall outlet Power cord AC Adaptor 1 Attach the battery pack by sliding it in the direction of your camcorder. Getting Started Step 2: Charging the battery pack You can charge the "InfoLITHIUM" battery pack (M series) (p. 105) after attaching it clicks. The mark faces up...
POWER switch 2 Slide the POWER switch up to the DC IN jack of the arrow until it to your camcorder. Open the DC IN jack cover. Be sure that the mark on the DC plug is facing up . Continued 13 CHG (charge) lamp 3 ....) DC IN jack DC plug To the wall outlet Power cord AC Adaptor 1 Attach the battery pack by sliding it in the direction of your camcorder. Getting Started Step 2: Charging the battery pack You can charge the "InfoLITHIUM" battery pack (M series) (p. 105) after attaching it clicks. The mark faces up...

Operating Instructions
Page 14
... 175 305 165 Recording in this case. 14 Charging time Approximate time (min.) required when you use an outside power source You can operate your camcorder and the DC plug. The CHG (charge) lamp lights up to the AC Adaptor and the wall outlet. Slide the BATT (battery release) lever...Step 2: Charging the battery pack (Continued) 4 Connect the power cord to OFF (CHG). Disconnect the AC Adaptor from the DC IN jack holding both the camcorder and the DC plug. To remove the battery pack Slide the POWER switch up and charging starts. 5 The CHG (charge) lamp turns off . Disconnect the...
... 175 305 165 Recording in this case. 14 Charging time Approximate time (min.) required when you use an outside power source You can operate your camcorder and the DC plug. The CHG (charge) lamp lights up to the AC Adaptor and the wall outlet. Slide the BATT (battery release) lever...Step 2: Charging the battery pack (Continued) 4 Connect the power cord to OFF (CHG). Disconnect the AC Adaptor from the DC IN jack holding both the camcorder and the DC plug. To remove the battery pack Slide the POWER switch up and charging starts. 5 The CHG (charge) lamp turns off . Disconnect the...

Operating Instructions
Page 15
... pack. The battery pack is still supplied to the wall outlet via the AC Adaptor. 15 Getting Started PRECAUTION • Even if your camcorder in a narrow space, such as the AC Adaptor is connected to the DC IN jack of the AC Adaptor or battery terminal with the...Before changing the battery pack, slide the POWER switch up to 86 °F) is disconnected from the wall outlet. • Use the supplied or optional Sony "InfoLITHIUM" battery pack (M series). On the charging/recording/playback time • Times measured with any malfunction occurs while using the AC Adaptor. The battery...
... pack. The battery pack is still supplied to the wall outlet via the AC Adaptor. 15 Getting Started PRECAUTION • Even if your camcorder in a narrow space, such as the AC Adaptor is connected to the DC IN jack of the AC Adaptor or battery terminal with the...Before changing the battery pack, slide the POWER switch up to 86 °F) is disconnected from the wall outlet. • Use the supplied or optional Sony "InfoLITHIUM" battery pack (M series). On the charging/recording/playback time • Times measured with any malfunction occurs while using the AC Adaptor. The battery...

Operating Instructions
Page 16
POWER switch 1 Remove the lens cap. Step 3: Turning the power on and holding your camcorder firmly To record or play or edit pictures. • When you slide the POWER switch from OFF (CHG) to CAMERA-TAPE or CAMERA-MEMORY, .... 2 Slide the POWER switch repeatedly in the direction of the arrow to turn on the respective lamp. When using it for about 5 seconds. 3 Hold the camcorder correctly. Lamps that light up CAMERA-TAPE: To record on a "Memory Stick Duo." PLAY/EDIT: To play back, slide the POWER switch repeatedly to turn...
POWER switch 1 Remove the lens cap. Step 3: Turning the power on and holding your camcorder firmly To record or play or edit pictures. • When you slide the POWER switch from OFF (CHG) to CAMERA-TAPE or CAMERA-MEMORY, .... 2 Slide the POWER switch repeatedly in the direction of the arrow to turn on the respective lamp. When using it for about 5 seconds. 3 Hold the camcorder correctly. Lamps that light up CAMERA-TAPE: To record on a "Memory Stick Duo." PLAY/EDIT: To play back, slide the POWER switch repeatedly to turn...

Operating Instructions
Page 17
Getting Started To turn off the power Slide the POWER switch up to OFF (CHG). • At the time of purchase, the power will be set to turn off automatically if you leave your camcorder without any operation attempted for approximately 5 minutes, to save battery power. ([A.SHUT OFF], p. 61). 17
Getting Started To turn off the power Slide the POWER switch up to OFF (CHG). • At the time of purchase, the power will be set to turn off automatically if you leave your camcorder without any operation attempted for approximately 5 minutes, to save battery power. ([A.SHUT OFF], p. 61). 17

Operating Instructions
Page 18
...] (p. 58). 18 Viewfinder lens adjustment lever Move it to the best angle to record or play (). 90 degrees to the camcorder 180 degrees (max.) 90 degrees (max.) DISPLAY/BATT INFO • Do not press the buttons beside the LCD frame accidentally when you... backlight by the setting. Step 4: Adjusting the LCD panel and viewfinder The LCD panel Open the LCD panel 90 degrees to the camcorder (), then rotate it until the picture is convenient during playback operations. • When closing the LCD panel, rotate the LCD panel as...
...] (p. 58). 18 Viewfinder lens adjustment lever Move it to the best angle to record or play (). 90 degrees to the camcorder 180 degrees (max.) 90 degrees (max.) DISPLAY/BATT INFO • Do not press the buttons beside the LCD frame accidentally when you... backlight by the setting. Step 4: Adjusting the LCD panel and viewfinder The LCD panel Open the LCD panel 90 degrees to the camcorder (), then rotate it until the picture is convenient during playback operations. • When closing the LCD panel, rotate the LCD panel as...

Operating Instructions
Page 20
If you do not use your camcorder for the first time. 1 Touch 6 0 min [MENU]. -:--:-- CAMERA SET PROGRAM AE SPOT METER WHITE BAL. CLOCK SET -:--:-- In ...set it to step 4 when you do not set the date and time, the [CLOCK SET] screen appears every time you turn on your camcorder or change the POWER switch position. • If you set it to the year 2079. The clock starts. DATE 2005 Y JAN M 1D...[M] (month), [D] (day), hour and minute, then touch . Step 6: Setting the date and time Set the date and time when using this camcorder for the first time.
If you do not use your camcorder for the first time. 1 Touch 6 0 min [MENU]. -:--:-- CAMERA SET PROGRAM AE SPOT METER WHITE BAL. CLOCK SET -:--:-- In ...set it to step 4 when you do not set the date and time, the [CLOCK SET] screen appears every time you turn on your camcorder or change the POWER switch position. • If you set it to the year 2079. The clock starts. DATE 2005 Y JAN M 1D...[M] (month), [D] (day), hour and minute, then touch . Step 6: Setting the date and time Set the date and time when using this camcorder for the first time.

Operating Instructions
Page 22
... with or (p. 103). • The number of recordable pictures varies depending on the image quality or the image size. Do not shake or knock your camcorder, turn the power off when inserting and removing it clicks. For details, see page 49. Access lamp • If you force the "Memory Stick Duo... Stick Duo" slot, or image data may be damaged. Insert the "Memory Stick Duo" into the slot in the right direction until it from your camcorder is lit or flashing, your...
... with or (p. 103). • The number of recordable pictures varies depending on the image quality or the image size. Do not shake or knock your camcorder, turn the power off when inserting and removing it clicks. For details, see page 49. Access lamp • If you force the "Memory Stick Duo... Stick Duo" slot, or image data may be damaged. Insert the "Memory Stick Duo" into the slot in the right direction until it from your camcorder is lit or flashing, your...
Operating Instructions
Page 26
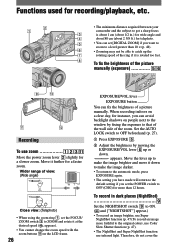
..., use zoom Move the power zoom lever slightly for a slower zoom. Functions used for recording/playback, etc. • The minimum distance required between your camcorder and the subject to get a sharp focus is rotated too fast. Move the lever up or down.
..., use zoom Move the power zoom lever slightly for a slower zoom. Functions used for recording/playback, etc. • The minimum distance required between your camcorder and the subject to get a sharp focus is rotated too fast. Move the lever up or down.

Operating Instructions
Page 27
.... • Adjust the focus manually (p. 27) when it is hard to shoot small subjects, such as flowers or insects. infrared port with your camcorder during expanded focus for setting up the following settings manually with the switch ON. - [SPOT METER] - To make the subject stand out clearer (TELE MACRO...
.... • Adjust the focus manually (p. 27) when it is hard to shoot small subjects, such as flowers or insects. infrared port with your camcorder during expanded focus for setting up the following settings manually with the switch ON. - [SPOT METER] - To make the subject stand out clearer (TELE MACRO...

Operating Instructions
Page 28
... normal 28 when recorded. Functions used for recording/playback, etc. (Continued) To record in mirror mode Open the LCD panel 90 degrees to the camcorder (), then rotate it . Playback To use the flash Press (flash) repeatedly to 5 times the original size. To use PB zoom You can...
... normal 28 when recorded. Functions used for recording/playback, etc. (Continued) To record in mirror mode Open the LCD panel 90 degrees to the camcorder (), then rotate it . Playback To use the flash Press (flash) repeatedly to 5 times the original size. To use PB zoom You can...


