Handycam® Handbook
Page 3
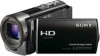
... conditions, such as at the sun. Table of Contents Enjoy Useful Functions Read this first Supplied items The numbers in ( ) are the supplied quantity. AC Adaptor (1) Power cord (Mains lead) (1) Component A/V cable (1) A/V connecting cable (1) USB connection support cable (1) Use this camcorder. LCD Screen Battery...
... conditions, such as at the sun. Table of Contents Enjoy Useful Functions Read this first Supplied items The numbers in ( ) are the supplied quantity. AC Adaptor (1) Power cord (Mains lead) (1) Component A/V cable (1) A/V connecting cable (1) USB connection support cable (1) Use this camcorder. LCD Screen Battery...
Handycam® Handbook
Page 4
Table of the camcorder being lost, save all the data stored on battery pack/AC Adaptor Be sure to remove the battery pack or the AC Adaptor after turning off the camcorder. Disconnect the AC Adaptor from being activated in such situations. DVD media recorded with HD image quality (high definition) DVD media recorded...
Table of the camcorder being lost, save all the data stored on battery pack/AC Adaptor Be sure to remove the battery pack or the AC Adaptor after turning off the camcorder. Disconnect the AC Adaptor from being activated in such situations. DVD media recorded with HD image quality (high definition) DVD media recorded...
Handycam® Handbook
Page 5
... purposes are as follows. Images cannot be damaged, recorded CX160/CX180) . recording media may be saved HDR-CX160 HDR-CX180 Internal memory + memory card 16 GB 32 GB ...the connector plug in this series are captured using a When using genuine Sony accessories. device with Table of Contents computer or accessories Do not try ...DVD disc recorded with communication cables, be available removing the battery pack or AC Adaptor in a malfunction of the camcorder is called "recording media." Pushing the plug forcibly...
... purposes are as follows. Images cannot be damaged, recorded CX160/CX180) . recording media may be saved HDR-CX160 HDR-CX180 Internal memory + memory card 16 GB 32 GB ...the connector plug in this series are captured using a When using genuine Sony accessories. device with Table of Contents computer or accessories Do not try ...DVD disc recorded with communication cables, be available removing the battery pack or AC Adaptor in a malfunction of the camcorder is called "recording media." Pushing the plug forcibly...
Handycam® Handbook
Page 13
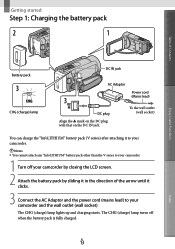
... charge the "InfoLITHIUM" battery pack (V series) after attaching it in the direction of Contents Enjoy Useful Functions Battery pack CHG (charge) lamp DC IN jack AC Adaptor Power cord (Mains lead) DC plug Align the mark on the DC plug with that on the DC IN jack. Getting started Step 1: Charging... the battery pack Table of the arrow until it clicks. 3 Connect the AC Adaptor and the power cord (mains lead) to your camcorder. 1 Turn off when the battery pack is fully charged.
... charge the "InfoLITHIUM" battery pack (V series) after attaching it in the direction of Contents Enjoy Useful Functions Battery pack CHG (charge) lamp DC IN jack AC Adaptor Power cord (Mains lead) DC plug Align the mark on the DC plug with that on the DC IN jack. Getting started Step 1: Charging... the battery pack Table of the arrow until it clicks. 3 Connect the AC Adaptor and the power cord (mains lead) to your camcorder. 1 Turn off when the battery pack is fully charged.
Handycam® Handbook
Page 14
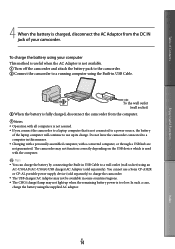
...IN jack of the laptop computer will continue to a wall outlet (wall socket) using an AC-U501AD/AC-U50AG USB charger/AC Adaptor (sold separately) to a running computer using the Built-in USB Cable. The camcorder may...the battery using your camcorder. Table of Contents Enjoy Useful Functions 4 When the battery is charged, disconnect the AC Adaptor from the computer. Notes Operation with all computers is not assured. If ...battery by connecting the Built-in USB Cable to use a Sony CP-AH2R or CP-AL portable power supply device (sold separately). US 14 Index
...IN jack of the laptop computer will continue to a wall outlet (wall socket) using an AC-U501AD/AC-U50AG USB charger/AC Adaptor (sold separately) to a running computer using the Built-in USB Cable. The camcorder may...the battery using your camcorder. Table of Contents Enjoy Useful Functions 4 When the battery is charged, disconnect the AC Adaptor from the computer. Notes Operation with all computers is not assured. If ...battery by connecting the Built-in USB Cable to use a Sony CP-AH2R or CP-AL portable power supply device (sold separately). US 14 Index
Handycam® Handbook
Page 15
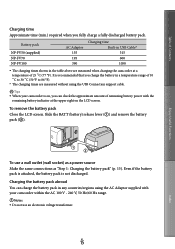
... if the battery pack is attached, the battery pack is recommended that you charge the battery in the table above are measured without using the AC Adaptor supplied with the remaining battery indicator at a temperature of 10 C to 30 C (50 °F to 86 °F). * The charging ... fully charge a fully discharged battery pack. To remove the battery pack Close the LCD screen. Battery pack NP-FV50 (supplied) NP-FV70 NP-FV100 AC Adaptor 155 195 390 Charging time Built-in USB Cable* 315 600 1050 The charging times shown in a temperature range of 25 C (77...
... if the battery pack is attached, the battery pack is recommended that you charge the battery in the table above are measured without using the AC Adaptor supplied with the remaining battery indicator at a temperature of 10 C to 30 C (50 °F to 86 °F). * The charging ... fully charge a fully discharged battery pack. To remove the battery pack Close the LCD screen. Battery pack NP-FV50 (supplied) NP-FV70 NP-FV100 AC Adaptor 155 195 390 Charging time Built-in USB Cable* 315 600 1050 The charging times shown in a temperature range of 25 C (77...
Handycam® Handbook
Page 16
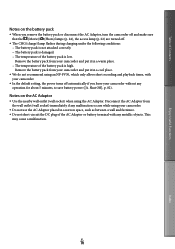
... malfunction occurs while using your camcorder. In the default setting, the power turns off automatically if you remove the battery pack or disconnect the AC Adaptor, turn the camcorder off and make sure that the (Movie)/ (Photo) lamps (p. 24), the access lamp (p. 22) are turned off. ...battery pack is damaged. The temperature of the battery pack is high. This may cause a malfunction. Shut Off], p. 82). Disconnect the AC Adaptor from your camcorder and put it in a narrow space, such as between a wall and furniture. Do not short-circuit the DC plug of...
... malfunction occurs while using your camcorder. In the default setting, the power turns off automatically if you remove the battery pack or disconnect the AC Adaptor, turn the camcorder off and make sure that the (Movie)/ (Photo) lamps (p. 24), the access lamp (p. 22) are turned off. ...battery pack is damaged. The temperature of the battery pack is high. This may cause a malfunction. Shut Off], p. 82). Disconnect the AC Adaptor from your camcorder and put it in a narrow space, such as between a wall and furniture. Do not short-circuit the DC plug of...
Handycam® Handbook
Page 25
... images across the entire screen (full pixel display). During this time, do not apply shock or vibration to the camcorder, or remove the battery or AC Adaptor. Access lamp (p. 22) is lit or flashing The media icon in the default setting. You can specify the priority face by touching...
... images across the entire screen (full pixel display). During this time, do not apply shock or vibration to the camcorder, or remove the battery or AC Adaptor. Access lamp (p. 22) is lit or flashing The media icon in the default setting. You can specify the priority face by touching...
Handycam® Handbook
Page 31
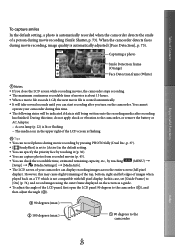
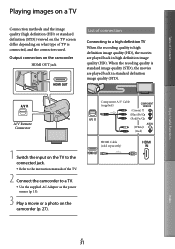
... screen differ depending on the camcorder (p. 27). Output connectors on the camcorder HDMI OUT jack List of connection Connecting to a TV. Use the supplied AC Adaptor as the power source (p. 15). 3 Play a movie or a photo on what type of TV is connected, and the connectors used.
... screen differ depending on the camcorder (p. 27). Output connectors on the camcorder HDMI OUT jack List of connection Connecting to a TV. Use the supplied AC Adaptor as the power source (p. 15). 3 Play a movie or a photo on what type of TV is connected, and the connectors used.
Handycam® Handbook
Page 42
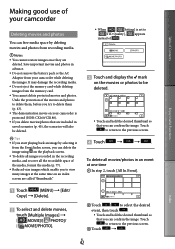
... desired thumbnail so that you can confirm the image. Save important movies and photos in advance. Do not remove the battery pack or the AC Adaptor from the memory card. You cannot delete protected movies and photos. Touch to return to the previous screen. Touch . Touch to return...]/[ PHOTO]/ [ MOVIE/PHOTO]. When [ / Setting] is set to [ STD Quality], appears instead of . Touch and display the mark on your camcorder is protected (HDR-CX160/CX180). If you delete movies/photos that are deleted.
... desired thumbnail so that you can confirm the image. Save important movies and photos in advance. Do not remove the battery pack or the AC Adaptor from the memory card. You cannot delete protected movies and photos. Touch to return to the previous screen. Touch . Touch to return...]/[ PHOTO]/ [ MOVIE/PHOTO]. When [ / Setting] is set to [ STD Quality], appears instead of . Touch and display the mark on your camcorder is protected (HDR-CX160/CX180). If you delete movies/photos that are deleted.
Handycam® Handbook
Page 44
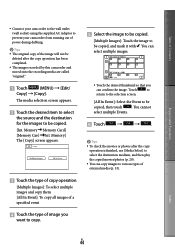
.../ Copy] [Copy]. Index US 44 Table of Contents Enjoy Useful Functions Connect your camcorder to the wall outlet (wall socket) using the supplied AC Adaptor to prevent your camcorder from running out of power during dubbing. Tips The original copy of the image will not be deleted after...
.../ Copy] [Copy]. Index US 44 Table of Contents Enjoy Useful Functions Connect your camcorder to the wall outlet (wall socket) using the supplied AC Adaptor to prevent your camcorder from running out of power during dubbing. Tips The original copy of the image will not be deleted after...

Handycam® Handbook
Page 45
... the playback screen of a movie. Returns to the beginning of the movie to divide it (p. 43). Do not remove the battery pack or the AC Adaptor from your camcorder while dividing the movie. Undo the protection of the selected movie Touch . Use the supplied software "PMB" for more precision. Enjoy...
... the playback screen of a movie. Returns to the beginning of the movie to divide it (p. 43). Do not remove the battery pack or the AC Adaptor from your camcorder while dividing the movie. Undo the protection of the selected movie Touch . Use the supplied software "PMB" for more precision. Enjoy...
Handycam® Handbook
Page 49
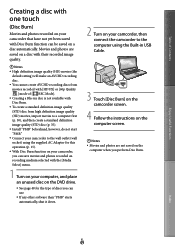
... definition image quality (STD) disc (p. 35). Install "PMB" beforehand, however, do not start "PMB." Connect your camcorder to the computer using the supplied AC Adaptor for this operation (p. 15). With Disc Burn function on your camcorder, you can save movies and photos recorded on recording medium selected with the...
... definition image quality (STD) disc (p. 35). Install "PMB" beforehand, however, do not start "PMB." Connect your camcorder to the computer using the supplied AC Adaptor for this operation (p. 15). With Disc Burn function on your camcorder, you can save movies and photos recorded on recording medium selected with the...

Handycam® Handbook
Page 50
...back to the camcorder. Turn on the computer beforehand. Notes Connect your camcorder to the wall outlet (wall socket) using the supplied AC Adaptor for this case, your camcorder, then connect the camcorder to the computer using the Built-in this operation (p. 15). 1 Turn on your camcorder) on...Movies and photos are imported to "PMB Help" for the movie to be imported to the computer using the [Media Select] menu (HDR-CX160/CX180). If the [USB Select] screen does not appear, touch (MENU) [Setup] [ (Connection)] [USB Connect...
...back to the camcorder. Turn on the computer beforehand. Notes Connect your camcorder to the wall outlet (wall socket) using the supplied AC Adaptor for this case, your camcorder, then connect the camcorder to the computer using the Built-in this operation (p. 15). 1 Turn on your camcorder) on...Movies and photos are imported to "PMB Help" for the movie to be imported to the computer using the [Media Select] menu (HDR-CX160/CX180). If the [USB Select] screen does not appear, touch (MENU) [Setup] [ (Connection)] [USB Connect...

Handycam® Handbook
Page 55
...assured with every device satisfying requirements for operating. For details on available external media devices, go to the Sony support website in your country/region. 1 Connect the AC Adaptor and the power cord (mains lead) to the DC IN jack of your camcorder and the wall outlet (wall... You may not be available in some countries/regions. Connect your camcorder to the wall outlet (wall socket) using the supplied AC Adaptor (p. 15). Refer to the instruction manual supplied with the external media device. Tips You can also play back images...
...assured with every device satisfying requirements for operating. For details on available external media devices, go to the Sony support website in your country/region. 1 Connect the AC Adaptor and the power cord (mains lead) to the DC IN jack of your camcorder and the wall outlet (wall... You may not be available in some countries/regions. Connect your camcorder to the wall outlet (wall socket) using the supplied AC Adaptor (p. 15). Refer to the instruction manual supplied with the external media device. Tips You can also play back images...

Handycam® Handbook
Page 58
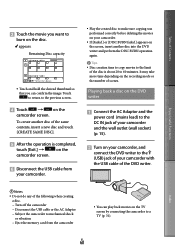
... can create a disc or play back the high definition image quality (HD) movies on your camcorder to the wall outlet (wall socket) using the supplied AC Adaptor for this operation (p. 15). DVDirect Express is referred to as "DVD writer" in USB Cable for this section. US 58 Discs that have not...; Touch [Copy images that can be used 12 cm DVD-R 12 cm DVD+R The device does not support two-layered discs. 1 Connect the AC Adaptor and the power cord (mains lead) to the DC IN jack of your camcorder and the wall outlet (wall socket) (p. 15). 2 Turn on your camcorder...
... can create a disc or play back the high definition image quality (HD) movies on your camcorder to the wall outlet (wall socket) using the supplied AC Adaptor for this operation (p. 15). DVDirect Express is referred to as "DVD writer" in USB Cable for this section. US 58 Discs that have not...; Touch [Copy images that can be used 12 cm DVD-R 12 cm DVD+R The device does not support two-layered discs. 1 Connect the AC Adaptor and the power cord (mains lead) to the DC IN jack of your camcorder and the wall outlet (wall socket) (p. 15). 2 Turn on your camcorder...
Handycam® Handbook
Page 60
...DVD writer to the previous screen. Touch on the camcorder screen. Playing back a disc on the DVD writer Connect the AC Adaptor and the power cord (mains lead) to the DC IN jack of your camcorder and the wall outlet (wall socket) (p. 15). Turn...Notes Do not do any of the following when creating a disc. Turn off the camcorder Disconnect the USB cable or the AC Adaptor Subject the camcorder to mechanical shock or vibration Eject the memory card from your camcorder. If [Failed.] or [DISC BURN ...
...DVD writer to the previous screen. Touch on the camcorder screen. Playing back a disc on the DVD writer Connect the AC Adaptor and the power cord (mains lead) to the DC IN jack of your camcorder and the wall outlet (wall socket) (p. 15). Turn...Notes Do not do any of the following when creating a disc. Turn off the camcorder Disconnect the USB cable or the AC Adaptor Subject the camcorder to mechanical shock or vibration Eject the memory card from your camcorder. If [Failed.] or [DISC BURN ...

Handycam® Handbook
Page 61
... USB cable to connect your camcorder to the wall outlet (wall socket) using the supplied AC Adaptor for this operation (p. 15). Sony DVD writer may not be available in USB Cable. http://sony.storagesupport.com/ 1 Connect the AC Adaptor and the power cord (mains lead) to your camcorder, and connect a DVD writer, ... the tray is completed, touch on your camcorder with the Built-in some countries/regions. Always maintain the firmware of the Sony DVDirect (DVD writer) to a disc creation device, which is compatible with high definition image quality (HD) movies, such as...
... USB cable to connect your camcorder to the wall outlet (wall socket) using the supplied AC Adaptor for this operation (p. 15). Sony DVD writer may not be available in USB Cable. http://sony.storagesupport.com/ 1 Connect the AC Adaptor and the power cord (mains lead) to your camcorder, and connect a DVD writer, ... the tray is completed, touch on your camcorder with the Built-in some countries/regions. Always maintain the firmware of the Sony DVDirect (DVD writer) to a disc creation device, which is compatible with high definition image quality (HD) movies, such as...

Handycam® Handbook
Page 62
... on a disc or video cassette, by connecting your camcorder to the wall outlet (wall socket) using the supplied AC Adaptor for this operation (p. 15). Sony DVD writer may not be copied with a recorder, etc. Enjoy Useful Functions Index US 62 Refer also to the instruction... manuals supplied with the devices to be connected. Notes Connect your camcorder to a disc recorder, a Sony DVD writer, etc., other...
... on a disc or video cassette, by connecting your camcorder to the wall outlet (wall socket) using the supplied AC Adaptor for this operation (p. 15). Sony DVD writer may not be copied with a recorder, etc. Enjoy Useful Functions Index US 62 Refer also to the instruction... manuals supplied with the devices to be connected. Notes Connect your camcorder to a disc recorder, a Sony DVD writer, etc., other...
Handycam® Handbook
Page 77
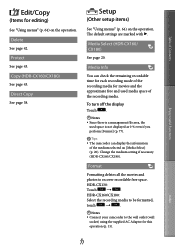
...Format Formatting deletes all the movies and photos to the wall outlet (wall socket) using the supplied AC Adaptor for editing) See "Using menus" (p. 64) on the operation. HDR-CX130: Touch . HDR-CX160/CX180: Select the recording media to be formatted, touch . Notes ... [Media Select] (p. 20). Table of Contents Enjoy Useful Functions Edit/Copy (Items for this operation (p. 15). Media Select (HDR-CX160/ CX180) See page 20. Protect See page 43. The default settings are marked with . Change the medium setting if necessary...
...Format Formatting deletes all the movies and photos to the wall outlet (wall socket) using the supplied AC Adaptor for editing) See "Using menus" (p. 64) on the operation. HDR-CX130: Touch . HDR-CX160/CX180: Select the recording media to be formatted, touch . Notes ... [Media Select] (p. 20). Table of Contents Enjoy Useful Functions Edit/Copy (Items for this operation (p. 15). Media Select (HDR-CX160/ CX180) See page 20. Protect See page 43. The default settings are marked with . Change the medium setting if necessary...


