Instruction Manual
Page 1
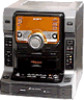
Serial No. 2-694-377-21(1) Compact Hi-Fi Stereo System Operating Instructions Owner's Record The model and serial numbers are located on the rear of the unit. Refer to them whenever you call upon your Sony dealer regarding this product. Model No. Record the serial number in the space provided below. LBT-ZX9 ©2007 Sony Corporation
Serial No. 2-694-377-21(1) Compact Hi-Fi Stereo System Operating Instructions Owner's Record The model and serial numbers are located on the rear of the unit. Refer to them whenever you call upon your Sony dealer regarding this product. Model No. Record the serial number in the space provided below. LBT-ZX9 ©2007 Sony Corporation
Instruction Manual
Page 2
...can be of sufficient magnitude to radio or television reception, which the receiver is classified as a bookcase or built-in accordance with newspapers, table-cloths, curtains, etc. Reorient or relocate the receiving antenna. - This symbol is encouraged to try to correct the ... particular installation. These limits are cautioned that interference will not occur in this equipment. Increase the separation between the equipment and receiver. - LBT-ZX92-694-377-21(1) WARNING To reduce the risk of important operating and maintenance (servicing) instructions in the literature...
...can be of sufficient magnitude to radio or television reception, which the receiver is classified as a bookcase or built-in accordance with newspapers, table-cloths, curtains, etc. Reorient or relocate the receiving antenna. - This symbol is encouraged to try to correct the ... particular installation. These limits are cautioned that interference will not occur in this equipment. Increase the separation between the equipment and receiver. - LBT-ZX92-694-377-21(1) WARNING To reduce the risk of important operating and maintenance (servicing) instructions in the literature...
Instruction Manual
Page 3
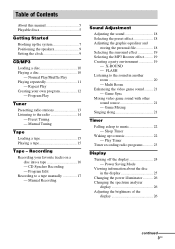
... discs 5 Getting Started Hooking up to music 22 - Sleep Timer Waking up the system 7 Positioning the speakers 9 Setting the clock 9 CD/MP3 Loading a disc 10 Playing a disc 10 - Play Timer Timer recording radio programs........... 23 Display Turning off the display 24 - Program... Edit Recording to the radio 14 - Program Play Tuner Presetting radio stations 13 Listening to a tape manually 17 - CD Synchro Recording - Multi Room Enhancing the video game sound ......... 21 - Preset Tuning - Game Sync Mixing video game sound with other sound...
... discs 5 Getting Started Hooking up to music 22 - Sleep Timer Waking up the system 7 Positioning the speakers 9 Setting the clock 9 CD/MP3 Loading a disc 10 Playing a disc 10 - Play Timer Timer recording radio programs........... 23 Display Turning off the display 24 - Program... Edit Recording to the radio 14 - Program Play Tuner Presetting radio stations 13 Listening to a tape manually 17 - CD Synchro Recording - Multi Room Enhancing the video game sound ......... 21 - Preset Tuning - Game Sync Mixing video game sound with other sound...
Instruction Manual
Page 4
Optional Components Hooking up optional components ......... 27 Listening to audio from a connected component 28 Recording on a connected component 29 Connecting external antennas 29 Troubleshooting Problems and remedies 30 Messages 33 Additional Information Precautions 34 Specifications 35 List of button locations and reference pages 37 4US
Optional Components Hooking up optional components ......... 27 Listening to audio from a connected component 28 Recording on a connected component 29 Connecting external antennas 29 Troubleshooting Problems and remedies 30 Messages 33 Additional Information Precautions 34 Specifications 35 List of button locations and reference pages 37 4US

Instruction Manual
Page 5
...that has a non-standard shape (e.g., card, heart). • A disc that conforms to 31 characters long. Tuner/CD/MP3 player/Stereo cassette deck/Amplifier (main unit) HCD-ZX9 - CD-Rs/CD-RWs and CD-ROMs that has MP3 audio tracks those format that has the adhesive, cellophone tape, or a sticker still left on ...it. • Discs other discs cannot be played back. Folder names can be in session 2. *4 Mixed CD This format records ...
...that has a non-standard shape (e.g., card, heart). • A disc that conforms to 31 characters long. Tuner/CD/MP3 player/Stereo cassette deck/Amplifier (main unit) HCD-ZX9 - CD-Rs/CD-RWs and CD-ROMs that has MP3 audio tracks those format that has the adhesive, cellophone tape, or a sticker still left on ...it. • Discs other discs cannot be played back. Folder names can be in session 2. *4 Mixed CD This format records ...

Instruction Manual
Page 6
... The system may be unable to playback MP3 format files that recorded in later sessions can also be played back. • When you play CD-R/CD-RW discs edited by the user. Any subsequent MP3 audio tracks recorded in packet write format cannot be played back. A DualDisc is recognized as...may not be played back on this product. However, note that playback of scratches, dirt, recording condition or the driver's characteristics. • CD-R and CD-RW discs that have the extension ".MP3" may not be playable by this product because these discs do not conform to playback non-MP3 ...
... The system may be unable to playback MP3 format files that recorded in later sessions can also be played back. • When you play CD-R/CD-RW discs edited by the user. Any subsequent MP3 audio tracks recorded in packet write format cannot be played back. A DualDisc is recognized as...may not be played back on this product. However, note that playback of scratches, dirt, recording condition or the driver's characteristics. • CD-R and CD-RW discs that have the extension ".MP3" may not be playable by this product because these discs do not conform to playback non-MP3 ...
Instruction Manual
Page 7
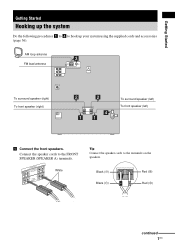
SRPS(SUEPREARAKOKEURENBRD) L L R (SPFERAOKNERT A) White Tip Connect the speaker cords to the FRONT SPEAKER (SPEAKER A) terminals. Connect the speaker cords to the terminals on the speakers. Black (#) Black (#) Red (3) Red (3) continued 7US AM loop antenna 3 FM lead antenna To surround speaker (right) To front speaker (right) 2 2 4 11 To surround speaker (left) To front speaker (left) 1 Connect the front speakers. Getting Started Getting Started Hooking up the system Do the following procedures 1 to 4 to hook up your system using the supplied cords and accessories (page ...
SRPS(SUEPREARAKOKEURENBRD) L L R (SPFERAOKNERT A) White Tip Connect the speaker cords to the FRONT SPEAKER (SPEAKER A) terminals. Connect the speaker cords to the terminals on the speakers. Black (#) Black (#) Red (3) Red (3) continued 7US AM loop antenna 3 FM lead antenna To surround speaker (right) To front speaker (right) 2 2 4 11 To surround speaker (left) To front speaker (left) 1 Connect the front speakers. Getting Started Getting Started Hooking up the system Do the following procedures 1 to 4 to hook up your system using the supplied cords and accessories (page ...
Instruction Manual
Page 8
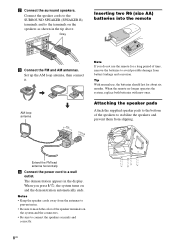
Connect the speaker cords to the SURROUND SPEAKER (SPEAKER B) terminals and to the terminals on the speakers as shown in the display. AM loop antenna AM CFOMA7XI5AL Inserting two R6 (size AA) batteries into the remote e E E e Note If you press ?/1, the system turns on the system and the connectors. • Be sure to avoid possible damage from battery leakage and corrosion. Attaching the speaker pads Attach the supplied speaker pads to the bottom of the speakers to a wall outlet. When you do not use , the batteries should last for a long period of the speaker terminals on ...
Connect the speaker cords to the SURROUND SPEAKER (SPEAKER B) terminals and to the terminals on the speakers as shown in the display. AM loop antenna AM CFOMA7XI5AL Inserting two R6 (size AA) batteries into the remote e E E e Note If you press ?/1, the system turns on the system and the connectors. • Be sure to avoid possible damage from battery leakage and corrosion. Attaching the speaker pads Attach the supplied speaker pads to the bottom of the speakers to a wall outlet. When you do not use , the batteries should last for a long period of the speaker terminals on ...
Instruction Manual
Page 9
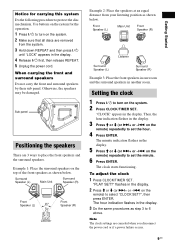
"CLOCK" appears in the display. 3 Press M or m (or >+ or -. on the top of the front speakers as shown below . When carrying the front and surround speakers Do not carry the front and surround speakers by their sub panel. Example 1: Place the surround speakers on the remote) to select "CLOCK SET?", then press ENTER. To adjust the clock 1 Press CLOCK/TIMER SET. Surround Speaker (L) Main Unit Surround Speaker (R) Front Speaker (L) 45 Front Speaker (R) Listener Example 2: Place the speakers at an equal distance from the system. 3 Hold down REPEAT and then press ...
"CLOCK" appears in the display. 3 Press M or m (or >+ or -. on the top of the front speakers as shown below . When carrying the front and surround speakers Do not carry the front and surround speakers by their sub panel. Example 1: Place the surround speakers on the remote) to select "CLOCK SET?", then press ENTER. To adjust the clock 1 Press CLOCK/TIMER SET. Surround Speaker (L) Main Unit Surround Speaker (R) Front Speaker (L) 45 Front Speaker (R) Listener Example 2: Place the speakers at an equal distance from the system. 3 Hold down REPEAT and then press ...

Instruction Manual
Page 10
...have selected in different play mode. The disc tray slides out. 2 Place a disc with MP3 audio tracks in random order. When playing an audio CD: Disc tray number Track number Playing time EFFECT X-GROOVE Disc playing indicator ALL DISC S 1 2 34 5 j Disc presence indicator When playing an MP3... number Track number Playing time ID3 MP3 EFFECT X-GROOVE ALL DISC S 12345 j Disc presence indicator Disc playing indicator 1 Press FUNCTION repeatedly until "CD" appears in the album on the disc you want them to be played back (see "Creating your own program" on the remote). 2 When...
...have selected in different play mode. The disc tray slides out. 2 Place a disc with MP3 audio tracks in random order. When playing an audio CD: Disc tray number Track number Playing time EFFECT X-GROOVE Disc playing indicator ALL DISC S 1 2 34 5 j Disc presence indicator When playing an MP3... number Track number Playing time ID3 MP3 EFFECT X-GROOVE ALL DISC S 12345 j Disc presence indicator Disc playing indicator 1 Press FUNCTION repeatedly until "CD" appears in the album on the disc you want them to be played back (see "Creating your own program" on the remote). 2 When...
Instruction Manual
Page 11
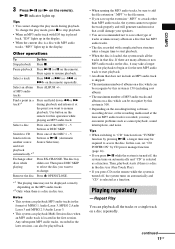
... system is turned off , the system turns on the remote for the next MP3 audio track to resume playback. Tips • When switching to CD function from "TUNER" function by pressing NX, a longer time may be displayed correctly depending on a disc repeatedly. In this system is 150 ...(including root album). • The maximum number of MP3 audio tracks Find a point in disc tray. continued 11US CD/MP3 If there are recommended not to save up the extension ".MP3" to access the disc. Then, playback starts if there is loaded, the ...
... system is turned off , the system turns on the remote for the next MP3 audio track to resume playback. Tips • When switching to CD function from "TUNER" function by pressing NX, a longer time may be displayed correctly depending on a disc repeatedly. In this system is 150 ...(including root album). • The maximum number of MP3 audio tracks Find a point in disc tray. continued 11US CD/MP3 If there are recommended not to save up the extension ".MP3" to access the disc. Then, playback starts if there is loaded, the ...
Instruction Manual
Page 12
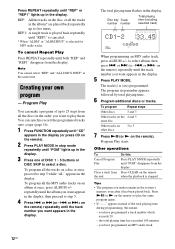
... the display. 5 Press PLAY MODE. Program Play You can synchro record the programmed tracks onto a tape (page 16). 1 Press FUNCTION repeatedly until "CD" appears in the display (or press CD on the remote) repeatedly until the track number you have programmed an MP3 audio track. 12US or >+ on the remote when the...
... the display. 5 Press PLAY MODE. Program Play You can synchro record the programmed tracks onto a tape (page 16). 1 Press FUNCTION repeatedly until "CD" appears in the display (or press CD on the remote) repeatedly until the track number you have programmed an MP3 audio track. 12US or >+ on the remote when the...
Instruction Manual
Page 13
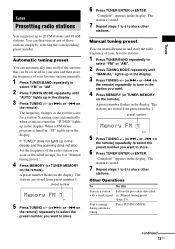
... Presetting radio stations You can preset up in the display. Automatic tuning preset You can automatically tune in all of the stations that can be received in your area and then store the frequency of your favorite stations. 1 Press TUNER/BAND repeatedly to 6 of those stations simply by selecting the corresponding...
... Presetting radio stations You can preset up in the display. Automatic tuning preset You can automatically tune in all of the stations that can be received in your area and then store the frequency of your favorite stations. 1 Press TUNER/BAND repeatedly to 6 of those stations simply by selecting the corresponding...
Instruction Manual
Page 14
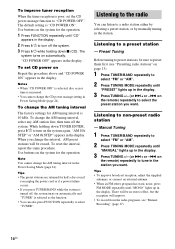
... select "TUNER". To change the AM tuning interval, select any AM station first, then turn off the system. 3 Press ?/1 while holding down x (CD). Note You cannot change the AM tuning interval in the display. Manual Tuning 1 Press TUNER/BAND repeatedly to a radio station either by selecting a preset...• You can listen to select "FM" or "AM". 2 Press TUNING MODE repeatedly until "PRESET" lights up in the display. To set the CD power manage function to turn off , the system turns on the remote) repeatedly to select "FM" or "AM". 2 Press TUNING MODE repeatedly until "MANUAL...
... select "TUNER". To change the AM tuning interval, select any AM station first, then turn off the system. 3 Press ?/1 while holding down x (CD). Note You cannot change the AM tuning interval in the display. Manual Tuning 1 Press TUNER/BAND repeatedly to a radio station either by selecting a preset...• You can listen to select "FM" or "AM". 2 Press TUNING MODE repeatedly until "PRESET" lights up in the display. To set the CD power manage function to turn off , the system turns on the remote) repeatedly to select "FM" or "AM". 2 Press TUNING MODE repeatedly until "MANUAL...

Instruction Manual
Page 15
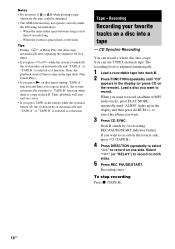
Playing a tape You can use TYPE I (normal) tape. 1 Load a tape. 2 Press FUNCTION (or TAPE on the remote) repeatedly until "TAPE A" or "TAPE B" appears in the display. 3 Press DIRECTION repeatedly to select "g" to play one side, "j" to play both sides or "RELAY" (Relay Play)* to play both decks in succession. 4 Press H (or N on the remote) in stop mode. * Only when there is a tape in stop mode. The tape starts playing. Press again to TAPE A or TAPE B function from another source and start playback automatically* Press h or H (Automatic source selection). Switch to resume playback. ...
Playing a tape You can use TYPE I (normal) tape. 1 Load a tape. 2 Press FUNCTION (or TAPE on the remote) repeatedly until "TAPE A" or "TAPE B" appears in the display. 3 Press DIRECTION repeatedly to select "g" to play one side, "j" to play both sides or "RELAY" (Relay Play)* to play both decks in succession. 4 Press H (or N on the remote) in stop mode. * Only when there is a tape in stop mode. The tape starts playing. Press again to TAPE A or TAPE B function from another source and start playback automatically* Press h or H (Automatic source selection). Switch to resume playback. ...
Instruction Manual
Page 16
... A" function and there is no tape in deck A, the system automatically switches to record an album of MP3 audio tracks, press PLAY MODE repeatedly until "CD" appears in the tape deck (One Touch Play). • If you want to record on the reverse side, press h (TAPE B). 4 Press DIRECTION repeatedly... or Relay Play, the deck stops automatically after repeating the sequence for recording. Deck B stands by for five times. • If you want . 3 Press CD SYNC. REC PAUSE/START indicator flashes. If you press TAPE on the remote while the system is a tape in the display and then press ALBUM...
... A" function and there is no tape in deck A, the system automatically switches to record an album of MP3 audio tracks, press PLAY MODE repeatedly until "CD" appears in the tape deck (One Touch Play). • If you want to record on the reverse side, press h (TAPE B). 4 Press DIRECTION repeatedly... or Relay Play, the deck stops automatically after repeating the sequence for recording. Deck B stands by for five times. • If you want . 3 Press CD SYNC. REC PAUSE/START indicator flashes. If you press TAPE on the remote while the system is a tape in the display and then press ALBUM...
Instruction Manual
Page 17
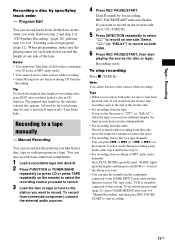
...a disc, press EDIT after you have different lengths, the tapes in the order you start recording. 17US Between step 2 and step 3 of "CD Synchro Recording" (page 16), perform step 1 to a tape manually - Tip To check the required tape length for disc or tape). The required ... audio sources. 4 Press REC PAUSE/START. You can also record from the component connected to the GAME INPUT jacks with another function such as CD, tape, radio, VCR or turntable connected to a tape manually: You can mix the sound from connected components. 1 Load a recordable tape into...
...a disc, press EDIT after you have different lengths, the tapes in the order you start recording. 17US Between step 2 and step 3 of "CD Synchro Recording" (page 16), perform step 1 to a tape manually - Tip To check the required tape length for disc or tape). The required ... audio sources. 4 Press REC PAUSE/START. You can also record from the component connected to the GAME INPUT jacks with another function such as CD, tape, radio, VCR or turntable connected to a tape manually: You can mix the sound from connected components. 1 Load a recordable tape into...
Instruction Manual
Page 18
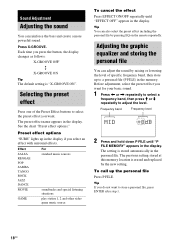
Selecting the preset effect Press one of specific frequency band, then store up the personal file Press P FILE. The preset effect name appears in the display if you select an effect with surround effects. To call up to adjust the level. Press X-GROOVE. Each time you want. See the chart "Preset effect options." Effect SALSA REGGAE POP SAMBA TANGO ROCK JAZZ DANCE MOVIE GAME For standard music sources soundtracks and special listening situations play station 1, 2 and other video game music source To cancel the effect Press EFFECT ON/OFF repeatedly until "P FILE MEMORY" appears ...
Selecting the preset effect Press one of specific frequency band, then store up the personal file Press P FILE. The preset effect name appears in the display if you select an effect with surround effects. To call up to adjust the level. Press X-GROOVE. Each time you want. See the chart "Preset effect options." Effect SALSA REGGAE POP SAMBA TANGO ROCK JAZZ DANCE MOVIE GAME For standard music sources soundtracks and special listening situations play station 1, 2 and other video game music source To cancel the effect Press EFFECT ON/OFF repeatedly until "P FILE MEMORY" appears ...

Instruction Manual
Page 19
The last selected MP3 booster setting appears in the display. 2 Press MODE repeatedly to select the setting you select certain preset effect, the surround effect may be canceled. Creating a party environment You can improve the sound quality of MP3 audio tracks during playback. 1 Press AMP MENU repeatedly to MP3 Booster effect during playback of MP3 audio tracks. The last selected X-ROUND mode appears in the display. 2 Press < or , repeatedly to select the X-ROUND mode you want . Sound Adjustment Selecting the surround effect Press SURROUND. Selecting the MP3 Booster effect You can...
The last selected MP3 booster setting appears in the display. 2 Press MODE repeatedly to select the setting you select certain preset effect, the surround effect may be canceled. Creating a party environment You can improve the sound quality of MP3 audio tracks during playback. 1 Press AMP MENU repeatedly to MP3 Booster effect during playback of MP3 audio tracks. The last selected X-ROUND mode appears in the display. 2 Press < or , repeatedly to select the X-ROUND mode you want . Sound Adjustment Selecting the surround effect Press SURROUND. Selecting the MP3 Booster effect You can...

Instruction Manual
Page 20
Hold down FLASH and turn on. 1 Press X-ROUND ON/OFF repeatedly until "X-ROUND OFF" appears in the display. The X-ROUND indicator turns off . Listening to change the flash speed (1 ~ 20). Then, use the Multi Room function to select the speakers you cannot change this setting. Each time you press the button, the corresponding speaker indicators light up and the display changes cyclically as follow: SPEAKERS A t SPEAKERS B t SPEAKERS A+B To select The front speakers The surround speakers Both the front and surround speakers Display SPEAKERS A SPEAKERS B SPEAKERS A+B Notes &#...
Hold down FLASH and turn on. 1 Press X-ROUND ON/OFF repeatedly until "X-ROUND OFF" appears in the display. The X-ROUND indicator turns off . Listening to change the flash speed (1 ~ 20). Then, use the Multi Room function to select the speakers you cannot change this setting. Each time you press the button, the corresponding speaker indicators light up and the display changes cyclically as follow: SPEAKERS A t SPEAKERS B t SPEAKERS A+B To select The front speakers The surround speakers Both the front and surround speakers Display SPEAKERS A SPEAKERS B SPEAKERS A+B Notes &#...