Instruction Manual
Page 2
...FCC Rules. CAUTION You are designed to radio communications. Note to CATV system installer: This reminder is connected. - Reorient or relocate the receiving antenna. - To prevent fire, do not place objects filled with the instructions, may be of sufficient magnitude to rain or moisture. To... equipment does cause harmful interference to radio or television reception, which the receiver is provided to call CATV system installer's attention to Article 820-40 of the NEC that to operate this manual could void your authority to which can radiate radio frequency energy and, if...
...FCC Rules. CAUTION You are designed to radio communications. Note to CATV system installer: This reminder is connected. - Reorient or relocate the receiving antenna. - To prevent fire, do not place objects filled with the instructions, may be of sufficient magnitude to rain or moisture. To... equipment does cause harmful interference to radio or television reception, which the receiver is provided to call CATV system installer's attention to Article 820-40 of the NEC that to operate this manual could void your authority to which can radiate radio frequency energy and, if...
Instruction Manual
Page 3
Manual Tuning Tape Loading a tape 15 Playing a tape 15 Tape - Game Sync Mixing video game sound with other sound source 21 - Sleep Timer Waking up the system 7 Positioning the speakers 9 Setting the clock 9 CD/MP3 Loading a disc 10 Playing a disc 10 - Play Timer Timer ...a disc into a tape 16 - Preset Tuning - CD Synchro Recording - FLASH Listening to the sound in the display 25 Changing the power illuminator 26 Changing the spectrum analyzer display 26 Adjusting the brightness of Contents About this manual 5 Playable discs 5 Getting Started Hooking up to music...
Manual Tuning Tape Loading a tape 15 Playing a tape 15 Tape - Game Sync Mixing video game sound with other sound source 21 - Sleep Timer Waking up the system 7 Positioning the speakers 9 Setting the clock 9 CD/MP3 Loading a disc 10 Playing a disc 10 - Play Timer Timer ...a disc into a tape 16 - Preset Tuning - CD Synchro Recording - FLASH Listening to the sound in the display 25 Changing the power illuminator 26 Changing the spectrum analyzer display 26 Adjusting the brightness of Contents About this manual 5 Playable discs 5 Getting Started Hooking up to music...

Instruction Manual
Page 5
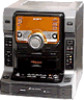
...discs begin at an area called the Lead-in the Audio CD format. - continued 5US Tuner/CD/MP3 player/Stereo cassette deck/Amplifier (main unit) HCD-ZX9 - There can be no longer than the following: - Audio CDs. - CD-Rs/CD-RWs and CD-ROMs that has MP3 audio tracks those format that enables adding... more than eight characters in the name, no more than three characters in the extension ".MP3") and in capital letters. About this manual This manual mainly explains operations using the buttons on the system, but the same operations can also be performed using the Track-At-Once method. ...
...discs begin at an area called the Lead-in the Audio CD format. - continued 5US Tuner/CD/MP3 player/Stereo cassette deck/Amplifier (main unit) HCD-ZX9 - There can be no longer than the following: - Audio CDs. - CD-Rs/CD-RWs and CD-ROMs that has MP3 audio tracks those format that enables adding... more than eight characters in the name, no more than three characters in the extension ".MP3") and in capital letters. About this manual This manual mainly explains operations using the buttons on the system, but the same operations can also be performed using the Track-At-Once method. ...
Instruction Manual
Page 13
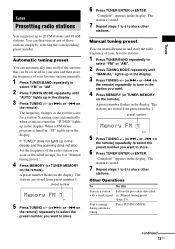
...13). A preset number flashes in the display. "TUNED" lights up in the display and the scanning does not stop Set the frequency of "Manual tuning preset". 4 Press MEMORY (or TUNER MEMORY on the remote) repeatedly to store. 6 Press TUNER ENTER or ENTER. appears in the display....>+ or -. preset number AUTO 5 Press TUNING +/- (or >+ or -. Automatic tuning preset You can automatically tune in all of the stations that can be received in the display. 3 Press TUNING +/- (or >+ or -. on the remote). The stations are stored from preset number 1. "Complete!" on the remote) ...
...13). A preset number flashes in the display. "TUNED" lights up in the display and the scanning does not stop Set the frequency of "Manual tuning preset". 4 Press MEMORY (or TUNER MEMORY on the remote) repeatedly to store. 6 Press TUNER ENTER or ENTER. appears in the display....>+ or -. preset number AUTO 5 Press TUNING +/- (or >+ or -. Automatic tuning preset You can automatically tune in all of the stations that can be received in the display. 3 Press TUNING +/- (or >+ or -. on the remote). The stations are stored from preset number 1. "Complete!" on the remote) ...
Instruction Manual
Page 14
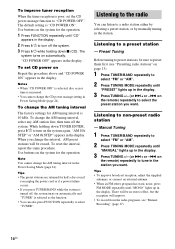
..." is selected, disc access time is increased. • You cannot change the CD power manage setting in the Power Saving Mode (page 24). Tips • The preset stations are retained for the operation. 1 Press FUNCTION repeatedly until "MANUAL" lights up in the display. 3 Press TUNING +/- (or >+ or -..... There will be no stereo effect, but the reception will be sure to preset them first (see "Manual Recording" (page 17). 14US To improve tuner reception When the tuner reception is poor, set CD power on Repeat the procedure above and "CD POWER ON" appears in the display.
..." is selected, disc access time is increased. • You cannot change the CD power manage setting in the Power Saving Mode (page 24). Tips • The preset stations are retained for the operation. 1 Press FUNCTION repeatedly until "MANUAL" lights up in the display. 3 Press TUNING +/- (or >+ or -..... There will be no stereo effect, but the reception will be sure to preset them first (see "Manual Recording" (page 17). 14US To improve tuner reception When the tuner reception is poor, set CD power on Repeat the procedure above and "CD POWER ON" appears in the display.
Instruction Manual
Page 17
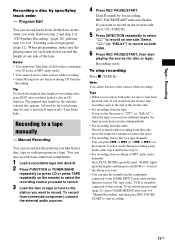
...You cannot use have loaded a disc in the order you start playing the source (for recording a disc, press EDIT after step 4 of "Manual Recording" and then press REC PAUSE/ START to other sources while recording. • Game Mixing does not function during recording pause mode (after ... to record. Between step 2 and step 3 of "Creating your own program" (page 12). Recording to 6 of "CD Synchro Recording" (page 16), perform step 1 to a tape manually - Recording Recording a disc by the total playing time for discs containing over 20 tracks or MP3 audio tracks. •...
...You cannot use have loaded a disc in the order you start playing the source (for recording a disc, press EDIT after step 4 of "Manual Recording" and then press REC PAUSE/ START to other sources while recording. • Game Mixing does not function during recording pause mode (after ... to record. Between step 2 and step 3 of "Creating your own program" (page 12). Recording to 6 of "CD Synchro Recording" (page 16), perform step 1 to a tape manually - Recording Recording a disc by the total playing time for discs containing over 20 tracks or MP3 audio tracks. •...

Instruction Manual
Page 19
.... 2 Press < or , repeatedly to MP3 Booster effect during playback. 1 Press AMP MENU repeatedly to another speaker by turning the JOG clockwise or anticlockwise. 2) You can manually change the speed of MP3 audio tracks during playback of "Positioning the speakers" on page 9). Creating a party environment You can create a party environment by turning...
.... 2 Press < or , repeatedly to MP3 Booster effect during playback. 1 Press AMP MENU repeatedly to another speaker by turning the JOG clockwise or anticlockwise. 2) You can manually change the speed of MP3 audio tracks during playback of "Positioning the speakers" on page 9). Creating a party environment You can create a party environment by turning...

Instruction Manual
Page 21
...MIXING MID t MIXING HIGH t MIXING OFF Notes • Game Mixing is canceled when you press REC PAUSE/START. • Game Mixing does not function during CD Synchro Recording. • During Game Mixing, when "TAPE A" or "TAPE B" function is selected, you use the AMS function. After you have finished Turn ...is selected, you will remain active while the power is changed. Tips • To record the mixed sound, press GAME MIXING after step 4 of "Manual Recording" on automatically and GAME is turned off, the system turns on page 17 and then press REC PAUSE/START to MIC 1 or MIC 2 ...
...MIXING MID t MIXING HIGH t MIXING OFF Notes • Game Mixing is canceled when you press REC PAUSE/START. • Game Mixing does not function during CD Synchro Recording. • During Game Mixing, when "TAPE A" or "TAPE B" function is selected, you use the AMS function. After you have finished Turn ...is selected, you will remain active while the power is changed. Tips • To record the mixed sound, press GAME MIXING after step 4 of "Manual Recording" on automatically and GAME is turned off, the system turns on page 17 and then press REC PAUSE/START to MIC 1 or MIC 2 ...

Parts List
Page 24
...-377-21 MANUAL, INSTRUCTION (ENGLISH) 2-694-377-31 MANUAL, INSTRUCTION (SPANISH) 4-210-254-02 CUSHION (FOOT) (for each component model, please refer to c hang e without notice . COMPONENT MODEL NAME COMPACT DISC DECK RECEIVER FRONT SPEAKER SURROUND SPEAKER LBT-ZX9 HCD-ZX9 SS-ZX9 SS-ZX9 US Model .... As service manuals are issued for SS-ZX9) COMPACT HI-FI STEREO SYSTEM 9-887-525-01 2007A04-1 © 2007.01 Sony Corporation Home Audio Division Published b y Sony Techno Create Corporation ACCESSORIES Part No. LBT-ZX9 SERVICE MANUAL Ver. 1.0 2007.01 • LBT-ZX9 is composed of...
...-377-21 MANUAL, INSTRUCTION (ENGLISH) 2-694-377-31 MANUAL, INSTRUCTION (SPANISH) 4-210-254-02 CUSHION (FOOT) (for each component model, please refer to c hang e without notice . COMPONENT MODEL NAME COMPACT DISC DECK RECEIVER FRONT SPEAKER SURROUND SPEAKER LBT-ZX9 HCD-ZX9 SS-ZX9 SS-ZX9 US Model .... As service manuals are issued for SS-ZX9) COMPACT HI-FI STEREO SYSTEM 9-887-525-01 2007A04-1 © 2007.01 Sony Corporation Home Audio Division Published b y Sony Techno Create Corporation ACCESSORIES Part No. LBT-ZX9 SERVICE MANUAL Ver. 1.0 2007.01 • LBT-ZX9 is composed of...

