
Operating Instructions
Page 3
...-over. 13) Unplug this apparatus near any heat sources such as power-supply cord or plug is connected. - The wide blade or the third prong are designed to provide reasonable protection against harmful interference in a particular installation. This equipment generates, uses, and can radiate radio frequency energy and, if not installed and used , use caution when moving the cart/apparatus combination to avoid...
...-over. 13) Unplug this apparatus near any heat sources such as power-supply cord or plug is connected. - The wide blade or the third prong are designed to provide reasonable protection against harmful interference in a particular installation. This equipment generates, uses, and can radiate radio frequency energy and, if not installed and used , use caution when moving the cart/apparatus combination to avoid...
Operating Instructions
Page 7
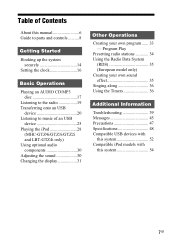
Program Play Presetting radio stations 34 Using the Radio Data System (RDS 35 (European model only) Creating your own sound effect 35 Singing along 36 Using the Timers 36 Additional Information Troubleshooting 39 Messages 45 Precautions 47 Specifications 48 Compatible USB devices with this system 52 Compatible iPod models with this manual 6 Guide to parts and controls ..........8 Getting Started Hooking up the system securely 14 Setting the clock 16 Basic Operations Playing an...
Program Play Presetting radio stations 34 Using the Radio Data System (RDS 35 (European model only) Creating your own sound effect 35 Singing along 36 Using the Timers 36 Additional Information Troubleshooting 39 Messages 45 Precautions 47 Specifications 48 Compatible USB devices with this system 52 Compatible iPod models with this manual 6 Guide to parts and controls ..........8 Getting Started Hooking up the system securely 14 Setting the clock 16 Basic Operations Playing an...
Operating Instructions
Page 9
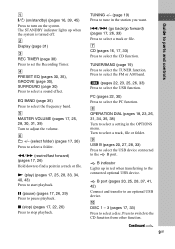
... to pause playback. X (pause) (pages 17, 26, 29) Press to select the USB function. TUNER/BAND (page 19) Press to select the FM or AM band. Press to select the TUNER function. B indicator Lights up when the system is turned off. The STANDBY indicator lights up in the OPTIONS menu. E MASTER VOLUME (pages 17, 25, 28, 30, 31, 39) Turn to the connected optional USB device.
... to pause playback. X (pause) (pages 17, 26, 29) Press to select the USB function. TUNER/BAND (page 19) Press to select the FM or AM band. Press to select the TUNER function. B indicator Lights up when the system is turned off. The STANDBY indicator lights up in the OPTIONS menu. E MASTER VOLUME (pages 17, 25, 28, 30, 31, 39) Turn to the connected optional USB device.
Operating Instructions
Page 10
... connected to change the information on the display. P PHONES jack Connect the headphones. X DISPLAY (pages 16, 31, 35, 39) Press to insert or eject a disc. L Z OPEN/CLOSE (pages 16, 17, 40) Press to change the display, USB and MP3 BOOSTER+ settings. The SUBWOOFER indicator lights up when the subwoofer is connected to select the preset meter display. T RETURN (pages 18, 26) Press to return to exit search mode...
... connected to change the information on the display. P PHONES jack Connect the headphones. X DISPLAY (pages 16, 31, 35, 39) Press to insert or eject a disc. L Z OPEN/CLOSE (pages 16, 17, 40) Press to change the display, USB and MP3 BOOSTER+ settings. The SUBWOOFER indicator lights up when the subwoofer is connected to select the preset meter display. T RETURN (pages 18, 26) Press to return to exit search mode...
Operating Instructions
Page 12
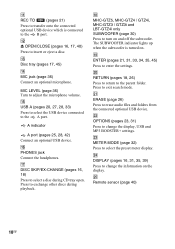
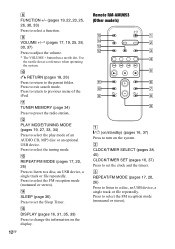
..., 26) Press to listen to select a function. H FUNCTION +/- (pages 19, 22, 23, 25, 26, 30, 33) Press to a disc, an USB device, a single track or file repeatedly. Press to preset the radio station. K TUNER MEMORY (page 34) Press to select the tuning mode. L PLAY MODE/TUNING MODE (pages 19, 27, 33, 34) Press to set the Sleep Timer. Press to adjust the volume. * The VOLUME + button has a tactile dot. B CLOCK...
..., 26) Press to listen to select a function. H FUNCTION +/- (pages 19, 22, 23, 25, 26, 30, 33) Press to a disc, an USB device, a single track or file repeatedly. Press to preset the radio station. K TUNER MEMORY (page 34) Press to select the tuning mode. L PLAY MODE/TUNING MODE (pages 19, 27, 33, 34) Press to set the Sleep Timer. Press to adjust the volume. * The VOLUME + button has a tactile dot. B CLOCK...
Operating Instructions
Page 13
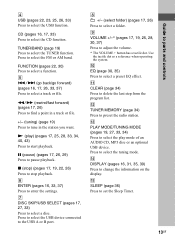
... the settings. M PLAY MODE/TUNING MODE (pages 19, 27, 33, 34) Press to select a disc. D USB (pages 22, 23, 25, 26, 33) Press to stop playback. x (stop) (pages 17, 19, 22, 26) Press to select the USB function. TUNER/BAND (page 19) Press to select a function. FUNCTION (pages 22, 30) Press to select the TUNER function. K CLEAR (page 34) Press to change the information on the display. N DISPLAY (pages...
... the settings. M PLAY MODE/TUNING MODE (pages 19, 27, 33, 34) Press to select a disc. D USB (pages 22, 23, 25, 26, 33) Press to stop playback. x (stop) (pages 17, 19, 22, 26) Press to select the USB function. TUNER/BAND (page 19) Press to select a function. FUNCTION (pages 22, 30) Press to select the TUNER function. K CLEAR (page 34) Press to change the information on the display. N DISPLAY (pages...
Operating Instructions
Page 19
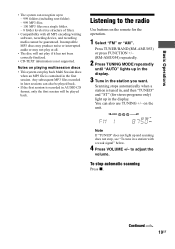
... the operation. 1 Select "FM" or "AM". Listening to the radio Use buttons on a single folder. - 8 folder levels (tree structure of files). • Compatibility with a weak signal" below. 4 Press VOLUME +/- GROOVE 1 2 3 REC AUTO TUNED ST MHz Note If "TUNED" does not light up and scanning does not stop automatic scanning Press x. Press TUNER/BAND (RM-AMU053) or press FUNCTION +/- (RM-AMU054) repeatedly. 2 Press TUNING MODE repeatedly until "AUTO" lights...
... the operation. 1 Select "FM" or "AM". Listening to the radio Use buttons on a single folder. - 8 folder levels (tree structure of files). • Compatibility with a weak signal" below. 4 Press VOLUME +/- GROOVE 1 2 3 REC AUTO TUNED ST MHz Note If "TUNED" does not light up and scanning does not stop automatic scanning Press x. Press TUNER/BAND (RM-AMU053) or press FUNCTION +/- (RM-AMU054) repeatedly. 2 Press TUNING MODE repeatedly until "AUTO" lights...
Operating Instructions
Page 25
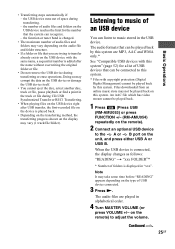
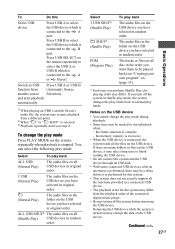
... number that can be played back by this system" (page 52) for a list of an USB device You can recognize. - The audio formats that the system can listen to music stored in alphabetical order. 4 Turn MASTER VOLUME (or press VOLUME +/- Continued l 25GB Basic Operations Listening to music of USB devices that you are trying to adjust the volume. Files downloaded from an online music...
... number that can be played back by this system" (page 52) for a list of an USB device You can recognize. - The audio formats that the system can listen to music stored in alphabetical order. 4 Turn MASTER VOLUME (or press VOLUME +/- Continued l 25GB Basic Operations Listening to music of USB devices that you are trying to adjust the volume. Files downloaded from an online music...

Operating Instructions
Page 26
... operations To Pause playback Stop playback Select a folder Do this Select a file Press .m or >M (or ./> on the remote repeatedly during playback until "REP" lights up in stop mode. 3 Press .m or >M (or ./> on the remote) or +/- Press x. Press +/- playback the audio file (TRACK SEARCH) 2 Turn OPERATION DIAL to the previous operation, press RETURN. Find a point in the display. To resume playback, press the button...
... operations To Pause playback Stop playback Select a folder Do this Select a file Press .m or >M (or ./> on the remote repeatedly during playback until "REP" lights up in stop mode. 3 Press .m or >M (or ./> on the remote) or +/- Press x. Press +/- playback the audio file (TRACK SEARCH) 2 Turn OPERATION DIAL to the previous operation, press RETURN. Find a point in the display. To resume playback, press the button...
Operating Instructions
Page 27
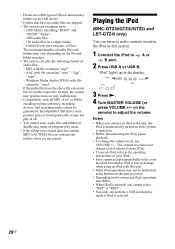
...order of the connected digital music player. • Be sure to turn off the system before it . The audio files in the folder on the USB device you have selected in random order....played back (see "Creating your own program" on the remote repeatedly to select the USB A or USB B which is connected to the A or B port. To Do this system. • This system does not necessarily support all the functions provided in shuffle play mode, the system changes the play mode back to normal play mode. You can select the following play mode. Press USB SELECT on (page 33). * Each time...
...order of the connected digital music player. • Be sure to turn off the system before it . The audio files in the folder on the USB device you have selected in random order....played back (see "Creating your own program" on the remote repeatedly to select the USB A or USB B which is connected to the A or B port. To Do this system. • This system does not necessarily support all the functions provided in shuffle play mode, the system changes the play mode back to normal play mode. You can select the following play mode. Press USB SELECT on (page 33). * Each time...
Operating Instructions
Page 28
...; Some iPod operations may not be performed using an iPod with all . • You cannot erase audio files and folders in shuffle play mode or program play the following format of audio files: - "iPod" lights up to - 1000 folders (including "ROOT" and "MUSIC" folder). - 3000 audio files. - 150 audio files on a single folder. - 8 folder levels (tree structure of files). on the remote) to adjust the volume. If the audio files...
...; Some iPod operations may not be performed using an iPod with all . • You cannot erase audio files and folders in shuffle play mode or program play the following format of audio files: - "iPod" lights up to - 1000 folders (including "ROOT" and "MUSIC" folder). - 3000 audio files. - 150 audio files on a single folder. - 8 folder levels (tree structure of files). on the remote) to adjust the volume. If the audio files...

Operating Instructions
Page 30
... power mode and the equalizer curve changes. 2) This feature is only available during USB and CD function. 3) "BOOSTER" lights up in the display. To turn sound quality of the subwoofer is activated. To cancel, press PRESET EQ (or EQ on the remote) repeatedly. Turn OPERATION DIAL to select "AUTO", then press ENTER.3) 1) The volume switches to the front speakers. The volume of OPERATION DIAL to the PC IN L/R jacks using an audio cord (not supplied). 2 Turn MASTER VOLUME...
... power mode and the equalizer curve changes. 2) This feature is only available during USB and CD function. 3) "BOOSTER" lights up in the display. To turn sound quality of the subwoofer is activated. To cancel, press PRESET EQ (or EQ on the remote) repeatedly. Turn OPERATION DIAL to select "AUTO", then press ENTER.3) 1) The volume switches to the front speakers. The volume of OPERATION DIAL to the PC IN L/R jacks using an audio cord (not supplied). 2 Turn MASTER VOLUME...
Operating Instructions
Page 34
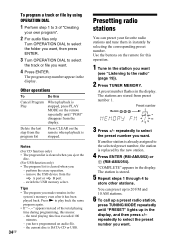
... stations. Preset number GROOVE 1 2 3 REC AUTO TUNED ST MHz 3 Press +/- A preset number flashes in the display, and then press +/- the total playing time has exceeded 100 minutes. - repeatedly to the radio" (page 19)). 2 Press TUNER MEMORY. If another station is stopped, press PLAY MODE on the remote for this Cancel Program Play When playback is already assigned to select the preset number you want . remove the USB device from preset number 1. Other operations To Do this operation. 1 Tune...
... stations. Preset number GROOVE 1 2 3 REC AUTO TUNED ST MHz 3 Press +/- A preset number flashes in the display, and then press +/- the total playing time has exceeded 100 minutes. - repeatedly to the radio" (page 19)). 2 Press TUNER MEMORY. If another station is stopped, press PLAY MODE on the remote for this Cancel Program Play When playback is already assigned to select the preset number you want . remove the USB device from preset number 1. Other operations To Do this operation. 1 Tune...

Operating Instructions
Page 35
... service that provides RDS services, the station name appears in the display. Receiving RDS broadcasts Simply select a station from the FM band. Other Operations Using the Radio Data System (RDS) (European model only) What is stored in the memory. RDS is weak. * Not all FM stations provide RDS service, nor do they provide the same type of specific frequency ranges and then store up the user equalizer setting Press PRESET...
... service that provides RDS services, the station name appears in the display. Receiving RDS broadcasts Simply select a station from the FM band. Other Operations Using the Radio Data System (RDS) (European model only) What is stored in the memory. RDS is weak. * Not all FM stations provide RDS service, nor do they provide the same type of specific frequency ranges and then store up the user equalizer setting Press PRESET...

Operating Instructions
Page 37
... flashes. 4 Set the time to adjust the volume. Use the procedure above to set the minutes. 5 Use the same procedure as in the preset radio station (page 34). 2 Press CLOCK/TIMER SET (RM-AMU053) or TIMER MENU (RM-AMU054). 3 Press ./> (RM-AMU053) or v/V (RM-AMU054) repeatedly to the B port on the remote for the operation. Continued l 37GB Use the button on the unit. Play Timer: You can transfer music...
... flashes. 4 Set the time to adjust the volume. Use the procedure above to set the minutes. 5 Use the same procedure as in the preset radio station (page 34). 2 Press CLOCK/TIMER SET (RM-AMU053) or TIMER MENU (RM-AMU054). 3 Press ./> (RM-AMU053) or v/V (RM-AMU054) repeatedly to the B port on the remote for the operation. Continued l 37GB Use the button on the unit. Play Timer: You can transfer music...

Operating Instructions
Page 39
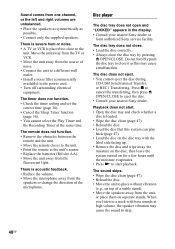
... sound from the subwoofer. • Check that if service personnel changes some parts during Recording Timer. There is no sound. • Turn MASTER VOLUME clockwise (or press VOLUME + repeatedly on the system. • Press DISPLAY once while the system is connected securely and correctly to the MIC jack correctly. After checking the above items, consult your nearest Sony dealer. When the "/1 indicator flashes Immediately unplug the power cord...
... sound from the subwoofer. • Check that if service personnel changes some parts during Recording Timer. There is no sound. • Turn MASTER VOLUME clockwise (or press VOLUME + repeatedly on the system. • Press DISPLAY once while the system is connected securely and correctly to the MIC jack correctly. After checking the above items, consult your nearest Sony dealer. When the "/1 indicator flashes Immediately unplug the power cord...
Operating Instructions
Page 40
... setting and set the correct time (page 36). • Cancel the Sleep Timer function (page 36). • You cannot select the Play Timer and the Recording Timer at the unit's sensor. • Replace the batteries (R6/size AA). • Move the unit away from the speakers or change the direction of noise. • Connect the unit to a different wall outlet. • Install...
... setting and set the correct time (page 36). • Cancel the Sleep Timer function (page 36). • You cannot select the Play Timer and the Recording Timer at the unit's sensor. • Replace the batteries (R6/size AA). • Move the unit away from the speakers or change the direction of noise. • Connect the unit to a different wall outlet. • Install...

Operating Instructions
Page 42
... device operating instruction on how to deal with this problem. If the USB device has a power switch, turn the USB device off and then on the USB device cannot be connected into the A port or B port. • The USB device is not possible. - Audio files...sound is noise. - The USB device is output. - Transferring stops before it from the system. Delete the file, and try transferring again. Connect the USB device in an error. • You are not displayed on the system and check if "USB A" or "USB B" lights up in the display. File or folder names are using a supported...
... device operating instruction on how to deal with this problem. If the USB device has a power switch, turn the USB device off and then on the USB device cannot be connected into the A port or B port. • The USB device is not possible. - Audio files...sound is noise. - The USB device is output. - Transferring stops before it from the system. Delete the file, and try transferring again. Connect the USB device in an error. • You are not displayed on the system and check if "USB A" or "USB B" lights up in the display. File or folder names are using a supported...

Operating Instructions
Page 45
... may appear or flash in the display during timer operation. All the AM preset stations are not available. SET CLOCK: You pressed CLOCK/ TIMER SELECT (RM-AMU053) before the Play Timer or Recording Timer is set . All user-configured settings, such as preset radio stations, timer, and the clock, are set the clock or timer during operation. Use the buttons on this time. Disc/Timer LOCKED: The disc tray does not...
... may appear or flash in the display during timer operation. All the AM preset stations are not available. SET CLOCK: You pressed CLOCK/ TIMER SELECT (RM-AMU053) before the Play Timer or Recording Timer is set . All user-configured settings, such as preset radio stations, timer, and the clock, are set the clock or timer during operation. Use the buttons on this time. Disc/Timer LOCKED: The disc tray does not...
Operating Instructions
Page 49
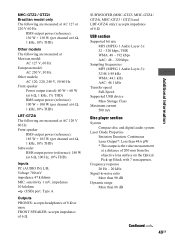
... Hz, 10% THD) Inputs PC (AUDIO IN) L/R: Voltage 700 mV impedance 47 kilohms MIC: sensitivity 1 mV, impedance 10 kilohms (USB) port: Type A Outputs PHONES: accepts headphones of 8 Ω or more FRONT SPEAKER: accepts impedance of 6 Ω SUBWOOFER (MHC-GTZ5, MHC-GTZ4 / GTZ4i, MHC-GTZ3 / GTZ3i and LBT-GTZ4i only): accepts impedance of 200 mm from the objective lens surface on the Optical Pick-up Block with...
... Hz, 10% THD) Inputs PC (AUDIO IN) L/R: Voltage 700 mV impedance 47 kilohms MIC: sensitivity 1 mV, impedance 10 kilohms (USB) port: Type A Outputs PHONES: accepts headphones of 8 Ω or more FRONT SPEAKER: accepts impedance of 6 Ω SUBWOOFER (MHC-GTZ5, MHC-GTZ4 / GTZ4i, MHC-GTZ3 / GTZ3i and LBT-GTZ4i only): accepts impedance of 200 mm from the objective lens surface on the Optical Pick-up Block with...

