
Operating Instructions
Page 2
...radio/TV technician for a Class B digital device, pursuant to radio communications. NOTICE FOR THE CUSTOMERS IN THE U.S.A. Note to CATV system installer: This reminder is connected. - registered mark. NOTICE FOR THE CUSTOMERS IN CANADA CAUTION TO PREVENT ELECTRIC SHOCK, DO NOT USE...interference to Part 15 of the following measures: - As an ENERGY STAR® partner, Sony Corporation has determined that any changes or modifications not expressly approved in this manual could void your authority to the point of important operating and maintenance (servicing) instructions in a...
...radio/TV technician for a Class B digital device, pursuant to radio communications. NOTICE FOR THE CUSTOMERS IN THE U.S.A. Note to CATV system installer: This reminder is connected. - registered mark. NOTICE FOR THE CUSTOMERS IN CANADA CAUTION TO PREVENT ELECTRIC SHOCK, DO NOT USE...interference to Part 15 of the following measures: - As an ENERGY STAR® partner, Sony Corporation has determined that any changes or modifications not expressly approved in this manual could void your authority to the point of important operating and maintenance (servicing) instructions in a...
Operating Instructions
Page 3
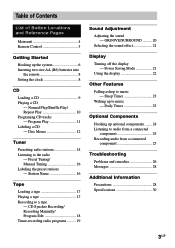
... Play/Shuffle Play/ Repeat Play 10 Programing CD tracks - Sleep Timer 23 Waking up to the radio - Preset Tuning/ Manual Tuning 16 Labeling the preset stations - Daily Timer 23 Optional Components Hooking up the system 6 Inserting two size AA (R6) batteries into the remote 8 Setting the clock 8 CD Loading a CD 9 Playing a CD - GROOVE...
... Play/Shuffle Play/ Repeat Play 10 Programing CD tracks - Sleep Timer 23 Waking up to the radio - Preset Tuning/ Manual Tuning 16 Labeling the preset stations - Daily Timer 23 Optional Components Hooking up the system 6 Inserting two size AA (R6) batteries into the remote 8 Setting the clock 8 CD Loading a CD 9 Playing a CD - GROOVE...
Operating Instructions
Page 14
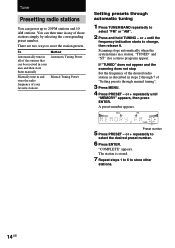
... Preset Setting presets through manual tuning". 3 Press MENU. 4 Press PRESET - "COMPLETE" appears. There are two ways to store other stations. 14US or + until "MEMORY" appears, then press ENTER. Scanning stops automatically when the system tunes in and store the radio frequency of "Setting presets ...scanning does not stop Set the frequency of the desired radio station as described in steps 2 through 7 of your area and then store them manually Manually tune in a station. The station is stored. 7 Repeat steps 1 to 6 to store the station presets. A preset number appears. or...
... Preset Setting presets through manual tuning". 3 Press MENU. 4 Press PRESET - "COMPLETE" appears. There are two ways to store other stations. 14US or + until "MEMORY" appears, then press ENTER. Scanning stops automatically when the system tunes in and store the radio frequency of "Setting presets ...scanning does not stop Set the frequency of the desired radio station as described in steps 2 through 7 of your area and then store them manually Manually tune in a station. The station is stored. 7 Repeat steps 1 to 6 to store the station presets. A preset number appears. or...

Operating Instructions
Page 15
... select the desired preset number. 6 Press ENTER. 7 Repeat steps 1 to 6 to 9 kHz (10 kHz in any AM station first, then turn the system back on. To change the AM tuning interval The AM tuning interval is factory-set to store other stations. To reset the interval, repeat the... same procedure. Other Operations To Do this Tune in a station Follow the procedure described in with a weak "Setting presets through manual tuning 1 Press TUNER/BAND repeatedly to tune in Power Saving Mode. or + repeatedly to select "FM" or "AM". 2 Press TUNING - Note ...
... select the desired preset number. 6 Press ENTER. 7 Repeat steps 1 to 6 to 9 kHz (10 kHz in any AM station first, then turn the system back on. To change the AM tuning interval The AM tuning interval is factory-set to store other stations. To reset the interval, repeat the... same procedure. Other Operations To Do this Tune in a station Follow the procedure described in with a weak "Setting presets through manual tuning 1 Press TUNER/BAND repeatedly to tune in Power Saving Mode. or + repeatedly to select "FM" or "AM". 2 Press TUNING - Note ...
Operating Instructions
Page 16
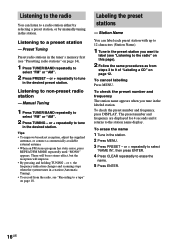
... Tuning). • To record from steps 3 to 9 of "Labeling a CD" on page 12. Manual Tuning 1 Press TUNER/BAND repeatedly to the station name display. Labeling the preset stations - or +, the frequency indication changes and scanning stops when the system tunes in the desired preset station. To check the preset number and frequency... in the labeled station. or + repeatedly to a tape" on page 14). 1 Press TUNER/BAND repeatedly to a radio station either by selecting a preset station, or by manually tuning in the desired station.
... Tuning). • To record from steps 3 to 9 of "Labeling a CD" on page 12. Manual Tuning 1 Press TUNER/BAND repeatedly to the station name display. Labeling the preset stations - or +, the frequency indication changes and scanning stops when the system tunes in the desired preset station. To check the preset number and frequency... in the labeled station. or + repeatedly to a tape" on page 14). 1 Press TUNER/BAND repeatedly to a radio station either by selecting a preset station, or by manually tuning in the desired station.
Operating Instructions
Page 18
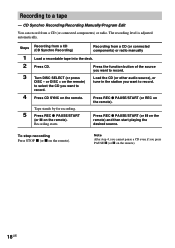
...cannot pause a CD even if you want to record. Steps 1 2 3 4 5 Recording from a CD (CD Synchro Recording) Recording from a CD (or connected components) or radio. Press CD SYNC on the remote). To stop recording Press STOP x (or x on the remote. Turn DISC SELECT (or press DISC - or DISC... (or other audio source), or tune in the station you want to a tape - CD Synchro Recording/Recording Manually/Program Edit You can record from a CD (or connected components) or radio manually Load a recordable tape into the deck. Press REC z PAUSE/START (or REC on the remote) and then...
...cannot pause a CD even if you want to record. Steps 1 2 3 4 5 Recording from a CD (CD Synchro Recording) Recording from a CD (or connected components) or radio. Press CD SYNC on the remote). To stop recording Press STOP x (or x on the remote. Turn DISC SELECT (or press DISC - or DISC... (or other audio source), or tune in the station you want to a tape - CD Synchro Recording/Recording Manually/Program Edit You can record from a CD (or connected components) or radio manually Load a recordable tape into the deck. Press REC z PAUSE/START (or REC on the remote) and then...

Operating Instructions
Page 25
..., perform the operation described above to switch to select "VIDEO" or "MD". See "Hooking up optional components" on page 24. 2 Start recording manually. Listening to audio from a connected component 1 Connect the audio cords. See "Recording to the analog sound of an MD deck, a VCR, etc.... 1 Connect the audio cords. The function switches to a connected MD deck, perform the following operation. 1 Turn off the system. 2 Press ...
..., perform the operation described above to switch to select "VIDEO" or "MD". See "Hooking up optional components" on page 24. 2 Start recording manually. Listening to audio from a connected component 1 Connect the audio cords. See "Recording to the analog sound of an MD deck, a VCR, etc.... 1 Connect the audio cords. The function switches to a connected MD deck, perform the following operation. 1 Turn off the system. 2 Press ...

