Operating Instructions
Page 3
... Using this manual 4 Checking supplied accessories 6 Step 1 Preparing the power supply ..... 7 Connecting to a wall outlet 7 Using with a battery pack (not supplied 8 Step 2 Inserting a cassette 11 Basic Operations Playing back a tape 12 Viewing the recording on TV 16 Recording from the other VCR or TV 18 Advanced Operations Enlarging playback images - PB ZOOM 20 Watching a tape with an analog video unit and a personal computer - Insert Editing 48 Customizing Your VCR Changing the menu settings 50 Resetting the date and time...
... Using this manual 4 Checking supplied accessories 6 Step 1 Preparing the power supply ..... 7 Connecting to a wall outlet 7 Using with a battery pack (not supplied 8 Step 2 Inserting a cassette 11 Basic Operations Playing back a tape 12 Viewing the recording on TV 16 Recording from the other VCR or TV 18 Advanced Operations Enlarging playback images - PB ZOOM 20 Watching a tape with an analog video unit and a personal computer - Insert Editing 48 Customizing Your VCR Changing the menu settings 50 Resetting the date and time...

Operating Instructions
Page 13
... mode. Slow playback for tapes recorded in reverse Horizontal noise may appear at double speed Press ×2 during playback. Using headphones Connect headphones (not supplied) to ON. Playing back a tape Various playback modes Basic Operations To operate the video control buttons, set the POWER switch to the i jack (p. 73). To resume playback, press X or H. Notes on your VCR; When you play back a tape in the Digital8 system Slow playback mode can adjust the volume of the screen. To view...
... mode. Slow playback for tapes recorded in reverse Horizontal noise may appear at double speed Press ×2 during playback. Using headphones Connect headphones (not supplied) to ON. Playing back a tape Various playback modes Basic Operations To operate the video control buttons, set the POWER switch to the i jack (p. 73). To resume playback, press X or H. Notes on your VCR; When you play back a tape in the Digital8 system Slow playback mode can adjust the volume of the screen. To view...

Operating Instructions
Page 15
... screen at full size when - Wide mode playback and recording Pictures recorded with a Sony digital video camera that is compatible with the Remote Commander. you set the POWER switch to ON or OFF, or eject the cassette with the video ID (ID-1/ID-2) system. - Basic Operations Playing back a tape Using a Remote Commander You can operate your VCR to the S video jack on the TV. If you connect your VCR using the Remote Commander supplied with the A/V connecting cable. When recording a 16:9 screen Your VCR...
... screen at full size when - Wide mode playback and recording Pictures recorded with a Sony digital video camera that is compatible with the Remote Commander. you set the POWER switch to ON or OFF, or eject the cassette with the video ID (ID-1/ID-2) system. - Basic Operations Playing back a tape Using a Remote Commander You can operate your VCR to the S video jack on the TV. If you connect your VCR using the Remote Commander supplied with the A/V connecting cable. When recording a 16:9 screen Your VCR...

Operating Instructions
Page 16
... sound is monaural even in stereo mode. If your VCR to the LINE IN input on the other VCR and the RFU adaptor. Then, set the TV/VCR selector on the TV to VCR. : Signal flow S video cable (not supplied) S VIDEO OUT AUDIO OUT IN S VIDEO VIDEO VIDEO OUT A/V connecting cable (supplied) AUDIO If your TV is the same as when playing back on the LCD screen. With this connection, you do not connect...
... sound is monaural even in stereo mode. If your VCR to the LINE IN input on the other VCR and the RFU adaptor. Then, set the TV/VCR selector on the TV to VCR. : Signal flow S video cable (not supplied) S VIDEO OUT AUDIO OUT IN S VIDEO VIDEO VIDEO OUT A/V connecting cable (supplied) AUDIO If your TV is the same as when playing back on the LCD screen. With this connection, you do not connect...
Operating Instructions
Page 17
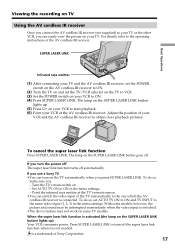
... receiver. If you : - Press SUPER LASER LINK to turn on the SUPER LASER LINK button lights up . (5) Press H on some models, however, the picture and sound may be interrupted momentarily when the video input is switched. •The above feature may not work on your VCR to start playback. (6) Point your VCR at the TV's remote sensor. •You can switch the video input of the TV automatically to...
... receiver. If you : - Press SUPER LASER LINK to turn on the SUPER LASER LINK button lights up . (5) Press H on some models, however, the picture and sound may be interrupted momentarily when the video input is switched. •The above feature may not work on your VCR to start playback. (6) Point your VCR at the TV's remote sensor. •You can switch the video input of the TV automatically to...
Operating Instructions
Page 27
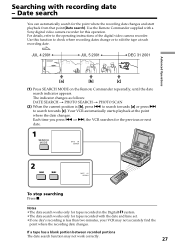
... or next date. 1 SEARCH MODE DATE 00 SEARCH 2 DATE 01 SEARCH To stop searching Press x. Each time you press . or >, the VCR searches for the point where the recording date changes and start playback from that point (Date search). to search towards [a] or press > to the operating instructions of the digital video camera recorder. Your VCR automatically starts playback at each recording date. If a tape has a blank portion between recorded portions The date search...
... or next date. 1 SEARCH MODE DATE 00 SEARCH 2 DATE 01 SEARCH To stop searching Press x. Each time you press . or >, the VCR searches for the point where the recording date changes and start playback from that point (Date search). to search towards [a] or press > to the operating instructions of the digital video camera recorder. Your VCR automatically starts playback at each recording date. If a tape has a blank portion between recorded portions The date search...

Operating Instructions
Page 30
... code function, bars and --:--:--) appear if - The tape is being played back. - Also, when you play back tapes recorded by your VCR to tape damage or noise. - The tape was recorded by a Digital8 system video camera recorder with the data code function, you can check the recording date/ time. Using the data code function Your VCR automatically stores the date/time and the recording data used during the recording in the Digital8 system. Displaying recording data and screen...
... code function, bars and --:--:--) appear if - The tape is being played back. - Also, when you play back tapes recorded by your VCR to tape damage or noise. - The tape was recorded by a Digital8 system video camera recorder with the data code function, you can check the recording date/ time. Using the data code function Your VCR automatically stores the date/time and the recording data used during the recording in the Digital8 system. Displaying recording data and screen...
Operating Instructions
Page 35
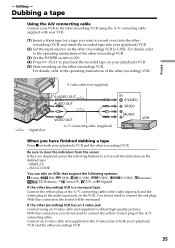
... A/V connecting cable. DISPLAY - DATA CODE You can edit on the dubbed tape - With this connection, you have finished dubbing a tape Press x on both your (playback) VCR. (5) Start recording on the other (recording) VCR using an S video cable (not supplied) to not record the indicators on VCRs that support the following buttons to obtain high-quality pictures. Editing S video cable (not supplied) : Signal flow S VIDEO OUT AUDIO OUT VIDEO OUT A/V connecting cable (supplied) IN S VIDEO VIDEO AUDIO When you do not need...
... A/V connecting cable. DISPLAY - DATA CODE You can edit on the dubbed tape - With this connection, you have finished dubbing a tape Press x on both your (playback) VCR. (5) Start recording on the other (recording) VCR using an S video cable (not supplied) to not record the indicators on VCRs that support the following buttons to obtain high-quality pictures. Editing S video cable (not supplied) : Signal flow S VIDEO OUT AUDIO OUT VIDEO OUT A/V connecting cable (supplied) IN S VIDEO VIDEO AUDIO When you do not need...

Operating Instructions
Page 38
... (playback) VCR. (2) Turn the power of the other (recording) VCR (P. 39), then press the dial. 4 5 38 3 MENU OTHERS WORLD TIME BEEP COMMANDER D I SPL AY V I DEO ED I T ED I T SET RETURN [MENU] : END 0 HR OTHERS ED I T SET CONTROL I R ADJ TEST CUT - Dubbing only desired scenes - When you connect a digital video camera recorder, set the input selector to select the IR SETUP code of the other (recording) VCR on the other (recording) VCR for operation - Using the A/V connecting cable To edit using the A/V connecting cable...
... (playback) VCR. (2) Turn the power of the other (recording) VCR (P. 39), then press the dial. 4 5 38 3 MENU OTHERS WORLD TIME BEEP COMMANDER D I SPL AY V I DEO ED I T ED I T SET RETURN [MENU] : END 0 HR OTHERS ED I T SET CONTROL I R ADJ TEST CUT - Dubbing only desired scenes - When you connect a digital video camera recorder, set the input selector to select the IR SETUP code of the other (recording) VCR on the other (recording) VCR for operation - Using the A/V connecting cable To edit using the A/V connecting cable...

Operating Instructions
Page 42
... I R SETUP PAUSEMODE I T SET CONTROL ADJ TEST CUT - L I NK If you connect a digital video camera recorder, set the input selector to select i.LINK, then press the dial. 5 3 MENU OTHERS WORLD TIME BEEP COMMANDER D I SPL AY V I DEO ED I T ED I T SET RETURN [MENU] : END 0 HR OTHERS ED I T SET CONTROL I T SET CONTROL ADJ TEST CUT - L I NK OTHERS ED I R ADJ TEST CUT - Digital program editing Step 2: Setting the other (recording) VCR on your (playback) VCR . (2) Turn the power of the other (recording) VCR for...
... I R SETUP PAUSEMODE I T SET CONTROL ADJ TEST CUT - L I NK If you connect a digital video camera recorder, set the input selector to select i.LINK, then press the dial. 5 3 MENU OTHERS WORLD TIME BEEP COMMANDER D I SPL AY V I DEO ED I T ED I T SET RETURN [MENU] : END 0 HR OTHERS ED I T SET CONTROL I T SET CONTROL ADJ TEST CUT - L I NK OTHERS ED I R ADJ TEST CUT - Digital program editing Step 2: Setting the other (recording) VCR on your (playback) VCR . (2) Turn the power of the other (recording) VCR for...
Operating Instructions
Page 45
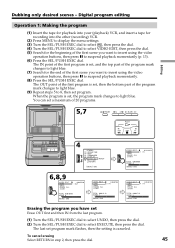
... RETURN in step 2, then press the dial. 45 Digital program editing Operation 1: Making the program (1) Insert the tape for playback into your (playback) VCR, and insert a tape for recording into the other (recording) VCR. (2) Press MENU to display the menu settings. (3) Turn the SEL/PUSH EXEC dial to select , then press the dial. (4) Turn the SEL/PUSH EXEC dial to select VIDEO EDIT, then press the dial. (5) Search for the...
... RETURN in step 2, then press the dial. 45 Digital program editing Operation 1: Making the program (1) Insert the tape for playback into your (playback) VCR, and insert a tape for recording into the other (recording) VCR. (2) Press MENU to display the menu settings. (3) Turn the SEL/PUSH EXEC dial to select , then press the dial. (4) Turn the SEL/PUSH EXEC dial to select VIDEO EDIT, then press the dial. (5) Search for the...

Operating Instructions
Page 46
...;You use the i.LINK cable (DV connecting cable) the following procedure is ejected. The program indicator changes to select EXECUTE, then press the dial. When the dubbing ends, both your (playback) VCR and the other (recording) VCR is not turned on the tape. To end the Digital program editing function Your (playback) VCR stops when the dubbing is complete. Then the display returns to VIDEO EDIT in the menu settings. (2) Turn the...
...;You use the i.LINK cable (DV connecting cable) the following procedure is ejected. The program indicator changes to select EXECUTE, then press the dial. When the dubbing ends, both your (playback) VCR and the other (recording) VCR is not turned on the tape. To end the Digital program editing function Your (playback) VCR stops when the dubbing is complete. Then the display returns to VIDEO EDIT in the menu settings. (2) Turn the...
Operating Instructions
Page 51
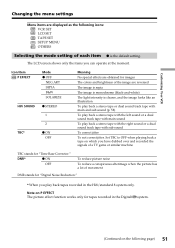
... a stereo tape with the left sound or a dual sound track tape with main sound To play back tapes recorded in the Digital8 system. (Continued on P EFFECT The picture effect function works only for tapes recorded in the Hi8/standard 8 system only. DNR* z ON OFF To reduce picture noise To reduce a conspicuous afterimage when the picture has a lot of movement DNR stands for "Time Base Corrector." Customizing Your VCR Changing the menu settings Menu...
... a stereo tape with the left sound or a dual sound track tape with main sound To play back tapes recorded in the Digital8 system. (Continued on P EFFECT The picture effect function works only for tapes recorded in the Hi8/standard 8 system only. DNR* z ON OFF To reduce picture noise To reduce a conspicuous afterimage when the picture has a lot of movement DNR stands for "Time Base Corrector." Customizing Your VCR Changing the menu settings Menu...

Operating Instructions
Page 52
... via your VCR To convert analog video signals into digital video siginals via your VCR "A/V t DV" appears on the LCD screen to lighten to the default setting when - Note on the tape, and play back the tape To play back a tape that was recorded in the 16-bit mode, you turn the POWER switch to record on LCD B.L. Meaning To adjust the balance between the stereo 1 and stereo 2 ST1 ST2...
... via your VCR To convert analog video signals into digital video siginals via your VCR "A/V t DV" appears on the LCD screen to lighten to the default setting when - Note on the tape, and play back the tape To play back a tape that was recorded in the 16-bit mode, you turn the POWER switch to record on LCD B.L. Meaning To adjust the balance between the stereo 1 and stereo 2 ST1 ST2...

Operating Instructions
Page 53
... DISPLAY button is pressed • during playback * To dub a tape to the other VCR You cannot select AUDIO MODE for tapes recorded in the Digital8 system. Customizing Your VCR Changing the menu settings Icon/item Mode REC MODE z SP LP AUDIO MODE* z 12BIT 16BIT q REMAIN z AUTO DATA CODE ON z DATE/CAM DATE Meaning To record in the SP (Standard Play) mode To increase the recording time to 1.5 times the SP mode To record or play back in the 12-bit mode (two stereo sounds...
... DISPLAY button is pressed • during playback * To dub a tape to the other VCR You cannot select AUDIO MODE for tapes recorded in the Digital8 system. Customizing Your VCR Changing the menu settings Icon/item Mode REC MODE z SP LP AUDIO MODE* z 12BIT 16BIT q REMAIN z AUTO DATA CODE ON z DATE/CAM DATE Meaning To record in the SP (Standard Play) mode To increase the recording time to 1.5 times the SP mode To record or play back in the 12-bit mode (two stereo sounds...

Operating Instructions
Page 54
... DEMO MODE when a cassette is removed. To output the melody when you connect and output through the i.LINK cable (DV connecting cable). Changing the menu settings Icon/item CLOCK SET AUTO TV ON Mode --- z OFF ON TV INPUT LTR SIZE z VIDEO1 VIDEO2 VIDEO3 OFF z NORMAL 2× DEMO MODE WORLD TIME z OFF ON --- Meaning To reset the date or time (p. 55) --- To display selected menu items in your VCR with a Remote Commander supplied with a Sony product. The clock changes by other menu...
... DEMO MODE when a cassette is removed. To output the melody when you connect and output through the i.LINK cable (DV connecting cable). Changing the menu settings Icon/item CLOCK SET AUTO TV ON Mode --- z OFF ON TV INPUT LTR SIZE z VIDEO1 VIDEO2 VIDEO3 OFF z NORMAL 2× DEMO MODE WORLD TIME z OFF ON --- Meaning To reset the date or time (p. 55) --- To display selected menu items in your VCR with a Remote Commander supplied with a Sony product. The clock changes by other menu...

Operating Instructions
Page 61
... troubleshoot the problem. c Press VOLUME + (p. 12, 72). • The stereo tape is played back with HiFi SOUND set to 2 in the menu settings. The date search does not work . • Moisture condensation has occurred. the Digital8 system is set to expose the red mark. c Use Hi8 /Digital8 tapes (p. 53). c Use a charged battery pack (p. 8-10). c Remove the cassette and leave your VCR, use the following page) 61 c Set it to ON. c Set it to STEREO (p. 50). • AUDIO...
... troubleshoot the problem. c Press VOLUME + (p. 12, 72). • The stereo tape is played back with HiFi SOUND set to 2 in the menu settings. The date search does not work . • Moisture condensation has occurred. the Digital8 system is set to expose the red mark. c Use Hi8 /Digital8 tapes (p. 53). c Use a charged battery pack (p. 8-10). c Remove the cassette and leave your VCR, use the following page) 61 c Set it to ON. c Set it to STEREO (p. 50). • AUDIO...

Operating Instructions
Page 62
...; Setting a program on the other (playback) VCR are dead. c Remove the cassette and leave your (recording) VCR. While editing using the i.LINK cable (DV connecting cable). The Remote Commander supplied with a new battery pack (p. 8). c Replace with a Sony digital video camera recorder does not work , press the RESET button on . Troubleshooting Symptom Cause and/or Corrective Actions No function works even though the power is completely dead, and cannot be monitored. • Remove the i.LINK cable (DV connecting cable), and connect it again. c Charge...
...; Setting a program on the other (playback) VCR are dead. c Remove the cassette and leave your (recording) VCR. While editing using the i.LINK cable (DV connecting cable). The Remote Commander supplied with a new battery pack (p. 8). c Replace with a Sony digital video camera recorder does not work , press the RESET button on . Troubleshooting Symptom Cause and/or Corrective Actions No function works even though the power is completely dead, and cannot be monitored. • Remove the i.LINK cable (DV connecting cable), and connect it again. c Charge...

Operating Instructions
Page 71
Specifications Additional Information VCR System Video recording system 2 rotary heads Helical scanning system Audio recording system Rotary heads, PCM system Quantization: 12 bits (Fs 32 kHz, stereo 1, stereo 2), 16 bits (Fs 48 kHz, stereo) Video signal NTSC color, EIA standards Recommended cassette Hi8 /Digital8 video cassette Recording/playback time (using 120 min. AC power adaptor Power requirements 100 - 240 V AC, 50/60 Hz Power consumption 23 W Output voltage DC OUT: 8.4 V, 1.5 A in the operating mode Operating temperature 32 °...
Specifications Additional Information VCR System Video recording system 2 rotary heads Helical scanning system Audio recording system Rotary heads, PCM system Quantization: 12 bits (Fs 32 kHz, stereo 1, stereo 2), 16 bits (Fs 48 kHz, stereo) Video signal NTSC color, EIA standards Recommended cassette Hi8 /Digital8 video cassette Recording/playback time (using 120 min. AC power adaptor Power requirements 100 - 240 V AC, 50/60 Hz Power consumption 23 W Output voltage DC OUT: 8.4 V, 1.5 A in the operating mode Operating temperature 32 °...

Operating Instructions
Page 76
Index A AC power adaptor 6, 7, 9 AFM HiFi Sound 58 AUDIO MIX 52 AUDIO MODE 53 A/V connecting cable 6, 16, 18, 35, 47 A/V converting cable ... 6, 18, 47 B Battery pack 8 BEEP 54, 64 C Charging battery 9 Clock set 55 Connection (viewing on TV 16 (dubbing a tape 35 Connection to your personal computer 47 D, E Data code 30, 53 Date search 27 DC IN jack 7, 9 DEMO MODE 54 DIGITAL EFFECT 23 Digital 8 system 57 Digital program editing ......... 37 DISPLAY 12 Dual sound track tape ...... 14, 58 Dubbing...
Index A AC power adaptor 6, 7, 9 AFM HiFi Sound 58 AUDIO MIX 52 AUDIO MODE 53 A/V connecting cable 6, 16, 18, 35, 47 A/V converting cable ... 6, 18, 47 B Battery pack 8 BEEP 54, 64 C Charging battery 9 Clock set 55 Connection (viewing on TV 16 (dubbing a tape 35 Connection to your personal computer 47 D, E Data code 30, 53 Date search 27 DC IN jack 7, 9 DEMO MODE 54 DIGITAL EFFECT 23 Digital 8 system 57 Digital program editing ......... 37 DISPLAY 12 Dual sound track tape ...... 14, 58 Dubbing...


