
User Manual
Page 2
...authority to do not open the cabinet. Refer servicing to Part 15 of Conformity Trade Name: SONY Model: FWD-50PX2/50PX2A Responsible Party: Sony Electronics Inc. Telephone Number: 858-942-2230 This device complies with the limits for help.... Operation is no guarantee that any changes or modifications not expressly approved in a particular installation. You are cautioned that interference will not occur in this manual could void your Sony...
...authority to do not open the cabinet. Refer servicing to Part 15 of Conformity Trade Name: SONY Model: FWD-50PX2/50PX2A Responsible Party: Sony Electronics Inc. Telephone Number: 858-942-2230 This device complies with the limits for help.... Operation is no guarantee that any changes or modifications not expressly approved in a particular installation. You are cautioned that interference will not occur in this manual could void your Sony...
User Manual
Page 4
... level gradually 41 (GB) Setting an IP address and communication speed 42 (GB) Obtaining an IP address automatically (DHCP) .... 42 (GB) Setting an IP address manually (Manual 42 (GB) Setting a communication speed (Speed Setup) ...... 43 (GB) Self-diagnosis Function 43 (GB) Operating a Specific Display With the Remote Commander 44 (GB) Troubleshooting 45...
... level gradually 41 (GB) Setting an IP address and communication speed 42 (GB) Obtaining an IP address automatically (DHCP) .... 42 (GB) Setting an IP address manually (Manual 42 (GB) Setting a communication speed (Speed Setup) ...... 43 (GB) Self-diagnosis Function 43 (GB) Operating a Specific Display With the Remote Commander 44 (GB) Troubleshooting 45...
User Manual
Page 14
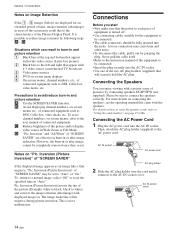
...reset the specified time in and picture retention A Use the SCREEN SAVER function. Never pull the cable itself. • Refer to the instruction manual of the equipment to be sure to connect the speakers correctly. Connecting the Speakers You can result in burn-in and picture retention 1 Black ... is possible to reduce image retention by grasping the plug. AC IN socket cover 14 (GB) Notes on connecting the speakers, see the operating manual that will securely hold the AC plug. Inversion (Picture Inversion)" of "SCREEN SAVER" If the displayed image appears as DSS, Cable box, video...
...reset the specified time in and picture retention A Use the SCREEN SAVER function. Never pull the cable itself. • Refer to the instruction manual of the equipment to be sure to connect the speakers correctly. Connecting the Speakers You can result in burn-in and picture retention 1 Black ... is possible to reduce image retention by grasping the plug. AC IN socket cover 14 (GB) Notes on connecting the speakers, see the operating manual that will securely hold the AC plug. Inversion (Picture Inversion)" of "SCREEN SAVER" If the displayed image appears as DSS, Cable box, video...
User Manual
Page 20
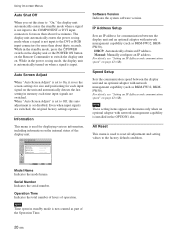
... switched, the original factory settings operate. INITIAL SETUP/INFORMATION Information Model Name: Serial Number: Operation Time: Software Version: Software Version Indicates the system software version. Manual: Manually configure an IP address. Operation Time Indicates the total number of hours of the Operation Time. 20 (GB)
... switched, the original factory settings operate. INITIAL SETUP/INFORMATION Information Model Name: Serial Number: Operation Time: Software Version: Software Version Indicates the system software version. Manual: Manually configure an IP address. Operation Time Indicates the total number of hours of the Operation Time. 20 (GB)
User Manual
Page 30
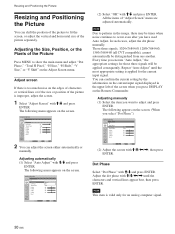
...: H Size: H Shift: V Size: V Shift: Reset 28 1344 30 30 30 30 Select Set ENTER Exit MENU 2 You can adjust the screen either automatically or manually. SCREEN CONTROL Adjust Screen Auto Adjust Dot Phase: Total H Pixel: H Size: H Shift: V Size: V Shift: Reset Cancel O28K 1344 30 30 30 30 Select ...Set ENTER Exit MENU (2) Select "OK" with M/m and press ENTER. All the items of "Adjust Screen" menu are adjusted automatically. Adjusting manually (1) Select the item you want to occur even after you execute "Auto Adjust," the appropriate settings for the current input signal.
...: H Size: H Shift: V Size: V Shift: Reset 28 1344 30 30 30 30 Select Set ENTER Exit MENU 2 You can adjust the screen either automatically or manually. SCREEN CONTROL Adjust Screen Auto Adjust Dot Phase: Total H Pixel: H Size: H Shift: V Size: V Shift: Reset Cancel O28K 1344 30 30 30 30 Select ...Set ENTER Exit MENU (2) Select "OK" with M/m and press ENTER. All the items of "Adjust Screen" menu are adjusted automatically. Adjusting manually (1) Select the item you want to occur even after you execute "Auto Adjust," the appropriate settings for the current input signal.
User Manual
Page 42
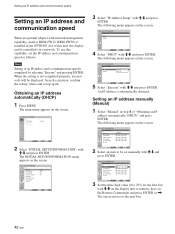
... ENTER. The following menu appears on the screen. INITIAL SETUP/INFORMATION IP Address Setup IP Address: Subnet Mask: Gateway Address: Primay DNS: Secondary DNS: Execute Manual 000 . 000 . 000 . 000 000 . 000 . 000 . 000 000 . 000 . 000 . 000 000 . 000 . 000 . 000 000 . 000 . ...To use this capability, set up again. Obtaining an IP address automatically (DHCP) 1 Press MENU. INITIAL SETUP/INFORMATION IP Address Setup DHCP Manual Select Set ENTER Exit MENU 4 Select "DHCP" with M/m and press ENTER. PICTURE/SOUND CONTROL Picture Mode: Adjust Picture Adjust Sound Standard ...
... ENTER. The following menu appears on the screen. INITIAL SETUP/INFORMATION IP Address Setup IP Address: Subnet Mask: Gateway Address: Primay DNS: Secondary DNS: Execute Manual 000 . 000 . 000 . 000 000 . 000 . 000 . 000 000 . 000 . 000 . 000 000 . 000 . 000 . 000 000 . 000 . ...To use this capability, set up again. Obtaining an IP address automatically (DHCP) 1 Press MENU. INITIAL SETUP/INFORMATION IP Address Setup DHCP Manual Select Set ENTER Exit MENU 4 Select "DHCP" with M/m and press ENTER. PICTURE/SOUND CONTROL Picture Mode: Adjust Picture Adjust Sound Standard ...

User Manual
Page 43
...the number of flashes if the indicator flashes at intervals of three seconds (with M/m, then press ENTER. A communication speed has been set manually. This function shows the display's condition based on the display). In this pattern repeats. Select Set ENTER Exit MENU 2 Press ENTER and ...Set ENTER Exit MENU 4 Set the three digit value (0 to be displayed in red, check the number of flashes and contact your authorized Sony dealer. 1 Check the flashing pattern of the POWER/ STANDBY indicator. INITIAL SETUP/INFORMATION IP Address Setup IP Address: Subnet Mask: Gateway Address...
...the number of flashes if the indicator flashes at intervals of three seconds (with M/m, then press ENTER. A communication speed has been set manually. This function shows the display's condition based on the display). In this pattern repeats. Select Set ENTER Exit MENU 2 Press ENTER and ...Set ENTER Exit MENU 4 Set the three digit value (0 to be displayed in red, check the number of flashes and contact your authorized Sony dealer. 1 Check the flashing pattern of the POWER/ STANDBY indicator. INITIAL SETUP/INFORMATION IP Address Setup IP Address: Subnet Mask: Gateway Address...
