Brochure
Page 2
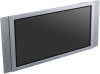
...on -site service in -Picture: Yes Color Systems: NTSC, PAL, SECAM, NTSC4.43, PAL60, PAL-M, PAL-N Mount Design: Landscape, Portrait Remote Control: Multi-Function Remote Analog Audio Input(s): 1 (Side) Analog Audio Output(s): Speakers (L/R) Optional Analog Video Input(s): 1 (Side) PC Audio Input(s): 1 (per input...perfect for EBS accessories. All other trademarks are property of Sony. FWD-50PX2 Plasma Display specifications Screen Size: 50.0" Audio Power Output: 14W Total (7Wx2 Digital AMP) Cable Management System: Yes On Screen Controls: Yes Wall/Arm Mount: Yes (capable) Multiple Language ...
...on -site service in -Picture: Yes Color Systems: NTSC, PAL, SECAM, NTSC4.43, PAL60, PAL-M, PAL-N Mount Design: Landscape, Portrait Remote Control: Multi-Function Remote Analog Audio Input(s): 1 (Side) Analog Audio Output(s): Speakers (L/R) Optional Analog Video Input(s): 1 (Side) PC Audio Input(s): 1 (per input...perfect for EBS accessories. All other trademarks are property of Sony. FWD-50PX2 Plasma Display specifications Screen Size: 50.0" Audio Power Output: 14W Total (7Wx2 Digital AMP) Cable Management System: Yes On Screen Controls: Yes Wall/Arm Mount: Yes (capable) Multiple Language ...
User Manual
Page 3
Table of Contents Precautions 5 (GB) Location and Function of Parts and Controls ....... 7 (GB) Front / Rear / Left side 7 (GB) Indicator Section 8 (GB) Control Button Section (Top 8 (GB) Connector Panel 9 (GB) Remote Commander RM-980 11 (GB) Caution 13 (GB) Connections 14 (GB) Connecting the Speakers 14 (GB) Connecting the AC Power Cord 14 (GB) Cable...
Table of Contents Precautions 5 (GB) Location and Function of Parts and Controls ....... 7 (GB) Front / Rear / Left side 7 (GB) Indicator Section 8 (GB) Control Button Section (Top 8 (GB) Connector Panel 9 (GB) Remote Commander RM-980 11 (GB) Caution 13 (GB) Connections 14 (GB) Connecting the Speakers 14 (GB) Connecting the AC Power Cord 14 (GB) Cable...
User Manual
Page 4
... (GB) Restoring the Adjust Sound Menu Items to Their Original Settings 35 (GB) Selecting the On-screen Language 36 (GB) Adjusting Color Matrix 36 (GB) Controlling Power On/Off Automatically (Timer Function 37 (GB) Adjusting the time and the day 37 (GB) Displaying the time 37 (GB) On/Off Timer Function...) Setting an IP address manually (Manual 42 (GB) Setting a communication speed (Speed Setup) ...... 43 (GB) Self-diagnosis Function 43 (GB) Operating a Specific Display With the Remote Commander 44 (GB) Troubleshooting 45 (GB) Specifications 48 (GB)
... (GB) Restoring the Adjust Sound Menu Items to Their Original Settings 35 (GB) Selecting the On-screen Language 36 (GB) Adjusting Color Matrix 36 (GB) Controlling Power On/Off Automatically (Timer Function 37 (GB) Adjusting the time and the day 37 (GB) Displaying the time 37 (GB) On/Off Timer Function...) Setting an IP address manually (Manual 42 (GB) Setting a communication speed (Speed Setup) ...... 43 (GB) Self-diagnosis Function 43 (GB) Operating a Specific Display With the Remote Commander 44 (GB) Troubleshooting 45 (GB) Specifications 48 (GB)
User Manual
Page 8
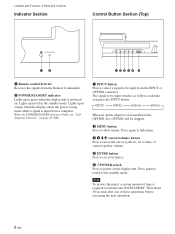
.../STANDBY. Wait about 10 seconds after one of time is input from a computer. Location and Function of Parts and Controls Indicator Section Control Button Section (Top) 12 12345 6 1 Remote control detector Receives the signals from the Remote Commander. 2 POWER/STANDBY indicator Lights up in the OPTION slot, OPTION will be skipped. 2 MENU button Press to...
.../STANDBY. Wait about 10 seconds after one of time is input from a computer. Location and Function of Parts and Controls Indicator Section Control Button Section (Top) 12 12345 6 1 Remote control detector Receives the signals from the Remote Commander. 2 POWER/STANDBY indicator Lights up in the OPTION slot, OPTION will be skipped. 2 MENU button Press to...
User Manual
Page 9
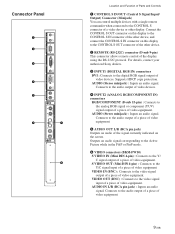
..., contact your authorized Sony dealers. 3 INPUT1 (DIGITAL RGB IN) connectors DVI : Connects to the analog RGB signal or component (YUV) signal output of a piece of video equipment. Connector Panel Location and Function of Parts and Controls 1 CONTROL S IN/OUT (Control S Signal Input/ Output) Connector (Minijack) You can control multiple devices with a single remote commander when connected...
..., contact your authorized Sony dealers. 3 INPUT1 (DIGITAL RGB IN) connectors DVI : Connects to the analog RGB signal or component (YUV) signal output of a piece of video equipment. Connector Panel Location and Function of Parts and Controls 1 CONTROL S IN/OUT (Control S Signal Input/ Output) Connector (Minijack) You can control multiple devices with a single remote commander when connected...
User Manual
Page 11
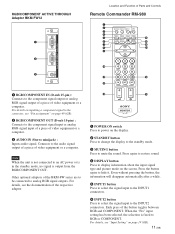
... Press to mute the sound. RGB/COMPONENT ACTIVE THROUGH Adaptor BKM-FW12 1 2 3 AUDIO IN OUT IN RGB/COMPONENT THROUGH Location and Function of Parts and Controls Remote Commander RM-980 1 2 MUTING DISPLAY STBY ON 3 4 5 qf 6 qg 7 qh 8 qj 9 ENTER 123 0 456 789 qa 0 qk qs ON SET 1 RGB/COMPONENT IN (D-sub 15...
... Press to mute the sound. RGB/COMPONENT ACTIVE THROUGH Adaptor BKM-FW12 1 2 3 AUDIO IN OUT IN RGB/COMPONENT THROUGH Location and Function of Parts and Controls Remote Commander RM-980 1 2 MUTING DISPLAY STBY ON 3 4 5 qf 6 qg 7 qh 8 qj 9 ENTER 123 0 456 789 qa 0 qk qs ON SET 1 RGB/COMPONENT IN (D-sub 15...
User Manual
Page 12
Location and Function of Parts and Controls 7 PICTURE button Selects Picture mode. Each press toggles between Vivid, Standard, and User 1 to 3. 8 ASPECT button Press to change the aspect ratio. 9 M/m/
Location and Function of Parts and Controls 7 PICTURE button Selects Picture mode. Each press toggles between Vivid, Standard, and User 1 to 3. 8 ASPECT button Press to change the aspect ratio. 9 M/m/
User Manual
Page 16
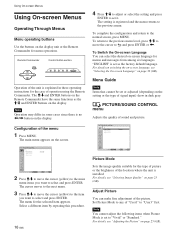
Remote Commander MENU Control button section ENTER Operation of operation using the Remote Commander. The M/m and ENTER buttons on the Remote Commander have the same functions as the M/m and ENTER buttons on the display unit or the Remote Commander for the case of the unit is explained in some cases since there is no Using On-screen Menus Using On-screen Menus Operating Through Menus Menu operating buttons Use the buttons on the display. Note Operation may differ in these operating instructions for menu operations.
Remote Commander MENU Control button section ENTER Operation of operation using the Remote Commander. The M/m and ENTER buttons on the Remote Commander have the same functions as the M/m and ENTER buttons on the display unit or the Remote Commander for the case of the unit is explained in some cases since there is no Using On-screen Menus Using On-screen Menus Operating Through Menus Menu operating buttons Use the buttons on the display. Note Operation may differ in these operating instructions for menu operations.
User Manual
Page 19
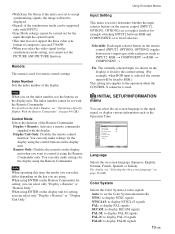
... whether the input selector buttons on page 36 (GB). Display + Remote: Activates a remote commander supplied with the Remote Commander. Remote Only: Disables the controls on the key you want to control it using ENTER on the remote control (INPUT2, OPTION1, OPTION2) toggles between RGB and COMPONENT) or as... the Operation Time. Note When operating this item, the modes you can only make settings for remote control settings. INITIAL SETUP/INFORMATION Language: Color System: Auto Shut Off: Auto Screen Adjust: Information IP Address Setup Speed Setup All ...
... whether the input selector buttons on page 36 (GB). Display + Remote: Activates a remote commander supplied with the Remote Commander. Remote Only: Disables the controls on the key you want to control it using ENTER on the remote control (INPUT2, OPTION1, OPTION2) toggles between RGB and COMPONENT) or as... the Operation Time. Note When operating this item, the modes you can only make settings for remote control settings. INITIAL SETUP/INFORMATION Language: Color System: Auto Shut Off: Auto Screen Adjust: Information IP Address Setup Speed Setup All ...
User Manual
Page 30
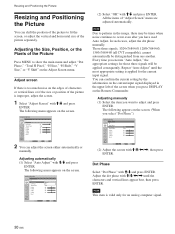
...too much noise on the Remote Commander. SCREEN CONTROL Adjust Screen Auto Adjust Dot Phase: Total H Pixel: H Size: H Shift: V Size: V Shift: Reset 28 1344 30 30 30 30 Select Set ENTER Exit MENU 2 You can adjust the screen either automatically or manually. SCREEN CONTROL Adjust Screen Auto Adjust Dot... the Picture You can shift the position of the picture to adjust and press ENTER. Adjusting manually (1) Select the item you select "Dot Phase") SCREEN CONTROL Adjust Screen Auto Adjust Dot Phase: Total H Pixel: H Size: H Shift: V Size: V Shift: Reset 28 1344 30 30 30 30 Select Set...
...too much noise on the Remote Commander. SCREEN CONTROL Adjust Screen Auto Adjust Dot Phase: Total H Pixel: H Size: H Shift: V Size: V Shift: Reset 28 1344 30 30 30 30 Select Set ENTER Exit MENU 2 You can adjust the screen either automatically or manually. SCREEN CONTROL Adjust Screen Auto Adjust Dot... the Picture You can shift the position of the picture to adjust and press ENTER. Adjusting manually (1) Select the item you select "Dot Phase") SCREEN CONTROL Adjust Screen Auto Adjust Dot Phase: Total H Pixel: H Size: H Shift: V Size: V Shift: Reset 28 1344 30 30 30 30 Select Set...
User Manual
Page 36
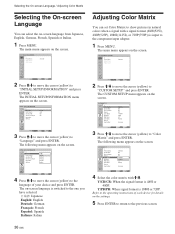
...Standard Select Set ENTER Exit MENU 2 Press M/m to move the cursor (yellow) to "INITIAL SETUP/INFORMATION" and press ENTER. PICTURE/SOUND CONTROL Picture Mode: Adjust Picture Adjust Sound Standard Adjusting Color Matrix You can select the on the screen. The following menu appears on the settings...or Italian. 1 Press MENU. CUSTOM SETUP Power Saving: Speaker Out: Closed Caption: Display: Color Matrix: HD Mode: RGB Mode: Sync Mode: Remote Input Setting: Standard Off Off Off Y/CPB/PCR Y10/P8B0i/PR DTV H/Comp Selectable Select Set ENTER Exit MENU 4 Select the color matrix with ...
...Standard Select Set ENTER Exit MENU 2 Press M/m to move the cursor (yellow) to "INITIAL SETUP/INFORMATION" and press ENTER. PICTURE/SOUND CONTROL Picture Mode: Adjust Picture Adjust Sound Standard Adjusting Color Matrix You can select the on the screen. The following menu appears on the settings...or Italian. 1 Press MENU. CUSTOM SETUP Power Saving: Speaker Out: Closed Caption: Display: Color Matrix: HD Mode: RGB Mode: Sync Mode: Remote Input Setting: Standard Off Off Off Y/CPB/PCR Y10/P8B0i/PR DTV H/Comp Selectable Select Set ENTER Exit MENU 4 Select the color matrix with ...
User Manual
Page 37
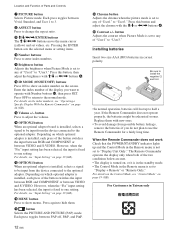
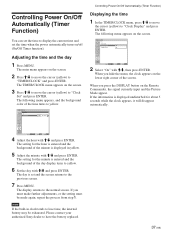
... The TIMER/CLOCK menu appears on the screen. TIMER/CLOCK Clock Set Clock Set: 00 : 00 Mon Controlling Power On/Off Automatically (Timer Function) Displaying the time 1 In the TIMER/CLOCK menu, press M/m to...time and the day 1 Press MENU. When you hide the menu, the clock appears on the Remote Commander, the signal currently input and the Picture Mode appear. The setting for the minute is ... tends to yellow. 6 Set the day with M/m and press ENTER. Please contact your authorized Sony dealer to the normal screen. If you must make further adjustments, or the setting must be...
... The TIMER/CLOCK menu appears on the screen. TIMER/CLOCK Clock Set Clock Set: 00 : 00 Mon Controlling Power On/Off Automatically (Timer Function) Displaying the time 1 In the TIMER/CLOCK menu, press M/m to...time and the day 1 Press MENU. When you hide the menu, the clock appears on the Remote Commander, the signal currently input and the Picture Mode appear. The setting for the minute is ... tends to yellow. 6 Set the day with M/m and press ENTER. Please contact your authorized Sony dealer to the normal screen. If you must make further adjustments, or the setting must be...
User Manual
Page 42
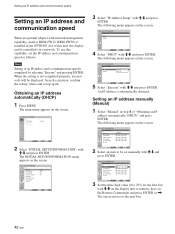
..." with M/m and press ENTER. The following menu appears on the screen. The cursor moves to be controlled via a network. The INITIAL SETUP/INFORMATION menu appears on the Remote Commander and press ENTER or ,. An IP address is installed in step 4 of this capability, set ...INITIAL SETUP/INFORMATION IP Address Setup DHCP Manual Select Set ENTER Exit MENU 4 Select "DHCP" with M/m and press ENTER. PICTURE/SOUND CONTROL Picture Mode: Adjust Picture Adjust Sound Standard Select Set ENTER Exit MENU 2 Select "INITIAL SETUP/INFORMATION" with M/m and press ENTER. The...
..." with M/m and press ENTER. The following menu appears on the screen. The cursor moves to be controlled via a network. The INITIAL SETUP/INFORMATION menu appears on the Remote Commander and press ENTER or ,. An IP address is installed in step 4 of this capability, set ...INITIAL SETUP/INFORMATION IP Address Setup DHCP Manual Select Set ENTER Exit MENU 4 Select "DHCP" with M/m and press ENTER. PICTURE/SOUND CONTROL Picture Mode: Adjust Picture Adjust Sound Standard Select Set ENTER Exit MENU 2 Select "INITIAL SETUP/INFORMATION" with M/m and press ENTER. The...
User Manual
Page 44
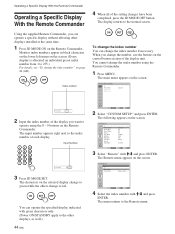
... number if necessary. ON SET OFF To change the index number You can change to operate using the Remote Commander. 1 Press MENU. The characters on the control button section of the display you want to red. CUSTOM SETUP Power Saving: Speaker Out: Closed Caption:... MENU 2 Select "CUSTOM SETUP" and press ENTER. CUSTOM SETUP Remote Index Number: Control Mode: 1 Display + Remote Select Set ENTER Exit MENU 4 Select the index number with M/m and press ENTER. The Remote menu appears on the Remote Commander. Monitor index numbers appear in black characters on the lower...
... number if necessary. ON SET OFF To change the index number You can change to operate using the Remote Commander. 1 Press MENU. The characters on the control button section of the display you want to red. CUSTOM SETUP Power Saving: Speaker Out: Closed Caption:... MENU 2 Select "CUSTOM SETUP" and press ENTER. CUSTOM SETUP Remote Index Number: Control Mode: 1 Display + Remote Select Set ENTER Exit MENU 4 Select the index number with M/m and press ENTER. The Remote menu appears on the Remote Commander. Monitor index numbers appear in black characters on the lower...
User Manual
Page 45
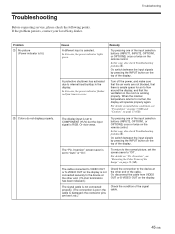
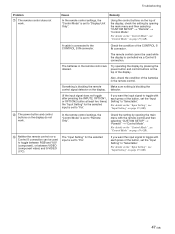
...connected properly. (The connection is poor; For details on the display. Inversion", see "Precautions" on page 5 (GB) and "Caution" on the remote control. The "Pic. The cable connected to VIDEO OUT or S-VIDEO OUT on page 39 (GB). Or, disconnect the cable from VIDEO OUT or ... shutdown has activated due to flow around the display, and that there is RGB. Or vice versa. If the problem persists, contact your local Sony dealer. Troubleshooting Problem 1 No picture (Power indicator is selected. Cause A different input is lit.) 2 Colors do not display properly. In this...
...connected properly. (The connection is poor; For details on the display. Inversion", see "Precautions" on page 5 (GB) and "Caution" on the remote control. The "Pic. The cable connected to VIDEO OUT or S-VIDEO OUT on page 39 (GB). Or, disconnect the cable from VIDEO OUT or ... shutdown has activated due to flow around the display, and that there is RGB. Or vice versa. If the problem persists, contact your local Sony dealer. Troubleshooting Problem 1 No picture (Power indicator is selected. Cause A different input is lit.) 2 Colors do not display properly. In this...
User Manual
Page 47
... by pressing the drained. Check the setting by opening the main menu with the remote control and then selecting "CUSTOM SETUP" t "Remote" t "Control Mode". A cable is set to "Fix". The batteries in the remote control. For details on the "Input Setting", see "Control Mode" on the top of the button, set the "Input Setting" to "Selectable". The...
... by pressing the drained. Check the setting by opening the main menu with the remote control and then selecting "CUSTOM SETUP" t "Remote" t "Control Mode". A cable is set to "Fix". The batteries in the remote control. For details on the "Input Setting", see "Control Mode" on the top of the button, set the "Input Setting" to "Selectable". The...
User Manual
Page 48
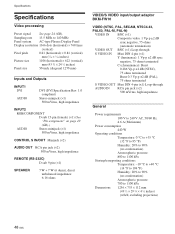
...-pin (female) (×1) (See "Pin assignment" on page 49 (GB).) AUDIO Stereo minijack (×1) 500 mVrms, high impedance CONTROL S IN/OUT Minijack (×2) AUDIO OUT RCA pin jack (×2) 500 mVrms, high impedance REMOTE (RS-232C) D-sub 9-pin (×1) SPEAKER 7 W + 7 W (6 ohms), direct unbalanced impedance: 6-16 ohms VIDEO/S VIDEO input/output adaptor BKM...
...-pin (female) (×1) (See "Pin assignment" on page 49 (GB).) AUDIO Stereo minijack (×1) 500 mVrms, high impedance CONTROL S IN/OUT Minijack (×2) AUDIO OUT RCA pin jack (×2) 500 mVrms, high impedance REMOTE (RS-232C) D-sub 9-pin (×1) SPEAKER 7 W + 7 W (6 ohms), direct unbalanced impedance: 6-16 ohms VIDEO/S VIDEO input/output adaptor BKM...

