Brochure
Page 2
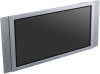
...x 4.37" w/out speakers; 56.29" x 29.6" x 4.37" w/ speakers Supplied Accessories: DVID cable, HD-15 to Component (RCA) cable, AC Power Cord, Remote Control, Operating Instructions, AC Plug Holder (2), AA/R6 Size Battery (2), Cable Holder (4) service and warranty Extended Warranty: Optional Plans for up to 5 ... or home use BKM-FW11: Component/5 BNC input BKM-FW12: Component/RGB loop through. ©2005 Sony Electronics Inc. FWD-50PX2 Plasma Display specifications Screen Size: 50.0" Audio Power Output: 14W Total (7Wx2 Digital AMP) Cable Management System: Yes On Screen Controls: Yes Wall/Arm ...
...x 4.37" w/out speakers; 56.29" x 29.6" x 4.37" w/ speakers Supplied Accessories: DVID cable, HD-15 to Component (RCA) cable, AC Power Cord, Remote Control, Operating Instructions, AC Plug Holder (2), AA/R6 Size Battery (2), Cable Holder (4) service and warranty Extended Warranty: Optional Plans for up to 5 ... or home use BKM-FW11: Component/5 BNC input BKM-FW12: Component/RGB loop through. ©2005 Sony Electronics Inc. FWD-50PX2 Plasma Display specifications Screen Size: 50.0" Audio Power Output: 14W Total (7Wx2 Digital AMP) Cable Management System: Yes On Screen Controls: Yes Wall/Arm ...
User Manual
Page 3
... (Top 8 (GB) Connector Panel 9 (GB) Remote Commander RM-980 11 (GB) Caution 13 (GB) Connections 14 (GB) Connecting the Speakers 14 (GB) Connecting the AC Power Cord 14 (GB) Cable management 15 (GB) Using On-screen Menus 16 (GB) Operating Through Menus 16 (GB) Menu Guide 16 (GB) GB Watching the Picture...
... (Top 8 (GB) Connector Panel 9 (GB) Remote Commander RM-980 11 (GB) Caution 13 (GB) Connections 14 (GB) Connecting the Speakers 14 (GB) Connecting the AC Power Cord 14 (GB) Cable management 15 (GB) Using On-screen Menus 16 (GB) Operating Through Menus 16 (GB) Menu Guide 16 (GB) GB Watching the Picture...
User Manual
Page 5
...may occur depending on handling and cleaning the display panel The display panel's special surface finish should be used in which to unplug the power cord before entering a command. Do not place the unit on surfaces (rugs, blankets, etc.) or near heat sources such as illustrated on ...this unit will never completely disappear. • To protect the plasma display, this unit, contact your authorized Sony dealers. 5 (GB) On cleaning • Be sure to transport the unit. When shipping the unit, repack it as radiators or air ...
...may occur depending on handling and cleaning the display panel The display panel's special surface finish should be used in which to unplug the power cord before entering a command. Do not place the unit on surfaces (rugs, blankets, etc.) or near heat sources such as illustrated on ...this unit will never completely disappear. • To protect the plasma display, this unit, contact your authorized Sony dealers. 5 (GB) On cleaning • Be sure to transport the unit. When shipping the unit, repack it as radiators or air ...
User Manual
Page 6
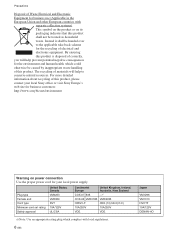
...Japan VM1296 VM1313 HVCTF 10A/125V DENAN-HO The recycling of materials will help to the applicable take-back scheme for your local power supply. For more detailed information about recycling of this product shall not be caused by inappropriate waste handling of electrical and electronic ...) This symbol on the product or on its packaging indicates that this product, please contact your local Sony office or visit Sony Europe's web site for business customers: http://www.sonybiz.net/environment Warning on power connection Use the proper power cord for the recycling of this product.
...Japan VM1296 VM1313 HVCTF 10A/125V DENAN-HO The recycling of materials will help to the applicable take-back scheme for your local power supply. For more detailed information about recycling of this product shall not be caused by inappropriate waste handling of electrical and electronic ...) This symbol on the product or on its packaging indicates that this product, please contact your local Sony office or visit Sony Europe's web site for business customers: http://www.sonybiz.net/environment Warning on power connection Use the proper power cord for the recycling of this product.
User Manual
Page 7
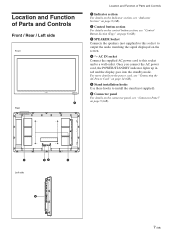
... this socket to output the audio matching the signal displayed on the screen. 4 - For more details on the power cord, see "Connecting the AC Power Cord" on page 14 (GB). 5 Stand installation hooks Use these hooks to install the stand (not supplied). 6 Connector panel For details on the ...on page 8 (GB). 3 SPEAKER Socket Connects the speakers (not supplied) to this socket and to a wall outlet. Once you connect the AC power cord, the POWER/STANDBY indicator lights up in red and the display goes into the standby mode. Location and Function of Parts and Controls Front / Rear / Left side...
... this socket to output the audio matching the signal displayed on the screen. 4 - For more details on the power cord, see "Connecting the AC Power Cord" on page 14 (GB). 5 Stand installation hooks Use these hooks to install the stand (not supplied). 6 Connector panel For details on the ...on page 8 (GB). 3 SPEAKER Socket Connects the speakers (not supplied) to this socket and to a wall outlet. Once you connect the AC power cord, the POWER/STANDBY indicator lights up in red and the display goes into the standby mode. Location and Function of Parts and Controls Front / Rear / Left side...
User Manual
Page 14
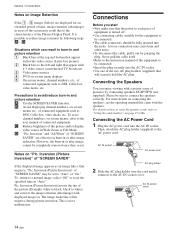
... to "Using the cable holders" on "Pic. AC IN socket AC power cord AC plug holder 2 Slide the AC plug holder over the cord until it out by grasping the plug. Please be sure to the AC power cord. It is turned off. • Use connecting cables suitable for an extended period of time,...which can enjoy viewing with displayed image on. Precautions to the left and right that will securely hold the AC plug. Connecting the AC Power Cord 1 Plug the AC power cord into the AC IN socket. • Use one of the picture and/or display video source in or after image reduction. However, ...
... to "Using the cable holders" on "Pic. AC IN socket AC power cord AC plug holder 2 Slide the AC plug holder over the cord until it out by grasping the plug. Please be sure to the AC power cord. It is turned off. • Use connecting cables suitable for an extended period of time,...which can enjoy viewing with displayed image on. Precautions to the left and right that will securely hold the AC plug. Connecting the AC Power Cord 1 Plug the AC power cord into the AC IN socket. • Use one of the picture and/or display video source in or after image reduction. However, ...
User Manual
Page 15
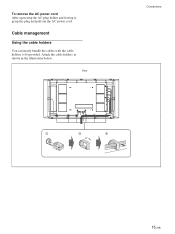
Cable management Using the cable holders You can neatly bundle the cables with the cable holders (×6) provided. Rear Connections 1 2 3 15 (GB) To remove the AC power cord After squeezing the AC plug holder and freeing it, grasp the plug and pull out the AC power cord. Attach the cable holders as shown in the illustration below.
Cable management Using the cable holders You can neatly bundle the cables with the cable holders (×6) provided. Rear Connections 1 2 3 15 (GB) To remove the AC power cord After squeezing the AC plug holder and freeing it, grasp the plug and pull out the AC power cord. Attach the cable holders as shown in the illustration below.
User Manual
Page 49
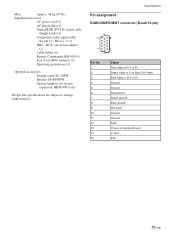
Mass Approx. 44 kg (97 lb.) Supplied accessories AC power cord (1) AC plug holder (2) Digital RGB (DVI-D) signal cable (Single Link) (1) Component video signal cable (D-sub 15 - Specifications Pin assignment RGB/COMPONENT connector (D-sub 15-pin) ...
Mass Approx. 44 kg (97 lb.) Supplied accessories AC power cord (1) AC plug holder (2) Digital RGB (DVI-D) signal cable (Single Link) (1) Component video signal cable (D-sub 15 - Specifications Pin assignment RGB/COMPONENT connector (D-sub 15-pin) ...


