
Brochure
Page 2
... Warranty: Optional Plans for hospitality or home use BKM-FW11: Component/5 BNC input BKM-FW12: Component/RGB loop through. ©2005 Sony Electronics Inc. FWD-50PX2 Plasma Display specifications Screen Size: 50.0" Audio Power Output: 14W Total (7Wx2 Digital AMP) Cable Management System: Yes On Screen Controls: Yes Wall/Arm Mount: Yes (capable) Multiple...
... Warranty: Optional Plans for hospitality or home use BKM-FW11: Component/5 BNC input BKM-FW12: Component/RGB loop through. ©2005 Sony Electronics Inc. FWD-50PX2 Plasma Display specifications Screen Size: 50.0" Audio Power Output: 14W Total (7Wx2 Digital AMP) Cable Management System: Yes On Screen Controls: Yes Wall/Arm Mount: Yes (capable) Multiple...
User Manual
Page 3
... (Top 8 (GB) Connector Panel 9 (GB) Remote Commander RM-980 11 (GB) Caution 13 (GB) Connections 14 (GB) Connecting the Speakers 14 (GB) Connecting the AC Power Cord 14 (GB) Cable management 15 (GB) Using On-screen Menus 16 (GB) Operating Through Menus 16 (GB) Menu Guide 16 (GB) GB Watching the...
... (Top 8 (GB) Connector Panel 9 (GB) Remote Commander RM-980 11 (GB) Caution 13 (GB) Connections 14 (GB) Connecting the Speakers 14 (GB) Connecting the AC Power Cord 14 (GB) Cable management 15 (GB) Using On-screen Menus 16 (GB) Operating Through Menus 16 (GB) Menu Guide 16 (GB) GB Watching the...
User Manual
Page 4
...) Restoring the Adjust Sound Menu Items to Their Original Settings 35 (GB) Selecting the On-screen Language 36 (GB) Adjusting Color Matrix 36 (GB) Controlling Power On/Off Automatically (Timer Function 37 (GB) Adjusting the time and the day 37 (GB) Displaying the time 37 (GB) On/Off Timer Function 38...
...) Restoring the Adjust Sound Menu Items to Their Original Settings 35 (GB) Selecting the On-screen Language 36 (GB) Adjusting Color Matrix 36 (GB) Controlling Power On/Off Automatically (Timer Function 37 (GB) Adjusting the time and the day 37 (GB) Displaying the time 37 (GB) On/Off Timer Function 38...
User Manual
Page 5
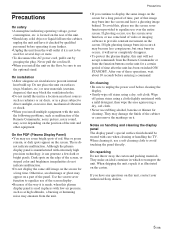
...use rubbing alcohol, benzine or thinner for cleaning. When shipping the unit, repack it . Precautions On safety • A nameplate indicating operating voltage, power consumption, etc. Never pull the cord itself. • When you continue to equalize use the optional stand. On the PDP (Plasma Display Panel... On repacking Do not throw away the carton and packing materials. When cleaning it is made, when this unit, contact your authorized Sony dealers. 5 (GB) Although the plasma display panel is used for a certain period of video or imaging software to avoid touching the...
...use rubbing alcohol, benzine or thinner for cleaning. When shipping the unit, repack it . Precautions On safety • A nameplate indicating operating voltage, power consumption, etc. Never pull the cord itself. • When you continue to equalize use the optional stand. On the PDP (Plasma Display Panel... On repacking Do not throw away the carton and packing materials. When cleaning it is made, when this unit, contact your authorized Sony dealers. 5 (GB) Although the plasma display panel is used for a certain period of video or imaging software to avoid touching the...
User Manual
Page 6
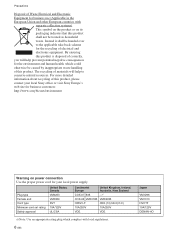
The recycling of this product, please contact your local Sony office or visit Sony Europe's web site for business customers: http://www.sonybiz.net/environment Warning on its packaging indicates that this product. Plug type Female end ...Waste Electrical and Electronic Equipment for the environment and human health, which complies with separate collection systems) This symbol on the product or on power connection Use the proper power cord for your local power supply. Precautions Disposal of electrical and electronic equipment. Instead it shall be treated as household waste.
The recycling of this product, please contact your local Sony office or visit Sony Europe's web site for business customers: http://www.sonybiz.net/environment Warning on its packaging indicates that this product. Plug type Female end ...Waste Electrical and Electronic Equipment for the environment and human health, which complies with separate collection systems) This symbol on the product or on power connection Use the proper power cord for your local power supply. Precautions Disposal of electrical and electronic equipment. Instead it shall be treated as household waste.
User Manual
Page 7
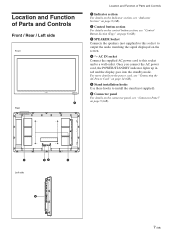
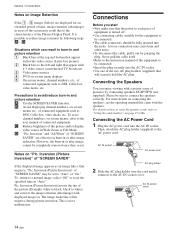
... in red and the display goes into the standby mode. AC IN socket Connect the supplied AC power cord to this socket to a wall outlet. For more details on the power cord, see "Connecting the AC Power Cord" on page 14 (GB). 5 Stand installation hooks Use these hooks to install the stand (not...
... in red and the display goes into the standby mode. AC IN socket Connect the supplied AC power cord to this socket to a wall outlet. For more details on the power cord, see "Connecting the AC Power Cord" on page 14 (GB). 5 Stand installation hooks Use these hooks to install the stand (not...
User Manual
Page 8
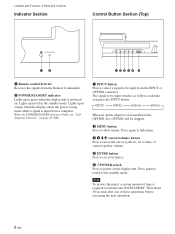
... as follows each time you press the INPUT button. The signal to the standby mode. Lights up in red in the standby mode. When the POWER/STANDBY indicator blinks, see "Selfdiagnosis Function" on the display unit. Press again to hide them. 3 4 m/M (cursor/volume) button Press to move the cursor...volume. 5 ENTER button Press to set your choice. 6 1POWER switch Press to turn the unit ON/STANDBY. When an option adaptor is required to power on page 43 (GB). 1 INPUT button Press to select a signal to show menus. Location and Function of Parts and Controls Indicator Section Control ...
... as follows each time you press the INPUT button. The signal to the standby mode. Lights up in red in the standby mode. When the POWER/STANDBY indicator blinks, see "Selfdiagnosis Function" on the display unit. Press again to hide them. 3 4 m/M (cursor/volume) button Press to move the cursor...volume. 5 ENTER button Press to set your choice. 6 1POWER switch Press to turn the unit ON/STANDBY. When an option adaptor is required to power on page 43 (GB). 1 INPUT button Press to select a signal to show menus. Location and Function of Parts and Controls Indicator Section Control ...
User Manual
Page 11
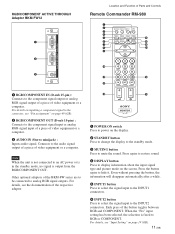
Note When the unit is not connected to hide it. Press the button again to an AC power or is in the standby mode, no signal is fixed to display information about the input signal type and picture mode on the display. 2 STANDBY ... "Input Setting" on page 49 (GB). 2 RGB/COMPONENT OUT (D-sub 15-pin) : Connects to analog RGB signal outputs. qd ql MONITOR RM-980 1 POWER ON switch Press to power on the screen. Even without pressing the button, the information will disappear automatically after a while. 5 INPUT1 button Press to select the signal input...
Note When the unit is not connected to hide it. Press the button again to an AC power or is in the standby mode, no signal is fixed to display information about the input signal type and picture mode on the display. 2 STANDBY ... "Input Setting" on page 49 (GB). 2 RGB/COMPONENT OUT (D-sub 15-pin) : Connects to analog RGB signal outputs. qd ql MONITOR RM-980 1 POWER ON switch Press to power on the screen. Even without pressing the button, the information will disappear automatically after a while. 5 INPUT1 button Press to select the signal input...
User Manual
Page 12
Each press toggles between Vivid, Standard, and User 1 to 3. 8 ASPECT button Press to change the aspect ratio. 9 M/m/ Location and Function of Parts and Controls 7 PICTURE button Selects Picture mode.
Each press toggles between Vivid, Standard, and User 1 to 3. 8 ASPECT button Press to change the aspect ratio. 9 M/m/ Location and Function of Parts and Controls 7 PICTURE button Selects Picture mode.
User Manual
Page 13
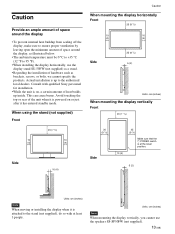
... the display vertically Front 20 (7 7/8) 25 (9 7/8) Side 10 (4) 25 (9 7/8) Make sure that the 1 POWER switch is at least 3 people. Avoid touching the top or rear of the unit when it is powered on , a certain amount of heat builds up to the authorized local dealers. Consult with at the lower...below. • The ambient temperature must be 0 °C to +35 °C (32 °F to the stand (not supplied), do so with qualified Sony personnel for installation. • While the unit is on or just after it is attached to 95 °F). • When installing the display horizontally, use...
... the display vertically Front 20 (7 7/8) 25 (9 7/8) Side 10 (4) 25 (9 7/8) Make sure that the 1 POWER switch is at least 3 people. Avoid touching the top or rear of the unit when it is powered on , a certain amount of heat builds up to the authorized local dealers. Consult with at the lower...below. • The ambient temperature must be 0 °C to +35 °C (32 °F to the stand (not supplied), do so with qualified Sony personnel for installation. • While the unit is on or just after it is attached to 95 °F). • When installing the display horizontally, use...
User Manual
Page 14
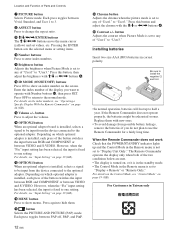
... (afterimage) with displayed image on. D "Pic. Inversion" and "All White" of "SCREEN SAVER" are displayed for the equipment to the AC power cord. Inversion (Picture Inversion) inverts the tint of connected equipment. AC IN socket cover 14 (GB) A loose connection may be set to the ...the speakers. B Avoid displaying channel numbers, on "Pic. To erase channel numbers, on connecting the speakers, see the operating manual that the power to each piece of "SCREEN SAVER" may cause hum and other noise. • To disconnect the cable, pull it connects to the characteristics...
... (afterimage) with displayed image on. D "Pic. Inversion" and "All White" of "SCREEN SAVER" are displayed for the equipment to the AC power cord. Inversion (Picture Inversion) inverts the tint of connected equipment. AC IN socket cover 14 (GB) A loose connection may be set to the ...the speakers. B Avoid displaying channel numbers, on "Pic. To erase channel numbers, on connecting the speakers, see the operating manual that the power to each piece of "SCREEN SAVER" may cause hum and other noise. • To disconnect the cable, pull it connects to the characteristics...
User Manual
Page 15
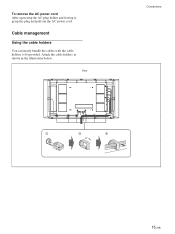
To remove the AC power cord After squeezing the AC plug holder and freeing it, grasp the plug and pull out the AC power cord. Cable management Using the cable holders You can neatly bundle the cables with the cable holders (×6) provided. Attach the cable holders as shown in the illustration below. Rear Connections 1 2 3 15 (GB)
To remove the AC power cord After squeezing the AC plug holder and freeing it, grasp the plug and pull out the AC power cord. Cable management Using the cable holders You can neatly bundle the cables with the cable holders (×6) provided. Attach the cable holders as shown in the illustration below. Rear Connections 1 2 3 15 (GB)
User Manual
Page 18
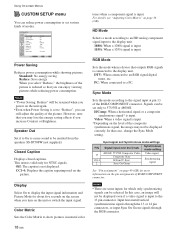
... RGB Mode: Sync Mode: Remote Input Setting Select Standard Off Off Off Y/PB/PR 1080i DTV H/Comp Selectable Set ENTER Exit MENU Power Saving Reduces power consumption while showing pictures. This item is connected to the display unit. HD Mode Selects a mode according to an HD analog component ... signals through the 13 or 14 pin connectors, or input Sync On Green signals through the RGB connector. 18 (GB) Notes • "Power Saving: Reduce" will not be selected. PIN 13 13/14 2 Input signal and Synchronous mode settings Signal input over the D-sub Synchronous mode...
... RGB Mode: Sync Mode: Remote Input Setting Select Standard Off Off Off Y/PB/PR 1080i DTV H/Comp Selectable Set ENTER Exit MENU Power Saving Reduces power consumption while showing pictures. This item is connected to the display unit. HD Mode Selects a mode according to an HD analog component ... signals through the 13 or 14 pin connectors, or input Sync On Green signals through the RGB connector. 18 (GB) Notes • "Power Saving: Reduce" will not be selected. PIN 13 13/14 2 Input signal and Synchronous mode settings Signal input over the D-sub Synchronous mode...
User Manual
Page 20
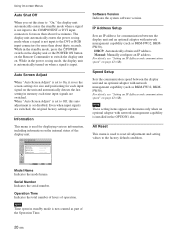
... Information Model Name: Serial Number: Operation Time: Software Version: Software Version Indicates the system software version. The display unit automatically enters the power saving mode when a signal is not input to the DVI or RGB input connectors for more than about five minutes. Using On-screen Menus.... While in standby mode is input. Note Time spent in the standby mode, press the 1POWER switch on the display unit or the POWER ON button on the Remote Commander to Off, this item to "On," the display unit automatically enters the standby mode when a signal ...
... Information Model Name: Serial Number: Operation Time: Software Version: Software Version Indicates the system software version. The display unit automatically enters the power saving mode when a signal is not input to the DVI or RGB input connectors for more than about five minutes. Using On-screen Menus.... While in standby mode is input. Note Time spent in the standby mode, press the 1POWER switch on the display unit or the POWER ON button on the Remote Commander to Off, this item to "On," the display unit automatically enters the standby mode when a signal ...
User Manual
Page 21
All White Turns the entire screen white to prevent image retention. Auto Dimmer When a still image is automatically turned on or off at which the power is displayed for long periods of time. On/Off Timer Sets the time at a predetermined time. Orbit All White: Off Background: Gray Auto Dimmer:... time" on page 39 (GB). Select Set ENTER Exit MENU Note The time and the day are not preset in clock, or make the unit power on/off . Inversion: Off Pic. Orbit Changes the position of a picture after a predetermined amount of time. For details, see "On/Off Timer Function"...
All White Turns the entire screen white to prevent image retention. Auto Dimmer When a still image is automatically turned on or off at which the power is displayed for long periods of time. On/Off Timer Sets the time at a predetermined time. Orbit All White: Off Background: Gray Auto Dimmer:... time" on page 39 (GB). Select Set ENTER Exit MENU Note The time and the day are not preset in clock, or make the unit power on/off . Inversion: Off Pic. Orbit Changes the position of a picture after a predetermined amount of time. For details, see "On/Off Timer Function"...
User Manual
Page 22
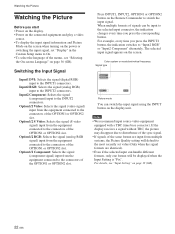
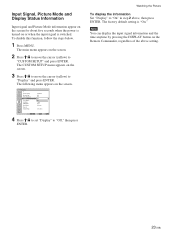
...recommend input source video equipment equipped with a TBC (time base corrector). Watching the Picture Watching the Picture Before you start • Power on the display. • Power on the connected equipment and play a video source. • To display the input signal information and Picture Mode on the screen ...when turning on the power or switching the input signal, set value (Only when the signal formats are identical). • Even if the selected input can handle ...
...recommend input source video equipment equipped with a TBC (time base corrector). Watching the Picture Watching the Picture Before you start • Power on the display. • Power on the connected equipment and play a video source. • To display the input signal information and Picture Mode on the screen ...when turning on the power or switching the input signal, set value (Only when the signal formats are identical). • Even if the selected input can handle ...
User Manual
Page 23
... turned on the screen. Watching the Picture To display the information Set "Display" to "CUSTOM SETUP" and press ENTER. CUSTOM SETUP Power Saving: Speaker Out: Closed Caption: Display: Color Matrix: HD Mode: RGB Mode: Sync Mode: Remote Input Setting: Standard Off Off Off OY/nPB/PR 1080i ...
... turned on the screen. Watching the Picture To display the information Set "Display" to "CUSTOM SETUP" and press ENTER. CUSTOM SETUP Power Saving: Speaker Out: Closed Caption: Display: Color Matrix: HD Mode: RGB Mode: Sync Mode: Remote Input Setting: Standard Off Off Off OY/nPB/PR 1080i ...
User Manual
Page 36
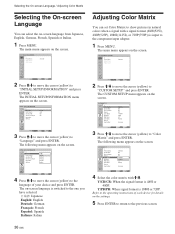
...language is 480I or 480P. The following menu appears on the settings. 5 Press ENTER to return to the previous screen. 36 (GB) CUSTOM SETUP Power Saving: Speaker Out: Closed Caption: Display: Color Matrix: HD Mode: RGB Mode: Sync Mode: Remote Input Setting: Standard Off Off Off Y/CPB...Italian Select Set ENTER Exit MENU 2 Press M/m to move the cursor (yellow) to the operating instructions of your choice and press ENTER. CUSTOM SETUP Power Saving: Speaker Out: Closed Caption: Display: Color Matrix: HD Mode: RGB Mode: Sync Mode: Remote Input Setting: Standard Off Off Off Y/PB/...
...language is 480I or 480P. The following menu appears on the settings. 5 Press ENTER to return to the previous screen. 36 (GB) CUSTOM SETUP Power Saving: Speaker Out: Closed Caption: Display: Color Matrix: HD Mode: RGB Mode: Sync Mode: Remote Input Setting: Standard Off Off Off Y/CPB...Italian Select Set ENTER Exit MENU 2 Press M/m to move the cursor (yellow) to the operating instructions of your choice and press ENTER. CUSTOM SETUP Power Saving: Speaker Out: Closed Caption: Display: Color Matrix: HD Mode: RGB Mode: Sync Mode: Remote Input Setting: Standard Off Off Off Y/PB/...
User Manual
Page 37
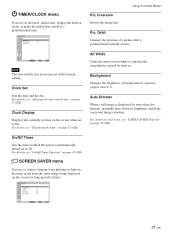
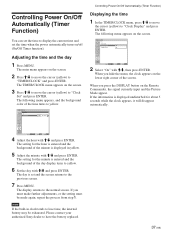
... about 5 seconds while the clock appears, it will disappear automatically. The display returns to have the battery replaced. 37 (GB) Please contact your authorized Sony dealer to the normal screen. Adjusting the time and the day 1 Press MENU. The TIMER/CLOCK menu appears on the screen. 2 Press M/m to...background of the minute is entered and the background of the day display turns to display the current time and set the time when the power automatically turns on the Remote Commander, the signal currently input and the Picture Mode appear. When you must make further adjustments, or the...
... about 5 seconds while the clock appears, it will disappear automatically. The display returns to have the battery replaced. 37 (GB) Please contact your authorized Sony dealer to the normal screen. Adjusting the time and the day 1 Press MENU. The TIMER/CLOCK menu appears on the screen. 2 Press M/m to...background of the minute is entered and the background of the day display turns to display the current time and set the time when the power automatically turns on the Remote Commander, the signal currently input and the Picture Mode appear. When you must make further adjustments, or the...
User Manual
Page 38
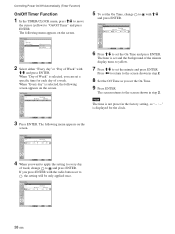
... Select Set ENTER Exit MENU 6 Press M/m to the screen shown in the factory setting, so "-- : --" is selected, the following menu appears on the screen. Controlling Power On/Off Automatically (Timer Function) On/Off Timer Function 1 In the TIMER/CLOCK menu, press M/m to move the cursor (yellow) to set the minute and...
... Select Set ENTER Exit MENU 6 Press M/m to the screen shown in the factory setting, so "-- : --" is selected, the following menu appears on the screen. Controlling Power On/Off Automatically (Timer Function) On/Off Timer Function 1 In the TIMER/CLOCK menu, press M/m to move the cursor (yellow) to set the minute and...


