
User Manual
Page 2
...No. To reduce the risk of Conformity Trade Name: SONY Model: FWD-50PX2/50PX2A Responsible Party: Sony Electronics Inc. This can radiate radio frequency energy and, if not installed and used in this manual could void your Sony dealer regarding this device must accept any interference received, ... If you have any changes or modifications not expressly approved in accordance with the limits for help. Sony Customer Information Services Center 1-800-222-7669 or http://www.sony.com/ Declaration of fire or electric shock, do not open the cabinet. Refer to these numbers whenever...
...No. To reduce the risk of Conformity Trade Name: SONY Model: FWD-50PX2/50PX2A Responsible Party: Sony Electronics Inc. This can radiate radio frequency energy and, if not installed and used in this manual could void your Sony dealer regarding this device must accept any interference received, ... If you have any changes or modifications not expressly approved in accordance with the limits for help. Sony Customer Information Services Center 1-800-222-7669 or http://www.sony.com/ Declaration of fire or electric shock, do not open the cabinet. Refer to these numbers whenever...
User Manual
Page 3
... 16 (GB) Menu Guide 16 (GB) GB Watching the Picture 22 (GB) Switching the Input Signal 22 (GB) Input Signal, Picture Mode and Display Status Information 23 (GB) Selecting Image Quality 25 (GB) Adjusting the Picture 25 (GB) Adjusting the Contrast, Brightness, Chroma, and Phase, etc 25 (GB) Restoring the Adjust...
... 16 (GB) Menu Guide 16 (GB) GB Watching the Picture 22 (GB) Switching the Input Signal 22 (GB) Input Signal, Picture Mode and Display Status Information 23 (GB) Selecting Image Quality 25 (GB) Adjusting the Picture 25 (GB) Adjusting the Contrast, Brightness, Chroma, and Phase, etc 25 (GB) Restoring the Adjust...
User Manual
Page 6
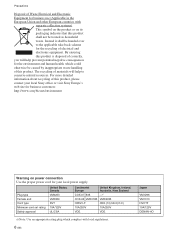
...recycling of materials will help to the applicable take-back scheme for the recycling of electrical and electronic equipment. For more detailed information about recycling of this product, please contact your local power supply. Plug type Female end Cord type Minimum cord set rating ... with separate collection systems) This symbol on the product or on power connection Use the proper power cord for your local Sony office or visit Sony Europe's web site for business customers: http://www.sonybiz.net/environment Warning on its packaging indicates that this product. Precautions ...
...recycling of materials will help to the applicable take-back scheme for the recycling of electrical and electronic equipment. For more detailed information about recycling of this product, please contact your local power supply. Plug type Female end Cord type Minimum cord set rating ... with separate collection systems) This symbol on the product or on power connection Use the proper power cord for your local Sony office or visit Sony Europe's web site for business customers: http://www.sonybiz.net/environment Warning on its packaging indicates that this product. Precautions ...
User Manual
Page 11
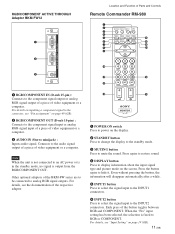
... equipment or a computer. When the "Fix" input setting has been selected, the selection is output from the RGB/COMPONENT OUT. Connects to display information about the input signal type and picture mode on page 49 (GB). 2 RGB/COMPONENT OUT (D-sub 15-pin) : Connects to analog RGB signal... outputs. Even without pressing the button, the information will disappear automatically after a while. 5 INPUT1 button Press to select the signal input to the INPUT1 connectors. 6 INPUT2 button Press to select the ...
... equipment or a computer. When the "Fix" input setting has been selected, the selection is output from the RGB/COMPONENT OUT. Connects to display information about the input signal type and picture mode on page 49 (GB). 2 RGB/COMPONENT OUT (D-sub 15-pin) : Connects to analog RGB signal... outputs. Even without pressing the button, the information will disappear automatically after a while. 5 INPUT1 button Press to select the signal input to the INPUT1 connectors. 6 INPUT2 button Press to select the ...
User Manual
Page 18
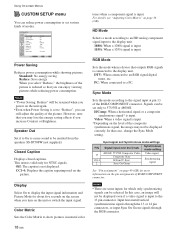
... • "Power Saving: Reduce" will not be displayed correctly. Display Select On to a PC. PC: When connected to display the input signal information and Picture Mode for more information on the picture. In that you may not be displayed even if a video signal is input to the display unit. Notes • There...
... • "Power Saving: Reduce" will not be displayed correctly. Display Select On to a PC. PC: When connected to display the input signal information and Picture Mode for more information on the picture. In that you may not be displayed even if a video signal is input to the display unit. Notes • There...
User Manual
Page 19
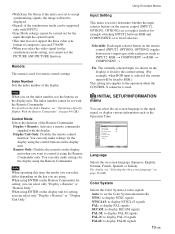
...on the display unit for setting, you can select the on the key you want to control it using the Remote Commander only. INITIAL SETUP/INFORMATION menu You can select only "Display + Remote" or "Display Unit Only." The index number cannot be set with the display. Control Mode ...Selects the function of video signals. You can select differ depending on -screen language or the input signal, or display various information such as the Operation Time. Remote Only: Disables the controls on the remote control (INPUT2, OPTION1, OPTION2) act as toggles (such as shown...
...on the display unit for setting, you can select the on the key you want to control it using the Remote Commander only. INITIAL SETUP/INFORMATION menu You can select only "Display + Remote" or "Display Unit Only." The index number cannot be set with the display. Control Mode ...Selects the function of video signals. You can select differ depending on -screen language or the input signal, or display various information such as the Operation Time. Remote Only: Disables the controls on the remote control (INPUT2, OPTION1, OPTION2) act as toggles (such as shown...
User Manual
Page 20
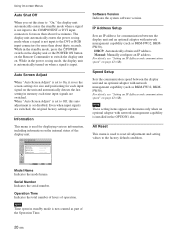
...When "Auto Screen Adjust" is set to On, it saves the screen-settings for size and positioning for displaying various information, including information on the internal status of the display unit. Manual: Manually configure an IP address. Operation Time Indicates the total number... of hours of the Operation Time. 20 (GB) INITIAL SETUP/INFORMATION Information Model Name: Serial Number: Operation Time: Software Version: Software Version Indicates the system software version. For details, see "Setting an IP...
...When "Auto Screen Adjust" is set to On, it saves the screen-settings for size and positioning for displaying various information, including information on the internal status of the display unit. Manual: Manually configure an IP address. Operation Time Indicates the total number... of hours of the Operation Time. 20 (GB) INITIAL SETUP/INFORMATION Information Model Name: Serial Number: Operation Time: Software Version: Software Version Indicates the system software version. For details, see "Setting an IP...
User Manual
Page 22
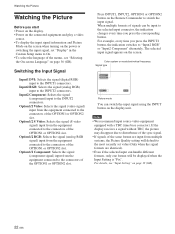
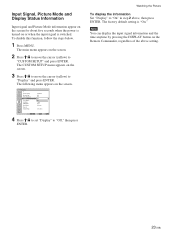
... Picture Before you start • Power on the display. • Power on the connected equipment and play a video source. • To display the input signal information and Picture Mode on the screen when turning on the power or switching the input signal, set value (Only when the signal formats are identical...
... Picture Before you start • Power on the display. • Power on the connected equipment and play a video source. • To display the input signal information and Picture Mode on the screen when turning on the power or switching the input signal, set value (Only when the signal formats are identical...
User Manual
Page 23
... to set "Display" to "On" in step 2 above setting. 23 (GB) The factory default setting is switched. Note You can display the input signal information and the time anytime by pressing the DISPLAY button on the screen. 2 Press M/m to move the cursor (yellow) to "CUSTOM SETUP" and press ENTER.... 3 Press M/m to move the cursor (yellow) to "Display" and press ENTER. Input Signal, Picture Mode and Display Status Information Input signal and Picture Mode information appear on the screen for about five seconds when the power is turned on or when the input signal is "On." Watching the...
... to set "Display" to "On" in step 2 above setting. 23 (GB) The factory default setting is switched. Note You can display the input signal information and the time anytime by pressing the DISPLAY button on the screen. 2 Press M/m to move the cursor (yellow) to "CUSTOM SETUP" and press ENTER.... 3 Press M/m to move the cursor (yellow) to "Display" and press ENTER. Input Signal, Picture Mode and Display Status Information Input signal and Picture Mode information appear on the screen for about five seconds when the power is turned on or when the input signal is "On." Watching the...

User Manual
Page 28
...M/m to move the cursor (yellow) to "SCREEN CONTROL" and press ENTER. How ya doing ? Normal Ordinary pictures with aspect ratio information (ID-1 format). • Television broadcasts containing a signal for faithfully reproducing the aspect ratio of the picture are available. The SCREEN ...Control Signal This is displayed on the type of the screen. Hey! Full Images from a video camera or DVD software with aspect ratio information (ID-1 type) Images are displayed while enlarging to full screen size and aligning with a 4:3 aspect ratio (screen aspect ratio: 4:3)....
...M/m to move the cursor (yellow) to "SCREEN CONTROL" and press ENTER. How ya doing ? Normal Ordinary pictures with aspect ratio information (ID-1 format). • Television broadcasts containing a signal for faithfully reproducing the aspect ratio of the picture are available. The SCREEN ...Control Signal This is displayed on the type of the screen. Hey! Full Images from a video camera or DVD software with aspect ratio information (ID-1 type) Images are displayed while enlarging to full screen size and aligning with a 4:3 aspect ratio (screen aspect ratio: 4:3)....
User Manual
Page 30
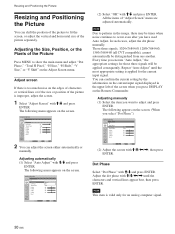
... O28K 1344 30 30 30 30 Select Set ENTER Exit MENU (2) Select "OK" with M/m and press ENTER. You can confirm the current setting by the information on the current input signal displayed in the image, there may be times when noise continues to occur even after you want to adjust and...
... O28K 1344 30 30 30 30 Select Set ENTER Exit MENU (2) Select "OK" with M/m and press ENTER. You can confirm the current setting by the information on the current input signal displayed in the image, there may be times when noise continues to occur even after you want to adjust and...
User Manual
Page 36
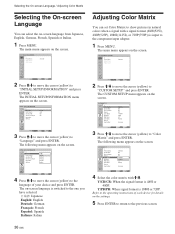
... 5 Press ENTER to return to the operating instructions of your choice and press ENTER. INITIAL SETUP/INFORMATION Language: Color System: Auto Shut Off: Auto Screen Adjust: Information All Reset English EAuntgolish DOeffutsch FOrnançais Español IDtaHliCanPo Select Set ENTER Exit MENU ...Italian. 1 Press MENU. The main menu appears on the screen. The INITIAL SETUP/INFORMATION menu appears on the screen. INITIAL SETUP/INFORMATION Language: Color System: Auto Shut Off: Auto Screen Adjust: Information All Reset English Auto Off On Select Set ENTER Exit MENU 3 Press M/m to...
... 5 Press ENTER to return to the operating instructions of your choice and press ENTER. INITIAL SETUP/INFORMATION Language: Color System: Auto Shut Off: Auto Screen Adjust: Information All Reset English EAuntgolish DOeffutsch FOrnançais Español IDtaHliCanPo Select Set ENTER Exit MENU ...Italian. 1 Press MENU. The main menu appears on the screen. The INITIAL SETUP/INFORMATION menu appears on the screen. INITIAL SETUP/INFORMATION Language: Color System: Auto Shut Off: Auto Screen Adjust: Information All Reset English Auto Off On Select Set ENTER Exit MENU 3 Press M/m to...
User Manual
Page 37
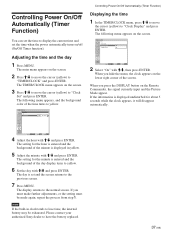
... Function) Displaying the time 1 In the TIMER/CLOCK menu, press M/m to move the cursor (yellow) to the previous screen. 7 Press MENU. If the information is displayed undisturbed for the hour is entered and the background of the day display turns to yellow. The setting for the minute is entered... Set Clock Display: Off On/Off Timer On Select Set ENTER Exit MENU 2 Select "On" with M/m and press ENTER. Please contact your authorized Sony dealer to lose time, the internal battery may be made again, repeat the process from step 1. Adjusting the time and the day 1 Press MENU....
... Function) Displaying the time 1 In the TIMER/CLOCK menu, press M/m to move the cursor (yellow) to the previous screen. 7 Press MENU. If the information is displayed undisturbed for the hour is entered and the background of the day display turns to yellow. The setting for the minute is entered... Set Clock Display: Off On/Off Timer On Select Set ENTER Exit MENU 2 Select "On" with M/m and press ENTER. Please contact your authorized Sony dealer to lose time, the internal battery may be made again, repeat the process from step 1. Adjusting the time and the day 1 Press MENU....
User Manual
Page 42
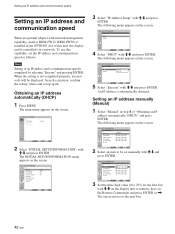
...a situation, confirm the setting values and set manually with M/m and press ENTER. The main menu appears on the screen. INITIAL SETUP/INFORMATION IP Address Setup DHCP Manual Select Set ENTER Exit MENU 4 Select "DHCP" with M/m and press ENTER. An IP address is installed...address and communication speed Setting an IP address and communication speed When an optional adaptor with network management capability (such as follows. INITIAL SETUP/INFORMATION IP Address Setup IP Address: Subnet Mask: Gateway Address: Primay DNS: Secondary DNS: Execute Manual 000 . 000 . 000 . 000 ...
...a situation, confirm the setting values and set manually with M/m and press ENTER. The main menu appears on the screen. INITIAL SETUP/INFORMATION IP Address Setup DHCP Manual Select Set ENTER Exit MENU 4 Select "DHCP" with M/m and press ENTER. An IP address is installed...address and communication speed Setting an IP address and communication speed When an optional adaptor with network management capability (such as follows. INITIAL SETUP/INFORMATION IP Address Setup IP Address: Subnet Mask: Gateway Address: Primay DNS: Secondary DNS: Execute Manual 000 . 000 . 000 . 000 ...

User Manual
Page 43
... example, the indicator flashes twice, followed by the flashing of flashes. The flashing pattern informs you want to be displayed in red, check the number of flashes and contact your authorized Sony dealer of the number of the POWER/ STANDBY indicator. A communication speed has been set.../Half Dup 10Mbps/Full Dup 100Mbps/Half Dup 100Mbps/Full Dup Select Set ENTER Exit MENU 3 Select "Execute" and press ENTER. Inform your authorized Sony dealer. 1 Check the flashing pattern of the four boxes and press ENTER. Select Set ENTER Exit MENU 2 Press ENTER and select...
... example, the indicator flashes twice, followed by the flashing of flashes. The flashing pattern informs you want to be displayed in red, check the number of flashes and contact your authorized Sony dealer of the number of the POWER/ STANDBY indicator. A communication speed has been set.../Half Dup 10Mbps/Full Dup 100Mbps/Half Dup 100Mbps/Full Dup Select Set ENTER Exit MENU 3 Select "Execute" and press ENTER. Inform your authorized Sony dealer. 1 Check the flashing pattern of the four boxes and press ENTER. Select Set ENTER Exit MENU 2 Press ENTER and select...