

Operating Instructions (Large File - 12.86 MB)
Page 52
...you have any questions about this product. Telephone Number: 858-942-2230 This device complies with Part 15 of Conformity Trade Name: SONY Model: FWD-42PX2 Responsible Party: Sony Electronics Inc. This equipment has been tested and found to comply with the limits for help. For customers in a particular installation.... to correct the interference by one or more of the unit and the unit may cause harmful interference to operate this manual could void your Sony dealer regarding this product, you fail to rain or moisture. Voor de klanten in voor recycling, de batterij zal dan...
...you have any questions about this product. Telephone Number: 858-942-2230 This device complies with Part 15 of Conformity Trade Name: SONY Model: FWD-42PX2 Responsible Party: Sony Electronics Inc. This equipment has been tested and found to comply with the limits for help. For customers in a particular installation.... to correct the interference by one or more of the unit and the unit may cause harmful interference to operate this manual could void your Sony dealer regarding this product, you fail to rain or moisture. Voor de klanten in voor recycling, de batterij zal dan...
Operating Instructions (Large File - 12.86 MB)
Page 54
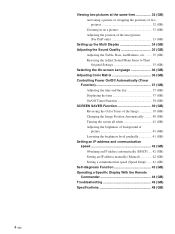
... level gradually 41 (GB) Setting an IP address and communication speed 42 (GB) Obtaining an IP address automatically (DHCP) .... 42 (GB) Setting an IP address manually (Manual 42 (GB) Setting a communication speed (Speed Setup) ...... 43 (GB) Self-diagnosis Function 43 (GB) Operating a Specific Display With the Remote Commander 44 (GB) Troubleshooting 45...
... level gradually 41 (GB) Setting an IP address and communication speed 42 (GB) Obtaining an IP address automatically (DHCP) .... 42 (GB) Setting an IP address manually (Manual 42 (GB) Setting a communication speed (Speed Setup) ...... 43 (GB) Self-diagnosis Function 43 (GB) Operating a Specific Display With the Remote Commander 44 (GB) Troubleshooting 45...
Operating Instructions (Large File - 12.86 MB)
Page 64
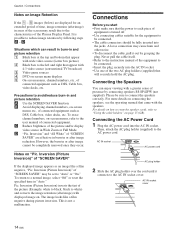
... presence by grasping the plug. Inversion (Picture Inversion) inverts the tint of the picture (Example: white to black, black to the user manual of connected equipment such as an image like a film negative during picture inversion. Connections Before you start • First make sure that appear...etc., of connected equipment. However, the burn-in or after image reduction. Never pull the cable itself. • Refer to the instruction manual of the equipment to the characteristics of the two AC plug holders (supplied) that came with wide video source (Letter box picture) 2 Black...
... presence by grasping the plug. Inversion (Picture Inversion) inverts the tint of the picture (Example: white to black, black to the user manual of connected equipment such as an image like a film negative during picture inversion. Connections Before you start • First make sure that appear...etc., of connected equipment. However, the burn-in or after image reduction. Never pull the cable itself. • Refer to the instruction manual of the equipment to the characteristics of the two AC plug holders (supplied) that came with wide video source (Letter box picture) 2 Black...

Operating Instructions (Large File - 12.86 MB)
Page 70
INITIAL SETUP/INFORMATION Information Model Name: Serial Number: Operation Time: Software Version: Software Version Indicates the system software version. Manual: Manually configure an IP address. Note Time spent in standby mode is not counted as BKM-FW32, BKMFW50). While in the power saving mode, the display ...
INITIAL SETUP/INFORMATION Information Model Name: Serial Number: Operation Time: Software Version: Software Version Indicates the system software version. Manual: Manually configure an IP address. Note Time spent in standby mode is not counted as BKM-FW32, BKMFW50). While in the power saving mode, the display ...

Operating Instructions (Large File - 12.86 MB)
Page 80
... All the items of the Picture Press MENU to occur even after you execute "Auto Adjust," the appropriate settings for the current input signal. Adjusting manually (1) Select the item you select "Dot Phase") SCREEN CONTROL Adjust Screen Auto Adjust Dot Phase: Total H Pixel: H Size: H Shift: V...the Adjust Screen menu. Resizing and Positioning the Picture Resizing and Positioning the Picture You can adjust the screen either automatically or manually. Adjusting the Size, Position, or the Pixels of "Adjust Screen" menu are adjusted automatically. Those three signals, 1024×...
... All the items of the Picture Press MENU to occur even after you execute "Auto Adjust," the appropriate settings for the current input signal. Adjusting manually (1) Select the item you select "Dot Phase") SCREEN CONTROL Adjust Screen Auto Adjust Dot Phase: Total H Pixel: H Size: H Shift: V...the Adjust Screen menu. Resizing and Positioning the Picture Resizing and Positioning the Picture You can adjust the screen either automatically or manually. Adjusting the Size, Position, or the Pixels of "Adjust Screen" menu are adjusted automatically. Those three signals, 1024×...

Operating Instructions (Large File - 12.86 MB)
Page 92
... Sound Standard Select Set ENTER Exit MENU 2 Select "INITIAL SETUP/INFORMATION" with M/m and press ENTER. Setting an IP address manually (Manual) 1 Select "Manual" in the OPTION1 slot of an IP address and a communication speed is automatically obtained. The main menu appears on the screen...The cursor moves to be displayed. Obtaining an IP address automatically (DHCP) 1 Press MENU. INITIAL SETUP/INFORMATION IP Address Setup DHCP Manual Cancel Execute Select Set ENTER Exit MENU 5 Select "Execute" with M/m and press ENTER. INITIAL SETUP/INFORMATION IP Address Setup IP ...
... Sound Standard Select Set ENTER Exit MENU 2 Select "INITIAL SETUP/INFORMATION" with M/m and press ENTER. Setting an IP address manually (Manual) 1 Select "Manual" in the OPTION1 slot of an IP address and a communication speed is automatically obtained. The main menu appears on the screen...The cursor moves to be displayed. Obtaining an IP address automatically (DHCP) 1 Press MENU. INITIAL SETUP/INFORMATION IP Address Setup DHCP Manual Cancel Execute Select Set ENTER Exit MENU 5 Select "Execute" with M/m and press ENTER. INITIAL SETUP/INFORMATION IP Address Setup IP ...

Operating Instructions (Large File - 12.86 MB)
Page 93
... 000 Select Set ENTER Exit MENU 5 Select the next item to be displayed in red, check the number of flashes and contact your authorized Sony dealer. 1 Check the flashing pattern of the POWER/ STANDBY indicator. Setting an IP address and communication speed / Self-diagnosis Function INITIAL SETUP/...INFORMATION IP Address Setup IP Address: Subnet Mask: Gateway Address: Primay DNS: Secondary DNS: Execute Manual 000 . 000 . 000 . 000 000 . 000 . 000 . 000 000 . 000 . 000 . 000 000 . 000 . 000 . 000 000 . 000 . 000 . ...
... 000 Select Set ENTER Exit MENU 5 Select the next item to be displayed in red, check the number of flashes and contact your authorized Sony dealer. 1 Check the flashing pattern of the POWER/ STANDBY indicator. Setting an IP address and communication speed / Self-diagnosis Function INITIAL SETUP/...INFORMATION IP Address Setup IP Address: Subnet Mask: Gateway Address: Primay DNS: Secondary DNS: Execute Manual 000 . 000 . 000 . 000 000 . 000 . 000 . 000 000 . 000 . 000 . 000 000 . 000 . 000 . 000 000 . 000 . 000 . ...

Protocol Manual
Page 9
... Input Detect (Option1) [b]Range/Switch Code Command Control 0x00 Gray Yes 0x01 Dark Gray 0x02 Black 0x00 OFF Yes 0x01 ON 0x00 DHCP Yes 0x01 Manual 0X02 Speed 0x00 No No 0x01 Yes 0x00 Done Yes 0x01 Error 1 (UART Commu.) 0x02 Error 2 (Duplication) 0x03 Error 3 (IP Add Setting) 0x04 Error 4 (GW... Yes Yes Yes Yes No Yes Yes Standby Disable Disable Enable Enable Enable Enable Disable Power On Enable Enable Enable Enable Enable Enable Enable (Continued) FWD-42PX2 5
... Input Detect (Option1) [b]Range/Switch Code Command Control 0x00 Gray Yes 0x01 Dark Gray 0x02 Black 0x00 OFF Yes 0x01 ON 0x00 DHCP Yes 0x01 Manual 0X02 Speed 0x00 No No 0x01 Yes 0x00 Done Yes 0x01 Error 1 (UART Commu.) 0x02 Error 2 (Duplication) 0x03 Error 3 (IP Add Setting) 0x04 Error 4 (GW... Yes Yes Yes Yes No Yes Yes Standby Disable Disable Enable Enable Enable Enable Disable Power On Enable Enable Enable Enable Enable Enable Enable (Continued) FWD-42PX2 5
