Operating Instructions
Page 3
... Parts and Controls ....... 7 (GB) Front / Rear / Left side / Right side / Bottom .......... 7 (GB) Indicator Section 8 (GB) Control Button Section (Top 8 (GB) Connector Panel (Bottom 9 (GB) Connector Panel (Left side 10 (GB) Remote Commander RM-980 12 (GB) Caution 14 (GB) Connections 15 (GB) Connecting the Speakers 15 (GB) Connecting the AC Power Cord 15...
... Parts and Controls ....... 7 (GB) Front / Rear / Left side / Right side / Bottom .......... 7 (GB) Indicator Section 8 (GB) Control Button Section (Top 8 (GB) Connector Panel (Bottom 9 (GB) Connector Panel (Left side 10 (GB) Remote Commander RM-980 12 (GB) Caution 14 (GB) Connections 15 (GB) Connecting the Speakers 15 (GB) Connecting the AC Power Cord 15...
Operating Instructions
Page 4
... (GB) Lowers the brightness level gradually 42 (GB) Setting an IP address and communication speed 42 (GB) Obtaining an IP address automatically (DHCP) .... 42 (GB) Setting an IP address manually (Manual 42 (GB) Setting a communication speed 43 (GB) Self-diagnosis Function 43 (GB) Operating a Specific Display With the Remote Commander 44 (GB) Specifications 45 (GB...
... (GB) Lowers the brightness level gradually 42 (GB) Setting an IP address and communication speed 42 (GB) Obtaining an IP address automatically (DHCP) .... 42 (GB) Setting an IP address manually (Manual 42 (GB) Setting a communication speed 43 (GB) Self-diagnosis Function 43 (GB) Operating a Specific Display With the Remote Commander 44 (GB) Specifications 45 (GB...
Operating Instructions
Page 5
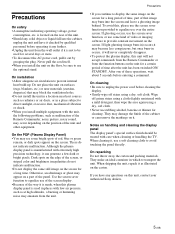
...is used for a long time. Although the plasma display panel is manufactured with extremely high precision technology, it can remove the markings on this plasma display panel is made, when this unit, contact your authorized Sony dealers. 5 (GB) After one of the Remote Commander, noisy picture, noisy sound, may burn ...If you install the unit on the unit for cleaning. On the PDP (Plasma Display Panel) • You may appear on the screen. To avoid this unit will not accept commands from the Remote Commander or from the function buttons on the floor, be used in a place...
...is used for a long time. Although the plasma display panel is manufactured with extremely high precision technology, it can remove the markings on this plasma display panel is made, when this unit, contact your authorized Sony dealers. 5 (GB) After one of the Remote Commander, noisy picture, noisy sound, may burn ...If you install the unit on the unit for cleaning. On the PDP (Plasma Display Panel) • You may appear on the screen. To avoid this unit will not accept commands from the Remote Commander or from the function buttons on the floor, be used in a place...
Operating Instructions
Page 8
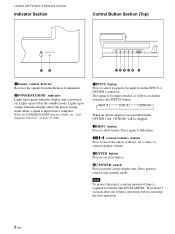
... a computer. The signal to be skipped. 2MENU button Press to show menus. Press again to return to power on . Note To protect the panel, a certain amount of time is powered on the display unit. Wait about 5 seconds after one of these operations before executing the next operation....Location and Function of Parts and Controls Indicator Section Control Button Section (Top) 12 12345 6 1Remote control detector Receives the signals from the Remote Commander. 2POWER/STANDBY indicator Lights up in green when the display unit is required to turn the unit ON/STANDBY. Lights up in red ...
... a computer. The signal to be skipped. 2MENU button Press to show menus. Press again to return to power on . Note To protect the panel, a certain amount of time is powered on the display unit. Wait about 5 seconds after one of these operations before executing the next operation....Location and Function of Parts and Controls Indicator Section Control Button Section (Top) 12 12345 6 1Remote control detector Receives the signals from the Remote Commander. 2POWER/STANDBY indicator Lights up in green when the display unit is required to turn the unit ON/STANDBY. Lights up in red ...
Operating Instructions
Page 9
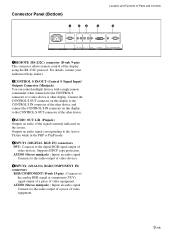
Supports HDCP copy protection. For details, contact your authorized Sony dealers. 2CONTROL S IN/OUT (Control S Signal Input/ Output) Connector (Minijack) You can control multiple devices with a single remote commander when connected to the analog RGB signal or component (YUV) signal output of a piece of a ... signal. Connects to the audio output of a piece of the display using the RS-232C protocol. Connector Panel (Bottom) 1 23 4 Location and Function of Parts and Controls 5 AC IN REMOTE IN OUT R L AUDIO CONTROL S AUDIO OUT DVI-HDCP INPUT 1 AUDIO RGB/COMPONENT INPUT 2 1REMOTE ...
Supports HDCP copy protection. For details, contact your authorized Sony dealers. 2CONTROL S IN/OUT (Control S Signal Input/ Output) Connector (Minijack) You can control multiple devices with a single remote commander when connected to the analog RGB signal or component (YUV) signal output of a piece of a ... signal. Connects to the audio output of a piece of the display using the RS-232C protocol. Connector Panel (Bottom) 1 23 4 Location and Function of Parts and Controls 5 AC IN REMOTE IN OUT R L AUDIO CONTROL S AUDIO OUT DVI-HDCP INPUT 1 AUDIO RGB/COMPONENT INPUT 2 1REMOTE ...
Operating Instructions
Page 12
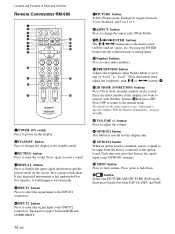
... and the picture mode on the display. 2STANDBY button Press to change the aspect ratio (Wide Mode). 9M/m/ Location and Function of Parts and Controls Remote Commander RM-980 1 2 MUTING DISPLAY STBY ON 3 4 5 qf 6 qg 7 qh 8 qj 9 ENTER 123 0 456 789 qa 0 qk qs ON SET qd ql MONITOR RM-980...
... and the picture mode on the display. 2STANDBY button Press to change the aspect ratio (Wide Mode). 9M/m/ Location and Function of Parts and Controls Remote Commander RM-980 1 2 MUTING DISPLAY STBY ON 3 4 5 qf 6 qg 7 qh 8 qj 9 ENTER 123 0 456 789 qa 0 qk qs ON SET qd ql MONITOR RM-980...
Operating Instructions
Page 13
qk CHROMA button Adjusts the chroma when the picture mode is set to any of "User1" to "User3." Press this button and adjust the chroma with the M/m or
qk CHROMA button Adjusts the chroma when the picture mode is set to any of "User1" to "User3." Press this button and adjust the chroma with the M/m or
Operating Instructions
Page 17
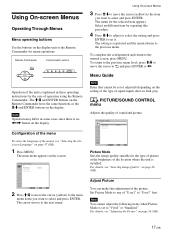
Note Operation may differ in these operating instructions for menu operations. Remote Commander MENU Control button section ENTER Operation of the unit is explained in some cases since there is no The M/m and ENTER buttons on the Remote Commander have the same functions as the M/m and ENTER buttons on the display unit or the Remote Commander for the case of operation using the Remote Commander. Using On-screen Menus Operating Through Menus Menu operating buttons Use the buttons on the display.
Note Operation may differ in these operating instructions for menu operations. Remote Commander MENU Control button section ENTER Operation of the unit is explained in some cases since there is no The M/m and ENTER buttons on the Remote Commander have the same functions as the M/m and ENTER buttons on the display unit or the Remote Commander for the case of operation using the Remote Commander. Using On-screen Menus Operating Through Menus Menu operating buttons Use the buttons on the display.
Operating Instructions
Page 19
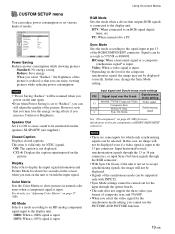
... • There are some inputs for NTSC signals. CUSTOM SETUP Power Saving: Speaker Out: Closed Caption: Display: Color Matrix: HD Mode: RGB Mode: Sync Mode: Remote Standard Off Off Off Y/PB/PR 1080i DTV H/Comp Select Set ENTER Exit MENU Power Saving Reduces power consumption while showing pictures. However, note that...
... • There are some inputs for NTSC signals. CUSTOM SETUP Power Saving: Speaker Out: Closed Caption: Display: Color Matrix: HD Mode: RGB Mode: Sync Mode: Remote Standard Off Off Off Y/PB/PR 1080i DTV H/Comp Select Set ENTER Exit MENU Power Saving Reduces power consumption while showing pictures. However, note that...
Operating Instructions
Page 20
...see "Selecting the On-screen Language" on -screen language (Japanese, English, German, French, Spanish, or Italian). When using the Remote Commander only. INITIAL SETUP/INFORMATION menu You can select the on page 44 (GB). The display unit automatically enters the power saving...item, the modes you can select differ depending on the key you can select only "Display + Remote" or "Remote Only." Display + Remote: Activates a remote commander supplied with the Remote Commander. INITIAL SETUP/INFORMATION Language: Color System: Auto Shut Off: Auto Screen Adjust: Information IP Address...
...see "Selecting the On-screen Language" on -screen language (Japanese, English, German, French, Spanish, or Italian). When using the Remote Commander only. INITIAL SETUP/INFORMATION menu You can select the on page 44 (GB). The display unit automatically enters the power saving...item, the modes you can select differ depending on the key you can select only "Display + Remote" or "Remote Only." Display + Remote: Activates a remote commander supplied with the Remote Commander. INITIAL SETUP/INFORMATION Language: Color System: Auto Shut Off: Auto Screen Adjust: Information IP Address...
Operating Instructions
Page 23
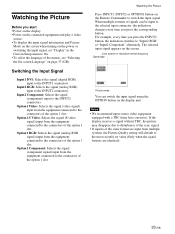
... display unit. When multiple formats of the menus, see "Selecting the On-screen Language" on page 37 (GB). The selected input signal appears on the Remote Commander to switch the input signal. Watching the Picture Before you start • Power on the display. • Power on the connected equipment and play...
... display unit. When multiple formats of the menus, see "Selecting the On-screen Language" on page 37 (GB). The selected input signal appears on the Remote Commander to switch the input signal. Watching the Picture Before you start • Power on the display. • Power on the connected equipment and play...
Operating Instructions
Page 24
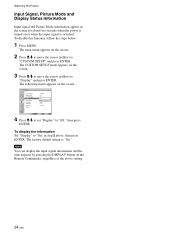
...follow the steps below. 1 Press MENU. CUSTOM SETUP Power Saving: Speaker Out: Closed Caption: Display: Color Matrix: HD Mode: RGB Mode: Sync Mode: Remote Standard Off Off Off OY/nPB/PR 1080i DTV H/Comp Select Set ENTER Exit MENU 4 Press M/m to set "Display" to "On" in step 2 above.... The factory default setting is switched. Note You can display the input signal information and the time anytime by pressing the DISPLAY button on the Remote Commander, regardless of the above , then press ENTER. The following menu appears on the screen. 2 Press M/m to move the cursor (yellow) to ...
...follow the steps below. 1 Press MENU. CUSTOM SETUP Power Saving: Speaker Out: Closed Caption: Display: Color Matrix: HD Mode: RGB Mode: Sync Mode: Remote Standard Off Off Off OY/nPB/PR 1080i DTV H/Comp Select Set ENTER Exit MENU 4 Press M/m to set "Display" to "On" in step 2 above.... The factory default setting is switched. Note You can display the input signal information and the time anytime by pressing the DISPLAY button on the Remote Commander, regardless of the above , then press ENTER. The following menu appears on the screen. 2 Press M/m to move the cursor (yellow) to ...
Operating Instructions
Page 37
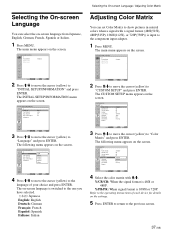
...in natural colors when a signal with M/m. CUSTOM SETUP Power Saving: Speaker Out: Closed Caption: Display: Color Matrix: HD Mode: RGB Mode: Sync Mode: Remote Standard Off Off Off Y/PB/PR 1080i DTV H/Comp Select Set ENTER Exit MENU 3 Press M/m to move the cursor (yellow) to "Language" and press...of your choice and press ENTER. CUSTOM SETUP Power Saving: Speaker Out: Closed Caption: Display: Color Matrix: HD Mode: RGB Mode: Sync Mode: Remote Standard Off Off Off Y/CPB/PCR Y10/P8B0i/PR DTV H/Comp Select Set ENTER Exit MENU 4 Select the color matrix with a signal format (480I...
...in natural colors when a signal with M/m. CUSTOM SETUP Power Saving: Speaker Out: Closed Caption: Display: Color Matrix: HD Mode: RGB Mode: Sync Mode: Remote Standard Off Off Off Y/PB/PR 1080i DTV H/Comp Select Set ENTER Exit MENU 3 Press M/m to move the cursor (yellow) to "Language" and press...of your choice and press ENTER. CUSTOM SETUP Power Saving: Speaker Out: Closed Caption: Display: Color Matrix: HD Mode: RGB Mode: Sync Mode: Remote Standard Off Off Off Y/CPB/PCR Y10/P8B0i/PR DTV H/Comp Select Set ENTER Exit MENU 4 Select the color matrix with a signal format (480I...
Operating Instructions
Page 38
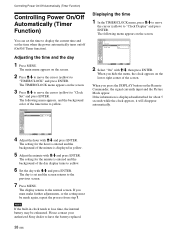
... press ENTER. Note If the built-in yellow. 5 Adjust the minute with M/m and press ENTER. Please contact your authorized Sony dealer to the normal screen. The main menu appears on the Remote Commander, the signal currently input and the Picture Mode appear. TIMER/CLOCK Clock Set Clock Display: Off On/Off Timer...
... press ENTER. Note If the built-in yellow. 5 Adjust the minute with M/m and press ENTER. Please contact your authorized Sony dealer to the normal screen. The main menu appears on the Remote Commander, the signal currently input and the Picture Mode appear. TIMER/CLOCK Clock Set Clock Display: Off On/Off Timer...

Operating Instructions
Page 43
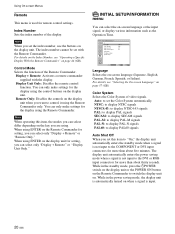
...FW32 A specified IP address is set for other device. If the POWER/STANDBY indicator flashes, check the number of flashes and contact your authorized Sony dealer. 1 Check the flashing pattern of the display's current condition. The cursor moves to the next box. INITIAL SETUP/INFORMATION IP Address ...of the number of three seconds. The flashing pattern informs you want to set . This function shows the display's condition based on the remote commander and press ENTER or ,. An IP address is already used for all the desired items, select "Execute" with M/m and repeat the...
...FW32 A specified IP address is set for other device. If the POWER/STANDBY indicator flashes, check the number of flashes and contact your authorized Sony dealer. 1 Check the flashing pattern of the display's current condition. The cursor moves to the next box. INITIAL SETUP/INFORMATION IP Address ...of the number of three seconds. The flashing pattern informs you want to set . This function shows the display's condition based on the remote commander and press ENTER or ,. An IP address is already used for all the desired items, select "Execute" with M/m and repeat the...
Operating Instructions
Page 44
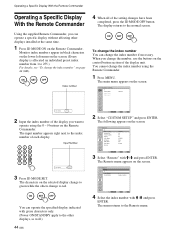
... apply to green while the others change the index number if necessary. You cannot change the index number using the 0 - 9 buttons on the Remote Commander. PICTURE/SOUND CONTROL Picture Mode: Adjust Picture Adjust Sound Standard Index Number 117 . . . 2 Input the index number of each display. ...(Every display is allocated an individual preset index number from 1 to the normal screen. ON SET OFF You can change to operate using the Remote Commander. 1 Press MENU. When you want to red. CUSTOM SETUP Power Saving: Speaker Out: Closed Caption: Display: Color Matrix: HD Mode:...
... apply to green while the others change the index number if necessary. You cannot change the index number using the 0 - 9 buttons on the Remote Commander. PICTURE/SOUND CONTROL Picture Mode: Adjust Picture Adjust Sound Standard Index Number 117 . . . 2 Input the index number of each display. ...(Every display is allocated an individual preset index number from 1 to the normal screen. ON SET OFF You can change to operate using the Remote Commander. 1 Press MENU. When you want to red. CUSTOM SETUP Power Saving: Speaker Out: Closed Caption: Display: Color Matrix: HD Mode:...
Operating Instructions
Page 45
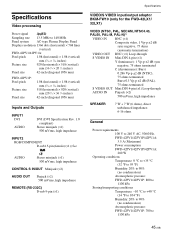
...OUT Minijack (×2) AUDIO OUT Pinjack (×2) 500 mVrms, high impedance REMOTE (RS-232C) D-sub 9-pin (×1) Specifications VIDEO/S VIDEO input/output adaptor BKM-FW10 (only for the FWD-42LX1/ 32LX1) VIDEO (NTSC, PAL, SECAM, NTSC4.43, PAL60,...Panel system AC-type Plasma Display Panel Display resolution 1366 dots (horizontal) × 768 lines (vertical) FWD-42PV1/42PV1A: Pixel pitch 1.08 (horizontal) × 1.08 (vertical) mm (1⁄16 × 1⁄16 inches) Picture size 920 (horizontal) × 518 (vertical) mm (36 1⁄4 × 20 1⁄2 inches) Panel size 42...
...OUT Minijack (×2) AUDIO OUT Pinjack (×2) 500 mVrms, high impedance REMOTE (RS-232C) D-sub 9-pin (×1) Specifications VIDEO/S VIDEO input/output adaptor BKM-FW10 (only for the FWD-42LX1/ 32LX1) VIDEO (NTSC, PAL, SECAM, NTSC4.43, PAL60,...Panel system AC-type Plasma Display Panel Display resolution 1366 dots (horizontal) × 768 lines (vertical) FWD-42PV1/42PV1A: Pixel pitch 1.08 (horizontal) × 1.08 (vertical) mm (1⁄16 × 1⁄16 inches) Picture size 920 (horizontal) × 518 (vertical) mm (36 1⁄4 × 20 1⁄2 inches) Panel size 42...
Operating Instructions
Page 46
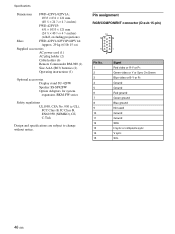
...used Ground Ground SDA H sync or composite sync V sync SCL 46 (GB) Specifications Dimensions FWD-42PV1/42PV1A: 1033 × 631 × 121 mm (40 3⁄4 × 24 7⁄8 × 4 7⁄8 inches) FWD-42PV1P: 631 × 1033 × 121 mm (24 7⁄8 × 40 ...3⁄4 × 4 7⁄8 inches) (w/h/d, excluding projections) Mass FWD-42PV1/42PV1P/42PV1A: Approx. 29 kg (63 lb 15 oz) Supplied accessories AC power cord (1) AC plug holder (2) Cable holder (6) Remote Commander RM-980 (1) Size AAA (R03) batteries (2) Operating instructions (1) Optional accessories...
...used Ground Ground SDA H sync or composite sync V sync SCL 46 (GB) Specifications Dimensions FWD-42PV1/42PV1A: 1033 × 631 × 121 mm (40 3⁄4 × 24 7⁄8 × 4 7⁄8 inches) FWD-42PV1P: 631 × 1033 × 121 mm (24 7⁄8 × 40 ...3⁄4 × 4 7⁄8 inches) (w/h/d, excluding projections) Mass FWD-42PV1/42PV1P/42PV1A: Approx. 29 kg (63 lb 15 oz) Supplied accessories AC power cord (1) AC plug holder (2) Cable holder (6) Remote Commander RM-980 (1) Size AAA (R03) batteries (2) Operating instructions (1) Optional accessories...


