
Wall-Mount Bracket: 3rd Party
Page 5
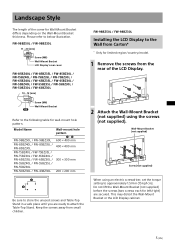
.../model. 1 Remove the screws from small children. 2 Attach the Wall-Mount Bracket (not supplied) using an electric screwdriver, set the torque setting to below illustration. FW-98BZ50L / FW-98BZ30L 11 - 20 (mm) Screw (M8) Wall-Mount Bracket LCD Display's rear cover FW-85BZ40L / FW-85BZ35L / FW-85BZ30L / FW-75BZ40L / FW-75BZ35L / FW-75BZ30L / FW-65BZ40L / FW-65BZ35L / FW-65BZ30L / FW-55BZ40L / FW-55BZ35L / FW-55BZ30L / FW-50BZ30L / FW-43BZ30L 10 - 12 (mm) FW-98BZ50L / FW-98BZ30L Installing the LCD Display to attach the Table-Top Stand. Wall-Mount Bracket (not supplied) Screw (not supplied...
.../model. 1 Remove the screws from small children. 2 Attach the Wall-Mount Bracket (not supplied) using an electric screwdriver, set the torque setting to below illustration. FW-98BZ50L / FW-98BZ30L 11 - 20 (mm) Screw (M8) Wall-Mount Bracket LCD Display's rear cover FW-85BZ40L / FW-85BZ35L / FW-85BZ30L / FW-75BZ40L / FW-75BZ35L / FW-75BZ30L / FW-65BZ40L / FW-65BZ35L / FW-65BZ30L / FW-55BZ40L / FW-55BZ35L / FW-55BZ30L / FW-50BZ30L / FW-43BZ30L 10 - 12 (mm) FW-98BZ50L / FW-98BZ30L Installing the LCD Display to attach the Table-Top Stand. Wall-Mount Bracket (not supplied) Screw (not supplied...

Wall-Mount Bracket: 3rd Party
Page 7
.../country/model. 1 Remove the screws from Table-Top Stand* * Only for left/right) are secured. Use of another tool might result in over torqueing the Wall-Mount Attachment and damaging the LCD Display. 3 Attach the Wall-Mount Bracket (not supplied) using an electric screwdriver, set the torque setting to install the Wall-Mount Attachment. 2 Attach the Wall-Mount Attachment (supplied with the LCD Display) to the rear of the LCD Display (to the Wall from the rear of the LCD Display. Installing the LCD Display...
.../country/model. 1 Remove the screws from Table-Top Stand* * Only for left/right) are secured. Use of another tool might result in over torqueing the Wall-Mount Attachment and damaging the LCD Display. 3 Attach the Wall-Mount Bracket (not supplied) using an electric screwdriver, set the torque setting to install the Wall-Mount Attachment. 2 Attach the Wall-Mount Attachment (supplied with the LCD Display) to the rear of the LCD Display (to the Wall from the rear of the LCD Display. Installing the LCD Display...
Wall-Mount Bracket: 3rd Party
Page 9
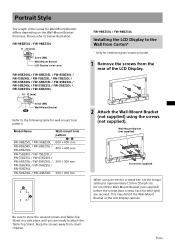
... FW-98BZ50L / FW-98BZ30L Installing the LCD Display to the Wall from Carton* * Only for Wall-Mount Bracket differs depending on the Wall-Mount Bracket thickness. Be sure to store the unused screws and Table-Top Stand in a safe place until you are secured. Portrait Style The length of the screw for limited region/country/model. 1 Remove the screws from the rear of the LCD Display. 2 Attach the Wall-Mount Bracket (not supplied) using an electric screwdriver, set...
... FW-98BZ50L / FW-98BZ30L Installing the LCD Display to the Wall from Carton* * Only for Wall-Mount Bracket differs depending on the Wall-Mount Bracket thickness. Be sure to store the unused screws and Table-Top Stand in a safe place until you are secured. Portrait Style The length of the screw for limited region/country/model. 1 Remove the screws from the rear of the LCD Display. 2 Attach the Wall-Mount Bracket (not supplied) using an electric screwdriver, set...
Wall-Mount Bracket: 3rd Party
Page 10
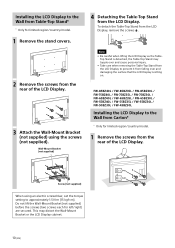
... Wall-Mount Bracket or the LCD Display cabinet. 10 (EN) Screw (not supplied) When using the screws (not supplied). Installing the LCD Display to the Wall from Table-Top Stand* * Only for limited region/country/model. 1 Remove the stand covers. 2 Remove the screws from the rear of the LCD Display. Note • Be careful when lifting the LCD Display as the Table- FW-85BZ40L / FW-85BZ35L / FW-85BZ30L / FW-75BZ40L / FW-75BZ35L / FW-75BZ30L / FW-65BZ40L / FW-65BZ35L / FW-65BZ30L / FW-55BZ40L / FW-55BZ35L / FW-55BZ30L / FW-50BZ30L / FW-43BZ30L Installing the LCD Display...
... Wall-Mount Bracket or the LCD Display cabinet. 10 (EN) Screw (not supplied) When using the screws (not supplied). Installing the LCD Display to the Wall from Table-Top Stand* * Only for limited region/country/model. 1 Remove the stand covers. 2 Remove the screws from the rear of the LCD Display. Note • Be careful when lifting the LCD Display as the Table- FW-85BZ40L / FW-85BZ35L / FW-85BZ30L / FW-75BZ40L / FW-75BZ35L / FW-75BZ30L / FW-65BZ40L / FW-65BZ35L / FW-65BZ30L / FW-55BZ40L / FW-55BZ35L / FW-55BZ30L / FW-50BZ30L / FW-43BZ30L Installing the LCD Display...
Wall-Mount Bracket: SU-WL855
Page 2
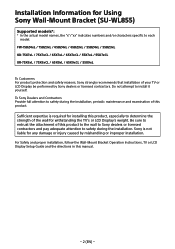
... entrust the attachment of the wall for Using Sony Wall-Mount Bracket (SU-WL855) Supported models*: * In the actual model names, the "x"/"xx" indicates numbers and/or characters specific to safety during the installation, periodic maintenance and examination of your TV or LCD Display be performed by mishandling or improper installation. To Sony Dealers and Contractors Provide full attention to install it yourself. FW-75BZ4xL / 75BZ3xL / 65BZ4xL / 65BZ3xL...
... entrust the attachment of the wall for Using Sony Wall-Mount Bracket (SU-WL855) Supported models*: * In the actual model names, the "x"/"xx" indicates numbers and/or characters specific to safety during the installation, periodic maintenance and examination of your TV or LCD Display be performed by mishandling or improper installation. To Sony Dealers and Contractors Provide full attention to install it yourself. FW-75BZ4xL / 75BZ3xL / 65BZ4xL / 65BZ3xL...

Wall-Mount Bracket: SU-WL855
Page 3
... your TV's or LCD Display's Reference Guide for its weight.) If the installation of the TV or LCD Display to persons who is not liable for future use. Specified products This Wall-Mount Bracket is your doctor before using this product close to licensed contractors. Mount Bracket. If you for 189.3 cm (75 inches) and above TV or LCD Display) are not affected. Wall-Mount Bracket On Safety To Customers...
... your TV's or LCD Display's Reference Guide for its weight.) If the installation of the TV or LCD Display to persons who is not liable for future use. Specified products This Wall-Mount Bracket is your doctor before using this product close to licensed contractors. Mount Bracket. If you for 189.3 cm (75 inches) and above TV or LCD Display) are not affected. Wall-Mount Bracket On Safety To Customers...

Wall-Mount Bracket: SU-WL855
Page 4
... injury to someone or damage to the TV or LCD Display. If the AC power cord or the connecting cable is pinched between the unit and the wall or is exposed to use the appropriate screws for Sony dealers only. Notice If you use the TV or LCD Display installed on the Wall-Mount Bracket for a long time, it may cause a fire, an electric shock or a malfunction...
... injury to someone or damage to the TV or LCD Display. If the AC power cord or the connecting cable is pinched between the unit and the wall or is exposed to use the appropriate screws for Sony dealers only. Notice If you use the TV or LCD Display installed on the Wall-Mount Bracket for a long time, it may cause a fire, an electric shock or a malfunction...
Wall-Mount Bracket: SU-WL855
Page 10
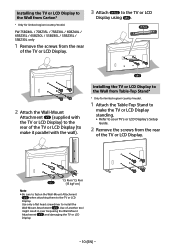
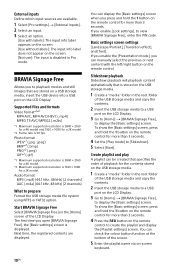
... Wall-Mount Attachment VS (supplied with the wall). Use only a flat head screwdriver to make the TV or LCD Display standing. • Refer to your TV's or LCD Display's Setup Guide. 2 Remove the screws from Carton* * Only for limited region/country/model. 1 Attach the Table-Top Stand to make it parallel with the TV or LCD Display) to the rear of the TV or LCD Display (to install the Wall-Mount Attachment VS . Installing the TV or LCD Display...
... Wall-Mount Attachment VS (supplied with the wall). Use only a flat head screwdriver to make the TV or LCD Display standing. • Refer to your TV's or LCD Display's Setup Guide. 2 Remove the screws from Carton* * Only for limited region/country/model. 1 Attach the Table-Top Stand to make it parallel with the TV or LCD Display) to the rear of the TV or LCD Display (to install the Wall-Mount Attachment VS . Installing the TV or LCD Display...

Wall-Mount Bracket: SU-WL855
Page 18
Use only a flat head screwdriver to the TV or LCD Display. Note ˎˎBe sure to fasten the Wall-Mount Attachment VS when attaching them to install the Wall-Mount Attachment VS . Installing the TV or LCD Display to the Wall from Table-Top Stand* * Only for limited region/country/model. 1 Attach the Table-Top Stand to make it parallel with the wall). XR-75X90L / 75X90CL / 65X90L / 65X90CL / 55X90L...
Use only a flat head screwdriver to the TV or LCD Display. Note ˎˎBe sure to fasten the Wall-Mount Attachment VS when attaching them to install the Wall-Mount Attachment VS . Installing the TV or LCD Display to the Wall from Table-Top Stand* * Only for limited region/country/model. 1 Attach the Table-Top Stand to make it parallel with the wall). XR-75X90L / 75X90CL / 65X90L / 65X90CL / 55X90L...
Reference Guide
Page 2
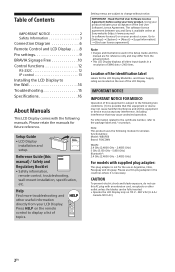
..., remote control, troubleshooting, wall-mount installation, specification, etc. For information related to the certificate number, refer to display a list of topics. Using your product indicates your Sony product. Setting menus are located on the rear of the LCD Display. Note: This product uses the following manuals. Go to [Settings] t [System] t [About] t [Legal information] t [End user license agreement]. Table of Contents IMPORTANT NOTICE 2 Safety Information 3 Connection Diagram 6 Remote Control and LCD Display . . . .8 Pro settings 9 BRAVIA Signage Free 10 Control functions...
..., remote control, troubleshooting, wall-mount installation, specification, etc. For information related to the certificate number, refer to display a list of topics. Using your product indicates your Sony product. Setting menus are located on the rear of the LCD Display. Note: This product uses the following manuals. Go to [Settings] t [System] t [About] t [Legal information] t [End user license agreement]. Table of Contents IMPORTANT NOTICE 2 Safety Information 3 Connection Diagram 6 Remote Control and LCD Display . . . .8 Pro settings 9 BRAVIA Signage Free 10 Control functions...

Reference Guide
Page 3
... Table-Top Stand accessory with any changes or modifications not expressly approved in a particular installation. Operation is very important for safety and to the Setup Guide). (Models with other antenna or transmitter except Grant condition. High-power radars are designed to https://www.sony.com/ am/support for LCD Display installations. Compatible Wall-Mount Bracket Information Use the following two conditions: (1) This device may cause undesired operation of the device. Before setting...
... Table-Top Stand accessory with any changes or modifications not expressly approved in a particular installation. Operation is very important for safety and to the Setup Guide). (Models with other antenna or transmitter except Grant condition. High-power radars are designed to https://www.sony.com/ am/support for LCD Display installations. Compatible Wall-Mount Bracket Information Use the following two conditions: (1) This device may cause undesired operation of the device. Before setting...
Reference Guide
Page 4
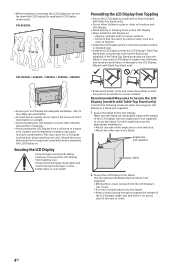
... Stand only) FW-75EZ20L / 65EZ20L / 55EZ20L / 50EZ20L / 43EZ20L • Ensure your LCD Display to show poor picture and/or poor color. Use two angle braces (not supplied) to the safety documentation. • For best picture quality, do not lay down the LCD Display (for the LCD Display. Recommended Measures to Secure the LCD Display (models with Table-Top Stand only). • Do not allow moisture to evaporate completely before powering the LCD Display...
... Stand only) FW-75EZ20L / 65EZ20L / 55EZ20L / 50EZ20L / 43EZ20L • Ensure your LCD Display to show poor picture and/or poor color. Use two angle braces (not supplied) to the safety documentation. • For best picture quality, do not lay down the LCD Display (for the LCD Display. Recommended Measures to Secure the LCD Display (models with Table-Top Stand only). • Do not allow moisture to evaporate completely before powering the LCD Display...

Reference Guide
Page 7
... support GENB HDMI eARC/ARC, an additional connection with DIGITAL AUDIO OUT (OPTICAL) is necessary. • Use the HDMI cable with Ethernet to connect audio system with other connected devices beside it. (Headphone) • Supports 3-pole stereo mini jack only. • You cannot output sound from both the headphone and the LCD Display speakers at the same time. / VIDEO IN • For a composite connection, use an Analog Extension Cable (not supplied...
... support GENB HDMI eARC/ARC, an additional connection with DIGITAL AUDIO OUT (OPTICAL) is necessary. • Use the HDMI cable with Ethernet to connect audio system with other connected devices beside it. (Headphone) • Supports 3-pole stereo mini jack only. • You cannot output sound from both the headphone and the LCD Display speakers at the same time. / VIDEO IN • For a composite connection, use an Analog Extension Cable (not supplied...

Reference Guide
Page 9
... HDMI input is disconnected. 1 Select [Pro settings] t [Wake-up on signal a) Automatically turn off . Lock settings You can protect the settings of [Pro settings] by using a USB storage media. 1 Select [Pro settings] t [Install APK]. 2 Select an APK. Display/Remote controls Enable or disable the buttons on the LCD Display or the remote control. 1 Select [Pro settings] t [Display/Remote controls]. 2 Select an option. [Display control]: Enable or disable the buttons on the LCD Display. [IR remote control]: Enable or disable the buttons on signal]. 2 Select the option. [Disable] (Default...
... HDMI input is disconnected. 1 Select [Pro settings] t [Wake-up on signal a) Automatically turn off . Lock settings You can protect the settings of [Pro settings] by using a USB storage media. 1 Select [Pro settings] t [Install APK]. 2 Select an APK. Display/Remote controls Enable or disable the buttons on the LCD Display or the remote control. 1 Select [Pro settings] t [Display/Remote controls]. 2 Select an option. [Display control]: Enable or disable the buttons on the LCD Display. [IR remote control]: Enable or disable the buttons on signal]. 2 Select the option. [Disable] (Default...
Reference Guide
Page 10
... a USB port on the remote control for more than 3 seconds. Audio format MP3 (.mp3) (44.1 kHz, 48 kHz) (2 channels) AAC (.m4a) (44.1 kHz, 48 kHz) (2 channels) What to create the playlist and display the [Playlist settings] screen. The first time you to view [BRAVIA Signage Free], enter the PIN code. To show the [Basic settings] screen, press and hold the 1 button on the remote control for more than 3 seconds. 4 Press the RED button...
... a USB port on the remote control for more than 3 seconds. Audio format MP3 (.mp3) (44.1 kHz, 48 kHz) (2 channels) AAC (.m4a) (44.1 kHz, 48 kHz) (2 channels) What to create the playlist and display the [Playlist settings] screen. The first time you to view [BRAVIA Signage Free], enter the PIN code. To show the [Basic settings] screen, press and hold the 1 button on the remote control for more than 3 seconds. 4 Press the RED button...

Reference Guide
Page 13
...-Exceed minimum value) 0x03 : Command Canceled (Abnormal end) 0x04 : Parse Error (Data Format Error) GENB 3 Check Sum 0xXX Command example Examples of input/power, control the LCD Display such as follows first. You can control the LCD Display via IP from the LCD Display to [Settings] t [Network & Internet] t [IP control]. Go to the controller No. Control Power on/off HDMI input selection Head 0x8C 0x8C Category Function 0x00 0x00 0x00 0x02 Length...
...-Exceed minimum value) 0x03 : Command Canceled (Abnormal end) 0x04 : Parse Error (Data Format Error) GENB 3 Check Sum 0xXX Command example Examples of input/power, control the LCD Display such as follows first. You can control the LCD Display via IP from the LCD Display to [Settings] t [Network & Internet] t [IP control]. Go to the controller No. Control Power on/off HDMI input selection Head 0x8C 0x8C Category Function 0x00 0x00 0x00 0x02 Length...
Reference Guide
Page 14
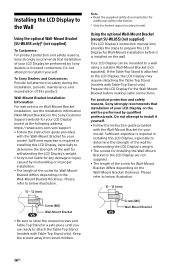
... Table-Top Stand (models with Table-Top Stand only). Using the optional Wall-Mount Bracket (except SU-WL855) (not supplied) This LCD Display's instruction manual only provides the steps to the LCD Display are ready to install it yourself. • Follow the instruction guide provided with the Wall-Mount Bracket for Wall-Mount installation before making cable connections. Wall-Mount Bracket Installation Information For instructions on Wall-Mount Bracket installation, see the Installation Information (Wall-Mount Bracket) on the Sony Customer Support website for Wall-Mount Bracket...
... Table-Top Stand (models with Table-Top Stand only). Using the optional Wall-Mount Bracket (except SU-WL855) (not supplied) This LCD Display's instruction manual only provides the steps to the LCD Display are ready to install it yourself. • Follow the instruction guide provided with the Wall-Mount Bracket for Wall-Mount installation before making cable connections. Wall-Mount Bracket Installation Information For instructions on Wall-Mount Bracket installation, see the Installation Information (Wall-Mount Bracket) on the Sony Customer Support website for Wall-Mount Bracket...
Reference Guide
Page 15
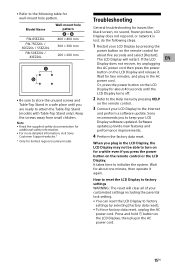
... . Troubleshooting General troubleshooting for issues like: black screen, no sound, frozen picture, LCD Display does not respond, or network is lost, do the following table for a while even if you press the power button on the LCD Display and release it again. Keep the screws away from small children. If the LCD GENB Display does not recover, try unplugging the AC power cord then press the power button on the remote control or the LCD Display. Software updates...
... . Troubleshooting General troubleshooting for issues like: black screen, no sound, frozen picture, LCD Display does not respond, or network is lost, do the following table for a while even if you press the power button on the LCD Display and release it again. Keep the screws away from small children. If the LCD GENB Display does not recover, try unplugging the AC power cord then press the power button on the remote control or the LCD Display. Software updates...
Reference Guide
Page 16
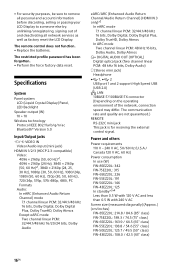
... Audio) (Stereo mini jack) Headphone 1, 2 USB port 1 and 2 support High Speed USB (USB 2.0) LAN 10BASE-T/100BASE-TX connector (Depending on the operating environment of and deactivating all network services as well as factory reset the LCD Display. The communication rate and quality are not guaranteed.) REMOTE RS-232C mini jack This jack is for receiving the external control signal. The remote control does not function. • Replace the batteries. Power and...
... Audio) (Stereo mini jack) Headphone 1, 2 USB port 1 and 2 support High Speed USB (USB 2.0) LAN 10BASE-T/100BASE-TX connector (Depending on the operating environment of and deactivating all network services as well as factory reset the LCD Display. The communication rate and quality are not guaranteed.) REMOTE RS-232C mini jack This jack is for receiving the external control signal. The remote control does not function. • Replace the batteries. Power and...
Reference Guide
Page 17
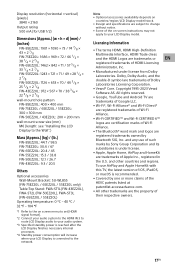
... × 200 mm wall-mount screw size (mm) M6 (length: see "Installing the LCD Display to the Wall".) Mass (Approx.) (kg) / (lb.) FW-85EZ20L: 44.7 / 98.5 FW-75EZ20L: 30.4 / 67 FW-65EZ20L: 20.4 / 45 FW-55EZ20L: 15.3 / 33.8 FW-50EZ20L: 12.1 / 26.7 FW-43EZ20L: 9.3 / 20.5 Others Optional accessories Wall-Mount Bracket: SU-WL855 (FW-75EZ20L / 65EZ20L / 55EZ20L only) Table-Top Stand: FWA-ST1L (FW-43EZ20L), FWA-ST2L (FW-50EZ20L), FWA-ST3L (FW-65EZ20L / 55EZ20L) Operating temperature: 0 º...
... × 200 mm wall-mount screw size (mm) M6 (length: see "Installing the LCD Display to the Wall".) Mass (Approx.) (kg) / (lb.) FW-85EZ20L: 44.7 / 98.5 FW-75EZ20L: 30.4 / 67 FW-65EZ20L: 20.4 / 45 FW-55EZ20L: 15.3 / 33.8 FW-50EZ20L: 12.1 / 26.7 FW-43EZ20L: 9.3 / 20.5 Others Optional accessories Wall-Mount Bracket: SU-WL855 (FW-75EZ20L / 65EZ20L / 55EZ20L only) Table-Top Stand: FWA-ST1L (FW-43EZ20L), FWA-ST2L (FW-50EZ20L), FWA-ST3L (FW-65EZ20L / 55EZ20L) Operating temperature: 0 º...

