
Help Guide
Page 2
... easier viewing (models with the viewfinder) [16] Displaying items on the LCD monitor [17] Preparing a memory card Inserting a memory card [18] Types of memory card you can use with this product [19] Recording Recording movies/photos Recording movies [20] Shooting photos [21] Changing the brightness manually for recording Controlling the image settings manually with the MANUAL ring [22] Assigning frequently-used functions to the MANUAL button or MANUAL ring [23] Useful functions for recording Zooming [24] Capturing photos during movie recording (Dual Capture) [25] Recording in mirror mode [26...
... easier viewing (models with the viewfinder) [16] Displaying items on the LCD monitor [17] Preparing a memory card Inserting a memory card [18] Types of memory card you can use with this product [19] Recording Recording movies/photos Recording movies [20] Shooting photos [21] Changing the brightness manually for recording Controlling the image settings manually with the MANUAL ring [22] Assigning frequently-used functions to the MANUAL button or MANUAL ring [23] Useful functions for recording Zooming [24] Capturing photos during movie recording (Dual Capture) [25] Recording in mirror mode [26...

Help Guide
Page 17
... 4. (microphone) jack (PLUG IN POWER) 5. (headphones) jack 6. This terminal does not support VMC-AVM1 Adaptor Cable (sold separately). Grip belt PHOTO button 2. Loop for a shoulder belt 8. Parts and controls Menu items Expected recording time of movies Expected number of recordable photos [2] How to Use Before use accessories via an A/V remote connector. 7. You cannot use Parts and controls Parts and controls (front/top) 1. Power zoom lever 3. For the following items, the descriptions are explained with the model name...
... 4. (microphone) jack (PLUG IN POWER) 5. (headphones) jack 6. This terminal does not support VMC-AVM1 Adaptor Cable (sold separately). Grip belt PHOTO button 2. Loop for a shoulder belt 8. Parts and controls Menu items Expected recording time of movies Expected number of recordable photos [2] How to Use Before use accessories via an A/V remote connector. 7. You cannot use Parts and controls Parts and controls (front/top) 1. Power zoom lever 3. For the following items, the descriptions are explained with the model name...
Help Guide
Page 18
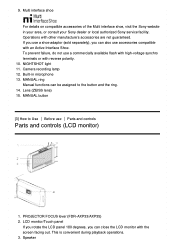
To prevent failure, do not use Parts and controls Parts and controls (LCD monitor) 1. Lens (ZEISS lens) 15. Operations with reverse polarity. 10. PROJECTOR FOCUS lever (FDR-AXP33/AXP35) 2. 9. If you use accessories compatible with the screen facing out. This is convenient during playback operations. 3. MANUAL ring Manual functions can close the LCD monitor with an Active Interface Shoe. LCD monitor/Touch panel If you rotate the LCD panel 180 degrees, you can...
To prevent failure, do not use Parts and controls Parts and controls (LCD monitor) 1. Lens (ZEISS lens) 15. Operations with reverse polarity. 10. PROJECTOR FOCUS lever (FDR-AXP33/AXP35) 2. 9. If you use accessories compatible with the screen facing out. This is convenient during playback operations. 3. MANUAL ring Manual functions can close the LCD monitor with an Active Interface Shoe. LCD monitor/Touch panel If you rotate the LCD panel 180 degrees, you can...
Help Guide
Page 38
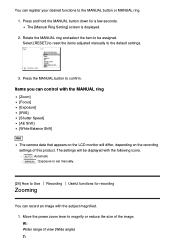
Select [RESET] to reset the items adjusted manually to confirm. You can record an image with the MANUAL ring [Zoom] [Focus] [Exposure] [IRIS] [Shutter Speed] [AE Shift] [White Balance Shift] Hint The camera data that appears on the LCD monitor will be assigned. Press the MANUAL button to the default settings. 3. Move the power zoom lever to be displayed with the following icons. : Automatic : Exposure is displayed. 2. Rotate the MANUAL ring and select the item...
Select [RESET] to reset the items adjusted manually to confirm. You can record an image with the MANUAL ring [Zoom] [Focus] [Exposure] [IRIS] [Shutter Speed] [AE Shift] [White Balance Shift] Hint The camera data that appears on the LCD monitor will be assigned. Press the MANUAL button to the default settings. 3. Move the power zoom lever to be displayed with the following icons. : Automatic : Exposure is displayed. 2. Rotate the MANUAL ring and select the item...

Help Guide
Page 48
... movie whose recording time is 12Mbps. If the number of a movie, select - [Clear All Points]. Menu items that of the background music, a highlight movie cannot be saved if its file size exceeds the free space of the memory. Start "PlayMemories Home" installed on this product using a USB cable. Hint You can select scenes to a smartphone or a computer, select displayed on the playback screen of the highlight movie. The created highlight movie...
... movie whose recording time is 12Mbps. If the number of a movie, select - [Clear All Points]. Menu items that of the background music, a highlight movie cannot be saved if its file size exceeds the free space of the memory. Start "PlayMemories Home" installed on this product using a USB cable. Hint You can select scenes to a smartphone or a computer, select displayed on the playback screen of the highlight movie. The created highlight movie...

Help Guide
Page 76
... playback on the recording device. 4. Insert the recording medium in the recording device (a disc recorder, etc.). Since copying is 4:3. Connect this product to the recording device with the HDMI cable. Connect this product to a disc recorder with standard definition image quality. A: AV cable (sold separately) to the video input jack, and the white (left channel) or the red (right channel) plug to copy the date and time and the camera setting data information. You can copy images on the device. Images will be copied...
... playback on the recording device. 4. Insert the recording medium in the recording device (a disc recorder, etc.). Since copying is 4:3. Connect this product to the recording device with the HDMI cable. Connect this product to a disc recorder with standard definition image quality. A: AV cable (sold separately) to the video input jack, and the white (left channel) or the red (right channel) plug to copy the date and time and the camera setting data information. You can copy images on the device. Images will be copied...

Help Guide
Page 85
... first time. 3. Note Do not close the LCD monitor while transferring files. You must turn off automatically after installing the software, set [USB Connect Setting] to [Mass Storage] on your access point does not support the WPS push button, refer to "Access point settings". If your computer. 1. [73] How to Use Using the Wi-Fi function Transferring images to a computer Send to Computer You can transfer and save movies and photos to your access point supports the...
... first time. 3. Note Do not close the LCD monitor while transferring files. You must turn off automatically after installing the software, set [USB Connect Setting] to [Mass Storage] on your access point does not support the WPS push button, refer to "Access point settings". If your computer. 1. [73] How to Use Using the Wi-Fi function Transferring images to a computer Send to Computer You can transfer and save movies and photos to your access point supports the...

Help Guide
Page 86
... a cable. Operations may take time until the images are compatible with the network function (including wired network). Play a movie or a photo on TV] - Depending on the wireless network environment, movies may not play smoothly. [75] How to Use Using the Wi-Fi function Connecting a smartphone Connecting to an Android smartphone or tablet Refer to "Access point settings". [74] How to Use Using the Wi-Fi function Transferring images to a TV Playing images on a TV (View on...
... a cable. Operations may take time until the images are compatible with the network function (including wired network). Play a movie or a photo on TV] - Depending on the wireless network environment, movies may not play smoothly. [75] How to Use Using the Wi-Fi function Connecting a smartphone Connecting to an Android smartphone or tablet Refer to "Access point settings". [74] How to Use Using the Wi-Fi function Transferring images to a TV Playing images on a TV (View on...
Help Guide
Page 109
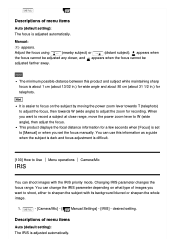
... type of images you want to record a subject at close range, move the power zoom lever to [Manual] or when you want to shoot, either to sharpen the subject with the IRIS priority mode. Descriptions of menu items Auto (default setting): The IRIS is adjusted automatically. You can shoot images with its background blurred or sharpen the whole image. 1. - [Camera/Mic] - [ Manual Settings] - [IRIS] - Hint It is set the focus manually. Adjust the focus using...
... type of images you want to record a subject at close range, move the power zoom lever to [Manual] or when you want to shoot, either to sharpen the subject with the IRIS priority mode. Descriptions of menu items Auto (default setting): The IRIS is adjusted automatically. You can shoot images with its background blurred or sharpen the whole image. 1. - [Camera/Mic] - [ Manual Settings] - [IRIS] - Hint It is set the focus manually. Adjust the focus using...

Help Guide
Page 126
... in Zoom Mic will be changed. [127] How to record dynamic sound. You can adjust the audio recording level. 1. - [Camera/Mic] - [ Microphone] - [Audio Rec Level] - Note [5.1ch Surround] is available when [ File Format] is automatically set to [Manual], Blt-in advance to Use Menu operations Camera/Mic Audio Rec Level You can change the recording sound format. 1. - [Camera/Mic] - [ Microphone] - [Audio Mode] - It is set to [2ch Stereo] and cannot be reset each time you wear headphones to [Off]. When [Audio Rec Level] is recommended that you switch between [Auto...
... in Zoom Mic will be changed. [127] How to record dynamic sound. You can adjust the audio recording level. 1. - [Camera/Mic] - [ Microphone] - [Audio Rec Level] - Note [5.1ch Surround] is available when [ File Format] is automatically set to [Manual], Blt-in advance to Use Menu operations Camera/Mic Audio Rec Level You can change the recording sound format. 1. - [Camera/Mic] - [ Microphone] - [Audio Mode] - It is set to [2ch Stereo] and cannot be reset each time you wear headphones to [Off]. When [Audio Rec Level] is recommended that you switch between [Auto...
Help Guide
Page 146
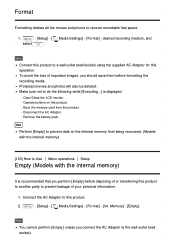
... recover recordable free space. 1. - [Setup] - [ Media Settings] - [Format] - Memory] - [Empty]. Protected movies and photos will also be deleted. Note You cannot perform [Empty] unless you should save them before disposing of or transferring this product to another party to Use Menu operations Setup Empty (Models with the internal memory) It is displayed. Disconnect the AC Adaptor. Connect the AC Adaptor to the wall outlet (wall socket). Open/Close the LCD monitor. Remove the battery pack. Operate buttons...
... recover recordable free space. 1. - [Setup] - [ Media Settings] - [Format] - Memory] - [Empty]. Protected movies and photos will also be deleted. Note You cannot perform [Empty] unless you should save them before disposing of or transferring this product to another party to Use Menu operations Setup Empty (Models with the internal memory) It is displayed. Disconnect the AC Adaptor. Connect the AC Adaptor to the wall outlet (wall socket). Open/Close the LCD monitor. Remove the battery pack. Operate buttons...

Help Guide
Page 149
adjust the volume using / . [168] How to Use Menu operations Setup Motion Interval ADJ Adjusts the residual image intervals of playback sound. 1. - [Setup] - [ Playback Settings] - [Volume] - Select . [169] How to Use Menu operations Setup Download Music (Models with / . 3. Depending on the TV screen if you connect this product Gain Brightness Exposure Flash Note The data code is displayed on the recording media condition may appear. [167] How to Use Menu operations Setup Volume You can transfer music files from audio CDs etc., to this product by connecting this ...
adjust the volume using / . [168] How to Use Menu operations Setup Motion Interval ADJ Adjusts the residual image intervals of playback sound. 1. - [Setup] - [ Playback Settings] - [Volume] - Select . [169] How to Use Menu operations Setup Download Music (Models with / . 3. Depending on the TV screen if you connect this product Gain Brightness Exposure Flash Note The data code is displayed on the recording media condition may appear. [167] How to Use Menu operations Setup Volume You can transfer music files from audio CDs etc., to this product by connecting this ...

Help Guide
Page 171
... to compress audio data. The MPEG-4 AVC/H.264 format is adopted to compress video data, and the Dolby Digital or Linear PCM system is reading or writing image files on memory card or memory card adaptor. Do not attach a label or the like on the memory card (while the access lamp is the AVCHD format? [204] How to record a high definition (HD) signal using efficient data compression coding technology. The...
... to compress audio data. The MPEG-4 AVC/H.264 format is adopted to compress video data, and the Dolby Digital or Linear PCM system is reading or writing image files on memory card or memory card adaptor. Do not attach a label or the like on the memory card (while the access lamp is the AVCHD format? [204] How to record a high definition (HD) signal using efficient data compression coding technology. The...

Help Guide
Page 175
... actually appear on the LCD monitor. These points are operational for effective use and storage place This product is not possible due to a malfunction of the manufacturing process and do not affect the shooting in this Help Guide, DVD discs recorded with the internal memory) and memory card are called "recording media." On use . TV color systems differ depending on -screen displays The example images used in any problems. Compensation for understandability...
... actually appear on the LCD monitor. These points are operational for effective use and storage place This product is not possible due to a malfunction of the manufacturing process and do not affect the shooting in this Help Guide, DVD discs recorded with the internal memory) and memory card are called "recording media." On use . TV color systems differ depending on -screen displays The example images used in any problems. Compensation for understandability...

Help Guide
Page 178
... connected to other devices through a USB connection and the power of this product On connecting to Use Additional information Handling of this product at all. However, even if the pre-installed rechargeable battery is not charged, this product operation other settings even when the LCD monitor is turned on optional accessories down. On the pre-installed rechargeable battery This product has a pre-installed rechargeable battery to retain the date, time...
... connected to other devices through a USB connection and the power of this product On connecting to Use Additional information Handling of this product at all. However, even if the pre-installed rechargeable battery is not charged, this product operation other settings even when the LCD monitor is turned on optional accessories down. On the pre-installed rechargeable battery This product has a pre-installed rechargeable battery to retain the date, time...
Help Guide
Page 192
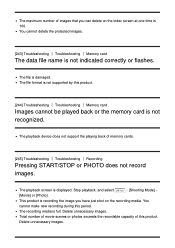
.... [244] Troubleshooting Troubleshooting Memory card Images cannot be played back or the memory card is not supported by this period. Delete unnecessary images. The file is not indicated correctly or flashes. Delete unnecessary images. The playback screen is full. Stop playback, and select - [Shooting Mode] - [Movie] or [Photo]. The recording media is displayed. The file format is not recognized. This product is 100. The maximum number of images that you can delete on the index screen at one time is recording the image you have...
.... [244] Troubleshooting Troubleshooting Memory card Images cannot be played back or the memory card is not supported by this period. Delete unnecessary images. The file is not indicated correctly or flashes. Delete unnecessary images. The playback screen is full. Stop playback, and select - [Shooting Mode] - [Movie] or [Photo]. The recording media is displayed. The file format is not recognized. This product is 100. The maximum number of images that you can delete on the index screen at one time is recording the image you have...
Help Guide
Page 205
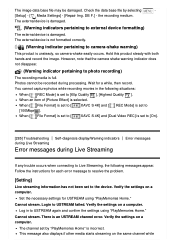
...] and [ REC Mode] is incorrect. When [ File Format] is set to [100Mbps ]. There is unsteady, so camera-shake easily occurs. The external device is not formatted correctly. (Warning indicator pertaining to USTREAM failed. Photos cannot be damaged. The image data base file may be recorded during Live Streaming Error messages If any trouble occurs when connecting to Live Streaming, the following situations: When [ REC Mode] is set by selecting - [Setup] - [ Media Settings] - [Repair Img. Cannot...
...] and [ REC Mode] is incorrect. When [ File Format] is set to [100Mbps ]. There is unsteady, so camera-shake easily occurs. The external device is not formatted correctly. (Warning indicator pertaining to USTREAM failed. Photos cannot be damaged. The image data base file may be recorded during Live Streaming Error messages If any trouble occurs when connecting to Live Streaming, the following situations: When [ REC Mode] is set by selecting - [Setup] - [ Media Settings] - [Repair Img. Cannot...

Operating Instructions
Page 11
...; Multi Camera Control • Trimming Playback Table of the camcorder. in -depth instructions on the many functions of Contents Read this first 2 Learning more about the camcorder (Help Guide) ......11 Selecting the recording format for movies 12 Getting started 14 Supplied items 14 Charging the battery pack ...... 15 Turning the power on 18 Inserting a memory card .........19 Recording/Playback ... 21 Recording 21 Using the manual adjustment features 24 Playback 25 Viewing images on -line manual. http://rd1.sony.net/help/cam...
...; Multi Camera Control • Trimming Playback Table of the camcorder. in -depth instructions on the many functions of Contents Read this first 2 Learning more about the camcorder (Help Guide) ......11 Selecting the recording format for movies 12 Getting started 14 Supplied items 14 Charging the battery pack ...... 15 Turning the power on 18 Inserting a memory card .........19 Recording/Playback ... 21 Recording 21 Using the manual adjustment features 24 Playback 25 Viewing images on -line manual. http://rd1.sony.net/help/cam...

Operating Instructions
Page 22
... the person recording the movie will be able to delete the demonstration movie on this product (FDR-AX30/AXP35). • When recording with using the default setting: [ File Format]: [ XAVC S 4K], [ REC Mode]: [60Mbps ], [Dual Video REC]: [Off] • When using a Sony memory card. • The actual recording time or number of recordable photos is displayed on the setting in [ REC Mode] and [ Frame Rate]. • You cannot specify the storage destination (internal memory/memory card) of photos and movies separately (FDR-AX30/AXP35...
... the person recording the movie will be able to delete the demonstration movie on this product (FDR-AX30/AXP35). • When recording with using the default setting: [ File Format]: [ XAVC S 4K], [ REC Mode]: [60Mbps ], [Dual Video REC]: [Off] • When using a Sony memory card. • The actual recording time or number of recordable photos is displayed on the setting in [ REC Mode] and [ Frame Rate]. • You cannot specify the storage destination (internal memory/memory card) of photos and movies separately (FDR-AX30/AXP35...

Operating Instructions
Page 50
Operations with reverse polarity. (microphone) jack (PLUG IN POWER) (headphones) jack Camera recording lamp NIGHTSHOT light Multi/Micro USB Terminal Supports Micro USB compatible devices. To prevent failure, do not use a commercially available flash with high-voltage synchro terminals or with other manufacture's accessories are reference pages. PHOTO button (21, 23) Power zoom lever (23) N mark (37) NFC: Near Field...
Operations with reverse polarity. (microphone) jack (PLUG IN POWER) (headphones) jack Camera recording lamp NIGHTSHOT light Multi/Micro USB Terminal Supports Micro USB compatible devices. To prevent failure, do not use a commercially available flash with high-voltage synchro terminals or with other manufacture's accessories are reference pages. PHOTO button (21, 23) Power zoom lever (23) N mark (37) NFC: Near Field...


