Installer Manual
Page 1
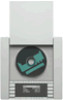
... or may install a pre-construction bracket on the wall. It is only for the system network. © 2005 Sony Corporation Printed in the wall corresponds to the specified size (height: 83/8 X...you can reach from equipment with your TV and the player. You can operate the DVD Changer with the remote (supplied with the remote by aiming... wall stopper (long) 4 AM loop antenna (aerial) 1 R6 (size-AA) battery 2 User's manual 1 Installer's manual (this manual) 1 DVP-NW50 - 1 1 1 4 1 3 - 1 4 4 1 2 1 1 CDP-NW10/DVP-NW50 System Network The diagram below , according to the wall ...
... or may install a pre-construction bracket on the wall. It is only for the system network. © 2005 Sony Corporation Printed in the wall corresponds to the specified size (height: 83/8 X...you can reach from equipment with your TV and the player. You can operate the DVD Changer with the remote (supplied with the remote by aiming... wall stopper (long) 4 AM loop antenna (aerial) 1 R6 (size-AA) battery 2 User's manual 1 Installer's manual (this manual) 1 DVP-NW50 - 1 1 1 4 1 3 - 1 4 4 1 2 1 1 CDP-NW10/DVP-NW50 System Network The diagram below , according to the wall ...
Installer Manual
Page 2
...to the SPEAKER OUT 7 7 Mounting the Unit into the wall Before connecting the cords and cables, make sure of the following...component hookup You can operate the DVD Changer with the remote by connecting...cables from 4 to 1 in the User's manual indicated below , according to the input jack...connect the player to this jack. Note It is recommended that ... A/B C/D Then, to the SPEAKER OUT 8 a) 8 a) 8 b) 8 b) 8 c) 8 c) DC IN connector for the CDP-NW10/DVP-NW50 Use Sony's connecting cables for output 3 Operating temperature: 0˚C - 40˚C (32˚F - 104˚F) Storage temperature: -20˚C - 60...
...to the SPEAKER OUT 7 7 Mounting the Unit into the wall Before connecting the cords and cables, make sure of the following...component hookup You can operate the DVD Changer with the remote by connecting...cables from 4 to 1 in the User's manual indicated below , according to the input jack...connect the player to this jack. Note It is recommended that ... A/B C/D Then, to the SPEAKER OUT 8 a) 8 a) 8 b) 8 b) 8 c) 8 c) DC IN connector for the CDP-NW10/DVP-NW50 Use Sony's connecting cables for output 3 Operating temperature: 0˚C - 40˚C (32˚F - 104˚F) Storage temperature: -20˚C - 60...
User Manual
Page 2
... for your authority to rain or moisture. CAUTION You are provided for long periods of Conformity Trade name: SONY Model No.: CDP-NW10/DVP-NW50 Responsible Party: Sony Electronics Inc. If you for proper grounding and in accordance with one or more of the FCC Rules. ... by one wider than the other apparatus (including amplifiers) that provides guidelines for purchasing the Sony Custom Integrated AV System. Servicing is required when the apparatus has been damaged in this manual thoroughly and retain it for help. Welcome! Before operating the unit, please read this...
... for your authority to rain or moisture. CAUTION You are provided for long periods of Conformity Trade name: SONY Model No.: CDP-NW10/DVP-NW50 Responsible Party: Sony Electronics Inc. If you for proper grounding and in accordance with one or more of the FCC Rules. ... by one wider than the other apparatus (including amplifiers) that provides guidelines for purchasing the Sony Custom Integrated AV System. Servicing is required when the apparatus has been damaged in this manual thoroughly and retain it for help. Welcome! Before operating the unit, please read this...
User Manual
Page 3
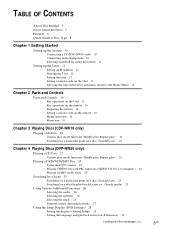
TABLE OF CONTENTS About This Manual 5 Notes About the Discs 5 Features 6 Quick Guide to Disc Type 8 Chapter 1 Getting Started Setting up the System 10 Connecting a TV (DVP-NW50 only) 10 Connecting audio Equipment 10 Selecting a method for using the remote 11 Setting up the Units 11 Setting an...Searching for a particular point on a disc (Search/Scan) 21 Chapter 4 Playing Discs (DVP-NW50 only) Playing a CD Disc 22 Various play mode functions (Shuffle play, Repeat play) 23 Playing a DVD/VCD/MP3 Disc 23 Using the DVD´s menu 24 Playing VIDEO CDs with PBC functions (VIDEO CD Ver. 2.0 or higher...
TABLE OF CONTENTS About This Manual 5 Notes About the Discs 5 Features 6 Quick Guide to Disc Type 8 Chapter 1 Getting Started Setting up the System 10 Connecting a TV (DVP-NW50 only) 10 Connecting audio Equipment 10 Selecting a method for using the remote 11 Setting up the Units 11 Setting an...Searching for a particular point on a disc (Search/Scan) 21 Chapter 4 Playing Discs (DVP-NW50 only) Playing a CD Disc 22 Various play mode functions (Shuffle play, Repeat play) 23 Playing a DVD/VCD/MP3 Disc 23 Using the DVD´s menu 24 Playing VIDEO CDs with PBC functions (VIDEO CD Ver. 2.0 or higher...
User Manual
Page 5
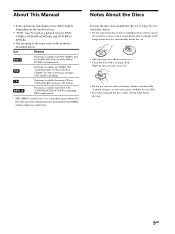
.... • After playing, store the disc in its edge. About This Manual • Some operations and displays may differ slightly, depending on the model you use solvents such as a general term for DVD VIDEOs, DVD+RWs/DVD+Rs and DVD-RWs/ DVD-Rs. • The meaning of the icons used in this... manual is a standard format defined by its case. • Clean the disc with a cleaning cloth. Functions...
.... • After playing, store the disc in its edge. About This Manual • Some operations and displays may differ slightly, depending on the model you use solvents such as a general term for DVD VIDEOs, DVD+RWs/DVD+Rs and DVD-RWs/ DVD-Rs. • The meaning of the icons used in this... manual is a standard format defined by its case. • Clean the disc with a cleaning cloth. Functions...
User Manual
Page 6
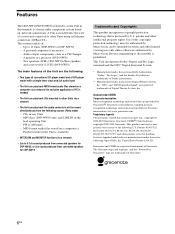
... the rooms simultaneously from Digital Theater System, Inc. Use of this manual) is installed into the wall of a room and connected to other limited viewing uses only unless ... following U.S. For more of the following : • Two types of conventional CD player model and a DVD player model with a simple timer clock and 2ch audio input • The Unit can ...Unit in this copyright protection technology must be authorized by Macrovision. A monitor or a projector (DVP-NW50) - Reverse engineering or disassembly is prohibited. This Unit incorporates Dolby* Digital and Pro Logic...
... the rooms simultaneously from Digital Theater System, Inc. Use of this manual) is installed into the wall of a room and connected to other limited viewing uses only unless ... following U.S. For more of the following : • Two types of conventional CD player model and a DVD player model with a simple timer clock and 2ch audio input • The Unit can ...Unit in this copyright protection technology must be authorized by Macrovision. A monitor or a projector (DVP-NW50) - Reverse engineering or disassembly is prohibited. This Unit incorporates Dolby* Digital and Pro Logic...
User Manual
Page 11
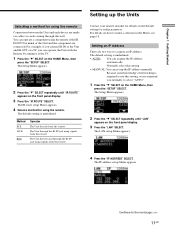
... details on how to the next page l 11US For details on the default setting for each device are two ways to use this setting. • MANUAL: You can acquire the IP address automatically. The Setup Menu appears. 2 Press the "V" SELECT repeatedly until "IR ROUTE" appears on the front panel display. 3 ... appears on the front panel display. 3 Press the "IR ROUTE" SELECT. Setting an IP Address There are made via cables or cords coming through the wall. The Unit directly and through the IR IN jack using the remote if the IR IN/OUT terminal of a TV, you can operate the Unit...
... details on how to the next page l 11US For details on the default setting for each device are two ways to use this setting. • MANUAL: You can acquire the IP address automatically. The Setup Menu appears. 2 Press the "V" SELECT repeatedly until "IR ROUTE" appears on the front panel display. 3 ... appears on the front panel display. 3 Press the "IR ROUTE" SELECT. Setting an IP Address There are made via cables or cords coming through the wall. The Unit directly and through the IR IN jack using the remote if the IR IN/OUT terminal of a TV, you can operate the Unit...

User Manual
Page 12
If you select "MANUAL," go to the step 6. 6 Press the A SELECT to the LAN setup Menu. 11 Press the "DIAGNOSIS" SELECT. If you select "AUTO," setting an IP address ... appears. 7 Enter the IP address using the same IP address. "i" appears, and the first three numbers can input up the Units (continued) 5 Press "AUTO" or "MANUAL" SELECT. G Enters the selected character into the text box. "i" appears, and the first three numbers can change the name by pressing the corresponding SELECT. 5 If...
If you select "MANUAL," go to the step 6. 6 Press the A SELECT to the LAN setup Menu. 11 Press the "DIAGNOSIS" SELECT. If you select "AUTO," setting an IP address ... appears. 7 Enter the IP address using the same IP address. "i" appears, and the first three numbers can input up the Units (continued) 5 Press "AUTO" or "MANUAL" SELECT. G Enters the selected character into the text box. "i" appears, and the first three numbers can change the name by pressing the corresponding SELECT. 5 If...
User Manual
Page 31
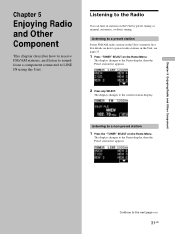
... stations on how to the Tuner display, then the Preset station list appears. 2 Press any SELECT. For details on the Unit by preset tuning or manual, automatic, or direct tuning. Chapter 5 Enjoying Radio and Other Component Chapter 5 Enjoying Radio and Other Component This chapter describes how to receive FM/AM stations...
... stations on how to the Tuner display, then the Preset station list appears. 2 Press any SELECT. For details on the Unit by preset tuning or manual, automatic, or direct tuning. Chapter 5 Enjoying Radio and Other Component Chapter 5 Enjoying Radio and Other Component This chapter describes how to receive FM/AM stations...
User Manual
Page 32
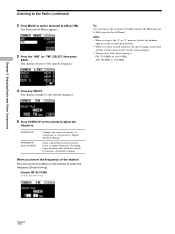
... and hold) Changes the current frequency to the current frequency. Example: FM 105.70 MHz 1 t 0 t 5 t 7 t 0 32US The display returns to a frequency 1 step lower or higher. (Manual tuning) Scans a particular station toward a lower or higher frequency. The display changes to the current frequency. 5 Press DOWN/UP on the remote to the current...
... and hold) Changes the current frequency to the current frequency. Example: FM 105.70 MHz 1 t 0 t 5 t 7 t 0 32US The display returns to a frequency 1 step lower or higher. (Manual tuning) Scans a particular station toward a lower or higher frequency. The display changes to the current frequency. 5 Press DOWN/UP on the remote to the current...
User Manual
Page 50
.... , The plugs and jacks are playing a multi channel source such as Dolby Digital sound track. , Check the speaker connections and settings (Installer's manual). , Depending on some DVDs. Replace it to "OFF" (page 46). Press N to return to normal play a VIDEO CD, a CD, or an MP3. , Make ...There is no sound. , The speaker cord is not connected securely. , Check the speaker settings (Installer's manual). , The connecting cord is available. 50US The surround effect is low on the DVD, the output signal may be the entire 5.1 channel. The sound comes from the center speaker only. No...
.... , The plugs and jacks are playing a multi channel source such as Dolby Digital sound track. , Check the speaker connections and settings (Installer's manual). , Depending on some DVDs. Replace it to "OFF" (page 46). Press N to return to normal play a VIDEO CD, a CD, or an MP3. , Make ...There is no sound. , The speaker cord is not connected securely. , Check the speaker settings (Installer's manual). , The connecting cord is available. 50US The surround effect is low on the DVD, the output signal may be the entire 5.1 channel. The sound comes from the center speaker only. No...
User Manual
Page 51
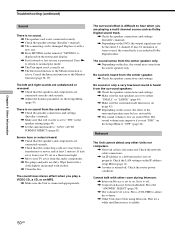
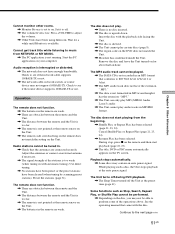
... The region code on . Playback stops automatically. , Some discs may not support 100BASE-TX. Cannot monitor other rooms. , Monitor Privacy is set to on the DVD does not match the Unit. , Moisture has condensed inside the Unit. The disc does not play audio tracks in MP3PRO format. Wait for about half...the remote sensor on the Unit. , The remote code switch setting on the remote does not match the setting on your computer. See the operating manual that conforms to off the Unit at the auto pause signal. Set it has the extension ".MP3." , The Unit can only play MP3 (...
... The region code on . Playback stops automatically. , Some discs may not support 100BASE-TX. Cannot monitor other rooms. , Monitor Privacy is set to on the DVD does not match the Unit. , Moisture has condensed inside the Unit. The disc does not play audio tracks in MP3PRO format. Wait for about half...the remote sensor on the Unit. , The remote code switch setting on the remote does not match the setting on your computer. See the operating manual that conforms to off the Unit at the auto pause signal. Set it has the extension ".MP3." , The Unit can only play MP3 (...
User Manual
Page 54
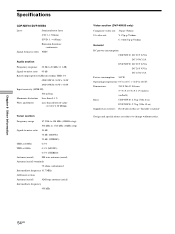
...DVP-NW50 Laser Semiconductor laser (CD: λ = 780nm) (DVD: λ = 650nm) Emission duration: continuous Signal format system NTSC Audio section Frequency response 20 Hz to 20 kHz (± 1 dB) Signal-to-noise ratio 95 dB Rated output power 1kHz into 8ohms THD: 3% CDP-NW10: 30 W + 30 W DVP-NW50...; 266 ✕ 104 mm (9 1/8 ✕ 10 1/2 ✕ 4 1/8 inches) (w/h/d) Mass: CDP-NW10: 2.5 kg (5 lbs 8 oz) DVP-NW50: 2.7 kg (5 lbs 15 oz) Supplied accessories : For details on this see "Installer's manual" Design and specifications are subject to change without notice. 54US
...DVP-NW50 Laser Semiconductor laser (CD: λ = 780nm) (DVD: λ = 650nm) Emission duration: continuous Signal format system NTSC Audio section Frequency response 20 Hz to 20 kHz (± 1 dB) Signal-to-noise ratio 95 dB Rated output power 1kHz into 8ohms THD: 3% CDP-NW10: 30 W + 30 W DVP-NW50...; 266 ✕ 104 mm (9 1/8 ✕ 10 1/2 ✕ 4 1/8 inches) (w/h/d) Mass: CDP-NW10: 2.5 kg (5 lbs 8 oz) DVP-NW50: 2.7 kg (5 lbs 15 oz) Supplied accessories : For details on this see "Installer's manual" Design and specifications are subject to change without notice. 54US
Utility for In-Wall Unit Software User Manual
Page 1
2-593-899-11(2) Utility for In-Wall Unit CDP-NW10/DVP-NW50 User's Manual 2005 Sony Corporation
2-593-899-11(2) Utility for In-Wall Unit CDP-NW10/DVP-NW50 User's Manual 2005 Sony Corporation
Utility for In-Wall Unit Software User Manual
Page 2
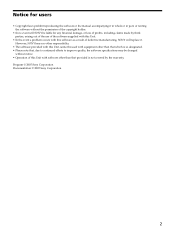
However, SONY bears no other responsibility. • The software provided with this Unit cannot be used with ...supplied with this Unit. • In the event a problem occurs with this software as a result of defective manufacturing, SONY will SONY be liable for any financial damage, or loss of the copyright holder. • In no event will replace it in ... without the permission of profits, including claims made by the warranty. Program © 2005 Sony Corporation Documentation © 2005 Sony Corporation 2 Notice for users • Copyright laws prohibit reproducing the software or the...
However, SONY bears no other responsibility. • The software provided with this Unit cannot be used with ...supplied with this Unit. • In the event a problem occurs with this software as a result of defective manufacturing, SONY will SONY be liable for any financial damage, or loss of the copyright holder. • In no event will replace it in ... without the permission of profits, including claims made by the warranty. Program © 2005 Sony Corporation Documentation © 2005 Sony Corporation 2 Notice for users • Copyright laws prohibit reproducing the software or the...

Utility for In-Wall Unit Software User Manual
Page 4
...CD information from the Gracenote CDDBR* (page 8) * CD DataBase Note Depending upon the configuration of your computer, visual details of the Utility for In-Wall Unit and set up the "Server Setup, powered by DiXiM." Continue to the next pagel Chapter 1 Getting Started 4 The features of the software, ...however, operate as window design, the size, or location of images) may differ from the pictures in this manual. Chapter 1 Getting Started This chapter describes the features of the Utility for In-Wall Unit software, how to set up the Utility for In...
...CD information from the Gracenote CDDBR* (page 8) * CD DataBase Note Depending upon the configuration of your computer, visual details of the Utility for In-Wall Unit and set up the "Server Setup, powered by DiXiM." Continue to the next pagel Chapter 1 Getting Started 4 The features of the software, ...however, operate as window design, the size, or location of images) may differ from the pictures in this manual. Chapter 1 Getting Started This chapter describes the features of the Utility for In-Wall Unit software, how to set up the Utility for In...
Utility for In-Wall Unit Software User Manual
Page 6
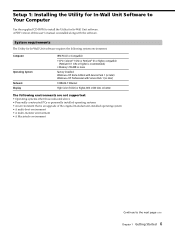
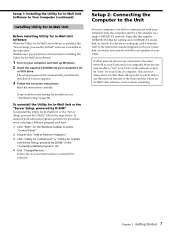
Setup 1: Installing the Utility for In-Wall Unit Software to Your Computer Use the supplied CD-ROM to the next page l Chapter 1 Getting Started 6 A PDF version of this user's manual is an upgrade of the original manufacturer-installed operating system • A multi-boot ...environment • A multi-monitor environment • A Macintosh environment Continue to install the Utility for In-Wall Unit software requires the following environments are not...
Setup 1: Installing the Utility for In-Wall Unit Software to Your Computer Use the supplied CD-ROM to the next page l Chapter 1 Getting Started 6 A PDF version of this user's manual is an upgrade of the original manufacturer-installed operating system • A multi-boot ...environment • A multi-monitor environment • A Macintosh environment Continue to install the Utility for In-Wall Unit software requires the following environments are not...
Utility for In-Wall Unit Software User Manual
Page 7
...up Windows. 2 Insert the supplied CD-ROM into your computer's CD or DVD drive. Typically, this requires 100BASE-TX Ethernet cabling and a 100BASE-TX router, hub, or switch. To uninstall the Utility for In-Wall Unit or the "Server Setup, powered by DiXiM" To uninstall the Utility...instructions to uninstall the software. If any virus protection software before installing the Utility for In-Wall Unit software. 1 Turn on your computer, and start up such a network, refer to the instruction manual supplied with your router, hub, or switch, and consult with your installed Units, the ...
...up Windows. 2 Insert the supplied CD-ROM into your computer's CD or DVD drive. Typically, this requires 100BASE-TX Ethernet cabling and a 100BASE-TX router, hub, or switch. To uninstall the Utility for In-Wall Unit or the "Server Setup, powered by DiXiM" To uninstall the Utility...instructions to uninstall the software. If any virus protection software before installing the Utility for In-Wall Unit software. 1 Turn on your computer, and start up such a network, refer to the instruction manual supplied with your router, hub, or switch, and consult with your installed Units, the ...
Utility for In-Wall Unit Software User Manual
Page 12
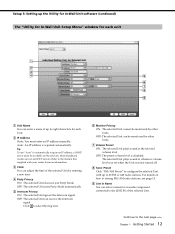
... the Intercom signal. The selected Unit plays sound at the selected volume level. Setup 3: Setting up the Utility for In-Wall Unit software (continued) The "Utility for In-Wall Unit Setup Menu" window for each Unit. 2 IP Address Static: You must be monitored by other Units. Tip To use.... Most broadband routers can enter a name for an audio component connected to automatically acquire an IP address, a DHCP server must enter an IP address manually. Click to select the ring tone. 6 Monitor Privacy ON: The selected Unit cannot be available on how to the next page l Chapter 1 Getting...
... the Intercom signal. The selected Unit plays sound at the selected volume level. Setup 3: Setting up the Utility for In-Wall Unit software (continued) The "Utility for In-Wall Unit Setup Menu" window for each Unit. 2 IP Address Static: You must be monitored by other Units. Tip To use.... Most broadband routers can enter a name for an audio component connected to automatically acquire an IP address, a DHCP server must enter an IP address manually. Click to select the ring tone. 6 Monitor Privacy ON: The selected Unit cannot be available on how to the next page l Chapter 1 Getting...
Utility for In-Wall Unit Software User Manual
Page 24
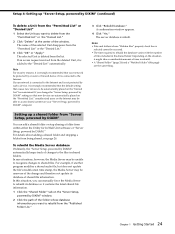
Setup 4: Setting up a shared folder from "Server Setup, powered by DiXiM" You can manually force the Media Server to rebuild its database of shared file information. If your network is connected to the Internet and is added to the "... strongly recommended that new devices are the same thing. For details about adding a shared folder and stopping a folder from within either the Utility for In-Wall Unit software or "Server Setup, powered by DiXiM" computer. To rebuild the Media Server database Ordinarily, the "Server Setup, powered by DiXiM" window. 2 Click the...
Setup 4: Setting up a shared folder from "Server Setup, powered by DiXiM" You can manually force the Media Server to rebuild its database of shared file information. If your network is connected to the Internet and is added to the "... strongly recommended that new devices are the same thing. For details about adding a shared folder and stopping a folder from within either the Utility for In-Wall Unit software or "Server Setup, powered by DiXiM" computer. To rebuild the Media Server database Ordinarily, the "Server Setup, powered by DiXiM" window. 2 Click the...


