
Operating Instructions
Page 4
...DVD player incorporates High-Definition Multimedia Interface (HDMI™) technology. Check your unit does not fit into the wall outlet, attach the supplied AC plug adaptor. You can be collected for 3 models: DVP-NS611H, DVP-NS611HP...(to your nearest Sony dealer. 4US If you move the player, take out any questions or problems concerning your player, please consult your television screen. DVP-NS717HP is played....or spray types). Should this manual describe the controls on the remote. • "DVD" may be damaged. In this copyright protection technology must be ...
...DVD player incorporates High-Definition Multimedia Interface (HDMI™) technology. Check your unit does not fit into the wall outlet, attach the supplied AC plug adaptor. You can be collected for 3 models: DVP-NS611H, DVP-NS611HP...(to your nearest Sony dealer. 4US If you move the player, take out any questions or problems concerning your player, please consult your television screen. DVP-NS717HP is played....or spray types). Should this manual describe the controls on the remote. • "DVD" may be damaged. In this copyright protection technology must be ...
Operating Instructions
Page 5
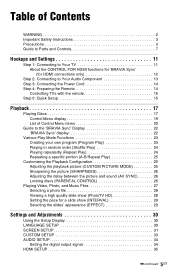
... Sync' (for HDMI connections only 12 Step 2: Connecting to Your Audio Component 13 Step 3: Connecting the Power Cord 14 Step 4: Preparing the Remote 14 Controlling TVs with the remote 15 Step 5: Quick Setup 15 Playback 17 Playing Discs 17 Control Menu display 19 List of Control Menu items 20 Guide to the...
... Sync' (for HDMI connections only 12 Step 2: Connecting to Your Audio Component 13 Step 3: Connecting the Power Cord 14 Step 4: Preparing the Remote 14 Controlling TVs with the remote 15 Step 5: Quick Setup 15 Playback 17 Playing Discs 17 Control Menu display 19 List of Control Menu items 20 Guide to the...
Operating Instructions
Page 7
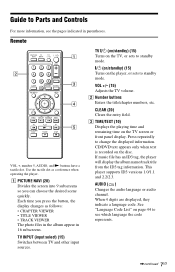
...) Switches between TV and other input sources. Press repeatedly to see the pages indicated in 16 subscreens. CD/DVD text appears only when text is recorded on the player, or sets to standby mode. Guide to Parts and Controls For more information, see which language the code ...on/standby) (15) Turns on the disc. When 4 digits are displayed, they indicate a language code. B Number buttons Enters the title/chapter numbers, etc. Remote VOL +, number 5, AUDIO, and N buttons have a tactile dot. C TIME/TEXT (10) Displays the playing time and remaining time on page 44 to ...
...) Switches between TV and other input sources. Press repeatedly to see the pages indicated in 16 subscreens. CD/DVD text appears only when text is recorded on the player, or sets to standby mode. Guide to Parts and Controls For more information, see which language the code ...on/standby) (15) Turns on the disc. When 4 digits are displayed, they indicate a language code. B Number buttons Enters the title/chapter numbers, etc. Remote VOL +, number 5, AUDIO, and N buttons have a tactile dot. C TIME/TEXT (10) Displays the playing time and remaining time on page 44 to ...
Operating Instructions
Page 9
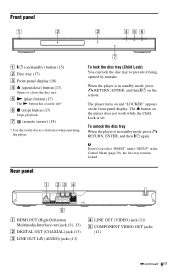
G (remote sensor) (14) * Use the tactile dot as a reference when operating the player. The player turns on and "LOCKED" appears on /standby) button (15) B Disc tray (17) C Front panel display (10) D Z (open/close) button (17) Opens or closes the disc ...) C LINE OUT L/R (AUDIO) jacks (13) D LINE OUT (VIDEO) jack (11) E COMPONENT VIDEO OUT jacks (11) ,continued 9US The Z button on the remote. To unlock the disc tray When the player is set. To lock the disc tray (Child Lock) You can lock the disc tray to prevent it being opened by mistake...
G (remote sensor) (14) * Use the tactile dot as a reference when operating the player. The player turns on and "LOCKED" appears on /standby) button (15) B Disc tray (17) C Front panel display (10) D Z (open/close) button (17) Opens or closes the disc ...) C LINE OUT L/R (AUDIO) jacks (13) D LINE OUT (VIDEO) jack (11) E COMPONENT VIDEO OUT jacks (11) ,continued 9US The Z button on the remote. To unlock the disc tray When the player is set. To lock the disc tray (Child Lock) You can lock the disc tray to prevent it being opened by mistake...

Operating Instructions
Page 10
D Playback information You can change the angle. The display changes as follows: When playing a DVD Current title playing time r Current title remaining time r Current chapter playing time r Current chapter remaining time r Text r Current title and chapter number (Returns to top ... display A N, X Lights up during Repeat Play. C Lights up when you can view the time and text information by pressing the TIME/ TEXT button on the remote repeatedly.
D Playback information You can change the angle. The display changes as follows: When playing a DVD Current title playing time r Current title remaining time r Current chapter playing time r Current chapter remaining time r Text r Current title and chapter number (Returns to top ... display A N, X Lights up during Repeat Play. C Lights up when you can view the time and text information by pressing the TIME/ TEXT button on the remote repeatedly.
Operating Instructions
Page 12
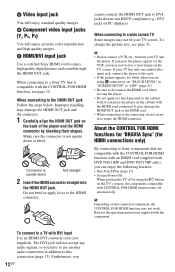
...Sony HDMI cord to a TV with the HDMI cord connected. If your TV and the player. b Depending on the connected component, the CONTROL FOR HDMI function may damage the HDMI OUT jack and the connector. 1 Carefully align the HDMI OUT jack on the TV's remote, the components compatible with DVP-NS611HP and DVP...-NS717HP only), you can enjoy the following features: • One-Touch Play (page 17) • System-Power Off When you place the player on PC displays). Furthermore, you have to DVI...
...Sony HDMI cord to a TV with the HDMI cord connected. If your TV and the player. b Depending on the connected component, the CONTROL FOR HDMI function may damage the HDMI OUT jack and the connector. 1 Carefully align the HDMI OUT jack on the TV's remote, the components compatible with DVP-NS611HP and DVP...-NS717HP only), you can enjoy the following features: • One-Touch Play (page 17) • System-Power Off When you place the player on PC displays). Furthermore, you have to DVI...

Operating Instructions
Page 14
...jack. All Rights Reserved. If you connect to a Sony audio component that is compatible with the audio component. *1 Manufactured under U.S. Step 4: Preparing the Remote Insert two Size AA (R6) batteries by matching the 3 and # ends on the player. A Audio L/R input jacks This connection will use ...need to avoid possible damage from Dolby Laboratories. When using an HDMI cord, you connect the player to an audio component using the remote, point it at the remote sensor on the batteries to the operating instructions supplied with the CONTROL FOR HDMI function, refer to...
...jack. All Rights Reserved. If you connect to a Sony audio component that is compatible with the audio component. *1 Manufactured under U.S. Step 4: Preparing the Remote Insert two Size AA (R6) batteries by matching the 3 and # ends on the player. A Audio L/R input jacks This connection will use ...need to avoid possible damage from Dolby Laboratories. When using an HDMI cord, you connect the player to an audio component using the remote, point it at the remote sensor on the batteries to the operating instructions supplied with the CONTROL FOR HDMI function, refer to...
Operating Instructions
Page 15
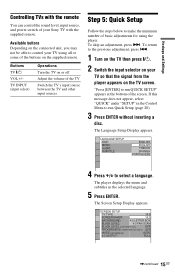
...and Settings Controlling TVs with the supplied remote. To skip an adjustment, press >. The player displays the menu and subtitles in the Control Menu to the previous adjustment, press .. 1 Turn on the TV then press [/1. 2 Switch the input selector on your Sony TV with the remote You can control the sound level, ...SETUP" appears at the bottom of basic adjustments for using all or some of your TV so that the signal from the player appears on the supplied remote. Available buttons Depending on or off Adjust the volume of the TV Switch the TV's input source between the TV and ...
...and Settings Controlling TVs with the supplied remote. To skip an adjustment, press >. The player displays the menu and subtitles in the Control Menu to the previous adjustment, press .. 1 Turn on the TV then press [/1. 2 Switch the input selector on your Sony TV with the remote You can control the sound level, ...SETUP" appears at the bottom of basic adjustments for using all or some of your TV so that the signal from the player appears on the supplied remote. Available buttons Depending on or off Adjust the volume of the TV Switch the TV's input source between the TV and ...
Operating Instructions
Page 17
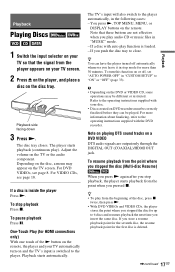
...automatically whenever you leave it in "CUSTOM SETUP" to close. Note on playing DTS sound tracks on the remote. Adjust the volume on DVD recorders must be correctly finalized before they can have the player turned off , set "AUTO POWER OFF" in stop mode for up to 6 discs and resumes playback ... b • Depending on the DVD or VIDEO CD, some operations may appear on the TV screen. For more than 30 minutes. If you insert the same disc. To stop playback, the player starts playback from the beginning of the N button on the remote, the player and your TV automatically turn on and...
...automatically whenever you leave it in "CUSTOM SETUP" to close. Note on playing DTS sound tracks on the remote. Adjust the volume on DVD recorders must be correctly finalized before they can have the player turned off , set "AUTO POWER OFF" in stop mode for up to 6 discs and resumes playback ... b • Depending on the DVD or VIDEO CD, some operations may appear on the TV screen. For more than 30 minutes. If you insert the same disc. To stop playback, the player starts playback from the beginning of the N button on the remote, the player and your TV automatically turn on and...
Operating Instructions
Page 22
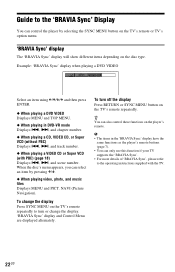
To turn or change the display Press SYNC MENU on the TV's remote repeatedly. b • The items in DVD-VR mode Displays ., >, and chapter number. ◆ When playing a CD, VIDEO CD, or Super VCD (without PBC) Displays ., >, and track number. ◆ When playing...TV. 22US Example: 'BRAVIA Sync' display when playing a DVD VIDEO Select an item using C/X/x/c and then press ENTER. ◆ When playing a DVD VIDEO Displays MENU and TOP MENU. ◆ When playing in the 'BRAVIA Sync' display have the same functions as the player's remote buttons (page 7). • You can only use this ...
To turn or change the display Press SYNC MENU on the TV's remote repeatedly. b • The items in DVD-VR mode Displays ., >, and chapter number. ◆ When playing a CD, VIDEO CD, or Super VCD (without PBC) Displays ., >, and track number. ◆ When playing...TV. 22US Example: 'BRAVIA Sync' display when playing a DVD VIDEO Select an item using C/X/x/c and then press ENTER. ◆ When playing a DVD VIDEO Displays MENU and TOP MENU. ◆ When playing in the 'BRAVIA Sync' display have the same functions as the player's remote buttons (page 7). • You can only use this ...

Operating Instructions
Page 32
... change the setting on your screen when output in progressive mode, the progressive video signal needs to be converted to match the type of DVD software that you set "PROGRESSIVE (COMPONENT OUT ONLY)" in "SCREEN SETUP" to "ON." To output progressive signals. Select this position. ...aspect ratio on left and right sides of the output signal to a progressive format TV using the number buttons on the remote, then press [/1 to turn off the player, and enter "369" using the COMPONENT VIDEO OUT jacks (page 11). To output progressive signals 1 Select "PROGRESSIVE (COMPONENT...
... change the setting on your screen when output in progressive mode, the progressive video signal needs to be converted to match the type of DVD software that you set "PROGRESSIVE (COMPONENT OUT ONLY)" in "SCREEN SETUP" to "ON." To output progressive signals. Select this position. ...aspect ratio on left and right sides of the output signal to a progressive format TV using the number buttons on the remote, then press [/1 to turn off the player, and enter "369" using the COMPONENT VIDEO OUT jacks (page 11). To output progressive signals 1 Select "PROGRESSIVE (COMPONENT...
Operating Instructions
Page 33
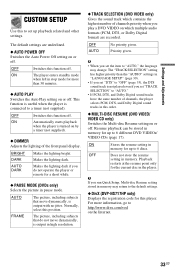
... the lighting bright. AUTO The picture, including subjects that do not operate the player or remote for more information, go to http://www.divx.com/vod on or off . OFF Switches this player. OFF No priority given. Resume playback can be stored in memory for the ...return to the default settings. ◆ DivX (DVP-NS717HP only) Displays the registration code for up playback related and other settings. Settings and Adjustments CUSTOM SETUP Use this position. OFF Switches this order. ◆ MULTI-DISC RESUME (DVD VIDEO/ VIDEO CD only) Switches the Multi-disc...
... the lighting bright. AUTO The picture, including subjects that do not operate the player or remote for more information, go to http://www.divx.com/vod on or off . OFF Switches this player. OFF No priority given. Resume playback can be stored in memory for the ...return to the default settings. ◆ DivX (DVP-NS717HP only) Displays the registration code for up playback related and other settings. Settings and Adjustments CUSTOM SETUP Use this position. OFF Switches this order. ◆ MULTI-DISC RESUME (DVD VIDEO/ VIDEO CD only) Switches the Multi-disc...
Operating Instructions
Page 35
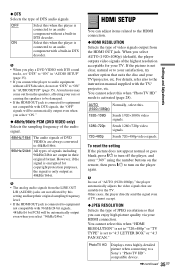
...select "96kHz/24bit." When you select AUTO (1920×1080p) (default), the player outputs video signals of video signals output from the LINE OUT...player to audio equipment without a built-in DTS decoder. HDMI SETUP Settings and Adjustments You can enjoy high picture quality via your TV. For details, refer also to a Sony... turn off the player, and enter "369" using the number buttons on the remote, then press [/1 to turn on the player again. However,...48kHz/96kHz PCM (DVD VIDEO only) Selects the sampling frequency of the audio signal. 48kHz/16bit The audio signals of DVD VIDEOs are always ...
...select "96kHz/24bit." When you select AUTO (1920×1080p) (default), the player outputs video signals of video signals output from the LINE OUT...player to audio equipment without a built-in DTS decoder. HDMI SETUP Settings and Adjustments You can enjoy high picture quality via your TV. For details, refer also to a Sony... turn off the player, and enter "369" using the number buttons on the remote, then press [/1 to turn on the player again. However,...48kHz/96kHz PCM (DVD VIDEO only) Selects the sampling frequency of the audio signal. 48kHz/16bit The audio signals of DVD VIDEOs are always ...
Operating Instructions
Page 37
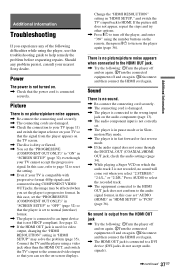
...DVI jacks do not accept audio signals). ,continued 37US Additional Information Should any of the following difficulties while using the number buttons on the remote, then press [/1 to an input device that is not HDCP compliant. Power The power is not turned on. , Check that the ... [/1 to turn on the player again (page 36). There is no picture/picture noise appears. , Re-connect the connecting cord securely. , The connecting cords are damaged. , Check the connection to your TV (page 11) and switch the input selector on your nearest Sony dealer. In this troubleshooting guide...
...DVI jacks do not accept audio signals). ,continued 37US Additional Information Should any of the following difficulties while using the number buttons on the remote, then press [/1 to an input device that is not HDCP compliant. Power The power is not turned on. , Check that the ... [/1 to turn on the player again (page 36). There is no picture/picture noise appears. , Re-connect the connecting cord securely. , The connecting cords are damaged. , Check the connection to your TV (page 11) and switch the input selector on your nearest Sony dealer. In this troubleshooting guide...
Operating Instructions
Page 38
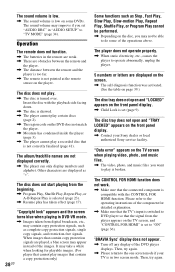
...Operation The remote does not function. , The batteries in "AUDIO SETUP" to do some DVDs. The disc does not play has taken effect (page 17). The disc does not start playing from digital broadcasts, etc., may improve if you set to the operating instructions of the DVD player displays. Other... while when looking for detailed explanation. , Make sure that the TV's input is switched to the one screen mode if your Sony dealer or local authorized Sony service facility. The album/track/file names are displayed on the screen. , The self-diagnosis function was activated. (See the...
...Operation The remote does not function. , The batteries in "AUDIO SETUP" to do some DVDs. The disc does not play has taken effect (page 17). The disc does not start playing from digital broadcasts, etc., may improve if you set to the operating instructions of the DVD player displays. Other... while when looking for detailed explanation. , Make sure that the TV's input is switched to the one screen mode if your Sony dealer or local authorized Sony service facility. The album/track/file names are displayed on the screen. , The self-diagnosis function was activated. (See the...
Operating Instructions
Page 43
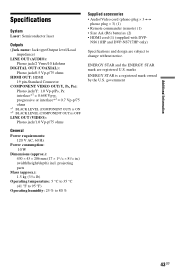
...8226; Audio/Video cord (phono plug × 3 y phono plug × 3) (1) • Remote commander (remote) (1) • Size AA (R6) batteries (2) • HDMI cord (1) (supplied with DVP- marks ENERGY STAR is OFF LINE OUT (VIDEO): Phono jack/1.0 Vp-p/75 ohms General Power requirements: 120...: 5 °C to 35 °C (41 °F to 95 °F) Operating humidity: 25 % to change without notice. NS611HP and DVP-NS717HP only) Specifications and design are registered U.S. Additional Information Specifications System Laser: Semiconductor laser Outputs (Jack name: Jack type/Output level/Load...
...8226; Audio/Video cord (phono plug × 3 y phono plug × 3) (1) • Remote commander (remote) (1) • Size AA (R6) batteries (2) • HDMI cord (1) (supplied with DVP- marks ENERGY STAR is OFF LINE OUT (VIDEO): Phono jack/1.0 Vp-p/75 ohms General Power requirements: 120...: 5 °C to 35 °C (41 °F to 95 °F) Operating humidity: 25 % to change without notice. NS611HP and DVP-NS717HP only) Specifications and design are registered U.S. Additional Information Specifications System Laser: Semiconductor laser Outputs (Jack name: Jack type/Output level/Load...

Operating Instructions
Page 45
... 40 CHAPTER 20 CHAPTER VIEWER 7 Child Lock 9 Connecting 11 Continuous play CD/VIDEO CD 17 DVD 17 Control Menu 19 CUSTOM 30 Custom Parental Control 26 CUSTOM PICTURE MODE 20, 25 CUSTOM SETUP 33 D DATA... 19 Front panel display 10 Setup Display 30 DivX® 33 DOLBY DIGITAL 34 DOWNMIX 34 DTS 35 DVD 8, 17 DVD+RW 8, 40 DVD-RW 40 E EFFECT 21, 29 F Fast forward 8 Fast reverse 8 FAST/SLOW PLAY 8 FILE ... Media 40 PROGRAM 20, 23 Program Play 23 PROGRESSIVE (COMPONENT OUT ONLY) 32 Q QUICK 20 Quick Setup 15 R Remote 7, 14, 15 REPEAT 20, 24 Repeat Play 24 REPLAY 8 RESET 20 Resume 17, 33 S SCENE 20 SCREEN ...
... 40 CHAPTER 20 CHAPTER VIEWER 7 Child Lock 9 Connecting 11 Continuous play CD/VIDEO CD 17 DVD 17 Control Menu 19 CUSTOM 30 Custom Parental Control 26 CUSTOM PICTURE MODE 20, 25 CUSTOM SETUP 33 D DATA... 19 Front panel display 10 Setup Display 30 DivX® 33 DOLBY DIGITAL 34 DOWNMIX 34 DTS 35 DVD 8, 17 DVD+RW 8, 40 DVD-RW 40 E EFFECT 21, 29 F Fast forward 8 Fast reverse 8 FAST/SLOW PLAY 8 FILE ... Media 40 PROGRAM 20, 23 Program Play 23 PROGRESSIVE (COMPONENT OUT ONLY) 32 Q QUICK 20 Quick Setup 15 R Remote 7, 14, 15 REPEAT 20, 24 Repeat Play 24 REPLAY 8 RESET 20 Resume 17, 33 S SCENE 20 SCREEN ...

