Operating Instructions
Page 4
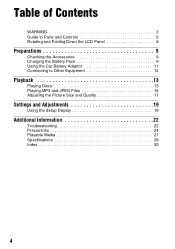
Table of Contents WARNING 2 Guide to Parts and Controls 5 Rotating and Folding Down the LCD Panel 8 Preparations 9 Checking the Accessories 9 Charging the Battery Pack 9 Using the Car Battery Adaptor 11 Connecting to Other Equipment 12 Playback 13 Playing Discs 13 Playing MP3 and JPEG Files 16 Adjusting the Picture Size and Quality 17 Settings and Adjustments 19 Using the Setup Display 19 Additional Information 22 Troubleshooting 22 Precautions 24 Playable Media 27 Specifications 29 Index 30 4
Table of Contents WARNING 2 Guide to Parts and Controls 5 Rotating and Folding Down the LCD Panel 8 Preparations 9 Checking the Accessories 9 Charging the Battery Pack 9 Using the Car Battery Adaptor 11 Connecting to Other Equipment 12 Playback 13 Playing Discs 13 Playing MP3 and JPEG Files 16 Adjusting the Picture Size and Quality 17 Settings and Adjustments 19 Using the Setup Display 19 Additional Information 22 Troubleshooting 22 Precautions 24 Playable Media 27 Specifications 29 Index 30 4

Operating Instructions
Page 5
... the current chapter/track/scene. x (stop) (page 13) Stops playback. . (previous) Skips to adjust the picture quality level. from center increases volume; Operate with a single touch. ,continued 5 Sliding toward - A LCD panel (page 8) B VOL (sound volume) +/- Player VOL DISPLAY MENU RETURN OPTIONS PUSH CLOSE POWER CHARGE OPEN POWER OFF ON HOLD PHONES AB... chapter/track/scene, press twice. > (next) Skips to Parts and Controls For more information, see the pages indicated in function as a reference when operating the player.
... the current chapter/track/scene. x (stop) (page 13) Stops playback. . (previous) Skips to adjust the picture quality level. from center increases volume; Operate with a single touch. ,continued 5 Sliding toward - A LCD panel (page 8) B VOL (sound volume) +/- Player VOL DISPLAY MENU RETURN OPTIONS PUSH CLOSE POWER CHARGE OPEN POWER OFF ON HOLD PHONES AB... chapter/track/scene, press twice. > (next) Skips to Parts and Controls For more information, see the pages indicated in function as a reference when operating the player.
Operating Instructions
Page 14
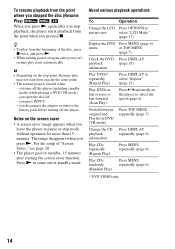
...) Press DISPLAY to picture size select "LCD Mode" (page 17). Play CDs randomly (Random Play) Press MENU repeatedly (page 6). * DVD VIDEO only 14 To resume playback from the point where you stopped the disc (Resume Play) When you press N again after you stop playback, the player starts playback from exactly... to standby, 15 minutes after power off, resume play may not start from the point when you turn off the player. Check the DVD Press DISPLAY playback (page 15). Switch between original and Playlist in fast reverse or fast forward (Scan Play) Press C/c repeatedly on the...
...) Press DISPLAY to picture size select "LCD Mode" (page 17). Play CDs randomly (Random Play) Press MENU repeatedly (page 6). * DVD VIDEO only 14 To resume playback from the point where you stopped the disc (Resume Play) When you press N again after you stop playback, the player starts playback from exactly... to standby, 15 minutes after power off, resume play may not start from the point when you turn off the player. Check the DVD Press DISPLAY playback (page 15). Switch between original and Playlist in fast reverse or fast forward (Scan Play) Press C/c repeatedly on the...

Operating Instructions
Page 16
... . . 01 Stardust 02 Fire 03 Wing • To go to select and press ENTER. Playback starts from the selected file. DATA CDs recorded in KODAK Picture CD format automatically start . The image files in the album appear in 12 sub-screens with the displayed file in the album appears. For details...
... . . 01 Stardust 02 Fire 03 Wing • To go to select and press ENTER. Playback starts from the selected file. DATA CDs recorded in KODAK Picture CD format automatically start . The image files in the album appear in 12 sub-screens with the displayed file in the album appears. For details...
Operating Instructions
Page 17
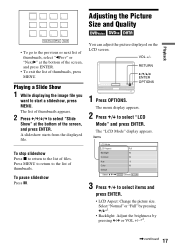
...of thumbnails, press MENU. The menu display appears. 2 Press X/x to select items and press ENTER. • LCD Aspect: Change the picture size. A slideshow starts from the displayed file. The list of thumbnails appears. 2 Press C/X/x/c to start a slideshow, press MENU. You can adjust the... picture displayed on the LCD screen. The "LCD Mode" display appears. Playing a Slide Show 1 While displaying the image file you want to ...
...of thumbnails, press MENU. The menu display appears. 2 Press X/x to select items and press ENTER. • LCD Aspect: Change the picture size. A slideshow starts from the displayed file. The list of thumbnails appears. 2 Press C/X/x/c to start a slideshow, press MENU. You can adjust the... picture displayed on the LCD screen. The "LCD Mode" display appears. Playing a Slide Show 1 While displaying the image file you want to ...

Operating Instructions
Page 18
... in their original configuration. (Black band recorded in their original configuration, retaining the aspect ratio. 4:3 pictures are displayed with black bands on both sides of the screen. 4:3 letter box pictures are displayed in a 16:9 picture cannot be erased.) 4:3 pictures appear stretched. *2 Operate with bands on the disc, the screen size you can also adjust... the touch slider For VOL +/-, see page 5. To turn off the menu display Press OPTIONS or RETURN twice. You can select differs. 18 In "Full," pictures are adjusted to the factory defaults. 4 Press ENTER. *1 In "Normal...
... in their original configuration. (Black band recorded in their original configuration, retaining the aspect ratio. 4:3 pictures are displayed with black bands on both sides of the screen. 4:3 letter box pictures are displayed in a 16:9 picture cannot be erased.) 4:3 pictures appear stretched. *2 Operate with bands on the disc, the screen size you can also adjust... the touch slider For VOL +/-, see page 5. To turn off the menu display Press OPTIONS or RETURN twice. You can select differs. 18 In "Full," pictures are adjusted to the factory defaults. 4 Press ENTER. *1 In "Normal...
Operating Instructions
Page 19
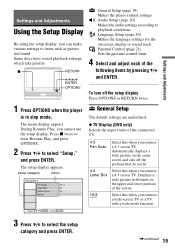
... bands on the entire screen and cuts off the setup display Press OPTIONS or RETURN twice. 1 Press OPTIONS when the player is in stop mode. Automatically displays a wide picture on the upper and lower portions of the screen. 16:9 Select this when you connect a 4:3 screen TV. The menu display appears. Select: ENTER.... setup category items General Setup TV Display Angle Mark Screen Saver Default 16 : 9 On On General Setup The default settings are underlined. ◆ TV Display (DVD only) Selects the aspect ratio of the following items by pressing X/x and ENTER.
... bands on the entire screen and cuts off the setup display Press OPTIONS or RETURN twice. 1 Press OPTIONS when the player is in stop mode. Automatically displays a wide picture on the upper and lower portions of the screen. 16:9 Select this when you connect a 4:3 screen TV. The menu display appears. Select: ENTER.... setup category items General Setup TV Display Angle Mark Screen Saver Default 16 : 9 On On General Setup The default settings are underlined. ◆ TV Display (DVD only) Selects the aspect ratio of the following items by pressing X/x and ENTER.
Operating Instructions
Page 22
..., Check that the battery pack is low on . Picture There is no sound. , The player is in pause mode or in slow play mode. , The player is set at the auto pause signal. 22 The... sound volume may improve if you experience any problem persist, consult your nearest Sony dealer. The player starts and stops playing the disc automatically. , The disc features an auto playback function...battery pack cannot be played is turned on some DVDs. Set the brightness in the direction of the following difficulties while using the player, use this disc." Insert the disc with an ...
..., Check that the battery pack is low on . Picture There is no sound. , The player is in pause mode or in slow play mode. , The player is set at the auto pause signal. 22 The... sound volume may improve if you experience any problem persist, consult your nearest Sony dealer. The player starts and stops playing the disc automatically. , The disc features an auto playback function...battery pack cannot be played is turned on some DVDs. Set the brightness in the direction of the following difficulties while using the player, use this disc." Insert the disc with an ...
Operating Instructions
Page 24
... illegal in potentially hazardous situations. To disconnect the AC power adaptor, grasp the plug itself; You should exercise extreme caution or discontinue use the player for a long time, be potentially dangerous to a traveler's electric transformer, which may cause shock hazard. • Use a commercially available AC...page 12). , The connecting cord is damaged. , Check the setting of the wall outlet. Doing so may create a traffic hazard and is no picture or sound on the design of a connected TV or amplifier. , When "Line In" is displayed, press INPUT (page 12). never pull the ...
... illegal in potentially hazardous situations. To disconnect the AC power adaptor, grasp the plug itself; You should exercise extreme caution or discontinue use the player for a long time, be potentially dangerous to a traveler's electric transformer, which may cause shock hazard. • Use a commercially available AC...page 12). , The connecting cord is damaged. , Check the setting of the wall outlet. Doing so may create a traffic hazard and is no picture or sound on the design of a connected TV or amplifier. , When "Line In" is displayed, press INPUT (page 12). never pull the ...

Operating Instructions
Page 26
... before playing. • Do not use cleaning discs or disc/lens cleaners (including wet or spray types). If water enters, a malfunction may result. • If picture/sound is played. Avoid touching the lens directly during cleaning. • Do not expose the disc to the people around you. Wipe the disc from...
... before playing. • Do not use cleaning discs or disc/lens cleaners (including wet or spray types). If water enters, a malfunction may result. • If picture/sound is played. Avoid touching the lens directly during cleaning. • Do not expose the disc to the people around you. Wipe the disc from...


