
Instruction Manual
Page 9
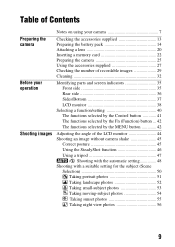
... 25 Using the accessories supplied 27 Checking the number of recordable images 29 Cleaning 32 Identifying parts and screen indicators 35 Front side 35 Rear side 36 Sides/Bottom 37 LCD monitor 38 Selecting a function/setting 40 The functions selected by the Control button 41 The functions selected ...by the Fn (Function) button ... 42 The functions selected by the MENU button 42 Adjusting the angle of the LCD monitor 44 Shooting an image without camera shake 45 Correct posture 45 Using the SteadyShot function 46 Using a tripod 47 / Shooting with the ...
... 25 Using the accessories supplied 27 Checking the number of recordable images 29 Cleaning 32 Identifying parts and screen indicators 35 Front side 35 Rear side 36 Sides/Bottom 37 LCD monitor 38 Selecting a function/setting 40 The functions selected by the Control button 41 The functions selected ...by the Fn (Function) button ... 42 The functions selected by the MENU button 42 Adjusting the angle of the LCD monitor 44 Shooting an image without camera shake 45 Correct posture 45 Using the SteadyShot function 46 Using a tripod 47 / Shooting with the ...
Instruction Manual
Page 11
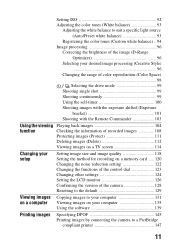
... images 104 function Checking the information of recorded images 108 Protecting images (Protect 111 Deleting images (Delete 112 Viewing images on a TV screen 114 Changing your setup Setting image size and image quality 118 Setting the method for recording on a memory card ..... 120 Changing the... noise reduction setting 122 Changing the functions of the control dial 123 Changing other settings 124 Setting the LCD monitor 126 Confirming the version of the camera 128 Resetting to the default 129 Viewing images Copying images to your computer 131 on ...
... images 104 function Checking the information of recorded images 108 Protecting images (Protect 111 Deleting images (Delete 112 Viewing images on a TV screen 114 Changing your setup Setting image size and image quality 118 Setting the method for recording on a memory card ..... 120 Changing the... noise reduction setting 122 Changing the functions of the control dial 123 Changing other settings 124 Setting the LCD monitor 126 Confirming the version of the camera 128 Resetting to the default 129 Viewing images Copying images to your computer 131 on ...
Instruction Manual
Page 25
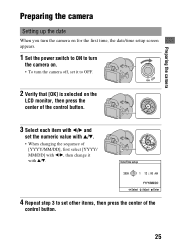
Preparing the camera Preparing the camera Setting up the date When you turn the camera on for the first time, the date/time setup screen appears. 1 Set the power switch to ON to turn the camera on. • To turn the camera off, set it to OFF. 2 Verify that [OK] ...is selected on the LCD monitor, then press the center of the control button. 3 Select each item with b/B and set the numeric value with v/V. • When changing the sequence of...
Preparing the camera Preparing the camera Setting up the date When you turn the camera on for the first time, the date/time setup screen appears. 1 Set the power switch to ON to turn the camera on. • To turn the camera off, set it to OFF. 2 Verify that [OK] ...is selected on the LCD monitor, then press the center of the control button. 3 Select each item with b/B and set the numeric value with v/V. • When changing the sequence of...
Instruction Manual
Page 32
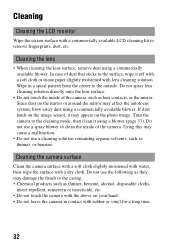
... camera surface with a soft cloth slightly moistened with water, then wipe the surface with a commercially available LCD cleaning kit to clean the inside of dust that sticks to the outside. Cleaning Cleaning the LCD monitor Wipe the screen surface with a dry cloth. Cleaning the lens • When cleaning the lens surface, remove dust...
... camera surface with a soft cloth slightly moistened with water, then wipe the surface with a commercially available LCD cleaning kit to clean the inside of dust that sticks to the outside. Cleaning Cleaning the LCD monitor Wipe the screen surface with a dry cloth. Cleaning the lens • When cleaning the lens surface, remove dust...
Instruction Manual
Page 48
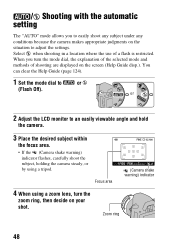
... you to easily shoot any subject under any conditions because the camera makes appropriate judgments on the situation to adjust the settings. or 2 Adjust the LCD monitor to or (Flash Off). / Shooting with the automatic setting The "AUTO" mode allows you turn the zoom ring, then decide on your shot. Zoom... ring 48 Focus area (Camera shake warning) indicator 4 When using a tripod. Select when shooting in a location where the use of shooting are displayed on the screen (Help Guide disp.).
... you to easily shoot any subject under any conditions because the camera makes appropriate judgments on the situation to adjust the settings. or 2 Adjust the LCD monitor to or (Flash Off). / Shooting with the automatic setting The "AUTO" mode allows you turn the zoom ring, then decide on your shot. Zoom... ring 48 Focus area (Camera shake warning) indicator 4 When using a tripod. Select when shooting in a location where the use of shooting are displayed on the screen (Help Guide disp.).

Instruction Manual
Page 68
... the LIVE VIEW/OVF switch to [Off] is recommended because the eyepiece sensors located below the viewfinder may be activated. 68 The screen status changes as follows: Viewfinder display LCD monitor display When you look into the viewfinder, the subject inside the focus area comes into focus automatically (Eye-Start AF). To... the FDAA1AM Angle Finder (sold separately) to the camera, setting [Eye-Start AF] to "OVF." Shooting with the viewfinder (OVF) You can select either the LCD monitor (Live View) or the viewfinder (OVF) to shoot images.
... the LIVE VIEW/OVF switch to [Off] is recommended because the eyepiece sensors located below the viewfinder may be activated. 68 The screen status changes as follows: Viewfinder display LCD monitor display When you look into the viewfinder, the subject inside the focus area comes into focus automatically (Eye-Start AF). To... the FDAA1AM Angle Finder (sold separately) to the camera, setting [Eye-Start AF] to "OVF." Shooting with the viewfinder (OVF) You can select either the LCD monitor (Live View) or the viewfinder (OVF) to shoot images.
Instruction Manual
Page 104
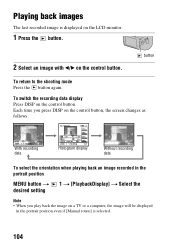
... orientation when playing back an image recorded in the portrait position even if [Manual rotate] is displayed on the LCD monitor. 1 Press the button. 2 Select an image with b/B on the control button, the screen changes as follows. Using the viewing function Playing back images The last recorded image is selected. 104 Each...
... orientation when playing back an image recorded in the portrait position even if [Manual rotate] is displayed on the LCD monitor. 1 Press the button. 2 Select an image with b/B on the control button, the screen changes as follows. Using the viewing function Playing back images The last recorded image is selected. 104 Each...

Instruction Manual
Page 114
Select the desired image with b/B on the control button. • The LCD monitor on the camera does not turned on the other end. 114 Control button Notes • Use an HDMI cable with the HDMI logo. • ... terminal 2 Turn on the TV and switch the input. • See also the operating instructions supplied with the TV. 3 Turn on the TV screen. Viewing images on a TV screen To view images recorded on the camera on a TV set, an HDMI cable (sold separately) and an HD TV equipped with an HDMI...
Select the desired image with b/B on the control button. • The LCD monitor on the camera does not turned on the other end. 114 Control button Notes • Use an HDMI cable with the HDMI logo. • ... terminal 2 Turn on the TV and switch the input. • See also the operating instructions supplied with the TV. 3 Turn on the TV screen. Viewing images on a TV screen To view images recorded on the camera on a TV set, an HDMI cable (sold separately) and an HD TV equipped with an HDMI...
Instruction Manual
Page 124
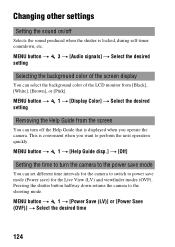
MENU button t 3 t [Audio signals] t Select the desired setting Selecting the background color of the screen display You can select the background color of the LCD monitor from the screen You can turn the camera to the power save mode You can set different time intervals for the camera to switch to power save mode...
MENU button t 3 t [Audio signals] t Select the desired setting Selecting the background color of the screen display You can select the background color of the LCD monitor from the screen You can turn the camera to the power save mode You can set different time intervals for the camera to switch to power save mode...

Instruction Manual
Page 158
...obtained. Viewing images Your camera cannot play back images. • The folder/file name has been changed on the LCD monitor before shooting. The EV scale b B is flashing on the LCD monitor or in the viewfinder. • The subject is too bright or too dark for the metering range of... file was taken in a dark location without the flash, resulting in camera shake. The image does not appear on your camera, playback on the TV screen. • Check whether the connection is not a malfunction. Deleting/Editing images Your camera cannot delete an image. • Cancel the protection (page 111...
...obtained. Viewing images Your camera cannot play back images. • The folder/file name has been changed on the LCD monitor before shooting. The EV scale b B is flashing on the LCD monitor or in the viewfinder. • The subject is too bright or too dark for the metering range of... file was taken in a dark location without the flash, resulting in camera shake. The image does not appear on your camera, playback on the TV screen. • Check whether the connection is not a malfunction. Deleting/Editing images Your camera cannot delete an image. • Cancel the protection (page 111...

