Instruction Manual
Page 3
... the set , and to protect it from overheating, these slots and openings must never be sure the service technician has used replacement parts specified by items placed upon or against them, paying particular attention to the plugs, receptacles, and the point where the cord exits from the wall outlet before cleaning...
... the set , and to protect it from overheating, these slots and openings must never be sure the service technician has used replacement parts specified by items placed upon or against them, paying particular attention to the plugs, receptacles, and the point where the cord exits from the wall outlet before cleaning...
Instruction Manual
Page 7
... "Cyber-shot Handbook" and "Cyber-shot Step-up Guide" ....... 23 Indicators on /setting the clock 13 Shooting images easily 14 Mode dial/Zoom/Flash/Macro/Self-timer/Display 15 Viewing/deleting images 16 Learning the various functions - HOME/Menu 18 Using the HOME screen 18 HOME items 19 Using menu items 20 Menu items 21 Enjoying your camera...
... "Cyber-shot Handbook" and "Cyber-shot Step-up Guide" ....... 23 Indicators on /setting the clock 13 Shooting images easily 14 Mode dial/Zoom/Flash/Macro/Self-timer/Display 15 Viewing/deleting images 16 Learning the various functions - HOME/Menu 18 Using the HOME screen 18 HOME items 19 Using menu items 20 Menu items 21 Enjoying your camera...
Instruction Manual
Page 13
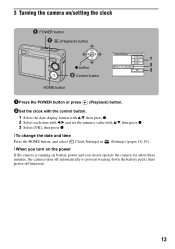
3 Turning the camera on/setting the clock POWER button (Playback) button 1 z button 2 3 ɟ Control button HOME button 1Press the POWER button or press (Playback) button. 2Set the clock with the control button. 1 Select the date display format with v/V, then press z. 2 Select each item with b/B and set the ...numeric value with v/V, then press z. 3 Select [OK], then press z. [ To change the date and time Press the HOME button, and select [ Clock Settings] in (Settings) (pages 18, 19). [ When you turn on the power If the camera is running on...
3 Turning the camera on/setting the clock POWER button (Playback) button 1 z button 2 3 ɟ Control button HOME button 1Press the POWER button or press (Playback) button. 2Set the clock with the control button. 1 Select the date display format with v/V, then press z. 2 Select each item with b/B and set the ...numeric value with v/V, then press z. 3 Select [OK], then press z. [ To change the date and time Press the HOME button, and select [ Clock Settings] in (Settings) (pages 18, 19). [ When you turn on the power If the camera is running on...

Instruction Manual
Page 18
... (Settings) category 1 Select the desired item with v/V on the control button. • This is functional only when you select (Settings). 2 Move to the right with B, select a setting with v/V, then press z. 3 Select a setting with v/V, then press z. • The camera is the gateway screen for all the ...functions of your camera. You can select the shooting mode or playback mode, or change the settings from the HOME screen. HOME/Menu Using...
... (Settings) category 1 Select the desired item with v/V on the control button. • This is functional only when you select (Settings). 2 Move to the right with B, select a setting with v/V, then press z. 3 Select a setting with v/V, then press z. • The camera is the gateway screen for all the ...functions of your camera. You can select the shooting mode or playback mode, or change the settings from the HOME screen. HOME/Menu Using...
Instruction Manual
Page 19
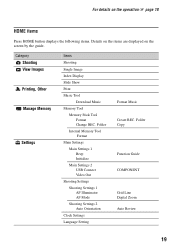
Category Shooting View Images Printing, Other Manage Memory Settings Items Shooting Single Image Index Display Slide Show Print Music Tool Download Music Memory Tool Memory Stick Tool Format Change REC. Folder Copy Function Guide COMPONENT Grid Line Digital Zoom Auto Review 19 Folder Internal Memory Tool Format Main Settings Main Settings 1 Beep Initialize...
Category Shooting View Images Printing, Other Manage Memory Settings Items Shooting Single Image Index Display Slide Show Print Music Tool Download Music Memory Tool Memory Stick Tool Format Change REC. Folder Copy Function Guide COMPONENT Grid Line Digital Zoom Auto Review 19 Folder Internal Memory Tool Format Main Settings Main Settings 1 Beep Initialize...
Instruction Manual
Page 20
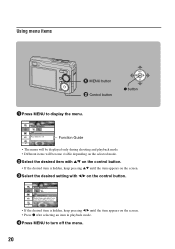
... only during shooting and playback mode. • Different items will become visible depending on the selected mode. 2Select the desired item with v/V on the control button. • If the desired item is hidden, keep pressing v/V until the item appears on the screen. 3Select the desired setting with ...b/B on the control button. • If the desired item is hidden, keep pressing b/B until the item appears on the screen. • Press z after selecting an item in playback mode. 4Press MENU to display the menu. Using menu items MENU button ɟ Control button z button 1Press MENU to...
... only during shooting and playback mode. • Different items will become visible depending on the selected mode. 2Select the desired item with v/V on the control button. • If the desired item is hidden, keep pressing v/V until the item appears on the screen. 3Select the desired setting with ...b/B on the control button. • If the desired item is hidden, keep pressing b/B until the item appears on the screen. • Press z after selecting an item in playback mode. 4Press MENU to display the menu. Using menu items MENU button ɟ Control button z button 1Press MENU to...

Instruction Manual
Page 21
...amount of the image or adds special effects. SteadyShot SETUP Selects the anti-blur mode. Retouches images. Rotates a still image. Only the available items are displayed on the camera mode. REC Mode Selects the continuous shooting method. Prints images using a PictBridge compliant printer. For details on ... menu is available only in the playback mode. Also, the menu items available vary depending on image that you want to reduce the red-eye phenomenon. Menu for shooting Image Size Selects the still image size. Face Detection Detects the faces of images. EV Adjusts...
...amount of the image or adds special effects. SteadyShot SETUP Selects the anti-blur mode. Retouches images. Rotates a still image. Only the available items are displayed on the camera mode. REC Mode Selects the continuous shooting method. Prints images using a PictBridge compliant printer. For details on ... menu is available only in the playback mode. Also, the menu items available vary depending on image that you want to reduce the red-eye phenomenon. Menu for shooting Image Size Selects the still image size. Face Detection Detects the faces of images. EV Adjusts...
Instruction Manual
Page 28
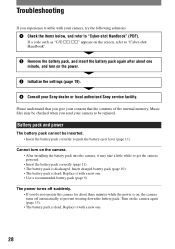
...your Sony dealer or local authorized Sony service facility. Battery pack and power The battery pack cannot be repaired. Replace it with a new one . • Use a recommended battery pack (page 9). The power turns off automatically to "Cyber-shot Handbook" (PDF). Turn on , the camera turns ...off suddenly. • If you do not operate the camera for about one minute, and turn on the power. 3 Initialize the settings (page 19). 4 Consult your camera, try the following solutions. 1 Check the items below, ...
...your Sony dealer or local authorized Sony service facility. Battery pack and power The battery pack cannot be repaired. Replace it with a new one . • Use a recommended battery pack (page 9). The power turns off automatically to "Cyber-shot Handbook" (PDF). Turn on , the camera turns ...off suddenly. • If you do not operate the camera for about one minute, and turn on the power. 3 Initialize the settings (page 19). 4 Consult your camera, try the following solutions. 1 Check the items below, ...
Sony® Guide to Digital Photography (Spring 2007)
Page 24
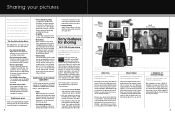
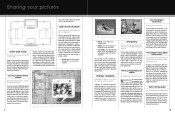
...Cyber-shot® Station cradle or the DSC-W80HDPR bundle connected to your HDTV (sold separately.) Some cameras go ! No processing time to share your still pictures - The electronic photo album With digital pictures, as long as you've got your camera...New construction in . The camera automatically groups pictures by Sony digital cameras are more ways than just cameras. You can even order specialty items such as photo album....your pictures, but the cameras will look amazing - This includes the DSC-W80 camera, DPP-FPHD1 PictureStation® printer and a Cyber-shot Station cradle. There are...
...Cyber-shot® Station cradle or the DSC-W80HDPR bundle connected to your HDTV (sold separately.) Some cameras go ! No processing time to share your still pictures - The electronic photo album With digital pictures, as long as you've got your camera...New construction in . The camera automatically groups pictures by Sony digital cameras are more ways than just cameras. You can even order specialty items such as photo album....your pictures, but the cameras will look amazing - This includes the DSC-W80 camera, DPP-FPHD1 PictureStation® printer and a Cyber-shot Station cradle. There are...
Sony® Guide to Digital Photography (Spring 2007)
Page 25
...; Color balance. and that enables the camera to digital photo prints at a time. Printing from our earlier DSC-F828, V3 and R1 Cyber-shot® digital cameras. The result? So you can make your changes, confident that our non-destructive editing maintains your digital pictures and share them by location. The Sony ImageStation.com website Our comprehensive on your...
...; Color balance. and that enables the camera to digital photo prints at a time. Printing from our earlier DSC-F828, V3 and R1 Cyber-shot® digital cameras. The result? So you can make your changes, confident that our non-destructive editing maintains your digital pictures and share them by location. The Sony ImageStation.com website Our comprehensive on your...

Cyber-shot Handbook
Page 3
HOME/Menu 33 Menu items 36 Using functions for better images 7 Focus - On "image quality" and "... internal memory 20 Basic Operations Using the mode dial 21 Shooting images easily (Auto Adjustment mode 22 Shooting still images (Scene Selection 26 Viewing images 29 Deleting images 31 Learning the various functions - Adjusting the light ...intensity 8 Color - Table of contents Notes on using your camera 2 Basic techniques for shooting Shooting menu 37 Image Size: Selecting the image size Face Detection: Detecting the face...
HOME/Menu 33 Menu items 36 Using functions for better images 7 Focus - On "image quality" and "... internal memory 20 Basic Operations Using the mode dial 21 Shooting images easily (Auto Adjustment mode 22 Shooting still images (Scene Selection 26 Viewing images 29 Deleting images 31 Learning the various functions - Adjusting the light ...intensity 8 Color - Table of contents Notes on using your camera 2 Basic techniques for shooting Shooting menu 37 Image Size: Selecting the image size Face Detection: Detecting the face...

Cyber-shot Handbook
Page 33
... 2 Select a category with b/B on the control button. 3 Select an item with v/V, then press z. • You cannot display the HOME screen when a PictBridge connection or a USB connection is made. • The camera is the basic screen used for accessing the various functions you can access the HOME screen regardless of the shooting/viewing...
... 2 Select a category with b/B on the control button. 3 Select an item with v/V, then press z. • You cannot display the HOME screen when a PictBridge connection or a USB connection is made. • The camera is the basic screen used for accessing the various functions you can access the HOME screen regardless of the shooting/viewing...

Cyber-shot Handbook
Page 34
...Initialize Function Guide Main Settings 2 (page 63) USB Connect Video Out COMPONENT Shooting Settings Shooting Settings 1 (page 65) AF Illuminator AF Mode Grid Line Digital Zoom Shooting Settings 2 (page 67) Auto Orientation Auto Review Clock Settings (page 68) Language Setting (page 69) *Shooting mode selected in the mode... dial will be applied. 34 Learning the various functions - HOME/Menu HOME items Pressing HOME button displays the following items. Details on the items are displayed on the screen by the guide.
...Initialize Function Guide Main Settings 2 (page 63) USB Connect Video Out COMPONENT Shooting Settings Shooting Settings 1 (page 65) AF Illuminator AF Mode Grid Line Digital Zoom Shooting Settings 2 (page 67) Auto Orientation Auto Review Clock Settings (page 68) Language Setting (page 69) *Shooting mode selected in the mode... dial will be applied. 34 Learning the various functions - HOME/Menu HOME items Pressing HOME button displays the following items. Details on the items are displayed on the screen by the guide.

Cyber-shot Handbook
Page 35
... displayed only during shooting and playback mode. • Different items will become visible depending on the selected mode. 2 Select the desired menu item with v/V on the control button. • If the desired item is hidden, keep pressing v/V until the item appears on the screen. 3 Select a setting with b/B.... keep pressing b/B until the setting appears on the screen. • Press z after selecting an item in playback mode. 4 Press MENU to display the menu. HOME/Menu Using the menu items MENU button z button v/V/b/B button Control button 1 Press MENU to turn off the menu. 35 ...
... displayed only during shooting and playback mode. • Different items will become visible depending on the selected mode. 2 Select the desired menu item with v/V on the control button. • If the desired item is hidden, keep pressing v/V until the item appears on the screen. 3 Select a setting with b/B.... keep pressing b/B until the setting appears on the screen. • Press z after selecting an item in playback mode. 4 Press MENU to display the menu. HOME/Menu Using the menu items MENU button z button v/V/b/B button Control button 1 Press MENU to turn off the menu. 35 ...

Cyber-shot Handbook
Page 36
... is available only in the shooting mode, and the viewing menu is limited according to the selected Scene Selection mode (page 28). Only the available items are displayed on the mode dial position. Mode dial position: ( : available) Scene Menu for viewing (page 51) (Delete) (Slide Show) (... Red Eye Reduction SteadyShot SETUP - * - * - - - - - - - - - - - * - - - * - - *The operation is available only in the playback mode. Also, the menu items available vary depending on the screen. Menu items The available menu items vary depending on the camera mode.
... is available only in the shooting mode, and the viewing menu is limited according to the selected Scene Selection mode (page 28). Only the available items are displayed on the mode dial position. Mode dial position: ( : available) Scene Menu for viewing (page 51) (Delete) (Slide Show) (... Red Eye Reduction SteadyShot SETUP - * - * - - - - - - - - - - - * - - - * - - *The operation is available only in the playback mode. Also, the menu items available vary depending on the screen. Menu items The available menu items vary depending on the camera mode.
Cyber-shot Handbook
Page 46
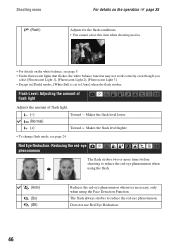
... [Auto] when the flash strobes. Shooting menu (Flash) For details on the operation 1 page 35 Adjusts for the flash conditions. • You cannot select this item when shooting movies. • For details on the white balance, see page 24.
... [Auto] when the flash strobes. Shooting menu (Flash) For details on the operation 1 page 35 Adjusts for the flash conditions. • You cannot select this item when shooting movies. • For details on the white balance, see page 24.

Cyber-shot Handbook
Page 47
...using [Retouch] in [ Shooting Settings] on the operation 1 page 35 • Because it takes about a second until the shutter clicks, hold the camera firmly to prevent the effects of vibration. In such a case, you can stabilize images even when zooming up a far subject. • Battery consumption... is selected. These items appearing in the following cases. - Also, do not let the subject move. • Red-eye reduction may not work properly in this menu...
...using [Retouch] in [ Shooting Settings] on the operation 1 page 35 • Because it takes about a second until the shutter clicks, hold the camera firmly to prevent the effects of vibration. In such a case, you can stabilize images even when zooming up a far subject. • Battery consumption... is selected. These items appearing in the following cases. - Also, do not let the subject move. • Red-eye reduction may not work properly in this menu...
Cyber-shot Handbook
Page 50
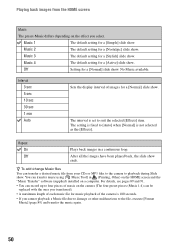
...-Music differs depending on a computer. The setting is fixed to suit the selected [Effects] item. You can be replaced with the ones you transferred). • A maximum length of each music file for music playback of the camera is not selected as the [Effects]. Music 2 The default setting for a [Normal] slide...Nostalgic] slide show . After all the images have been played back, the slide show . Playing back images from your CDs or MP3 files to the camera to playback during Slide show . Interval 3 sec 5 sec 10 sec 30 sec 1 min Auto Sets the display interval of music on the...
...-Music differs depending on a computer. The setting is fixed to suit the selected [Effects] item. You can be replaced with the ones you transferred). • A maximum length of each music file for music playback of the camera is not selected as the [Effects]. Music 2 The default setting for a [Normal] slide...Nostalgic] slide show . After all the images have been played back, the slide show . Playing back images from your CDs or MP3 files to the camera to playback during Slide show . Interval 3 sec 5 sec 10 sec 30 sec 1 min Auto Sets the display interval of music on the...

Cyber-shot Handbook
Page 51
See page 48. (Retouch): Retouching still images after shooting • The trimmed image is recorded as [ Slide ...Focus) Blurs the periphery around a chosen point to signalize a subject. 1 Set the center point of images This item has same function as the newest file in playback mode. Surrounds a chosen point in monochrome to signalize a subject. ...Viewing menu For details on the operation 1 page 35 This section explains the menu items available when you press MENU button in the selected recording folder, and the original image is now selected. ...
See page 48. (Retouch): Retouching still images after shooting • The trimmed image is recorded as [ Slide ...Focus) Blurs the periphery around a chosen point to signalize a subject. 1 Set the center point of images This item has same function as the newest file in playback mode. Surrounds a chosen point in monochrome to signalize a subject. ...Viewing menu For details on the operation 1 page 35 This section explains the menu items available when you press MENU button in the selected recording folder, and the original image is now selected. ...
Cyber-shot Handbook
Page 54
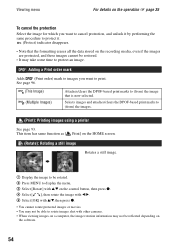
... media, even if the images are protected, and these images cannot be restored. • It may not be able to rotate images shot with other cameras. • When viewing images on a computer, the image rotation information may take some time to protect an image. : Adding a Print...DPOF-based print marks to protect it. (Protect) indicator disappears. • Note that is now selected. This item has same function as [ Print] on the HOME screen. (Rotate): Rotating a still image Rotates a still image. 1 Display the image to be rotated. 2 Press MENU to display the menu. 3 Select [Rotate]...
... media, even if the images are protected, and these images cannot be restored. • It may not be able to rotate images shot with other cameras. • When viewing images on a computer, the image rotation information may take some time to protect an image. : Adding a Print...DPOF-based print marks to protect it. (Protect) indicator disappears. • Note that is now selected. This item has same function as [ Print] on the HOME screen. (Rotate): Rotating a still image Rotates a still image. 1 Display the image to be rotated. 2 Press MENU to display the menu. 3 Select [Rotate]...