
Instruction Manual
Page 2
... appliance, and keep this product. For Customers in a fire or electric shock. Use [ Power Sources This set should still fail to fit, contact your Sony dealer regarding this manual for future reference. For those sets designed to operate from the type of power source indicated on the set. [ Attachments Do...of any kind into the set may cause hazards. If you are unable to insert the plug fully into the power outlet only one way. DSC-W35/W55 Serial No WARNING To reduce fire or shock hazard, do not expose the unit to the presence of uninsulated "dangerous voltage" within the product...
... appliance, and keep this product. For Customers in a fire or electric shock. Use [ Power Sources This set should still fail to fit, contact your Sony dealer regarding this manual for future reference. For those sets designed to operate from the type of power source indicated on the set. [ Attachments Do...of any kind into the set may cause hazards. If you are unable to insert the plug fully into the power outlet only one way. DSC-W35/W55 Serial No WARNING To reduce fire or shock hazard, do not expose the unit to the presence of uninsulated "dangerous voltage" within the product...

Instruction Manual
Page 3
Do not use power-line operated sets near or over a radiator or heat register, or where it is exposed to direct sunlight. [ Lightning For added protection for this indicates a need for service. [ Servicing Do not attempt to service the set yourself as opening or removing covers may expose you to perform routine safety checks (as specified by the manufacturer that it from the wall outlet and disconnect the antenna or cable system. The set may result in performance - If the set does not operate normally when following conditions: - To ensure reliable operation of the set, and ...
Do not use power-line operated sets near or over a radiator or heat register, or where it is exposed to direct sunlight. [ Lightning For added protection for this indicates a need for service. [ Servicing Do not attempt to service the set yourself as opening or removing covers may expose you to perform routine safety checks (as specified by the manufacturer that it from the wall outlet and disconnect the antenna or cable system. The set may result in performance - If the set does not operate normally when following conditions: - To ensure reliable operation of the set, and ...

Instruction Manual
Page 4
... Address: 16530 Via Esprillo, San Diego, CA 92127U.S.A. Telephone No.: 858-942-2230 This device complies with Part 15 of Conformity Trade Name: SONY Model No.: DSC-W55 Responsible Party: Sony Electronics Inc. You can help preserve our environment by returning your used rechargeable batteries to the following two conditions: (1) This device may not... interference received, including interference that may cause undesired operation. Telephone No.: 858-942-2230 This device complies with Part 15 of Conformity Trade Name: SONY Model No.: DSC-W35 Responsible Party: Sony Electronics Inc.
... Address: 16530 Via Esprillo, San Diego, CA 92127U.S.A. Telephone No.: 858-942-2230 This device complies with Part 15 of Conformity Trade Name: SONY Model No.: DSC-W55 Responsible Party: Sony Electronics Inc. You can help preserve our environment by returning your used rechargeable batteries to the following two conditions: (1) This device may not... interference received, including interference that may cause undesired operation. Telephone No.: 858-942-2230 This device complies with Part 15 of Conformity Trade Name: SONY Model No.: DSC-W35 Responsible Party: Sony Electronics Inc.

Instruction Manual
Page 5
...limits are cautioned that this product is connected. - The supplied interface cable must be handed over to the applicable collection point for a Class B digital device, pursuant to Part 15 of the following measures: - By ensuring this product shall not be determined by inappropriate waste handling of correctly, you... are designed to provide reasonable protection against harmful interference in a residential installation. Consult the dealer or an experienced radio/TV technician for a digital device pursuant to Subpart B of Part 15 of California, USA only Perchlorate Material -
...limits are cautioned that this product is connected. - The supplied interface cable must be handed over to the applicable collection point for a Class B digital device, pursuant to Part 15 of the following measures: - By ensuring this product shall not be determined by inappropriate waste handling of correctly, you... are designed to provide reasonable protection against harmful interference in a residential installation. Consult the dealer or an experienced radio/TV technician for a digital device pursuant to Subpart B of Part 15 of California, USA only Perchlorate Material -

Instruction Manual
Page 6
... BSI to BS 1362, (i.e., marked with an or mark) must be sure to this equipment has a detachable fuse cover, be used. Notice for your nearest Sony service station. 6
... BSI to BS 1362, (i.e., marked with an or mark) must be sure to this equipment has a detachable fuse cover, be used. Notice for your nearest Sony service station. 6
Instruction Manual
Page 7
...22 Setup items 23 GB Enjoying your computer 25 Supported Operating Systems for USB connection and application software (supplied 25 Viewing "Cyber-shot Handbook 25 Battery life and memory capacity 26 Battery life and number of images that can be recorded/viewed .......... 26 Number ...of still images and recording time of contents IMPORTANT SAFEGUARDS 2 Read this first 4 Notes on using your camera 8 Getting started 9 Checking the accessories supplied 9 1 Preparing the battery pack 10 2 Inserting the battery pack/a "Memory Stick Duo" (not supplied)...
...22 Setup items 23 GB Enjoying your computer 25 Supported Operating Systems for USB connection and application software (supplied 25 Viewing "Cyber-shot Handbook 25 Battery life and memory capacity 26 Battery life and number of images that can be recorded/viewed .......... 26 Number ...of still images and recording time of contents IMPORTANT SAFEGUARDS 2 Read this first 4 Notes on using your camera 8 Getting started 9 Checking the accessories supplied 9 1 Preparing the battery pack 10 2 Inserting the battery pack/a "Memory Stick Duo" (not supplied)...
Instruction Manual
Page 8
...dust-proof, nor splashproof, nor water-proof. However, there may be some cases may not be repairable. • Do not aim the camera at the sun or other materials may be contrary to the provisions of the copyright laws. [ No compensation for contents of the recording ...inability to record images, this manual are not guaranteed. [ Warning on copyright Television programs, films, videotapes, and other bright light. Notes on using your camera [ Internal memory and "Memory Stick Duo" back up copy. [ Notes on recording/playback • Before you record, make a trial recording to ...
...dust-proof, nor splashproof, nor water-proof. However, there may be some cases may not be repairable. • Do not aim the camera at the sun or other materials may be contrary to the provisions of the copyright laws. [ No compensation for contents of the recording ...inability to record images, this manual are not guaranteed. [ Warning on copyright Television programs, films, videotapes, and other bright light. Notes on using your camera [ Internal memory and "Memory Stick Duo" back up copy. [ Notes on recording/playback • Before you record, make a trial recording to ...
Instruction Manual
Page 9
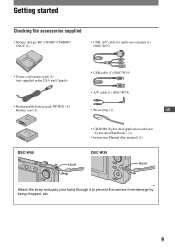
... Canada) • USB cable (1) (DSC-W35) • A/V cable (1) (DSC-W35) • Rechargeable battery pack NP-BG1 (1)/ Battery case (1) • Wrist strap (1) GB DSC-W55 Hook • CD-ROM (Cyber-shot application software/ "Cyber-shot Handbook") (1) • Instruction Manual (this manual) (1) DSC-W35 Hook Attach the strap and pass your hand through it to prevent the camera from damage by being...
... Canada) • USB cable (1) (DSC-W35) • A/V cable (1) (DSC-W35) • Rechargeable battery pack NP-BG1 (1)/ Battery case (1) • Wrist strap (1) GB DSC-W55 Hook • CD-ROM (Cyber-shot application software/ "Cyber-shot Handbook") (1) • Instruction Manual (this manual) (1) DSC-W35 Hook Attach the strap and pass your hand through it to prevent the camera from damage by being...

Instruction Manual
Page 10
...), the charge will last slightly longer. [ Charging time Full charge time Approx. 330 min. If you continue charging the battery pack for use with compatible Sony batteries. 10 Charging may take longer under certain circumstances or conditions. • For details on , and charging starts.
...), the charge will last slightly longer. [ Charging time Full charge time Approx. 330 min. If you continue charging the battery pack for use with compatible Sony batteries. 10 Charging may take longer under certain circumstances or conditions. • For details on , and charging starts.
Instruction Manual
Page 11
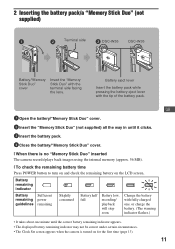
...8226; The displayed battery remaining indicator may not be correct under certain circumstances. • The Clock Set screen appears when the camera is no "Memory Stick Duo" inserted The camera records/plays back images using the internal memory (approx. 56 MB). [ To check the remaining battery time Press POWER button to... Duo" cover. [ When there is turned on the LCD screen. 2 Inserting the battery pack/a "Memory Stick Duo" (not supplied) ɟ Terminal side ɠ DSC-W55 DSC-W35 Battery/"Memory Stick Duo" cover Insert the "Memory Stick Duo" with the terminal side facing the lens.
...8226; The displayed battery remaining indicator may not be correct under certain circumstances. • The Clock Set screen appears when the camera is no "Memory Stick Duo" inserted The camera records/plays back images using the internal memory (approx. 56 MB). [ To check the remaining battery time Press POWER button to... Duo" cover. [ When there is turned on the LCD screen. 2 Inserting the battery pack/a "Memory Stick Duo" (not supplied) ɟ Terminal side ɠ DSC-W55 DSC-W35 Battery/"Memory Stick Duo" cover Insert the "Memory Stick Duo" with the terminal side facing the lens.

Instruction Manual
Page 12
Slide the battery eject lever. • Be sure not to drop the battery pack. • Never remove the battery pack/"Memory Stick Duo" when the access lamp is not lit, then push the "Memory Stick Duo" in once. "Memory Stick Duo" Battery pack Make sure that the access lamp is lit, otherwise the data may be destroyed. 12 [ To remove the battery pack/"Memory Stick Duo" Open the battery/"Memory Stick Duo" cover.
Slide the battery eject lever. • Be sure not to drop the battery pack. • Never remove the battery pack/"Memory Stick Duo" when the access lamp is not lit, then push the "Memory Stick Duo" in once. "Memory Stick Duo" Battery pack Make sure that the access lamp is lit, otherwise the data may be destroyed. 12 [ To remove the battery pack/"Memory Stick Duo" Open the battery/"Memory Stick Duo" cover.
Instruction Manual
Page 13
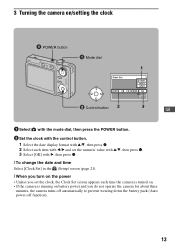
3 Turning the camera on/setting the clock POWER button Mode dial 1 ɟ Control button 2 3 GB 1 Select with the mode dial, then press the POWER button. 2 Set the clock ... • Unless you set the clock, the Clock Set screen appears each time the camera is turned on. • If the camera is running on battery power and you do not operate the camera for about three minutes, the camera turns off automatically to prevent wearing down the battery pack (Auto power-off function...
3 Turning the camera on/setting the clock POWER button Mode dial 1 ɟ Control button 2 3 GB 1 Select with the mode dial, then press the POWER button. 2 Set the clock ... • Unless you set the clock, the Clock Set screen appears each time the camera is turned on. • If the camera is running on battery power and you do not operate the camera for about three minutes, the camera turns off automatically to prevent wearing down the battery pack (Auto power-off function...
Instruction Manual
Page 14
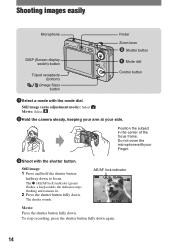
... shutter button. Position the subject in the center of the focus frame. The shutter sounds. Still image (auto adjustment mode): Select . Movie: Select . 2Hold the camera steady, keeping your arm at your Finger. 3Shoot with the mode dial. To stop recording, press the shutter button fully down to focus. Still image...
... shutter button. Position the subject in the center of the focus frame. The shutter sounds. Still image (auto adjustment mode): Select . Movie: Select . 2Hold the camera steady, keeping your arm at your Finger. 3Shoot with the mode dial. To stop recording, press the shutter button fully down to focus. Still image...
Instruction Manual
Page 15
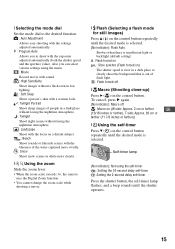
... vividly. : Snow Shoot snow scenes in white more clearly. [ Using the zoom Slide the zoom lever. • When the zoom scale exceeds 3×, the camera uses the Digital Zoom function. • You cannot change the zoom scale while shooting a movie. [ Flash (Selecting a flash mode for still images) Press v ( ) on the control button...
... vividly. : Snow Shoot snow scenes in white more clearly. [ Using the zoom Slide the zoom lever. • When the zoom scale exceeds 3×, the camera uses the Digital Zoom function. • You cannot change the zoom scale while shooting a movie. [ Flash (Selecting a flash mode for still images) Press v ( ) on the control button...

Instruction Manual
Page 16
Toward +: Brightens an image. To turn off Movies Image size Guidelines FINE 640 : 640(Fine) Display on TV (high quality) : STD 640 Display on TV (standard) 640(Standard) 1 6 0 : 160 For E-mail [ On the recordable number of still images and recordable time of movies Recordable number of still images and recordable time of movies vary depending on the control button, then press v/V to adjust the exposure. Histogram on Indicators off the EV adjustment bar, press the b button again. [ DISP Changing the screen display Each time you press the DISP (Screen display switch) ...
Toward +: Brightens an image. To turn off Movies Image size Guidelines FINE 640 : 640(Fine) Display on TV (high quality) : STD 640 Display on TV (standard) 640(Standard) 1 6 0 : 160 For E-mail [ On the recordable number of still images and recordable time of movies Recordable number of still images and recordable time of movies vary depending on the control button, then press v/V to adjust the exposure. Histogram on Indicators off the EV adjustment bar, press the b button again. [ DISP Changing the screen display Each time you press the DISP (Screen display switch) ...
Instruction Manual
Page 17
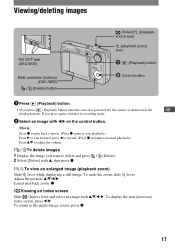
... an image with v/V/b/B. Viewing/deleting images A/V OUT jack (DSC-W35) Multi connector (bottom) (DSC-W55) (Delete) button (Index)/ (playback zoom) lever (playback zoom) lever (Playback) button ɟ Control button 1 Press (Playback) button. • If you press (Playback) button when the camera is powered off, the camera is turned on the control button. To display the...
... an image with v/V/b/B. Viewing/deleting images A/V OUT jack (DSC-W35) Multi connector (bottom) (DSC-W55) (Delete) button (Index)/ (playback zoom) lever (playback zoom) lever (Playback) button ɟ Control button 1 Press (Playback) button. • If you press (Playback) button when the camera is powered off, the camera is turned on the control button. To display the...
Instruction Manual
Page 18
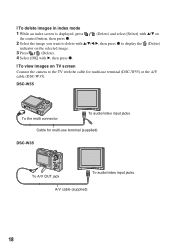
DSC-W55 To the multi connector To audio/video input jacks Cable for multi-use terminal (supplied) DSC-W35 To A/V OUT jack To audio/video input jacks A/V cable (supplied) 18 [ To delete images in index mode 1 While an index screen is displayed, press (... press z to display the (Delete) indicator on the selected image. 3 Press (Delete). 4 Select [OK] with B, then press z. [ To view images on TV screen Connect the camera to the TV with the cable for multi-use terminal (DSC-W55) or the A/V cable...
DSC-W55 To the multi connector To audio/video input jacks Cable for multi-use terminal (supplied) DSC-W35 To A/V OUT jack To audio/video input jacks A/V cable (supplied) 18 [ To delete images in index mode 1 While an index screen is displayed, press (... press z to display the (Delete) indicator on the selected image. 3 Press (Delete). 4 Select [OK] with B, then press z. [ To view images on TV screen Connect the camera to the TV with the cable for multi-use terminal (DSC-W55) or the A/V cable...
Instruction Manual
Page 19
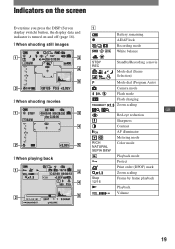
... playing back A z M WB Battery remaining AE/AF lock Recording mode White balance STBY REC Standby/Recording a movie Mode dial (Scene Selection) Mode dial (Program Auto) Camera mode SL Flash mode Flash charging 1.3 Zoom scaling GB Red-eye reduction Sharpness Contrast ON AF illuminator Metering mode RICH NATURAL SEPIA B&W Color mode Playback...
... playing back A z M WB Battery remaining AE/AF lock Recording mode White balance STBY REC Standby/Recording a movie Mode dial (Scene Selection) Mode dial (Program Auto) Camera mode SL Flash mode Flash charging 1.3 Zoom scaling GB Red-eye reduction Sharpness Contrast ON AF illuminator Metering mode RICH NATURAL SEPIA B&W Color mode Playback...

Instruction Manual
Page 20
B S AF M AF 1.0m Macro AF mode AF range finder frame indicator Focus preset distance EV adjustment bar V Darker v Brighter 101-0012 C 7M 3:2 5M 3M 2M 1M VGA 16:9 FINE 640 STD 640 160 FINE STD 101 101 00:00:00 [00:28:25] 1/30" 400 C:32:00 Adjusting EV Folder-file number Playback bar PictBridge connecting Image size Image quality Recording folder Change folder Playback folder Remaining internal memory capacity Remaining "Memory Stick" capacity Recording time [maximum recordable time] Multi Burst interval Remaining number of recordable images Self-timer Self-diagnosis display ISO ...
B S AF M AF 1.0m Macro AF mode AF range finder frame indicator Focus preset distance EV adjustment bar V Darker v Brighter 101-0012 C 7M 3:2 5M 3M 2M 1M VGA 16:9 FINE 640 STD 640 160 FINE STD 101 101 00:00:00 [00:28:25] 1/30" 400 C:32:00 Adjusting EV Folder-file number Playback bar PictBridge connecting Image size Image quality Recording folder Change folder Playback folder Remaining internal memory capacity Remaining "Memory Stick" capacity Recording time [maximum recordable time] Multi Burst interval Remaining number of recordable images Self-timer Self-diagnosis display ISO ...
Instruction Manual
Page 21
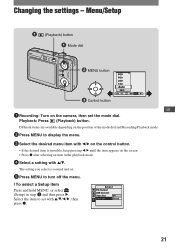
The setting you select is invisible, keep pressing b/B until the item appears on the camera, then set . 5 Press MENU to display the menu. 3 Select the desired menu item with v/V/b/B, then press z. 21 Menu/Setup (Playback) button Mode dial ɟ MENU ...
The setting you select is invisible, keep pressing b/B until the item appears on the camera, then set . 5 Press MENU to display the menu. 3 Select the desired menu item with v/V/b/B, then press z. 21 Menu/Setup (Playback) button Mode dial ɟ MENU ...
