Instruction Manual
Page 1
GB © 2009 Sony Corporation 4-140-272-11(1) Digital Still Camera Instruction Manual DSC-W210/W215/W220/W230 Before operating the unit, please read "Cybershot Handbook" (PDF) and "Cyber-shot Step-up Guide" on advanced operations, please read this manual thoroughly, and retain it for future reference. For details on the CD-ROM (supplied) using a computer.
GB © 2009 Sony Corporation 4-140-272-11(1) Digital Still Camera Instruction Manual DSC-W210/W215/W220/W230 Before operating the unit, please read "Cybershot Handbook" (PDF) and "Cyber-shot Step-up Guide" on advanced operations, please read this manual thoroughly, and retain it for future reference. For details on the CD-ROM (supplied) using a computer.
Instruction Manual
Page 2
Model No. If the shape of the plug does not fit the power outlet, use an attachment plug adaptor of the proper configuration for the power outlet. 2 Refer to rain or moisture. DSC-W210/W215/W220/W230 Serial No WARNING To reduce fire or shock hazard, do not expose the unit to these numbers whenever you call upon your Sony dealer regarding this product. Owner's Record The model and serial numbers are located on the bottom. Record the serial number in the space provided below.
Model No. If the shape of the plug does not fit the power outlet, use an attachment plug adaptor of the proper configuration for the power outlet. 2 Refer to rain or moisture. DSC-W210/W215/W220/W230 Serial No WARNING To reduce fire or shock hazard, do not expose the unit to these numbers whenever you call upon your Sony dealer regarding this product. Owner's Record The model and serial numbers are located on the bottom. Record the serial number in the space provided below.

Instruction Manual
Page 3
...; Do not disassemble. • Do not crush and do not allow metal objects to come into contact with the same or equivalent type recommended by Sony. • Dispose of used rechargeable batteries to the wall outlet (wall socket). If some trouble occurs while using a genuine... accept any shock or force such as hammering, dropping or stepping on it is connected to the collection and recycling location nearest you. This Class B digital apparatus complies with Part 15 of the FCC Rules. CAUTION [ Battery pack If the battery pack is mishandled, the battery pack can charge the battery...
...; Do not disassemble. • Do not crush and do not allow metal objects to come into contact with the same or equivalent type recommended by Sony. • Dispose of used rechargeable batteries to the wall outlet (wall socket). If some trouble occurs while using a genuine... accept any shock or force such as hammering, dropping or stepping on it is connected to the collection and recycling location nearest you. This Class B digital apparatus complies with Part 15 of the FCC Rules. CAUTION [ Battery pack If the battery pack is mishandled, the battery pack can charge the battery...
Instruction Manual
Page 4
...complies with Part 15 of Conformity Trade Name: SONY Model No.: DSC-W210, DSC-W215 Responsible Party: Sony Electronics Inc. If you have any questions about this product, you may call: Sony Customer Information Center 1-800-222-SONY (7669) The number below is subject to ...92127U.S.A. Declaration of Conformity Trade Name: SONY Model No.: DSC-W230 Responsible Party: Sony Electronics Inc. Operation is for the FCC related matters only. [ Regulatory Information Declaration of Conformity Trade Name: SONY Model No.: DSC-W220 Responsible Party: Sony Electronics Inc. For Customers in this manual...
...complies with Part 15 of Conformity Trade Name: SONY Model No.: DSC-W210, DSC-W215 Responsible Party: Sony Electronics Inc. If you have any questions about this product, you may call: Sony Customer Information Center 1-800-222-SONY (7669) The number below is subject to ...92127U.S.A. Declaration of Conformity Trade Name: SONY Model No.: DSC-W230 Responsible Party: Sony Electronics Inc. Operation is for the FCC related matters only. [ Regulatory Information Declaration of Conformity Trade Name: SONY Model No.: DSC-W220 Responsible Party: Sony Electronics Inc. For Customers in this manual...

Instruction Manual
Page 5
...its packaging indicates that this product. The Authorized Representative for the customers in the countries applying EU Directives The manufacturer of this product is Sony Deutschland GmbH, Hedelfinger Strasse 61, 70327 Stuttgart, Germany. By ensuring this product is encouraged to try to correct the interference by turning ... receiving antenna. - [ Note: This equipment has been tested and found compliant with the limits set out in the EMC Directive for a digital device pursuant to Subpart B of Part 15 of FCC Rules. Consult the dealer or an experienced radio/TV technician for a Class...
...its packaging indicates that this product. The Authorized Representative for the customers in the countries applying EU Directives The manufacturer of this product is Sony Deutschland GmbH, Hedelfinger Strasse 61, 70327 Stuttgart, Germany. By ensuring this product is encouraged to try to correct the interference by turning ... receiving antenna. - [ Note: This equipment has been tested and found compliant with the limits set out in the EMC Directive for a digital device pursuant to Subpart B of Part 15 of FCC Rules. Consult the dealer or an experienced radio/TV technician for a Class...

Instruction Manual
Page 6
... electronic equipment. Notice for customers in the United Kingdom A moulded plug complying with BS 1363 is fitted to the applicable collection point for your nearest Sony service station. 6 If the plug supplied with this equipment has a detachable fuse cover, be sure to attach the fuse cover after you will be treated...
... electronic equipment. Notice for customers in the United Kingdom A moulded plug complying with BS 1363 is fitted to the applicable collection point for your nearest Sony service station. 6 If the plug supplied with this equipment has a detachable fuse cover, be sure to attach the fuse cover after you will be treated...
Instruction Manual
Page 7
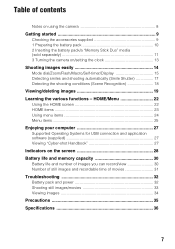
...Using menu items 24 Menu items 25 Enjoying your computer 27 Supported Operating Systems for USB connection and application software (supplied 27 Viewing "Cyber-shot Handbook 27 Indicators on /setting the clock 13 Shooting images easily 14 Mode dial/Zoom/Flash/Macro/Self-timer/Display 15 Detecting smiles... pack/a "Memory Stick Duo" media (sold separately 11 3 Turning the camera on the screen 28 Battery life and memory capacity 30 Battery life and number of images you can record/view 30 Number of still images and recordable time of movies 31 Troubleshooting 32 Battery pack and power...
...Using menu items 24 Menu items 25 Enjoying your computer 27 Supported Operating Systems for USB connection and application software (supplied 27 Viewing "Cyber-shot Handbook 27 Indicators on /setting the clock 13 Shooting images easily 14 Mode dial/Zoom/Flash/Macro/Self-timer/Display 15 Detecting smiles... pack/a "Memory Stick Duo" media (sold separately 11 3 Turning the camera on the screen 28 Battery life and memory capacity 30 Battery life and number of images you can record/view 30 Number of still images and recordable time of movies 31 Troubleshooting 32 Battery pack and power...
Instruction Manual
Page 8
..., make a trial recording to make a backup copy to the provisions of the copyright laws. [ No compensation for damaged content or recording failure Sony cannot compensate for effective use the camera near a location that other bright light. Insert a charged battery pack and turn off . [ Warning on the LCD screen and lens • The...
..., make a trial recording to make a backup copy to the provisions of the copyright laws. [ No compensation for damaged content or recording failure Sony cannot compensate for effective use the camera near a location that other bright light. Insert a charged battery pack and turn off . [ Warning on the LCD screen and lens • The...
Instruction Manual
Page 9
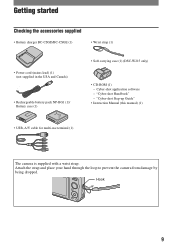
... the loop to prevent the camera from damage by being dropped. Hook 9 "Cyber-shot Handbook" - "Cyber-shot Step-up Guide" • Instruction Manual (this manual) (1) • USB, A/V cable for multi-use terminal (1) The camera is supplied with a wrist strap.... Getting started Checking the accessories supplied • Battery charger BC-CSGD/BC-CSGE (1) • Wrist strap (1) • Power cord (mains lead) (1) (not supplied in the USA and Canada) • Rechargeable battery pack NP-BG1 (1)/ Battery case (1) • Soft carrying case (1) (DSC...
... the loop to prevent the camera from damage by being dropped. Hook 9 "Cyber-shot Handbook" - "Cyber-shot Step-up Guide" • Instruction Manual (this manual) (1) • USB, A/V cable for multi-use terminal (1) The camera is supplied with a wrist strap.... Getting started Checking the accessories supplied • Battery charger BC-CSGD/BC-CSGE (1) • Wrist strap (1) • Power cord (mains lead) (1) (not supplied in the USA and Canada) • Rechargeable battery pack NP-BG1 (1)/ Battery case (1) • Soft carrying case (1) (DSC...
Instruction Manual
Page 10
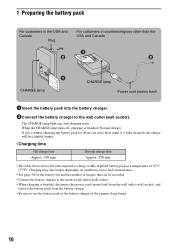
... pack at a temperature of 25°C (77°F). If you continue charging the battery pack for the battery life and the number of the genuine Sony brand. 10 Normal charge time Approx. 270 min. • The table above shows the time required to the wall outlet (wall socket). The CHARGE lamp...
... pack at a temperature of 25°C (77°F). If you continue charging the battery pack for the battery life and the number of the genuine Sony brand. 10 Normal charge time Approx. 270 min. • The table above shows the time required to the wall outlet (wall socket). The CHARGE lamp...
Instruction Manual
Page 11
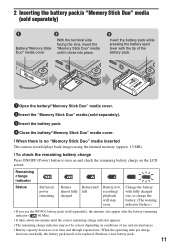
..." media (sold separately). 3 Insert the battery pack. 4 Close the battery/"Memory Stick Duo" media cover. [ When there is no "Memory Stick Duo" media inserted The camera records/plays back images using the internal memory (approx. 15 MB). [ To check the remaining battery charge Press ON/OFF (Power) button to be correct...
..." media (sold separately). 3 Insert the battery pack. 4 Close the battery/"Memory Stick Duo" media cover. [ When there is no "Memory Stick Duo" media inserted The camera records/plays back images using the internal memory (approx. 15 MB). [ To check the remaining battery charge Press ON/OFF (Power) button to be correct...

Instruction Manual
Page 12
Be sure not to data in once. Slide the battery eject lever. "Memory Stick Duo" media Battery pack Make sure that the access lamp is lit. [ To remove the battery pack/"Memory Stick Duo" media Open the battery/"Memory Stick Duo" media cover. This may cause damage to drop the battery pack. • Never remove the battery pack/"Memory Stick Duo" media when the access lamp is not lit, then push the "Memory Stick Duo" media in the "Memory Stick Duo" media/internal memory. 12
Be sure not to data in once. Slide the battery eject lever. "Memory Stick Duo" media Battery pack Make sure that the access lamp is lit. [ To remove the battery pack/"Memory Stick Duo" media Open the battery/"Memory Stick Duo" media cover. This may cause damage to drop the battery pack. • Never remove the battery pack/"Memory Stick Duo" media when the access lamp is not lit, then push the "Memory Stick Duo" media in the "Memory Stick Duo" media/internal memory. 12

Instruction Manual
Page 13
... power is turned on • Once the battery pack is inserted in the camera, it may take time before operation becomes possible. • If the camera is running on battery power and you do not operate the camera for superimposing dates on /setting the clock ON/OFF (Power) button Control button... v/V, then press z. 2 Select each item with b/B and set the numeric value with v/V, then press z. 3 Select [OK], then press z. • The camera does not have a feature for about three minutes, the camera turns off automatically to prevent wearing down the battery pack (Auto power-off function). 13
... power is turned on • Once the battery pack is inserted in the camera, it may take time before operation becomes possible. • If the camera is running on battery power and you do not operate the camera for superimposing dates on /setting the clock ON/OFF (Power) button Control button... v/V, then press z. 2 Select each item with b/B and set the numeric value with v/V, then press z. 3 Select [OK], then press z. • The camera does not have a feature for about three minutes, the camera turns off automatically to prevent wearing down the battery pack (Auto power-off function). 13
Instruction Manual
Page 14
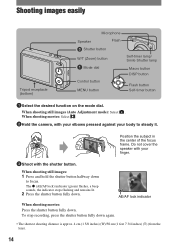
... down again. • The shortest shooting distance is approx. 4 cm (1 5/8 inches) (W)/50 cm (1 feet 7 3/4 inches) (T) (from the lens). 14 When shooting movies: Select . 2Hold the camera, with the shutter button. To stop recording, press the shutter button fully down . AE/AF lock indicator When shooting movies: Press the shutter button fully... Self-timer lamp/ Smile Shutter lamp Macro button DISP button Flash button Self-timer button 1Select the desired function on the mode dial. When shooting still images: 1 Press and hold the shutter button halfway down . When shooting...
... down again. • The shortest shooting distance is approx. 4 cm (1 5/8 inches) (W)/50 cm (1 feet 7 3/4 inches) (T) (from the lens). 14 When shooting movies: Select . 2Hold the camera, with the shutter button. To stop recording, press the shutter button fully down . AE/AF lock indicator When shooting movies: Press the shutter button fully... Self-timer lamp/ Smile Shutter lamp Macro button DISP button Flash button Self-timer button 1Select the desired function on the mode dial. When shooting still images: 1 Press and hold the shutter button halfway down . When shooting...
Instruction Manual
Page 15
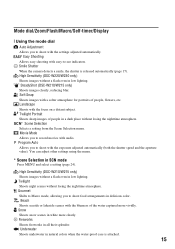
.../Zoom/Flash/Macro/Self-timer/Display [ Using the mode dial Auto Adjustment Allows you to shoot with audio. Smile Shutter When the camera detects a smile, the shutter is attached. 15 Movie Mode Allows you to shoot with a softer atmosphere for portraits of people, ...with the blueness of people in delicious color. Underwater Shoots underwater in all their splendor. SteadyShot (DSC-W210/W215 only) Shoots images clearly, reducing blur. High Sensitivity (DSC-W220/W230 only) Shoots images without losing the nighttime atmosphere. Soft Snap Shoots images with the exposure adjusted ...
.../Zoom/Flash/Macro/Self-timer/Display [ Using the mode dial Auto Adjustment Allows you to shoot with audio. Smile Shutter When the camera detects a smile, the shutter is attached. 15 Movie Mode Allows you to shoot with a softer atmosphere for portraits of people, ...with the blueness of people in delicious color. Underwater Shoots underwater in all their splendor. SteadyShot (DSC-W210/W215 only) Shoots images clearly, reducing blur. High Sensitivity (DSC-W220/W230 only) Shoots images without losing the nighttime atmosphere. Soft Snap Shoots images with the exposure adjusted ...
Instruction Manual
Page 16
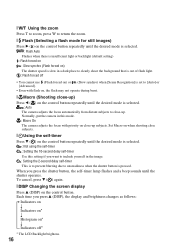
...( ) on the control button. [ W/T Using the zoom Press T to zoom, press W to return the zoom. [ Flash (Selecting a flash mode for still images) Press B ( ) on the control button repeatedly until the desired mode is selected. : Flash Auto Flashes when there is insufficient light or backlight (default ... : Setting the 2-second delay self-timer This is to prevent blurring due to unsteadiness when the shutter button is pressed. Normally, put the camera in this setting if you press v (DISP), the display and brightness changes as follows: Indicators on r Indicators on* r Histogram on* ...
...( ) on the control button. [ W/T Using the zoom Press T to zoom, press W to return the zoom. [ Flash (Selecting a flash mode for still images) Press B ( ) on the control button repeatedly until the desired mode is selected. : Flash Auto Flashes when there is insufficient light or backlight (default ... : Setting the 2-second delay self-timer This is to prevent blurring due to unsteadiness when the shutter button is pressed. Normally, put the camera in this setting if you press v (DISP), the display and brightness changes as follows: Indicators on r Indicators on* r Histogram on* ...
Instruction Manual
Page 17
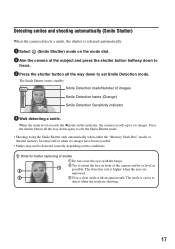
...higher when the eyes are showing. 17 The smile is released automatically. 1 Select (Smile Shutter) mode on the mode dial. 2 Aim the camera at the subject and press the shutter button halfway down to focus. 3 Press the shutter button all the way down to set Smile Detection ...mode. The Smile Shutter enters standby. Detecting smiles and shooting automatically (Smile Shutter) When the camera detects a smile, the shutter is easier to exit the Smile Shutter mode. • Shooting using the Smile Shutter ends automatically when either the ...
...higher when the eyes are showing. 17 The smile is released automatically. 1 Select (Smile Shutter) mode on the mode dial. 2 Aim the camera at the subject and press the shutter button halfway down to focus. 3 Press the shutter button all the way down to set Smile Detection ...mode. The Smile Shutter enters standby. Detecting smiles and shooting automatically (Smile Shutter) When the camera detects a smile, the shutter is easier to exit the Smile Shutter mode. • Shooting using the Smile Shutter ends automatically when either the ...

Instruction Manual
Page 18
... image is shot as Scene Recognition [Off]. 18 When using Digital Zoom z When the camera recognizes the scene Setting value icon Scene Recognition icon When the camera recognizes the scene, (Twilight), (Twilight Portrait), (Twilight using scene recognition. (A total of two shots) •... use Scene Recognition. : Auto When the camera recognizes the scene, it switches to the optimal settings and shoots the image. : Advanced The camera shoots one image without using the scene recognition function and another image using a tripod) (DSC-W220/W230 only), (Backlight), (Backlight Portrait) appears...
... image is shot as Scene Recognition [Off]. 18 When using Digital Zoom z When the camera recognizes the scene Setting value icon Scene Recognition icon When the camera recognizes the scene, (Twilight), (Twilight Portrait), (Twilight using scene recognition. (A total of two shots) •... use Scene Recognition. : Auto When the camera recognizes the scene, it switches to the optimal settings and shoots the image. : Advanced The camera shoots one image without using the scene recognition function and another image using a tripod) (DSC-W220/W230 only), (Backlight), (Backlight Portrait) appears...
Instruction Manual
Page 19
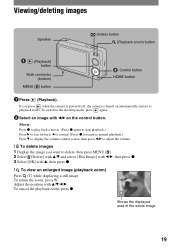
... and select [This Image] with b/B, then press z. 3 Select [OK] with v, then press z. [ To view an enlarged image (playback zoom) Press (T) while displaying a still image. Movie: Press z to play back a movie. (Press z again to stop playback.) Press B to fast forward, b to rewind. (Press z to return to normal ...volume control screen, then press b/B to adjust the volume. [ To delete images 1 Display the image you press when the camera is powered off, the camera is turned on the control button. Adjust the position with b/B on automatically and set to the shooting mode, press again. ...
... and select [This Image] with b/B, then press z. 3 Select [OK] with v, then press z. [ To view an enlarged image (playback zoom) Press (T) while displaying a still image. Movie: Press z to play back a movie. (Press z again to stop playback.) Press B to fast forward, b to rewind. (Press z to return to normal ...volume control screen, then press b/B to adjust the volume. [ To delete images 1 Display the image you press when the camera is powered off, the camera is turned on the control button. Adjust the position with b/B on automatically and set to the shooting mode, press again. ...
Instruction Manual
Page 20
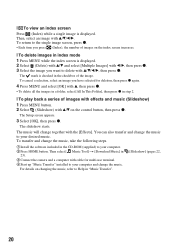
... the index screen is displayed. To transfer and change the music. For details on the index screen increases. [ To delete images in 23). 3 Connect the camera and a computer with v/V/b/B, then press z. The mark is checked in the checkbox of images with effects and music (Slideshow) 1 Press MENU button. 2 Select (Slideshow) with...
... the index screen is displayed. To transfer and change the music. For details on the index screen increases. [ To delete images in 23). 3 Connect the camera and a computer with v/V/b/B, then press z. The mark is checked in the checkbox of images with effects and music (Slideshow) 1 Press MENU button. 2 Select (Slideshow) with...
