Instruction Manual
Page 2
...by the manufacturer, as they may cause hazards. If the plug should be operated only from battery power, or other ). Do not defeat the safety purpose of power source indicated on the ...and serial numbers are unable to insert the plug fully into the outlet, try reversing the plug. DSC-W150/W170 Serial No WARNING To reduce fire or shock hazard, do not expose the unit to the operating... before operating the appliance, and keep this product. Refer to your home, consult your Sony dealer regarding this manual for future reference. This plug will fit into the power outlet only...
...by the manufacturer, as they may cause hazards. If the plug should be operated only from battery power, or other ). Do not defeat the safety purpose of power source indicated on the ...and serial numbers are unable to insert the plug fully into the outlet, try reversing the plug. DSC-W150/W170 Serial No WARNING To reduce fire or shock hazard, do not expose the unit to the operating... before operating the appliance, and keep this product. Refer to your home, consult your Sony dealer regarding this manual for future reference. This plug will fit into the power outlet only...
Instruction Manual
Page 4
....: 858-942-2230 This device complies with Part 15 of Conformity Trade Name: SONY Model No.: DSC-W170 Responsible Party: Sony Electronics Inc. Otherwise, fire or injury may cause undesired operation. 4 You can help preserve our environment by returning your used rechargeable batteries to excessive heat such as sunshine, fire or the like. Address: 16530...
....: 858-942-2230 This device complies with Part 15 of Conformity Trade Name: SONY Model No.: DSC-W170 Responsible Party: Sony Electronics Inc. Otherwise, fire or injury may cause undesired operation. 4 You can help preserve our environment by returning your used rechargeable batteries to excessive heat such as sunshine, fire or the like. Address: 16530...
Instruction Manual
Page 6
... negative consequences for EMC and product safety is Sony Deutschland GmbH, Hedelfinger Strasse 61, 70327 Stuttgart, Germany. In case of products that for safety, performance or data integrity reasons require a permanent connection with an incorporated battery, this equipment has a detachable fuse cover, ...plug complying with an or mark) must be replaced, a fuse of the battery. For more detailed information about recycling of this product or battery, please contact your local Civic Office, your nearest Sony service station. 6 Notice for customers in the plug supplied need to BS 1362...
... negative consequences for EMC and product safety is Sony Deutschland GmbH, Hedelfinger Strasse 61, 70327 Stuttgart, Germany. In case of products that for safety, performance or data integrity reasons require a permanent connection with an incorporated battery, this equipment has a detachable fuse cover, ...plug complying with an or mark) must be replaced, a fuse of the battery. For more detailed information about recycling of this product or battery, please contact your local Civic Office, your nearest Sony service station. 6 Notice for customers in the plug supplied need to BS 1362...
Instruction Manual
Page 7
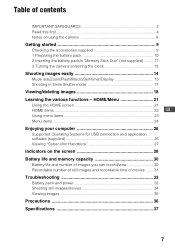
...computer 26 Supported Operating Systems for USB connection and application software (supplied 26 Viewing "Cyber-shot Handbook 27 Indicators on the screen 28 Battery life and memory capacity 30 Battery life and number of images you can record/view 30 Recordable number of still ...IMPORTANT SAFEGUARDS 2 Read this first 4 Notes on using the camera 8 Getting started 9 Checking the accessories supplied 9 1 Preparing the battery pack 10 2 Inserting the battery pack/a "Memory Stick Duo" (not supplied) ........ 11 3 Turning the camera on/setting the clock 13 Shooting images easily 14 Mode ...
...computer 26 Supported Operating Systems for USB connection and application software (supplied 26 Viewing "Cyber-shot Handbook 27 Indicators on the screen 28 Battery life and memory capacity 30 Battery life and number of images you can record/view 30 Recordable number of still ...IMPORTANT SAFEGUARDS 2 Read this first 4 Notes on using the camera 8 Getting started 9 Checking the accessories supplied 9 1 Preparing the battery pack 10 2 Inserting the battery pack/a "Memory Stick Duo" (not supplied) ........ 11 3 Turning the camera on/setting the clock 13 Shooting images easily 14 Mode ...
Instruction Manual
Page 8
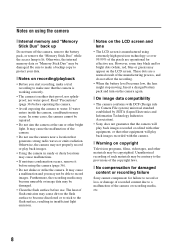
... become unusable or image data may be contrary to the provisions of the copyright laws. [ No compensation for damaged content or recording failure Sony cannot compensate for failure to record or loss or damage of recorded content due to the flash surface, resulting in sandy or dusty locations... may be damaged. • Clean the flash surface before use. Insert a charged battery pack and turn off the camera, remove the battery pack, or remove the "Memory Stick Duo" while the access lamp is manufactured using the camera [ Internal memory and "Memory Stick Duo" back up Do not turn on the...
... become unusable or image data may be contrary to the provisions of the copyright laws. [ No compensation for damaged content or recording failure Sony cannot compensate for failure to record or loss or damage of recorded content due to the flash surface, resulting in sandy or dusty locations... may be damaged. • Clean the flash surface before use. Insert a charged battery pack and turn off the camera, remove the battery pack, or remove the "Memory Stick Duo" while the access lamp is manufactured using the camera [ Internal memory and "Memory Stick Duo" back up Do not turn on the...
Instruction Manual
Page 9
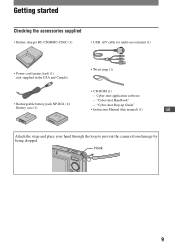
"Cyber-shot Step-up Guide" Battery case (1) • Instruction Manual (this manual) (1) GB Attach the strap and place your hand through the loop to prevent the camera from damage by being dropped. Hook 9 Getting started Checking the accessories supplied • Battery charger BC-CSGB/BC-CSGC (1) • USB, A/V cable for multi-use terminal (1) • Power cord (mains lead) (1) (not supplied in the USA and Canada) • Wrist strap (1) • CD-ROM (1) - "Cyber-shot Handbook" • Rechargeable battery pack NP-BG1 (1)/ - Cyber-shot application software -
"Cyber-shot Step-up Guide" Battery case (1) • Instruction Manual (this manual) (1) GB Attach the strap and place your hand through the loop to prevent the camera from damage by being dropped. Hook 9 Getting started Checking the accessories supplied • Battery charger BC-CSGB/BC-CSGC (1) • USB, A/V cable for multi-use terminal (1) • Power cord (mains lead) (1) (not supplied in the USA and Canada) • Wrist strap (1) • CD-ROM (1) - "Cyber-shot Handbook" • Rechargeable battery pack NP-BG1 (1)/ - Cyber-shot application software -
Instruction Manual
Page 10
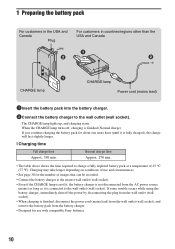
...battery charger, immediately shut off , charging is finished (Normal charge). If you continue charging the battery pack for the number of images that can be recorded. • Connect the battery...lamp is not lit, the battery charger is not disconnected from the battery charger. • Designed ...wall socket), and remove the battery pack from the AC power source (mains) as ...(wall socket). 1 Preparing the battery pack For customers in the USA...lead) 1Insert the battery pack into the battery charger. 2Connect the battery charger to charge a fully depleted battery pack at a ...
...battery charger, immediately shut off , charging is finished (Normal charge). If you continue charging the battery pack for the number of images that can be recorded. • Connect the battery...lamp is not lit, the battery charger is not disconnected from the battery charger. • Designed ...wall socket), and remove the battery pack from the AC power source (mains) as ...(wall socket). 1 Preparing the battery pack For customers in the USA...lead) 1Insert the battery pack into the battery charger. 2Connect the battery charger to charge a fully depleted battery pack at a ...
Instruction Manual
Page 11
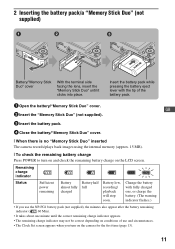
GB 2 Insert the "Memory Stick Duo" (not supplied). 3 Insert the battery pack. 4 Close the battery/"Memory Stick Duo" cover. [ When there is no "Memory Stick Duo" inserted The camera records/plays back images using the internal memory (approx. 15 MB). [ To check the remaining battery charge Press POWER to turn on the LCD screen. Remaining...
GB 2 Insert the "Memory Stick Duo" (not supplied). 3 Insert the battery pack. 4 Close the battery/"Memory Stick Duo" cover. [ When there is no "Memory Stick Duo" inserted The camera records/plays back images using the internal memory (approx. 15 MB). [ To check the remaining battery charge Press POWER to turn on the LCD screen. Remaining...
Instruction Manual
Page 12
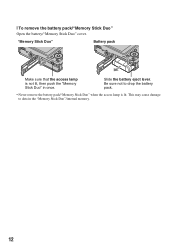
This may cause damage to drop the battery pack. • Never remove the battery pack/"Memory Stick Duo" when the access lamp is not lit, then push the "Memory Stick Duo" in the "Memory Stick Duo"/internal memory. 12 Slide the battery eject lever. "Memory Stick Duo" Battery pack Make sure that the access lamp is lit. Be sure not to data in once. [ To remove the battery pack/"Memory Stick Duo" Open the battery/"Memory Stick Duo" cover.
This may cause damage to drop the battery pack. • Never remove the battery pack/"Memory Stick Duo" when the access lamp is not lit, then push the "Memory Stick Duo" in the "Memory Stick Duo"/internal memory. 12 Slide the battery eject lever. "Memory Stick Duo" Battery pack Make sure that the access lamp is lit. Be sure not to data in once. [ To remove the battery pack/"Memory Stick Duo" Open the battery/"Memory Stick Duo" cover.
Instruction Manual
Page 13
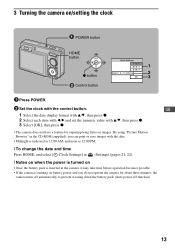
...when the power is turned on • Once the battery pack is inserted in the camera, it may take time before operation becomes possible. • If the camera is running on battery power and you do not operate the camera for superimposing dates on /setting the clock POWER button HOME... button 3 ɟ Control button 1 Press POWER. 2 Set the clock with v/V, then press z. 3 Select [OK], then press z. • The camera does not have a feature for about three minutes, the camera turns off automatically to prevent wearing down the battery pack (Auto power-off function). 13 3 Turning the...
...when the power is turned on • Once the battery pack is inserted in the camera, it may take time before operation becomes possible. • If the camera is running on battery power and you do not operate the camera for superimposing dates on /setting the clock POWER button HOME... button 3 ɟ Control button 1 Press POWER. 2 Set the clock with v/V, then press z. 3 Select [OK], then press z. • The camera does not have a feature for about three minutes, the camera turns off automatically to prevent wearing down the battery pack (Auto power-off function). 13 3 Turning the...
Instruction Manual
Page 28
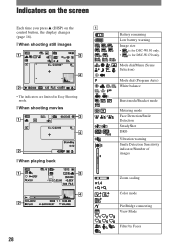
... display changes (page 16). [ When shooting still images • The indicators are limited in Easy Shooting mode. [ When shooting movies +2.0EV [ When playing back 28 Battery remaining Low battery warning Image size • is for DSC-W150 only. • is for DSC-W170 only.
... display changes (page 16). [ When shooting still images • The indicators are limited in Easy Shooting mode. [ When shooting movies +2.0EV [ When playing back 28 Battery remaining Low battery warning Image size • is for DSC-W150 only. • is for DSC-W170 only.
Instruction Manual
Page 30
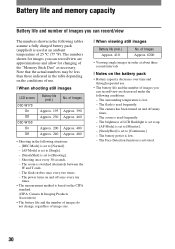
... that the actual numbers may be less than those indicated in the table depending on the CIPA standard. (CIPA: Camera & Imaging Products Association) • The battery life and the number of images do not change, regardless of the "Memory Stick Duo" as necessary. The power...]. - The Face Detection function is used frequently. - The camera has been turned on the battery pack • Battery capacity decreases over time and through repeated use . [ When shooting still images LCD screen DSC-W170 On Off DSC-W150 On Off Battery life (min.) Approx. 195 Approx. 230 Approx. 200 Approx...
... that the actual numbers may be less than those indicated in the table depending on the CIPA standard. (CIPA: Camera & Imaging Products Association) • The battery life and the number of images do not change, regardless of the "Memory Stick Duo" as necessary. The power...]. - The Face Detection function is used frequently. - The camera has been turned on the battery pack • Battery capacity decreases over time and through repeated use . [ When shooting still images LCD screen DSC-W170 On Off DSC-W150 On Off Battery life (min.) Approx. 195 Approx. 230 Approx. 200 Approx...
Instruction Manual
Page 33
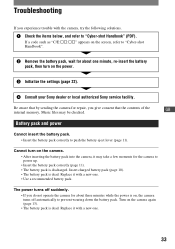
...Cyber-shot Handbook" (PDF). Turn on the camera again (page 13). • The battery pack is dead. Insert charged battery pack (page 10). • The battery pack is dead. Replace it with a new one. • Use a recommended battery pack. Cannot turn on the camera. • After inserting the battery pack into the camera..., it with a new one minute, re-insert the battery pack, then turn on the power. 3 Initialize the settings (page 22). 4 Consult your Sony dealer or local authorized Sony...
...Cyber-shot Handbook" (PDF). Turn on the camera again (page 13). • The battery pack is dead. Insert charged battery pack (page 10). • The battery pack is dead. Replace it with a new one. • Use a recommended battery pack. Cannot turn on the camera. • After inserting the battery pack into the camera..., it with a new one minute, re-insert the battery pack, then turn on the power. 3 Initialize the settings (page 22). 4 Consult your Sony dealer or local authorized Sony...
Instruction Manual
Page 34
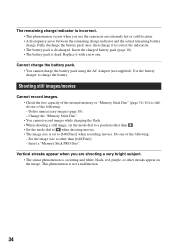
...shooting a still image, set to correct the indication. • The battery pack is full, do one . Fully discharge the battery pack once, then charge it is discharged. Vertical streaks appear when you use the camera in an extremely hot or cold location. • A discrepancy arose ...between the remaining charge indicator and the actual remaining battery charge. Replace it with a new one of the following : - Delete unnecessary images...
...shooting a still image, set to correct the indication. • The battery pack is full, do one . Fully discharge the battery pack once, then charge it is discharged. Vertical streaks appear when you use the camera in an extremely hot or cold location. • A discrepancy arose ...between the remaining charge indicator and the actual remaining battery charge. Replace it with a new one of the following : - Delete unnecessary images...
Instruction Manual
Page 36
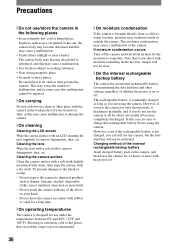
...sandy or dusty places Be careful not to let sand or dust get into the camera. However, even if this rechargeable battery is not charged, you shoot with the power off the camera and wait about one month it becomes completely discharged. To prevent damage to chemical products... alcohol, disposable cloths, insect repellent, sunscreen or insecticide. - This rechargeable battery is designed for a long time. [ On operating temperatures The camera is continually charged as long as you do not use the camera at all for 24 hours or more with moisture remaining inside or outside the...
...sandy or dusty places Be careful not to let sand or dust get into the camera. However, even if this rechargeable battery is not charged, you shoot with the power off the camera and wait about one month it becomes completely discharged. To prevent damage to chemical products... alcohol, disposable cloths, insect repellent, sunscreen or insecticide. - This rechargeable battery is designed for a long time. [ On operating temperatures The camera is continually charged as long as you do not use the camera at all for 24 hours or more with moisture remaining inside or outside the...
Instruction Manual
Page 37
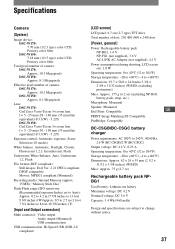
... of camera: DSC-W170: Approx. 10.3 Megapixels DSC-W150: Approx. 8.3 Megapixels Effective pixel number of camera: DSC-W170: Approx. 10.1 Megapixels DSC-W150: Approx. 8.1 Megapixels Lens: DSC-W170: Carl Zeiss Vario-Tessar 5× zoom lens f = 5 - 25 mm (28 - 140 mm (35 mm film equivalent)) F3.3(W) - 5.2(T) DSC-W150...screen] LCD panel: 6.7 cm (2.7 type) TFT drive Total number of dots: 230 400 (960 × 240) dots [Power, general] Power: Rechargeable battery pack NP-BG1, 3.6 V NP-FG1 (not supplied), 3.6 V AC-LS5K AC Adaptor (not supplied), 4.2 V Power consumption (during shooting, LCD screen ...
... of camera: DSC-W170: Approx. 10.3 Megapixels DSC-W150: Approx. 8.3 Megapixels Effective pixel number of camera: DSC-W170: Approx. 10.1 Megapixels DSC-W150: Approx. 8.1 Megapixels Lens: DSC-W170: Carl Zeiss Vario-Tessar 5× zoom lens f = 5 - 25 mm (28 - 140 mm (35 mm film equivalent)) F3.3(W) - 5.2(T) DSC-W150...screen] LCD panel: 6.7 cm (2.7 type) TFT drive Total number of dots: 230 400 (960 × 240) dots [Power, general] Power: Rechargeable battery pack NP-BG1, 3.6 V NP-FG1 (not supplied), 3.6 V AC-LS5K AC Adaptor (not supplied), 4.2 V Power consumption (during shooting, LCD screen ...


