
Operating Instructions
Page 3
...fuse in the United Kingdom A moulded plug complying with BS 1363 is fitted to this camera. For the Customers in Europe RECYCLING LITHIUM-ION BATTERIES Lithium-Ion batteries are recyclable. If you change the fuse. Attention The electromagnetic field at the specific... frequencies may regulate disposal of the same rating as the supplied one and approved by returning your nearest Sony service station....
...fuse in the United Kingdom A moulded plug complying with BS 1363 is fitted to this camera. For the Customers in Europe RECYCLING LITHIUM-ION BATTERIES Lithium-Ion batteries are recyclable. If you change the fuse. Attention The electromagnetic field at the specific... frequencies may regulate disposal of the same rating as the supplied one and approved by returning your nearest Sony service station....
Operating Instructions
Page 6
...images on a TV screen 44 Deleting still images Deleting images 46 Formatting a recording medium 48 Before advanced operations How to setup and operate your camera 17 How to scene conditions - AE LOCK 63 Shooting three images with the exposure fixed - AF Mode 68 Setting the distance to ...of Contents Read this first 4 Identifying the parts 9 Mode dial 12 Getting started Charging the battery pack 13 Using the AC adaptor 16 Using your camera abroad 16 Turning on/off your camera... 50 Changing the menu settings 50 Changing the items in the SET UP screen 51 How to use...
...images on a TV screen 44 Deleting still images Deleting images 46 Formatting a recording medium 48 Before advanced operations How to setup and operate your camera 17 How to scene conditions - AE LOCK 63 Shooting three images with the exposure fixed - AF Mode 68 Setting the distance to ...of Contents Read this first 4 Identifying the parts 9 Mode dial 12 Getting started Charging the battery pack 13 Using the AC adaptor 16 Using your camera abroad 16 Turning on/off your camera... 50 Changing the menu settings 50 Changing the items in the SET UP screen 51 How to use...

Operating Instructions
Page 8
... of images that can be saved or shooting time 133 Menu items 136 SET UP items 140 Precautions 143 On "Memory Stick 144 On "InfoLITHIUM" battery pack......... 146 Specifications 147 The LCD screen 149 Index Index 154 8 Using "Picture Package 112 Printing images 114 Using "Image Data Converter"......... 114...
... of images that can be saved or shooting time 133 Menu items 136 SET UP items 140 Precautions 143 On "Memory Stick 144 On "InfoLITHIUM" battery pack......... 146 Specifications 147 The LCD screen 149 Index Index 154 8 Using "Picture Package 112 Printing images 114 Using "Image Data Converter"......... 114...
Operating Instructions
Page 11
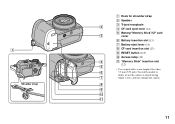
... unable to firmly secure the camera to tripods having 7 longer screws, and may damage the camera. 8 9 q; 1 Shoulder strap Hook for shoulder strap Speaker Tripod receptacle 2 CF card eject lever (24) Battery/"Memory Stick"/CF card 3 cover Battery insertion slot (13) Battery eject lever (14) CF card...
... unable to firmly secure the camera to tripods having 7 longer screws, and may damage the camera. 8 9 q; 1 Shoulder strap Hook for shoulder strap Speaker Tripod receptacle 2 CF card eject lever (24) Battery/"Memory Stick"/CF card 3 cover Battery insertion slot (13) Battery eject lever (14) CF card...
Operating Instructions
Page 13
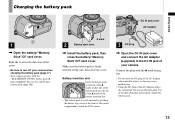
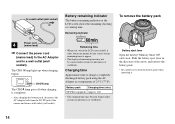
...supplied). Make sure the battery pack is easily inserted by pushing the battery eject lever at the front of the battery compartment toward the LCD screen. 3 DC plug Open the DC IN jack cover and connect the AC Adaptor (supplied) to turn off your camera. Use of the ...dirty plug may cause malfunction. • Clean the DC plug of your camera when charging the battery pack (page 17). • Your camera operates with a dry cotton bud. Charging the battery pack Getting started 1 2 1 Open the battery/"Memory Stick"/CF card cover...
...supplied). Make sure the battery pack is easily inserted by pushing the battery eject lever at the front of the battery compartment toward the LCD screen. 3 DC plug Open the DC IN jack cover and connect the AC Adaptor (supplied) to turn off your camera. Use of the ...dirty plug may cause malfunction. • Clean the DC plug of your camera when charging the battery pack (page 17). • Your camera operates with a dry cotton bud. Charging the battery pack Getting started 1 2 1 Open the battery/"Memory Stick"/CF card cover...
Operating Instructions
Page 14
... begins. Charging time Approximate time to charge a completely discharged battery pack using the AC Adaptor at a temperature of the camera and from the DC IN jack of 25°C (77°F). To remove the battery pack Battery eject lever Open the battery/"Memory Stick"/CF card cover. Battery pack Charging time (min.) NP-FR1 (supplied) Approx...
... begins. Charging time Approximate time to charge a completely discharged battery pack using the AC Adaptor at a temperature of the camera and from the DC IN jack of 25°C (77°F). To remove the battery pack Battery eject lever Open the battery/"Memory Stick"/CF card cover. Battery pack Charging time (min.) NP-FR1 (supplied) Approx...
Operating Instructions
Page 15
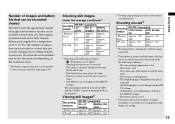
...NP-FR1 (supplied) LCD screen LCD screen On Off "Memory Approx. 120 Approx. 170 Stick" min. The camera has been turned on the conditions of use. • The battery capacity decreases as necessary. Note that can be recorded/viewed are decreased under the following situations: - (P.Quality)...set to [Single] in the SET UP settings The measurement method is low • The battery life and the number of images recordable or viewable does not depend on CIPA standard. (CIPA: Camera & Imaging Products Association) Viewing still images2) Recording medium NP-FR1 (supplied) No. Number of...
...NP-FR1 (supplied) LCD screen LCD screen On Off "Memory Approx. 120 Approx. 170 Stick" min. The camera has been turned on the conditions of use. • The battery capacity decreases as necessary. Note that can be recorded/viewed are decreased under the following situations: - (P.Quality)...set to [Single] in the SET UP settings The measurement method is low • The battery life and the number of images recordable or viewable does not depend on CIPA standard. (CIPA: Camera & Imaging Products Association) Viewing still images2) Recording medium NP-FR1 (supplied) No. Number of...

Operating Instructions
Page 17
...when the mode dial is set to , P, S, A, M, SCN or , the lens portion moves. Do not touch the lens portion while it is operating using a battery pack. To set a SET UP item, press on the control button to make the setting. 17 Getting started The POWER lamp (green) lights up and... the power is connected to the (USB) jack or the A/V OUT (MONO) jack How to use the control button Camera 1 1 AF Mode: 2 Digital Zoom: Date/Time: Red Eye Reduction: 1 Hologram AF: 2 Auto Review: Single Smart Off Off Auto Off SELECT Setup 2 1 File Number: USB Connect: 2 Video...
...when the mode dial is set to , P, S, A, M, SCN or , the lens portion moves. Do not touch the lens portion while it is operating using a battery pack. To set a SET UP item, press on the control button to make the setting. 17 Getting started The POWER lamp (green) lights up and... the power is connected to the (USB) jack or the A/V OUT (MONO) jack How to use the control button Camera 1 1 AF Mode: 2 Digital Zoom: Date/Time: Red Eye Reduction: 1 Hologram AF: 2 Auto Review: Single Smart Off Off Auto Off SELECT Setup 2 1 File Number: USB Connect: 2 Video...

Operating Instructions
Page 18
... this happens, reset the date and time, by starting from [Y/M/D] (year/month/day), [M/D/Y] (month/day/year) or [D/M/Y] (day/month/year). • If the rechargeable button battery (page 144), which provides the power for saving the time data, ever becomes low, the Clock Set screen will appear again. The POWER lamp (green...
... this happens, reset the date and time, by starting from [Y/M/D] (year/month/day), [M/D/Y] (month/day/year) or [D/M/Y] (day/month/year). • If the rechargeable button battery (page 144), which provides the power for saving the time data, ever becomes low, the Clock Set screen will appear again. The POWER lamp (green...
Operating Instructions
Page 22
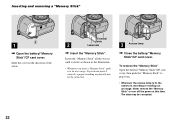
...Stick" all the way in until it clicks as it correctly, a proper recording or playback may be carried out. 3 Access lamp Close the battery/"Memory Stick"/CF card cover. The data may not be corrupted. 22 Terminal side 2 Label side Insert the "Memory Stick". If you insert...or turn off the power at this time. Inserting and removing a "Memory Stick" 1 2 1 Open the battery/"Memory Stick"/CF card cover. To remove the "Memory Stick" Open the battery/"Memory Stick"/CF card cover, then push the "Memory Stick" to pop it out. • Whenever the access lamp...
...Stick" all the way in until it clicks as it correctly, a proper recording or playback may be carried out. 3 Access lamp Close the battery/"Memory Stick"/CF card cover. The data may not be corrupted. 22 Terminal side 2 Label side Insert the "Memory Stick". If you insert...or turn off the power at this time. Inserting and removing a "Memory Stick" 1 2 1 Open the battery/"Memory Stick"/CF card cover. To remove the "Memory Stick" Open the battery/"Memory Stick"/CF card cover, then push the "Memory Stick" to pop it out. • Whenever the access lamp...
Operating Instructions
Page 23
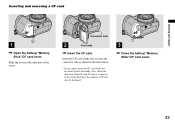
...; If you try to insert it forcefully. Also, check the direction of the arrow. Shooting still images Inserting and removing a CF card 1 2 1 Open the battery/"Memory Stick"/CF card cover. Insert the CF card all the way in, do not push it in the wrong direction, the...
...; If you try to insert it forcefully. Also, check the direction of the arrow. Shooting still images Inserting and removing a CF card 1 2 1 Open the battery/"Memory Stick"/CF card cover. Insert the CF card all the way in, do not push it in the wrong direction, the...

Operating Instructions
Page 24
... even when the mode dial is set to , and turn on the image size, see page 26. 24 To remove the CF card Open the battery/"Memory Stick"/CF card cover, then push the CF card eject lever so that the CF card is recording or reading out an image. The... the still image size 7M 7M 3:2 5M 3M 1M Image Size CF card eject lever Access lamp • Whenever the access lamp is lit, the camera is ejected.
... even when the mode dial is set to , and turn on the image size, see page 26. 24 To remove the CF card Open the battery/"Memory Stick"/CF card cover, then push the CF card eject lever so that the CF card is recording or reading out an image. The... the still image size 7M 7M 3:2 5M 3M 1M Image Size CF card eject lever Access lamp • Whenever the access lamp is lit, the camera is ejected.

Operating Instructions
Page 30
...release the shutter button, shooting will be canceled. • You can shoot the next image. • When operating the camera using a battery pack, if you do not operate the camera for a split second depending on , the AE/AF lock indicator changes to prevent wearing down . In such cases, ... flash automatically pops up Press and hold the shutter button halfway down the battery (page 17). The Auto Focus function may be frozen for a while during recording or playback, the camera turns off automatically to flashing slowly. 60min VGA FINE 101 95 S AF 30 F3...
...release the shutter button, shooting will be canceled. • You can shoot the next image. • When operating the camera using a battery pack, if you do not operate the camera for a split second depending on , the AE/AF lock indicator changes to prevent wearing down . In such cases, ... flash automatically pops up Press and hold the shutter button halfway down the battery (page 17). The Auto Focus function may be frozen for a while during recording or playback, the camera turns off automatically to flashing slowly. 60min VGA FINE 101 95 S AF 30 F3...

Operating Instructions
Page 36
... time you press , the display changes in dark places. Complying with the finder Finder The finder is convenient when you want to save battery power, or when it is not recommended to confirm the image using the LCD screen. Shooting images with these standards identifies...
... time you press , the display changes in dark places. Complying with the finder Finder The finder is convenient when you want to save battery power, or when it is not recommended to confirm the image using the LCD screen. Shooting images with these standards identifies...

Operating Instructions
Page 68
... [c] Shutter button pressed fully down and AF lock is complete, the focus is completed. When shooting with the focus already adjusted. Camera 1 1 AF Mode: 2 Digital Zoom: Date/Time: Red Eye Reduction: 1 Hologram AF: 2 Auto Review: Single Monitor Cont The focus is not adjusted before... operation - When shooting in Monitoring AF mode. - When using the self-timer, the focus is locked. • Battery consumption may be able to SET UP. Select 1 (Camera 1) with , then select [AF Mode] with /. Select the desired mode with continued focus...
... [c] Shutter button pressed fully down and AF lock is complete, the focus is completed. When shooting with the focus already adjusted. Camera 1 1 AF Mode: 2 Digital Zoom: Date/Time: Red Eye Reduction: 1 Hologram AF: 2 Auto Review: Single Monitor Cont The focus is not adjusted before... operation - When shooting in Monitoring AF mode. - When using the self-timer, the focus is locked. • Battery consumption may be able to SET UP. Select 1 (Camera 1) with , then select [AF Mode] with /. Select the desired mode with continued focus...

Operating Instructions
Page 75
Control button Shutter button • When the battery power decreases with use or the capacity of images in step . When "Recording" disappears, you can shoot images with /. Shoot the ..., shooting will stop at that point. Shooting continuously This mode is full, recording stops even if you press and hold down the shutter button, the camera records the maximum number of the recording medium is used for continuous shooting.
Control button Shutter button • When the battery power decreases with use or the capacity of images in step . When "Recording" disappears, you can shoot images with /. Shoot the ..., shooting will stop at that point. Shooting continuously This mode is full, recording stops even if you press and hold down the shutter button, the camera records the maximum number of the recording medium is used for continuous shooting.
Operating Instructions
Page 104
...switch (page 21). • When you use the AC Adaptor. Set the mode dial to [Normal]. Turn on the LCD screen of the camera. Connect the USB cable to recognize the camera. Wait for the first time, your computer automatically runs the used program to your computer and the... indicators turn red. USB Mode Normal Memory Stick Access indicators* Switch on MENU "USB Mode Normal" appears on your computer. • When using the battery pack, copying may be failed or cause data corruption by battery shutoff. We recommend that you copy images to page 106.
...switch (page 21). • When you use the AC Adaptor. Set the mode dial to [Normal]. Turn on the LCD screen of the camera. Connect the USB cable to recognize the camera. Wait for the first time, your computer automatically runs the used program to your computer and the... indicators turn red. USB Mode Normal Memory Stick Access indicators* Switch on MENU "USB Mode Normal" appears on your computer. • When using the battery pack, copying may be failed or cause data corruption by battery shutoff. We recommend that you copy images to page 106.
Operating Instructions
Page 119
... display function is working (page 132). 2 Should your Sony dealer or local authorized Sony service facility. Troubleshooting RESET Battery pack and power Symptom You cannot charge the battery pack. The battery pack cannot be installed. Turn the camera off (page 17). • Install the battery pack while pushing the battery eject lever toward the LCD screen side using...
... display function is working (page 132). 2 Should your Sony dealer or local authorized Sony service facility. Troubleshooting RESET Battery pack and power Symptom You cannot charge the battery pack. The battery pack cannot be installed. Turn the camera off (page 17). • Install the battery pack while pushing the battery eject lever toward the LCD screen side using...

Operating Instructions
Page 120
...; You have used the camera in the remaining battery time. Replace the battery pack with a cotton swab, etc., and charge the battery pack. • After charging the battery pack, disconnect the DC plug from your Sony dealer or local authorized Sony service facility. • Install the battery pack correctly (page 13). • The battery pack is completely charged. •...
...; You have used the camera in the remaining battery time. Replace the battery pack with a cotton swab, etc., and charge the battery pack. • After charging the battery pack, disconnect the DC plug from your Sony dealer or local authorized Sony service facility. • Install the battery pack correctly (page 13). • The battery pack is completely charged. •...

Operating Instructions
Page 123
...reflected the flash light and appeared in the recording medium (pages 46 and 99) or change the recording medium. • The battery pack is selected. or (Candle mode) for NightShot) (pages 77 and 78). • The NightFraming function cannot be used when focus preset ...mode is discharged, so you press and hold the shutter button halfway down. Install a charged battery pack (page 13). Symptom Cause/Solution NightFraming or NightShot does not function. • Set the mode dial to [Ext.] in the SET UP settings...
...reflected the flash light and appeared in the recording medium (pages 46 and 99) or change the recording medium. • The battery pack is selected. or (Candle mode) for NightShot) (pages 77 and 78). • The NightFraming function cannot be used when focus preset ...mode is discharged, so you press and hold the shutter button halfway down. Install a charged battery pack (page 13). Symptom Cause/Solution NightFraming or NightShot does not function. • Set the mode dial to [Ext.] in the SET UP settings...


