
Instruction Manual
Page 8
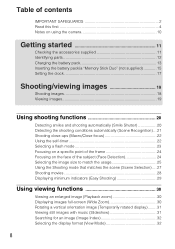
... contents IMPORTANT SAFEGUARDS 2 Read this first 4 Notes on using the camera 10 Getting started 11 Checking the accessories supplied 11 Identifying parts 12 ... the shooting conditions automatically (Scene Recognition) ... 21 Shooting close-ups (Macro/Close focus 22 Using the self-timer 22 Selecting a flash mode 23 Focusing on a specific point of the frame 24 Focusing on the face of... Zoom 30 Rotating a vertical orientation image (Temporarily rotated display)........ 31 Viewing still images with music (Slideshow 31 Searching for an image (Image Index 32 Selecting the display format (View Mode ...
... contents IMPORTANT SAFEGUARDS 2 Read this first 4 Notes on using the camera 10 Getting started 11 Checking the accessories supplied 11 Identifying parts 12 ... the shooting conditions automatically (Scene Recognition) ... 21 Shooting close-ups (Macro/Close focus 22 Using the self-timer 22 Selecting a flash mode 23 Focusing on a specific point of the frame 24 Focusing on the face of... Zoom 30 Rotating a vertical orientation image (Temporarily rotated display)........ 31 Viewing still images with music (Slideshow 31 Searching for an image (Image Index 32 Selecting the display format (View Mode ...

Instruction Manual
Page 12
Otherwise, you cannot firmly secure the camera, and damage to the camera may occur. O Battery eject lever P Access lamp Q "Memory Stick Duo" slot R Battery insertion slot S Multi connector 12 Getting started Identifying parts Bottom A Zoom (W/T) lever B Shutter button C Microphone D POWER button/POWER lamp E Flash F Self-timer lamp/Smile Shutter lamp/ AF illuminator G Lens H Lens...
Otherwise, you cannot firmly secure the camera, and damage to the camera may occur. O Battery eject lever P Access lamp Q "Memory Stick Duo" slot R Battery insertion slot S Multi connector 12 Getting started Identifying parts Bottom A Zoom (W/T) lever B Shutter button C Microphone D POWER button/POWER lamp E Flash F Self-timer lamp/Smile Shutter lamp/ AF illuminator G Lens H Lens...
Instruction Manual
Page 22
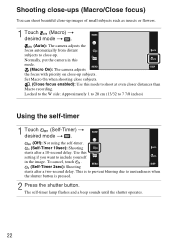
... 7 7/8 inches) Using the self-timer 1 Touch (Self-Timer) t desired mode t . (Off): Not using the self-timer. (Self-Timer 10sec): Shooting starts after a two-second delay. Use this mode. (Macro On): The camera adjusts the focus with priority on close-up subjects. The self-timer lamp flashes and a beep sounds until... subjects. (Close focus enabled): Use this mode to shoot at even closer distances than Macro recording. Normally, put the camera in this setting if you want to include yourself in the image. To cancel, touch . (Self-Timer 2sec): Shooting starts after a 10-second delay.
... 7 7/8 inches) Using the self-timer 1 Touch (Self-Timer) t desired mode t . (Off): Not using the self-timer. (Self-Timer 10sec): Shooting starts after a two-second delay. Use this mode. (Macro On): The camera adjusts the focus with priority on close-up subjects. The self-timer lamp flashes and a beep sounds until... subjects. (Close focus enabled): Use this mode to shoot at even closer distances than Macro recording. Normally, put the camera in this setting if you want to include yourself in the image. To cancel, touch . (Self-Timer 2sec): Shooting starts after a 10-second delay.

Instruction Manual
Page 29
... below shows the approximate maximum recording times. These are the total times for movies. Using shooting functions Action Self-Timer Image Size Flash How to change Select (Self-Timer 10sec) or (Off) with the size set to [640(Fine)] can only be recorded on the shooting conditions...(Auto Adjustment) t . 29 Continuous shooting is possible for approximately 10 minutes. (Units: hour : minute : second) Capacity Internal memory "Memory Stick Duo" formatted with this camera Size Approx. 15 MB 256 MB 512 MB 1 GB 2 GB 4 GB 8 GB 16 GB 640(Fine) - 0:02:50 0:06:00 0:12:20 0:25:00...
... below shows the approximate maximum recording times. These are the total times for movies. Using shooting functions Action Self-Timer Image Size Flash How to change Select (Self-Timer 10sec) or (Off) with the size set to [640(Fine)] can only be recorded on the shooting conditions...(Auto Adjustment) t . 29 Continuous shooting is possible for approximately 10 minutes. (Units: hour : minute : second) Capacity Internal memory "Memory Stick Duo" formatted with this camera Size Approx. 15 MB 256 MB 512 MB 1 GB 2 GB 4 GB 8 GB 16 GB 640(Fine) - 0:02:50 0:06:00 0:12:20 0:25:00...
Instruction Manual
Page 50
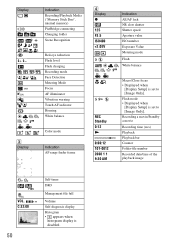
.... Recording a movie/Standby a movie Recording time (m:s) Playback Playback bar Counter Folder-file number Recorded date/time of the playback image VOL. C:32:00 50 Self-timer DRO Management file full Volume Self-diagnosis display Histogram • appears when histogram display is set to [Image Only]. Display C Display Indication Recording/Playback Media...
.... Recording a movie/Standby a movie Recording time (m:s) Playback Playback bar Counter Folder-file number Recorded date/time of the playback image VOL. C:32:00 50 Self-timer DRO Management file full Volume Self-diagnosis display Histogram • appears when histogram display is set to [Image Only]. Display C Display Indication Recording/Playback Media...

Cyber-shot® Handbook
Page 4
... this handbook 2 Notes on using the camera 3 Operation Search 7 HOME/MENU Search 9 Using the touch panel 14 Changing the DISP (screen display) setting 15 Album/Photo Library Function (DSC-T700 only)··· 17 Using the internal memory (DSC-T77 only 18 Shooting Auto Adjustment 19 Scene ...Selection 20 Smile Shutter 22 Easy Shooting 23 Program Auto 24 Movie Mode 25 Zoom 26 Self-Timer 27 Macro/Close focus 28 Flash...
... this handbook 2 Notes on using the camera 3 Operation Search 7 HOME/MENU Search 9 Using the touch panel 14 Changing the DISP (screen display) setting 15 Album/Photo Library Function (DSC-T700 only)··· 17 Using the internal memory (DSC-T77 only 18 Shooting Auto Adjustment 19 Scene ...Selection 20 Smile Shutter 22 Easy Shooting 23 Program Auto 24 Movie Mode 25 Zoom 26 Self-Timer 27 Macro/Close focus 28 Flash...

Cyber-shot® Handbook
Page 7
Table of contents Operation Search HOME/MENU Search Operation Search Leaving the settings to the camera Auto Adjustment 19 Scene Selection 20 Scene Recognition 79 Shooting portraits Soft Snap 20 Twilight Portrait 20 Smile Shutter 22 Face Detection 82 Anti Blink ... focus enabled 28 Shooting moving objects Hi-Speed Shutter 21 Burst 85 Shooting without blur High Sensitivity 20 Hi-Speed Shutter 21 2-second delay self-timer 27 ISO 33 Shooting with backlight Forced Flash 29 Scene Recognition 79 Shooting in dark places High Sensitivity 20 Slow Synchro 29 ISO 33 Index...
Table of contents Operation Search HOME/MENU Search Operation Search Leaving the settings to the camera Auto Adjustment 19 Scene Selection 20 Scene Recognition 79 Shooting portraits Soft Snap 20 Twilight Portrait 20 Smile Shutter 22 Face Detection 82 Anti Blink ... focus enabled 28 Shooting moving objects Hi-Speed Shutter 21 Burst 85 Shooting without blur High Sensitivity 20 Hi-Speed Shutter 21 2-second delay self-timer 27 ISO 33 Shooting with backlight Forced Flash 29 Scene Recognition 79 Shooting in dark places High Sensitivity 20 Slow Synchro 29 ISO 33 Index...

Cyber-shot® Handbook
Page 23
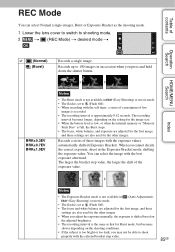
... Size: t Select [Large] or [Small] in [Image Size] Flash: t Select [Auto] or [Off] in [Flash] Self-Timer: t Select (Self-Timer 10sec) or (Off) HOME/MENU Search Index 23GB The settings you shoot still images using the minimum necessary functions. The text size increases and indicators become easier to see. 1 Lower the lens cover... more quickly because the screen brightness increases automatically. Table of contents Operation Search Easy Shooting Allows you can change are Image Size, Flash and Self-Timer.
... Size: t Select [Large] or [Small] in [Image Size] Flash: t Select [Auto] or [Off] in [Flash] Self-Timer: t Select (Self-Timer 10sec) or (Off) HOME/MENU Search Index 23GB The settings you shoot still images using the minimum necessary functions. The text size increases and indicators become easier to see. 1 Lower the lens cover... more quickly because the screen brightness increases automatically. Table of contents Operation Search Easy Shooting Allows you can change are Image Size, Flash and Self-Timer.

Cyber-shot® Handbook
Page 27
... shutter is released 2 seconds after you can select only (Self-Timer 10sec) or (Off). Setting the 2-second delay self-timer Note • In (Easy Shooting) mode, you press the shutter button, which reduces camera shake when the shutter button is pressed. zReducing blurring with the ...two-second self-timer • Use the 2-second delay self-timer to prevent blur of contents Operation Search Self-Timer 1 Lower the lens cover to switch to shooting mode....
... shutter is released 2 seconds after you can select only (Self-Timer 10sec) or (Off). Setting the 2-second delay self-timer Note • In (Easy Shooting) mode, you press the shutter button, which reduces camera shake when the shutter button is pressed. zReducing blurring with the ...two-second self-timer • Use the 2-second delay self-timer to prevent blur of contents Operation Search Self-Timer 1 Lower the lens cover to switch to shooting mode....
Cyber-shot® Handbook
Page 85
...; The recording interval is the same as the shooting mode. 1 Lower the lens cover to switch to (Flash Off). • When recording with the self timer, a series of a maximum of five images is recorded. • The recording interval is too bright or too dark, you press and hold down the shutter...
...; The recording interval is the same as the shooting mode. 1 Lower the lens cover to switch to (Flash Off). • When recording with the self timer, a series of a maximum of five images is recorded. • The recording interval is too bright or too dark, you press and hold down the shutter...

Cyber-shot® Handbook
Page 98
...shake while you can do to reduce the blurring: • Use a tripod or place the camera on a flat surface to make the shutter speed faster, and press the shutter button before the... default settings so that case, shoot with a 2-second delay self-timer and stabilize the camera by holding your arms firmly at your side after pressing the shutter button. In that the... moves during the exposure so the subject looks blurred when the shutter button is called "Camera shake." Subject blur What you hold the camera steady. • Shoot with the above tips in (Twilight Portrait) or (Twilight) ...
...shake while you can do to reduce the blurring: • Use a tripod or place the camera on a flat surface to make the shutter speed faster, and press the shutter button before the... default settings so that case, shoot with a 2-second delay self-timer and stabilize the camera by holding your arms firmly at your side after pressing the shutter button. In that the... moves during the exposure so the subject looks blurred when the shutter button is called "Camera shake." Subject blur What you hold the camera steady. • Shoot with the above tips in (Twilight Portrait) or (Twilight) ...
Cyber-shot® Handbook
Page 169
... Retro 109 Rotate 117 S Scene Recognition 79 Scene Selection 20 Scrapbook 45 Screen 15 SD 65 Select Folder 101 Self-diagnosis display 155 Self-Timer 27 Semi manual 30 Sepia 96 Settings 10 Shooting 9, 19, 25 Shooting Settings 1 10 Shooting Settings 2 10 Shutter speed 35 Slideshow 38... 145 TV 119 TV TYPE 67 Twilight Portrait 20 Twilight 20 U Underwater 21 Underwater White Balance 91 Unsharp masking 108 USB Connect 63 Using the camera abroad 160 V VGA 77 Video Out 66 View Images 1 9 View Images 2 9 View Mode 102 Vivid 96 Volume Settings 118 W Warning indicators ...
... Retro 109 Rotate 117 S Scene Recognition 79 Scene Selection 20 Scrapbook 45 Screen 15 SD 65 Select Folder 101 Self-diagnosis display 155 Self-Timer 27 Semi manual 30 Sepia 96 Settings 10 Shooting 9, 19, 25 Shooting Settings 1 10 Shooting Settings 2 10 Shutter speed 35 Slideshow 38... 145 TV 119 TV TYPE 67 Twilight Portrait 20 Twilight 20 U Underwater 21 Underwater White Balance 91 Unsharp masking 108 USB Connect 63 Using the camera abroad 160 V VGA 77 Video Out 66 View Images 1 9 View Images 2 9 View Mode 102 Vivid 96 Volume Settings 118 W Warning indicators ...

Marketing Specifications (Brown Model)
Page 2
...Sony, Cyber-shot, SteadyShot, Smile Shutter, Face Detection, BIONZ, Full 1080 and HDNA logos are approximate and may vary based on product settings, usage patterns, battery and environmental conditions. Not supported by Mac OS. 5. Non-metric weights and measurements are trademarks of inactivity) In-Camera.../ 800 / 1600 / 3200 Filter Diameter: No Digital Zoom: Smart Zoom / Precision Digital Zoom / Off Optical Zoom: 4x Macro Mode: Auto...support Access Control security function. Still Image Mode(s): Normal (JPEG...F USB Port(s): Yes - DSC-T77/T Specifications General Megapixel: 10.1...
...Sony, Cyber-shot, SteadyShot, Smile Shutter, Face Detection, BIONZ, Full 1080 and HDNA logos are approximate and may vary based on product settings, usage patterns, battery and environmental conditions. Not supported by Mac OS. 5. Non-metric weights and measurements are trademarks of inactivity) In-Camera.../ 800 / 1600 / 3200 Filter Diameter: No Digital Zoom: Smart Zoom / Precision Digital Zoom / Off Optical Zoom: 4x Macro Mode: Auto...support Access Control security function. Still Image Mode(s): Normal (JPEG...F USB Port(s): Yes - DSC-T77/T Specifications General Megapixel: 10.1...
