
Instruction Manual
Page 7
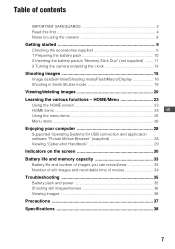
...Enjoying your computer 28 Supported Operating Systems for USB connection and application software "Picture Motion Browser" (supplied 28 Viewing "Cyber-shot Handbook 29 Indicators on the screen 30 Battery life and memory capacity 33 Battery life and number of images you can record/view 33 Number of still...supplied 9 1 Preparing the battery pack 10 2 Inserting the battery pack/a "Memory Stick Duo" (not supplied) ........ 11 3 Turning the camera on/setting the clock 13 Shooting images 15 Image size/Self-timer/Shooting mode/Flash/Macro/Display 16 Shooting in Smile Shutter mode 19 Viewing...
...Enjoying your computer 28 Supported Operating Systems for USB connection and application software "Picture Motion Browser" (supplied 28 Viewing "Cyber-shot Handbook 29 Indicators on the screen 30 Battery life and memory capacity 33 Battery life and number of images you can record/view 33 Number of still...supplied 9 1 Preparing the battery pack 10 2 Inserting the battery pack/a "Memory Stick Duo" (not supplied) ........ 11 3 Turning the camera on/setting the clock 13 Shooting images 15 Image size/Self-timer/Shooting mode/Flash/Macro/Display 16 Shooting in Smile Shutter mode 19 Viewing...

Instruction Manual
Page 8
... damaged. Notes on the LCD screen and make it before using the camera (page 37). • Do not shake or strike the camera. These dots are operational for Camera File system) universal standard established by JEITA (Japan Electronics and Information Technology Industries Association). • Sony does not guarantee that the camera will play back images recorded...
... damaged. Notes on the LCD screen and make it before using the camera (page 37). • Do not shake or strike the camera. These dots are operational for Camera File system) universal standard established by JEITA (Japan Electronics and Information Technology Industries Association). • Sony does not guarantee that the camera will play back images recorded...

Instruction Manual
Page 12
...not to data in once. This may not be correct under certain circumstances. • The Clock Set screen appears when you turn on and check the remaining battery charge on the camera for the first time (page 13). [ To remove the battery pack/"Memory Stick Duo" Open the ...the battery pack. • Never remove the battery pack/"Memory Stick Duo" when the access lamp is lit. Change the battery with this camera. 12 Remaining charge indicator Status Sufficient power remaining Battery almost fully charged Battery half full Battery low, recording/ playback will stop soon. [ To...
...not to data in once. This may not be correct under certain circumstances. • The Clock Set screen appears when you turn on and check the remaining battery charge on the camera for the first time (page 13). [ To remove the battery pack/"Memory Stick Duo" Open the ...the battery pack. • Never remove the battery pack/"Memory Stick Duo" when the access lamp is lit. Change the battery with this camera. 12 Remaining charge indicator Status Sufficient power remaining Battery almost fully charged Battery half full Battery low, recording/ playback will stop soon. [ To...
Instruction Manual
Page 14
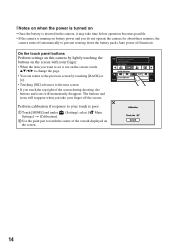
...is turned on • Once the battery is inserted in the camera, it may take time before operation becomes possible. • If the camera is running on battery power and you touch the top right of the screen during shooting, the buttons and icons will reappear when you take your...8226; You can return to the previous screen by touching [BACK] or [×]. • Touching [OK] advances to the next screen. • If you do not operate the camera for about three minutes, the camera turns off automatically to your touch is not on the screen. 14 Perform calibration if response to prevent...
...is turned on • Once the battery is inserted in the camera, it may take time before operation becomes possible. • If the camera is running on battery power and you touch the top right of the screen during shooting, the buttons and icons will reappear when you take your...8226; You can return to the previous screen by touching [BACK] or [×]. • Touching [OK] advances to the next screen. • If you do not operate the camera for about three minutes, the camera turns off automatically to your touch is not on the screen. 14 Perform calibration if response to prevent...

Instruction Manual
Page 15
...Self-timer lamp/ Smile Shutter lamp Lens cover Tripod receptacle (bottom) 1 Open the lens cover. 2 Hold the camera, with the shutter button. GB Position the subject in the center of the screen if a face is detected at the touched position or is displayed if an object other than a person's face... is detected. 3 Shoot with your elbows pressed against your body to bring into focus by touching the screen. When shooting still images: 1 Press and hold the shutter button halfway down . Using the zoom: Slide the zoom (W/T) lever to the T side ...
...Self-timer lamp/ Smile Shutter lamp Lens cover Tripod receptacle (bottom) 1 Open the lens cover. 2 Hold the camera, with the shutter button. GB Position the subject in the center of the screen if a face is detected at the touched position or is displayed if an object other than a person's face... is detected. 3 Shoot with your elbows pressed against your body to bring into focus by touching the screen. When shooting still images: 1 Press and hold the shutter button halfway down . Using the zoom: Slide the zoom (W/T) lever to the T side ...
Instruction Manual
Page 16
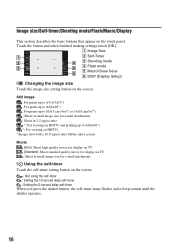
...mode E Macro/Close focus F DISP (Display Setup) [ Changing the image size Touch the image size setting button on the screen. : Not using the self-timer : Setting the 10-second delay self-timer : Setting the 2-second delay self-timer When you press... Shoot at small image size for e-mail attachments [ Using the self-timer Touch the self-timer setting button on the screen. Still image : For prints up to A3+(13×19") : For prints up to A4(8×10") :.../Display This section describes the basic buttons that appear on HDTVs * Images shot with a 16:9 aspect ratio fill the entire screen.
...mode E Macro/Close focus F DISP (Display Setup) [ Changing the image size Touch the image size setting button on the screen. : Not using the self-timer : Setting the 10-second delay self-timer : Setting the 2-second delay self-timer When you press... Shoot at small image size for e-mail attachments [ Using the self-timer Touch the self-timer setting button on the screen. Still image : For prints up to A3+(13×19") : For prints up to A4(8×10") :.../Display This section describes the basic buttons that appear on HDTVs * Images shot with a 16:9 aspect ratio fill the entire screen.

Instruction Manual
Page 17
...with a softer atmosphere for Focus, Metering mode, ISO and EV will appear on the bottom of people, flowers, etc. When the camera detects a smile, the shutter is attached. Shoots images with the exposure adjusted automatically (both the shutter speed and the aperture value). Shoots...when the water-proof case is released automatically (page 19). Shoots fireworks in bright places. Allows easy shooting with the focus on the screen. Shoots underwater in white more vividly. Shoots night scenes without a flash even in a dark place without losing the nighttime atmosphere. ...
...with a softer atmosphere for Focus, Metering mode, ISO and EV will appear on the bottom of people, flowers, etc. When the camera detects a smile, the shutter is attached. Shoots images with the exposure adjusted automatically (both the shutter speed and the aperture value). Shoots...when the water-proof case is released automatically (page 19). Shoots fireworks in bright places. Allows easy shooting with the focus on the screen. Shoots underwater in white more vividly. Shoots night scenes without a flash even in a dark place without losing the nighttime atmosphere. ...

Instruction Manual
Page 18
.... : Close focus enabled Locked to the W side: Approx. 1 to 20 cm (13/32 to 7 7/8 inches) [ Changing the screen display Touch [DISP] on the screen. : Auto The camera adjusts the focus automatically from [Normal], [Simple] or [Image Only]. [ Flash (Selecting a flash mode for still images) Touch the flash...whether or not to display the buttons and icons on the screen. Display Setup: This sets whether or not to display the histogram on the screen. LCD Brightness: This sets the backlight brightness. 18 Normally, put the camera in a dark place to clearly shoot the background that is...
.... : Close focus enabled Locked to the W side: Approx. 1 to 20 cm (13/32 to 7 7/8 inches) [ Changing the screen display Touch [DISP] on the screen. : Auto The camera adjusts the focus automatically from [Normal], [Simple] or [Image Only]. [ Flash (Selecting a flash mode for still images) Touch the flash...whether or not to display the buttons and icons on the screen. Display Setup: This sets whether or not to display the histogram on the screen. LCD Brightness: This sets the backlight brightness. 18 Normally, put the camera in a dark place to clearly shoot the background that is...

Instruction Manual
Page 20
...may not be able to play back these images. [ To delete images 1 Display the image you press (Playback) when the camera is powered off the volume control screen. Fast forward/Rewind: m/M (Touch B to return to playback a movie. Slide the lever to the W side to select ...the T side. v/V/b/B: Adjusts the position. : Changes the zoom scale. : Turns v/V/b/B on automatically and set to play back some images shot using an earlier Sony model. Viewing/deleting images (Playback) button Zoom (W/T) lever Still image Movie Speaker B/x Touch panel 1Press (Playback) button. If you want...
...may not be able to play back these images. [ To delete images 1 Display the image you press (Playback) when the camera is powered off the volume control screen. Fast forward/Rewind: m/M (Touch B to return to playback a movie. Slide the lever to the W side to select ...the T side. v/V/b/B: Adjusts the position. : Changes the zoom scale. : Turns v/V/b/B on automatically and set to play back some images shot using an earlier Sony model. Viewing/deleting images (Playback) button Zoom (W/T) lever Still image Movie Speaker B/x Touch panel 1Press (Playback) button. If you want...

Instruction Manual
Page 21
... music will change together with USB cable. 4 Start up "Music Transfer" installed to your computer. 3 Connect the camera and a computer with the [Effects]. For details on the HOME screen (page 24). • If you touch [DISP] in index mode, you can also transfer and change the music, take the ...You can change the View Mode using the internal memory). GB [ To play back a series of the image. To return to the single image screen, touch the thumbnail image. • Under default settings, the display is displayed. 2 Touch the thumbnail images you want to display the previous/next...
... music will change together with USB cable. 4 Start up "Music Transfer" installed to your computer. 3 Connect the camera and a computer with the [Effects]. For details on the HOME screen (page 24). • If you touch [DISP] in index mode, you can also transfer and change the music, take the ...You can change the View Mode using the internal memory). GB [ To play back a series of the image. To return to the single image screen, touch the thumbnail image. • Under default settings, the display is displayed. 2 Touch the thumbnail images you want to display the previous/next...

Instruction Manual
Page 22
[ To view images on HD (High Definition) TV, an HD Output Adaptor Cable (not supplied) is needed. • If you set the image size to [16:9], you can record images in the size that fills the entire screen of the HD TV. • You cannot view movies output in [HD(1080i)] signal format. Set [COMPONENT] to the TV with the cable for multi-use terminal (supplied). To the multi connector To audio/video input jacks Cable for multi-use terminal To view on TV Connect the camera to [SD] when shooting movies. 22
[ To view images on HD (High Definition) TV, an HD Output Adaptor Cable (not supplied) is needed. • If you set the image size to [16:9], you can record images in the size that fills the entire screen of the HD TV. • You cannot view movies output in [HD(1080i)] signal format. Set [COMPONENT] to the TV with the cable for multi-use terminal (supplied). To the multi connector To audio/video input jacks Cable for multi-use terminal To view on TV Connect the camera to [SD] when shooting movies. 22

Instruction Manual
Page 23
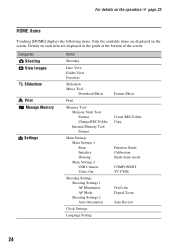
... Guide If the function guide is the gateway screen for all the functions of the camera, and can be called up regardless of the mode setting (shooting/viewing). 1 Touch [HOME] to the previous screen. Learning the various functions - HOME/Menu Using the HOME screen The HOME screen is displayed, touch [OK] to confirm. [ When you... the category you want to change, then touch [OK]. 4 Touch the desired setting value. • Touch [×] or [BACK] to return to display the HOME screen. Guide 23
... Guide If the function guide is the gateway screen for all the functions of the camera, and can be called up regardless of the mode setting (shooting/viewing). 1 Touch [HOME] to the previous screen. Learning the various functions - HOME/Menu Using the HOME screen The HOME screen is displayed, touch [OK] to confirm. [ When you... the category you want to change, then touch [OK]. 4 Touch the desired setting value. • Touch [×] or [BACK] to return to display the HOME screen. Guide 23
Instruction Manual
Page 24
... Shooting Settings 2 Auto Orientation Clock Settings Language Setting Format Music Create REC.Folder Copy Function Guide Calibration Smile demo mode COMPONENT TV TYPE Grid Line Digital Zoom Auto Review 24 For details on the operation 1 page 23 HOME items Touching [HOME] displays the following items. Only the available items are displayed...
... Shooting Settings 2 Auto Orientation Clock Settings Language Setting Format Music Create REC.Folder Copy Function Guide Calibration Smile demo mode COMPONENT TV TYPE Grid Line Digital Zoom Auto Review 24 For details on the operation 1 page 23 HOME items Touching [HOME] displays the following items. Only the available items are displayed...

Instruction Manual
Page 25
GB 3 Touch a desired setting item. 4 Touch [OK] to display the menu. Function Guide MENU • Different items will become visible depending on the selected mode. 2 Touch a desired menu item. • If the desired item is hidden, keep touching v/V until the item appears on the screen. Using the menu items 1 Touch [MENU] to turn off the menu. 25
GB 3 Touch a desired setting item. 4 Touch [OK] to display the menu. Function Guide MENU • Different items will become visible depending on the selected mode. 2 Touch a desired menu item. • If the desired item is hidden, keep touching v/V until the item appears on the screen. Using the menu items 1 Touch [MENU] to turn off the menu. 25

Instruction Manual
Page 26
.... 26 Smile Detection Sensitivity Sets the level of the image or adds special effects. Scene Recognition Automatically detects the shooting conditions and then takes the shot. Only the available items are displayed on the mode setting (shooting/viewing) and the shooting mode. Shooting menu Image Size Selects the still image size...-blur mode. White Balance Adjusts the color tones. For details on the operation 1 page 25 Menu items The available menu items vary depending on the screen. Flash Level Adjusts the amount of flash light.
.... 26 Smile Detection Sensitivity Sets the level of the image or adds special effects. Scene Recognition Automatically detects the shooting conditions and then takes the shot. Only the available items are displayed on the mode setting (shooting/viewing) and the shooting mode. Shooting menu Image Size Selects the still image size...-blur mode. White Balance Adjusts the color tones. For details on the operation 1 page 25 Menu items The available menu items vary depending on the screen. Flash Level Adjusts the amount of flash light.

Instruction Manual
Page 29
Adobe Reader is complete, double- The screen below appears. [ For Macintosh users 1 Turn on your computer, and insert the CD- ROM (supplied) into the CD-ROM drive. Viewing "Cyber-shot Handbook" "Cyber-shot Handbook" in the CD-ROM (supplied) explains how to use the camera in the [GB] folder to view it. [ For Windows users 1 Turn on...
Adobe Reader is complete, double- The screen below appears. [ For Macintosh users 1 Turn on your computer, and insert the CD- ROM (supplied) into the CD-ROM drive. Viewing "Cyber-shot Handbook" "Cyber-shot Handbook" in the CD-ROM (supplied) explains how to use the camera in the [GB] folder to view it. [ For Windows users 1 Turn on...
Instruction Manual
Page 30
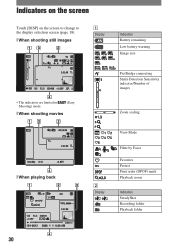
Indicators on the screen Touch [DISP] on the screen to change to the display selection screen (page 18). [ When shooting still images A Display Indication Battery remaining Low battery warning Image size • The indicators are limited in Shooting) mode. (Easy [ When shooting movies [ When playing back PictBridge connecting Smile Detection Sensitivity indicator/Number of images Zoom scaling B Display View Mode Filter by Faces Favorites Protect Print order (DPOF) mark Playback zoom Indication SteadyShot Recording folder Playback folder 30
Indicators on the screen Touch [DISP] on the screen to change to the display selection screen (page 18). [ When shooting still images A Display Indication Battery remaining Low battery warning Image size • The indicators are limited in Shooting) mode. (Easy [ When shooting movies [ When playing back PictBridge connecting Smile Detection Sensitivity indicator/Number of images Zoom scaling B Display View Mode Filter by Faces Favorites Protect Print order (DPOF) mark Playback zoom Indication SteadyShot Recording folder Playback folder 30

Instruction Manual
Page 35
Cannot turn on the power. 3 Initialize the settings (page 24). 4 Consult your Sony dealer or local authorized Sony service facility. Replace it with a new one . 35 Replace it may be checked. Be aware that by pressing and holding the battery eject lever open (... (page 13). • The battery pack is dead. Turn on , the camera turns off automatically to "Cyber-shot Handbook." 2 Remove the battery pack, wait for about one minute, re-insert the battery pack, then turn on the screen, refer to prevent wearing down the battery pack. The power turns off suddenly. • If you...
Cannot turn on the power. 3 Initialize the settings (page 24). 4 Consult your Sony dealer or local authorized Sony service facility. Replace it with a new one . 35 Replace it may be checked. Be aware that by pressing and holding the battery eject lever open (... (page 13). • The battery pack is dead. Turn on , the camera turns off automatically to "Cyber-shot Handbook." 2 Remove the battery pack, wait for about one minute, re-insert the battery pack, then turn on the screen, refer to prevent wearing down the battery pack. The power turns off suddenly. • If you...

Instruction Manual
Page 37
...cause a malfunction. • Under direct sunlight or near a heater The camera body may become discolored or deformed, and this may cause malfunction or damage the camera. [ On cleaning Cleaning the LCD screen Wipe the screen surface with an LCD cleaning kit (not supplied) to remove fingerprints, ...dust, etc. Note that exceed this range is not recommended. [ On moisture condensation If the camera is brought directly from a ...
...cause a malfunction. • Under direct sunlight or near a heater The camera body may become discolored or deformed, and this may cause malfunction or damage the camera. [ On cleaning Cleaning the LCD screen Wipe the screen surface with an LCD cleaning kit (not supplied) to remove fingerprints, ...dust, etc. Note that exceed this range is not recommended. [ On moisture condensation If the camera is brought directly from a ...
Instruction Manual
Page 38
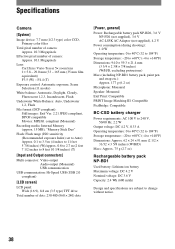
...] Image device: 7.7 mm (1/2.3 type) color CCD, Primary color filter Total pixel number of camera: Approx. 10.3 Megapixels Effective pixel number of dots: 230 400 (960 × 240) dots [Power, general] Power: Rechargeable battery pack NP-BD1, 3.6 V NP-FD1... and Output connectors] Multi connector: Video output Audio output (Monaural) USB communication USB communication: Hi-Speed USB (USB 2.0 compliant) [LCD screen] LCD panel: Wide (16:9), 8.8 cm (3.5 type) TFT drive Total number of camera: Approx. 10.1 Megapixels Lens: Carl Zeiss Vario-Tessar 5× zoom lens f = 5.8 - 29.0 mm (33 - 165 mm (35...
...] Image device: 7.7 mm (1/2.3 type) color CCD, Primary color filter Total pixel number of camera: Approx. 10.3 Megapixels Effective pixel number of dots: 230 400 (960 × 240) dots [Power, general] Power: Rechargeable battery pack NP-BD1, 3.6 V NP-FD1... and Output connectors] Multi connector: Video output Audio output (Monaural) USB communication USB communication: Hi-Speed USB (USB 2.0 compliant) [LCD screen] LCD panel: Wide (16:9), 8.8 cm (3.5 type) TFT drive Total number of camera: Approx. 10.1 Megapixels Lens: Carl Zeiss Vario-Tessar 5× zoom lens f = 5.8 - 29.0 mm (33 - 165 mm (35...


