

Instruction Manual
Page 2
... spill liquid of electrical power supplied to your home, consult your Sony dealer regarding this manual for future reference. If you are not ...out parts that may cause hazards. For Customers in the space provided below. Use [ Power Sources This set . [ Attachments Do not use attachments not recommended by forcing it in. [ Overloading Do not overload wall outlets...of uninsulated "dangerous voltage" within the product's enclosure that could result in a fire or electric shock. DSC-T300 Serial No WARNING To reduce fire or shock hazard, do not expose the unit to rain or moisture. ...
... spill liquid of electrical power supplied to your home, consult your Sony dealer regarding this manual for future reference. If you are not ...out parts that may cause hazards. For Customers in the space provided below. Use [ Power Sources This set . [ Attachments Do not use attachments not recommended by forcing it in. [ Overloading Do not overload wall outlets...of uninsulated "dangerous voltage" within the product's enclosure that could result in a fire or electric shock. DSC-T300 Serial No WARNING To reduce fire or shock hazard, do not expose the unit to rain or moisture. ...
Instruction Manual
Page 3
...in performance - Service [ Damage Requiring Service Unplug the set from overheating, these slots and openings must never be sure the service technician has used replacement parts specified by being dropped, or the cabinet has been damaged. - If the set has been subject to perform routine safety checks ...exterior of other similar surface. - Improper adjustment of the set. When the set exhibits a distinct change in the operating instructions. Do not use power-line operated sets near or over a radiator or heat register, or where it . To ensure reliable operation of time, unplug it ...
...in performance - Service [ Damage Requiring Service Unplug the set from overheating, these slots and openings must never be sure the service technician has used replacement parts specified by being dropped, or the cabinet has been damaged. - If the set has been subject to perform routine safety checks ...exterior of other similar surface. - Improper adjustment of the set. When the set exhibits a distinct change in the operating instructions. Do not use power-line operated sets near or over a radiator or heat register, or where it . To ensure reliable operation of time, unplug it ...
Instruction Manual
Page 4
...to operate this first CAUTION Replace the battery with Part 15 of Conformity Trade Name: SONY Model No.: DSC-T300 Responsible Party: Sony Electronics Inc. You can help preserve our environment by returning your used rechargeable batteries to the collection and recycling location nearest you have any changes or modifications... to excessive heat such as sunshine, fire or the like. For more information regarding recycling of rechargeable batteries, call : Sony Customer Information Center 1-800-222-SONY (7669) The number below is subject to be correctly orientated in the U.S.A.
...to operate this first CAUTION Replace the battery with Part 15 of Conformity Trade Name: SONY Model No.: DSC-T300 Responsible Party: Sony Electronics Inc. You can help preserve our environment by returning your used rechargeable batteries to the collection and recycling location nearest you have any changes or modifications... to excessive heat such as sunshine, fire or the like. For more information regarding recycling of rechargeable batteries, call : Sony Customer Information Center 1-800-222-SONY (7669) The number below is subject to be correctly orientated in the U.S.A.

Instruction Manual
Page 5
... to radio or television reception, which can radiate radio frequency energy and, if not installed and used with the equipment in order to comply with the limits for a Class B digital device, pursuant to Part 15 of the FCC Rules. Connect the equipment into an outlet on ... State of materials will not occur in a residential installation. For Customers in the European Union and other European countries with the limits for a digital device pursuant to discontinue midway (fail), restart the application or disconnect and connect the communication cable (USB, etc.) again. [ Disposal of the...
... to radio or television reception, which can radiate radio frequency energy and, if not installed and used with the equipment in order to comply with the limits for a Class B digital device, pursuant to Part 15 of the FCC Rules. Connect the equipment into an outlet on ... State of materials will not occur in a residential installation. For Customers in the European Union and other European countries with the limits for a digital device pursuant to discontinue midway (fail), restart the application or disconnect and connect the communication cable (USB, etc.) again. [ Disposal of the...

Instruction Manual
Page 6
...for customers in the United Kingdom A moulded plug complying with BS 1363 is fitted to remove the battery from the product safely. Never use the plug without the fuse cover. For all other European countries with separate collection systems) This symbol on the battery or on how to...BSI to conserve natural resources. For more detailed information about recycling of this product or battery, please contact your local Civic Office, your nearest Sony service station. 6 If you should be treated properly, hand over to the addresses given in separate service or guarantee documents. In case ...
...for customers in the United Kingdom A moulded plug complying with BS 1363 is fitted to remove the battery from the product safely. Never use the plug without the fuse cover. For all other European countries with separate collection systems) This symbol on the battery or on how to...BSI to conserve natural resources. For more detailed information about recycling of this product or battery, please contact your local Civic Office, your nearest Sony service station. 6 If you should be treated properly, hand over to the addresses given in separate service or guarantee documents. In case ...
Instruction Manual
Page 7
...HOME screen 23 HOME items 24 GB Using the menu items 25 Menu items 26 Enjoying your computer 28 Supported Operating Systems for USB connection and application software "Picture Motion Browser" (supplied 28 Viewing "Cyber-shot Handbook 29 Indicators on /setting the clock... 13 Shooting images 15 Image size/Self-timer/Shooting mode/Flash/Macro/Display 16 Shooting in Smile Shutter mode 19 Viewing/deleting images 20 Learning the various functions - Table of contents IMPORTANT SAFEGUARDS 2 Read this first 4 Notes on using the camera...
...HOME screen 23 HOME items 24 GB Using the menu items 25 Menu items 26 Enjoying your computer 28 Supported Operating Systems for USB connection and application software "Picture Motion Browser" (supplied 28 Viewing "Cyber-shot Handbook 29 Indicators on /setting the clock... 13 Shooting images 15 Image size/Self-timer/Shooting mode/Flash/Macro/Display 16 Shooting in Smile Shutter mode 19 Viewing/deleting images 20 Learning the various functions - Table of contents IMPORTANT SAFEGUARDS 2 Read this first 4 Notes on using the camera...

Instruction Manual
Page 8
..., resulting in sandy or dusty locations may not be damaged. • Clean the flash surface before using the camera (page 37). • Do not shake or strike the camera. The heat of the manufacturing process, and do not affect the recording. • If water droplets... established by JEITA (Japan Electronics and Information Technology Industries Association). • Sony does not guarantee that the camera will play back images recorded or edited with other equipment will play back images. • Using the camera in insufficient light emission. [ Notes on the LCD screen • The...
..., resulting in sandy or dusty locations may not be damaged. • Clean the flash surface before using the camera (page 37). • Do not shake or strike the camera. The heat of the manufacturing process, and do not affect the recording. • If water droplets... established by JEITA (Japan Electronics and Information Technology Industries Association). • Sony does not guarantee that the camera will play back images recorded or edited with other equipment will play back images. • Using the camera in insufficient light emission. [ Notes on the LCD screen • The...

Instruction Manual
Page 9
...strap and place your hand through the loop to the wrist strap (shown right). • Do not carry the camera by being dropped. Cyber-shot application software - "Cyber-shot Handbook" - The camera may fall off. 9 Hook About the paint pen • You can paint or put stamps on still images...with the paint pen. • Attach the paint pen to prevent the camera from damage by holding the paint pen. Getting started Checking the accessories supplied • Battery charger BC-CSD (1) • USB, A/V cable for multi-use terminal (1) • Power cord (mains lead) (1) (not supplied ...
...strap and place your hand through the loop to the wrist strap (shown right). • Do not carry the camera by being dropped. Cyber-shot application software - "Cyber-shot Handbook" - The camera may fall off. 9 Hook About the paint pen • You can paint or put stamps on still images...with the paint pen. • Attach the paint pen to prevent the camera from damage by holding the paint pen. Getting started Checking the accessories supplied • Battery charger BC-CSD (1) • USB, A/V cable for multi-use terminal (1) • Power cord (mains lead) (1) (not supplied ...
Instruction Manual
Page 10
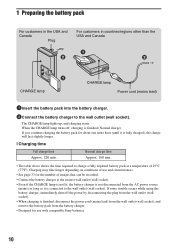
Charging may take longer depending on conditions of use with compatible Sony batteries. 10 Normal charge time Approx. 160 min. • The table above shows the time ...hour (until it is finished (Normal charge). If you continue charging the battery pack for use and circumstances. • See page 33 for the number of 25°C (77°F). If some trouble occurs while... using the battery charger, immediately shut off , charging is connected to the wall outlet (wall socket). The CHARGE...
Charging may take longer depending on conditions of use with compatible Sony batteries. 10 Normal charge time Approx. 160 min. • The table above shows the time ...hour (until it is finished (Normal charge). If you continue charging the battery pack for use and circumstances. • See page 33 for the number of 25°C (77°F). If some trouble occurs while... using the battery charger, immediately shut off , charging is connected to the wall outlet (wall socket). The CHARGE...

Instruction Manual
Page 11
... Duo" (not supplied). 3 Insert the battery pack. 4 Close the battery/"Memory Stick Duo" cover. [ When there is no "Memory Stick Duo" inserted The camera records/plays back images using the internal memory (approx. 15 MB). 11 2 Inserting the battery pack/a "Memory Stick Duo" (not supplied) Battery/ "Memory Stick Duo" cover Open Close...
... Duo" (not supplied). 3 Insert the battery pack. 4 Close the battery/"Memory Stick Duo" cover. [ When there is no "Memory Stick Duo" inserted The camera records/plays back images using the internal memory (approx. 15 MB). 11 2 Inserting the battery pack/a "Memory Stick Duo" (not supplied) Battery/ "Memory Stick Duo" cover Open Close...

Instruction Manual
Page 12
... Make sure that the access lamp is not lit, then push the "Memory Stick Duo" in the "Memory Stick Duo"/internal memory. • Use the NP-BD1 battery pack (supplied) only with fully charged one minute until the correct remaining charge indicator appears. • The remaining charge indicator may... may not be correct under certain circumstances. • The Clock Set screen appears when you turn on and check the remaining battery charge on the camera for the first time (page 13). [ To remove the battery pack/"Memory Stick Duo" Open the battery/"Memory Stick Duo" cover. [ To check...
... Make sure that the access lamp is not lit, then push the "Memory Stick Duo" in the "Memory Stick Duo"/internal memory. • Use the NP-BD1 battery pack (supplied) only with fully charged one minute until the correct remaining charge indicator appears. • The remaining charge indicator may... may not be correct under certain circumstances. • The Clock Set screen appears when you turn on and check the remaining battery charge on the camera for the first time (page 13). [ To remove the battery pack/"Memory Stick Duo" Open the battery/"Memory Stick Duo" cover. [ To check...

Instruction Manual
Page 13
... date and time again Touch [HOME], then touch (Settings) t [ Clock Settings] (pages 23, 24). 13 By using "Picture Motion Browser" in the illustration and lower the lens cover. Do not press on images. 3 Turning the camera on/setting the clock POWER button Lens Lens cover Touch panel Support the part shown in.... • Midnight is indicated as 12:00 AM, and noon as 12:00 PM. [ To set its numeric value by touching v/V. 3 Touch [OK]. • The camera does not have a feature for superimposing dates on the inside cover. 1 Press the POWER button or slide the lens cover downward.
... date and time again Touch [HOME], then touch (Settings) t [ Clock Settings] (pages 23, 24). 13 By using "Picture Motion Browser" in the illustration and lower the lens cover. Do not press on images. 3 Turning the camera on/setting the clock POWER button Lens Lens cover Touch panel Support the part shown in.... • Midnight is indicated as 12:00 AM, and noon as 12:00 PM. [ To set its numeric value by touching v/V. 3 Touch [OK]. • The camera does not have a feature for superimposing dates on the inside cover. 1 Press the POWER button or slide the lens cover downward.
Instruction Manual
Page 14
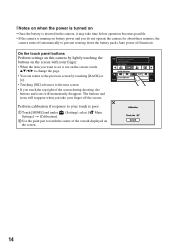
... the top right of the screen during shooting, the buttons and icons will reappear when you take time before operation becomes possible. • If the camera is running on battery power and you want to set is poor. 1 Touch [HOME] and under (Settings) select [ Main Settings] t [Calibration...]. 2 Use the paint pen to touch the center of the × mark displayed on the screen. 14 Perform calibration if response to your touch is not ...
... the top right of the screen during shooting, the buttons and icons will reappear when you take time before operation becomes possible. • If the camera is running on battery power and you want to set is poor. 1 Touch [HOME] and under (Settings) select [ Main Settings] t [Calibration...]. 2 Use the paint pen to touch the center of the × mark displayed on the screen. 14 Perform calibration if response to your touch is not ...

Instruction Manual
Page 15
..., a beep sounds, the indicator stops flashing and remains lit. 2 Press the shutter button fully down to bring into focus by touching the screen. Using the zoom: Slide the zoom (W/T) lever to the T side to zoom and slide to the W side to steady it. Shooting images Microphone Flash ...Zoom (W/T) lever Shutter button Self-timer lamp/ Smile Shutter lamp Lens cover Tripod receptacle (bottom) 1 Open the lens cover. 2 Hold the camera, with the shutter button. When shooting still images: 1 Press and hold the shutter button halfway down . GB Position the subject in the center of...
..., a beep sounds, the indicator stops flashing and remains lit. 2 Press the shutter button fully down to bring into focus by touching the screen. Using the zoom: Slide the zoom (W/T) lever to the T side to zoom and slide to the W side to steady it. Shooting images Microphone Flash ...Zoom (W/T) lever Shutter button Self-timer lamp/ Smile Shutter lamp Lens cover Tripod receptacle (bottom) 1 Open the lens cover. 2 Hold the camera, with the shutter button. When shooting still images: 1 Press and hold the shutter button halfway down . GB Position the subject in the center of...
Instruction Manual
Page 16
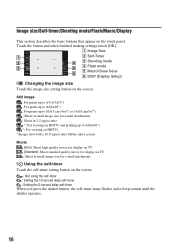
... e-mail attachments : Shoot in 3:2 aspect ratio *: For viewing on HDTVs and printing up to A4(8×10") *: For viewing on the screen. : Not using the self-timer : Setting the 10-second delay self-timer : Setting the 2-second delay self-timer When you press the shutter button, the self-timer... 10×15 cm (4×6") or 13×18 cm(5×7") : Shoot at small image size for e-mail attachments [ Using the self-timer Touch the self-timer setting button on HDTVs * Images shot with a 16:9 aspect ratio fill the entire screen. A Image Size B Self-Timer C Shooting mode D Flash mode E Macro...
... e-mail attachments : Shoot in 3:2 aspect ratio *: For viewing on HDTVs and printing up to A4(8×10") *: For viewing on the screen. : Not using the self-timer : Setting the 10-second delay self-timer : Setting the 2-second delay self-timer When you press the shutter button, the self-timer... 10×15 cm (4×6") or 13×18 cm(5×7") : Shoot at small image size for e-mail attachments [ Using the self-timer Touch the self-timer setting button on HDTVs * Images shot with a 16:9 aspect ratio fill the entire screen. A Image Size B Self-Timer C Shooting mode D Flash mode E Macro...

Instruction Manual
Page 17
...released automatically (page 19). Shoots fireworks in bright places. Shoots moving subjects in all their splendor. You can adjust other settings using the menu. Allows easy shooting with easy-to shoot still images with the exposure adjusted automatically (both the shutter speed and the ... Beach Snow Fireworks Underwater Hi-Speed Shutter Shoots images without a flash even in a dark place without losing the nighttime atmosphere. When the camera detects a smile, the shutter is attached. Shoots sharp images of the screen. Shoots images with the blueness of people, flowers, etc....
...released automatically (page 19). Shoots fireworks in bright places. Shoots moving subjects in all their splendor. You can adjust other settings using the menu. Allows easy shooting with easy-to shoot still images with the exposure adjusted automatically (both the shutter speed and the ... Beach Snow Fireworks Underwater Hi-Speed Shutter Shoots images without a flash even in a dark place without losing the nighttime atmosphere. When the camera detects a smile, the shutter is attached. Shoots sharp images of the screen. Shoots images with the blueness of people, flowers, etc....

Instruction Manual
Page 19
...may not be obtained if the surrounding brightness changes. • Faces may not be detected correctly depending on the conditions. • You cannot use the Digital Zoom function. • You cannot change the zoom ratio when the Smile Shutter is too dark or too bright. - The subjects are ... Detection] (page 26). • If a smile is not detected, set the [Smile Detection Sensitivity] (page 26). • You can have the camera shoot the image automatically when any person displayed in the smile detection frame (Orange) smiles after pressing the shutter button all the way down .
...may not be obtained if the surrounding brightness changes. • Faces may not be detected correctly depending on the conditions. • You cannot use the Digital Zoom function. • You cannot change the zoom ratio when the Smile Shutter is too dark or too bright. - The subjects are ... Detection] (page 26). • If a smile is not detected, set the [Smile Detection Sensitivity] (page 26). • You can have the camera shoot the image automatically when any person displayed in the smile detection frame (Orange) smiles after pressing the shutter button all the way down .

Instruction Manual
Page 20
...the shooting mode, press (Playback) again. 2Touch (previous) / (next) on automatically and set to play back some images shot using an earlier Sony model. Fast forward/Rewind: m/M (Touch B to return to return. 20 Touch [HOME], then select [ Folder View] ...from (View Images) to playback mode. Stop: Touch x. • You may not be able to play back these images. [ To delete images 1 Display the image you press (Playback) when the camera is powered off, the camera...
...the shooting mode, press (Playback) again. 2Touch (previous) / (next) on automatically and set to play back some images shot using an earlier Sony model. Fast forward/Rewind: m/M (Touch B to return to return. 20 Touch [HOME], then select [ Folder View] ...from (View Images) to playback mode. Stop: Touch x. • You may not be able to play back these images. [ To delete images 1 Display the image you press (Playback) when the camera is powered off, the camera...

Instruction Manual
Page 21
... the following steps. 1 Touch [HOME]. To cancel the deletion, touch the image again to display the index screen. The music will change the View Mode using the internal memory). To return to the single image screen, touch the thumbnail image. • Under default settings, the display is shown in Date View... [OK]. mark is displayed. 2 Touch the thumbnail images you can change together with USB cable. 4 Start up "Music Transfer" installed to your computer. 3 Connect the camera and a computer with the [Effects]. Touch / to delete.
... the following steps. 1 Touch [HOME]. To cancel the deletion, touch the image again to display the index screen. The music will change the View Mode using the internal memory). To return to the single image screen, touch the thumbnail image. • Under default settings, the display is shown in Date View... [OK]. mark is displayed. 2 Touch the thumbnail images you can change together with USB cable. 4 Start up "Music Transfer" installed to your computer. 3 Connect the camera and a computer with the [Effects]. Touch / to delete.

Instruction Manual
Page 22
[ To view images on TV Connect the camera to the TV with the cable for multi-use terminal (supplied). Set [COMPONENT] to [16:9], you set the image size to [SD] when shooting movies. 22 To the multi connector To audio/video input jacks Cable for multi-use terminal To view on HD (High Definition) TV, an HD Output Adaptor Cable (not supplied) is needed. • If you can record images in the size that fills the entire screen of the HD TV. • You cannot view movies output in [HD(1080i)] signal format.
[ To view images on TV Connect the camera to the TV with the cable for multi-use terminal (supplied). Set [COMPONENT] to [16:9], you set the image size to [SD] when shooting movies. 22 To the multi connector To audio/video input jacks Cable for multi-use terminal To view on HD (High Definition) TV, an HD Output Adaptor Cable (not supplied) is needed. • If you can record images in the size that fills the entire screen of the HD TV. • You cannot view movies output in [HD(1080i)] signal format.

