

Instruction Manual
Page 2
... in a fire or electric shock. Carefully observe all warnings, precautions and instructions on the marking label. DSC-T20/DSC-T25 Serial No WARNING To reduce fire or shock hazard, do not expose the unit to the presence ...enclosure that may be operated only from battery power, or other ). Use [ Power Sources This set should still fail to persons. If you are not sure of the type of electric shock to fit, contact your dealer... instructions in the literature accompanying the appliance. 2 IMPORTANT SAFEGUARDS For your Sony dealer regarding this manual for future reference.
... in a fire or electric shock. Carefully observe all warnings, precautions and instructions on the marking label. DSC-T20/DSC-T25 Serial No WARNING To reduce fire or shock hazard, do not expose the unit to the presence ...enclosure that may be operated only from battery power, or other ). Use [ Power Sources This set should still fail to persons. If you are not sure of the type of electric shock to fit, contact your dealer... instructions in the literature accompanying the appliance. 2 IMPORTANT SAFEGUARDS For your Sony dealer regarding this manual for future reference.
Instruction Manual
Page 3
[ Cleaning Unplug the set from the wall outlet and refer servicing to qualified service personnel under the following the operating instructions. Installation [ Water and Moisture Do not use liquid cleaners or aerosol cleaners. Never cover the slots and openings with water for cleaning the exterior of any service or repairs to the set yourself as a bookcase, or built-in fire, electric shock, or other hazards. [ Safety Check Upon completion of the set to normal operation. - Never block the slots and openings by items placed upon or against them, paying particular attention to be ...
[ Cleaning Unplug the set from the wall outlet and refer servicing to qualified service personnel under the following the operating instructions. Installation [ Water and Moisture Do not use liquid cleaners or aerosol cleaners. Never cover the slots and openings with water for cleaning the exterior of any service or repairs to the set yourself as a bookcase, or built-in fire, electric shock, or other hazards. [ Safety Check Upon completion of the set to normal operation. - Never block the slots and openings by items placed upon or against them, paying particular attention to be ...
Instruction Manual
Page 4
...a particular installation. For more information regarding recycling of rechargeable batteries, call : Sony Customer Information Center 1-800-222-SONY (7669) The number below is subject to the following two conditions: (1) This...digital apparatus complies with the limits for the FCC related matters only. [ Regulatory Information Declaration of the FCC Rules. Battery charger This power unit is no guarantee that may cause undesired operation. Operation is for a Class B digital device, pursuant to Part 15 of Conformity Trade Name: SONY Model No.: DSC-T20/DSC-T25 Responsible Party: Sony...
...a particular installation. For more information regarding recycling of rechargeable batteries, call : Sony Customer Information Center 1-800-222-SONY (7669) The number below is subject to the following two conditions: (1) This...digital apparatus complies with the limits for the FCC related matters only. [ Regulatory Information Declaration of the FCC Rules. Battery charger This power unit is no guarantee that may cause undesired operation. Operation is for a Class B digital device, pursuant to Part 15 of Conformity Trade Name: SONY Model No.: DSC-T20/DSC-T25 Responsible Party: Sony...

Instruction Manual
Page 5
...product has been tested and found compliant with an or mark) must be used . For the State of this equipment for a digital device pursuant to this product. By ensuring this product shall not be treated as the supplied one or more detailed information about ... & Electronic Equipment (Applicable in the United Kingdom A moulded plug complying with this product, please contact your local Civic Office, your nearest Sony service station. 5 Notice for customers in the European Union and other European countries with separate collection systems) This symbol on the product or...
...product has been tested and found compliant with an or mark) must be used . For the State of this equipment for a digital device pursuant to this product. By ensuring this product shall not be treated as the supplied one or more detailed information about ... & Electronic Equipment (Applicable in the United Kingdom A moulded plug complying with this product, please contact your local Civic Office, your nearest Sony service station. 5 Notice for customers in the European Union and other European countries with separate collection systems) This symbol on the product or...
Instruction Manual
Page 6
.... In addition to malfunctions and an inability to record images, this may be some cases may not be repairable. • Do not aim the camera at the sun or other materials may be contrary to the provisions of the copyright laws. [ No compensation for contents of the recording The contents... Stick Duo" back up copy. [ Notes on recording/playback • Before you record, make a trial recording to make sure that the camera is working correctly. • This camera is lighted, as the internal memory data or "Memory Stick Duo" data may cause dirt on the flash surface to become discolored or...
.... In addition to malfunctions and an inability to record images, this may be some cases may not be repairable. • Do not aim the camera at the sun or other materials may be contrary to the provisions of the copyright laws. [ No compensation for contents of the recording The contents... Stick Duo" back up copy. [ Notes on recording/playback • Before you record, make a trial recording to make sure that the camera is working correctly. • This camera is lighted, as the internal memory data or "Memory Stick Duo" data may cause dirt on the flash surface to become discolored or...
Instruction Manual
Page 7
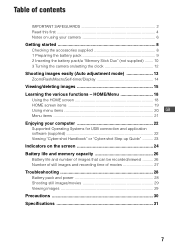
... 22 Viewing "Cyber-shot Handbook" or "Cyber-shot Step-up Guide 23 Indicators on the screen 24 Battery life and memory capacity 26 Battery life and number of images that can be recorded/viewed .......... 26 Number of still images and recording time of contents IMPORTANT SAFEGUARDS 2 Read this first 4 Notes on using your camera 6 Getting started...
... 22 Viewing "Cyber-shot Handbook" or "Cyber-shot Step-up Guide 23 Indicators on the screen 24 Battery life and memory capacity 26 Battery life and number of images that can be recorded/viewed .......... 26 Number of still images and recording time of contents IMPORTANT SAFEGUARDS 2 Read this first 4 Notes on using your camera 6 Getting started...

Instruction Manual
Page 8
... Canada) • HD Output Adaptor Cable (1) (DSC-T25 only) • Rechargeable battery pack NP-BG1 (1)/ Battery case (1) Attach the strap and pass your hand through it, to prevent the camera from damage by being dropped, etc. • Wrist strap (1) • CD-ROM (Cyber-shot application software/ "Cyber-shot Handbook"/"Cyber-shot Step-up Guide") (1) • Instruction Manual (this...
... Canada) • HD Output Adaptor Cable (1) (DSC-T25 only) • Rechargeable battery pack NP-BG1 (1)/ Battery case (1) Attach the strap and pass your hand through it, to prevent the camera from damage by being dropped, etc. • Wrist strap (1) • CD-ROM (Cyber-shot application software/ "Cyber-shot Handbook"/"Cyber-shot Step-up Guide") (1) • Instruction Manual (this...
Instruction Manual
Page 9
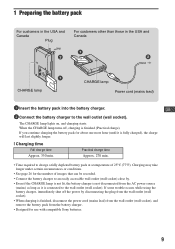
... . • Even if the CHARGE lamp is not lit, the battery charger is not disconnected from the battery charger. • Designed for use with compatible Sony batteries. 9 Practical charge time Approx. 270 min. • Time required to the wall outlet (wall socket). The CHARGE lamp lights on, and charging starts. Charging...
... . • Even if the CHARGE lamp is not lit, the battery charger is not disconnected from the battery charger. • Designed for use with compatible Sony batteries. 9 Practical charge time Approx. 270 min. • Time required to the wall outlet (wall socket). The CHARGE lamp lights on, and charging starts. Charging...
Instruction Manual
Page 10
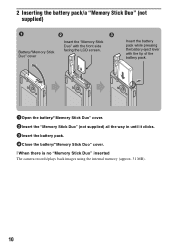
... way in until it clicks. 3Insert the battery pack. 4Close the battery/"Memory Stick Duo" cover. [ When there is no "Memory Stick Duo" inserted The camera records/plays back images using the internal memory (approx. 31 MB). 10
... way in until it clicks. 3Insert the battery pack. 4Close the battery/"Memory Stick Duo" cover. [ When there is no "Memory Stick Duo" inserted The camera records/plays back images using the internal memory (approx. 31 MB). 10
Instruction Manual
Page 11
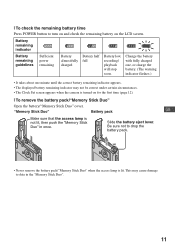
.../ playback will stop soon. Slide the battery eject lever. This may not be correct under certain circumstances. • The Clock Set screen appears when the camera is lit. [ To check the remaining battery time Press POWER button to turn on and check the remaining battery on for the first time (page...
.../ playback will stop soon. Slide the battery eject lever. This may not be correct under certain circumstances. • The Clock Set screen appears when the camera is lit. [ To check the remaining battery time Press POWER button to turn on and check the remaining battery on for the first time (page...
Instruction Manual
Page 12
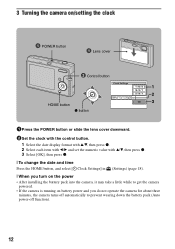
3 Turning the camera on/setting the clock POWER button Lens cover ɟ Control button 1 2 3 HOME button z button 1Press the POWER button or slide the lens cover downward. 2Set ... on the power • After installing the battery pack into the camera, it may take a little while to get the camera powered. • If the camera is running on battery power and you do not operate the camera for about three minutes, the camera turns off automatically to prevent wearing down the battery pack (Auto...
3 Turning the camera on/setting the clock POWER button Lens cover ɟ Control button 1 2 3 HOME button z button 1Press the POWER button or slide the lens cover downward. 2Set ... on the power • After installing the battery pack into the camera, it may take a little while to get the camera powered. • If the camera is running on battery power and you do not operate the camera for about three minutes, the camera turns off automatically to prevent wearing down the battery pack (Auto...
Instruction Manual
Page 13
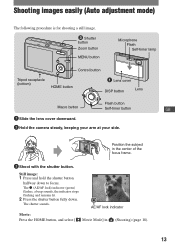
...indicator Movie: Press the HOME button, and select [ Movie Mode] in the center of the focus frame. 3 Shoot with the shutter button. Still image: 1 Press and hold the shutter button halfway down . Position the subject in (Shooting) (page 18). 13 Shooting images easily (Auto ...adjustment mode) The following procedure is for shooting a still image. ɠ Shutter button Zoom button MENU button Microphone Flash Self-timer lamp Control button Tripod receptacle (bottom) HOME button Lens cover DISP...
...indicator Movie: Press the HOME button, and select [ Movie Mode] in the center of the focus frame. 3 Shoot with the shutter button. Still image: 1 Press and hold the shutter button halfway down . Position the subject in (Shooting) (page 18). 13 Shooting images easily (Auto ...adjustment mode) The following procedure is for shooting a still image. ɠ Shutter button Zoom button MENU button Microphone Flash Self-timer lamp Control button Tripod receptacle (bottom) HOME button Lens cover DISP...

Instruction Manual
Page 14
... Press v (DISP) on 14 Zoom/Flash/Macro/Self-timer/Display [ Using the zoom Press to zoom, press to undo zoom. [ Flash (Selecting a flash mode for still images) Press B ( ) on the control button repeatedly until the desired mode is selected. : Flash Auto Strobes when there is insufficient light or backlight (default setting...
... Press v (DISP) on 14 Zoom/Flash/Macro/Self-timer/Display [ Using the zoom Press to zoom, press to undo zoom. [ Flash (Selecting a flash mode for still images) Press B ( ) on the control button repeatedly until the desired mode is selected. : Flash Auto Strobes when there is insufficient light or backlight (default setting...
Instruction Manual
Page 15
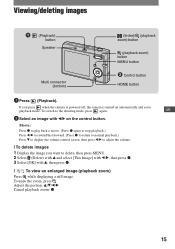
...select [This Image] with b/B, then press z. 3 Select [OK] with v, then press z. [ To view an enlarged image (playback zoom) Press while displaying a still image. Movie: Press z to play back a movie. (Press z again to stop playback.) Press b/B to rewind/fast forward. (Press z to return to normal playback...volume control screen, then press b/B to adjust the volume. [ To delete images 1 Display the image you press when the camera is powered off, the camera is turned on the control button. To undo the zoom, press . Viewing/deleting images (Playback) button Speaker Multi connector (bottom...
...select [This Image] with b/B, then press z. 3 Select [OK] with v, then press z. [ To view an enlarged image (playback zoom) Press while displaying a still image. Movie: Press z to play back a movie. (Press z again to stop playback.) Press b/B to rewind/fast forward. (Press z to return to normal playback...volume control screen, then press b/B to adjust the volume. [ To delete images 1 Display the image you press when the camera is powered off, the camera is turned on the control button. To undo the zoom, press . Viewing/deleting images (Playback) button Speaker Multi connector (bottom...
Instruction Manual
Page 16
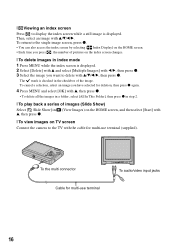
... in (View Images) on the HOME screen, and then select [Start] with v, then press z. [ To view images on TV screen Connect the camera to display the index screen while a still image is displayed. To the multi connector Cable for multi-use terminal To audio/video input jacks 16 Then, select an image...
... in (View Images) on the HOME screen, and then select [Start] with v, then press z. [ To view images on TV screen Connect the camera to display the index screen while a still image is displayed. To the multi connector Cable for multi-use terminal To audio/video input jacks 16 Then, select an image...
Instruction Manual
Page 17
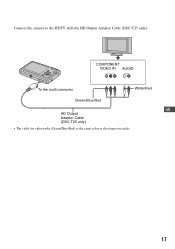
COMPONENT VIDEO IN AUDIO To the multi connector White/Red Green/Blue/Red GB HD Output Adaptor Cable (DSC-T25 only) • The cable for video jacks (Green/Blue/Red) is the same color as the respective jacks. 17 Connect the camera to the HDTV with the HD Output Adaptor Cable (DSC-T25 only).
COMPONENT VIDEO IN AUDIO To the multi connector White/Red Green/Blue/Red GB HD Output Adaptor Cable (DSC-T25 only) • The cable for video jacks (Green/Blue/Red) is the same color as the respective jacks. 17 Connect the camera to the HDTV with the HD Output Adaptor Cable (DSC-T25 only).

Instruction Manual
Page 18
... with B and select a setting with v/V, then press z. 3 Select the desired setting with v/V. • This procedure is the gateway screen for all the functions of your camera. You can select the shooting mode or playback mode, or change the settings from the HOME screen. Learning the various functions - Category Item Guide 2 Select...
... with B and select a setting with v/V, then press z. 3 Select the desired setting with v/V. • This procedure is the gateway screen for all the functions of your camera. You can select the shooting mode or playback mode, or change the settings from the HOME screen. Learning the various functions - Category Item Guide 2 Select...

Instruction Manual
Page 19
... 1 Beep Initialize Main Settings 2 USB Connect Video Out Function Guide COMPONENT Shooting Settings Shooting Settings 1 AF Illuminator AF Mode Shooting Settings 2 Auto Orientation Grid Line Digital Zoom Auto Review Clock Settings Language Setting 19
... 1 Beep Initialize Main Settings 2 USB Connect Video Out Function Guide COMPONENT Shooting Settings Shooting Settings 1 AF Illuminator AF Mode Shooting Settings 2 Auto Orientation Grid Line Digital Zoom Auto Review Clock Settings Language Setting 19

Instruction Manual
Page 20
..., depending on the selected mode. 2Select the desired item with v/V on the control button. Function Guide • The menu can be displayed only when the camera is hidden, keep pressing v/V until the item appears on the screen. 3Select the desired setting with b/B on the control button. • If the desired item...
..., depending on the selected mode. 2Select the desired item with v/V on the control button. Function Guide • The menu can be displayed only when the camera is hidden, keep pressing v/V until the item appears on the screen. 3Select the desired setting with b/B on the control button. • If the desired item...

Instruction Manual
Page 21
...items are available depending on the selected shooting mode (such as Auto Adjustment, Scene Selection, Program Auto, Movie Mode) on the camera mode. Face Detection Detects the faces and adjusts focus and other setting to the scene. Menu for viewing images. 21 Adds a ...for viewing (Delete) (Slide Show) (Retouch) (Protect) DPOF (Print) (Rotate) (Select Folder) Deletes images. Image Size Selects the still image quality. REC Mode Selects the continuous shooting method. Color Mode Changes the vividness of flash light. SteadyShot Selects the anti-blur mode. SETUP...
...items are available depending on the selected shooting mode (such as Auto Adjustment, Scene Selection, Program Auto, Movie Mode) on the camera mode. Face Detection Detects the faces and adjusts focus and other setting to the scene. Menu for viewing images. 21 Adds a ...for viewing (Delete) (Slide Show) (Retouch) (Protect) DPOF (Print) (Rotate) (Select Folder) Deletes images. Image Size Selects the still image quality. REC Mode Selects the continuous shooting method. Color Mode Changes the vividness of flash light. SteadyShot Selects the anti-blur mode. SETUP...
