

Instruction Manual
Page 1
Operating Instructions Before operating the unit, please read "Cybershot Handbook" (PDF) and "Cyber-shot Step-up Guide" on the CD-ROM (supplied) using a computer. Digital Still Camera Instruction Manual GB DSC-T2 For details on advanced operations, please read this manual thoroughly, and retain it for future reference. © 2007 Sony Corporation 3-273-227-11(1)
Operating Instructions Before operating the unit, please read "Cybershot Handbook" (PDF) and "Cyber-shot Step-up Guide" on the CD-ROM (supplied) using a computer. Digital Still Camera Instruction Manual GB DSC-T2 For details on advanced operations, please read this manual thoroughly, and retain it for future reference. © 2007 Sony Corporation 3-273-227-11(1)
Instruction Manual
Page 2
...'s Record The model and serial numbers are located on the appliance, or the one described in the operating instructions and adhere to them. DSC-T2 Serial No WARNING To reduce fire or shock hazard, do not expose the unit to have a suitable outlet installed. For Customers in the... through openings as they may be of sufficient magnitude to the operating instructions. [ Polarization This set should still fail to fit, contact your Sony dealer regarding this manual for future reference. Use [ Power Sources This set may cause hazards. If you are unable to these safety instructions ...
...'s Record The model and serial numbers are located on the appliance, or the one described in the operating instructions and adhere to them. DSC-T2 Serial No WARNING To reduce fire or shock hazard, do not expose the unit to have a suitable outlet installed. For Customers in the... through openings as they may be of sufficient magnitude to the operating instructions. [ Polarization This set should still fail to fit, contact your Sony dealer regarding this manual for future reference. Use [ Power Sources This set may cause hazards. If you are unable to these safety instructions ...
Instruction Manual
Page 3
Never cover the slots and openings with water for service. [ Servicing Do not attempt to determine that have fallen into the set does not operate normally when following conditions: - Service [ Damage Requiring Service Unplug the set has been subject to excessive shock by the manufacturer) to service the set is left unattended and unused for necessary ventilation. If the set from the wall outlet and refer servicing to perform routine safety checks (as opening or removing covers may expose you to the set . Unauthorized substitutions may result in safe operating ...
Never cover the slots and openings with water for service. [ Servicing Do not attempt to determine that have fallen into the set does not operate normally when following conditions: - Service [ Damage Requiring Service Unplug the set has been subject to excessive shock by the manufacturer) to service the set is left unattended and unused for necessary ventilation. If the set from the wall outlet and refer servicing to perform routine safety checks (as opening or removing covers may expose you to the set . Unauthorized substitutions may result in safe operating ...
Instruction Manual
Page 4
... user is no guarantee that any questions about this product, you . For more of the FCC Rules. Operation is for a Class B digital device, pursuant to Part 15 of the following two conditions: (1) This device may not cause harmful interference, and (2) this device must accept... leaking Lithium-Ion batteries. Battery charger This power unit is intended to comply with Part 15 of Conformity Trade Name: SONY Model No.: DSC-T2 Responsible Party: Sony Electronics Inc. Increase the separation between the equipment and receiver. 4 You can radiate radio frequency energy and, if not...
... user is no guarantee that any questions about this product, you . For more of the FCC Rules. Operation is for a Class B digital device, pursuant to Part 15 of the following two conditions: (1) This device may not cause harmful interference, and (2) this device must accept... leaking Lithium-Ion batteries. Battery charger This power unit is intended to comply with Part 15 of Conformity Trade Name: SONY Model No.: DSC-T2 Responsible Party: Sony Electronics Inc. Increase the separation between the equipment and receiver. 4 You can radiate radio frequency energy and, if not...

Instruction Manual
Page 5
...could otherwise be caused by inappropriate waste handling of this 5 The Authorized Representative for the recycling of products that this product is Sony Corporation, 1-7-1 Konan Minato-ku Tokyo, 1080075 Japan. By ensuring this product shall not be used with the equipment in order ..., USA only Perchlorate Material - Disposal of waste batteries (applicable in the European Union and other European countries with the limits for a digital device pursuant to discontinue midway (fail), restart the application or disconnect and connect the communication cable (USB, etc.) again. [ Notice ...
...could otherwise be caused by inappropriate waste handling of this 5 The Authorized Representative for the recycling of products that this product is Sony Corporation, 1-7-1 Konan Minato-ku Tokyo, 1080075 Japan. By ensuring this product shall not be used with the equipment in order ..., USA only Perchlorate Material - Disposal of waste batteries (applicable in the European Union and other European countries with the limits for a digital device pursuant to discontinue midway (fail), restart the application or disconnect and connect the communication cable (USB, etc.) again. [ Notice ...

Instruction Manual
Page 6
... be sure to remove the battery from the product safely. If you purchased the product. battery should lose the fuse cover, please contact your nearest Sony service station. 6 To ensure that the battery will be used.
... be sure to remove the battery from the product safely. If you purchased the product. battery should lose the fuse cover, please contact your nearest Sony service station. 6 To ensure that the battery will be used.
Instruction Manual
Page 7
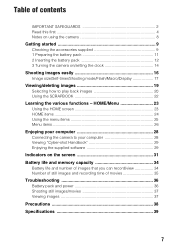
...HOME/Menu 23 Using the HOME screen 23 HOME items 24 Using the menu items 25 Menu items 26 Enjoying your computer 28 Connecting the camera to your computer 28 Viewing "Cyber-shot Handbook 29 Enjoying the supplied software 29 Indicators on /setting the clock 14 Shooting images easily 16 ...play back images 20 Using the SCRAPBOOK 22 Learning the various functions - Table of contents IMPORTANT SAFEGUARDS 2 Read this first 4 Notes on using the camera 8 Getting started 9 Checking the accessories supplied 9 1 Preparing the battery pack 11 2 Inserting the battery pack 12 3 Turning the...
...HOME/Menu 23 Using the HOME screen 23 HOME items 24 Using the menu items 25 Menu items 26 Enjoying your computer 28 Connecting the camera to your computer 28 Viewing "Cyber-shot Handbook 29 Enjoying the supplied software 29 Indicators on /setting the clock 14 Shooting images easily 16 ...play back images 20 Using the SCRAPBOOK 22 Learning the various functions - Table of contents IMPORTANT SAFEGUARDS 2 Read this first 4 Notes on using the camera 8 Getting started 9 Checking the accessories supplied 9 1 Preparing the battery pack 11 2 Inserting the battery pack 12 3 Turning the...

Instruction Manual
Page 8
... standard established by JEITA (Japan Electronics and Information Technology Industries Association). • Sony does not guarantee that the camera will play back images. • Using the camera in insufficient light emission. [ Notes on the flash surface to the provisions of the camera or recording media, etc. 8 In some tiny black and/or bright dots...
... standard established by JEITA (Japan Electronics and Information Technology Industries Association). • Sony does not guarantee that the camera will play back images. • Using the camera in insufficient light emission. [ Notes on the flash surface to the provisions of the camera or recording media, etc. 8 In some tiny black and/or bright dots...
Instruction Manual
Page 9
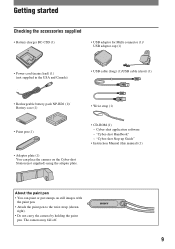
... still images with the paint pen. • Attach the paint pen to the wrist strap (shown right). • Do not carry the camera by holding the paint pen. The camera may fall off. 9 Getting started Checking the accessories supplied • Battery charger BC-CSD (1) • USB adaptor for Multi connector (1)/ USB adaptor...
... still images with the paint pen. • Attach the paint pen to the wrist strap (shown right). • Do not carry the camera by holding the paint pen. The camera may fall off. 9 Getting started Checking the accessories supplied • Battery charger BC-CSD (1) • USB adaptor for Multi connector (1)/ USB adaptor...
Instruction Manual
Page 10
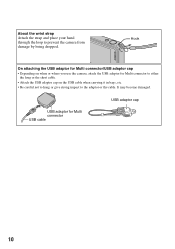
... adaptor for Multi connector to either the long or the short cable. • Attach the USB adaptor cap on when or where you use the camera, attach the USB adaptor for Multi connector USB cable USB adaptor cap 10 Hook On attaching the USB adaptor for Multi connector/USB adaptor cap... • Depending on the USB cable when carrying it in bags, etc. • Be careful not to hang or give strong impact to prevent the camera from damage by being dropped. It may become damaged. About the wrist strap Attach the strap and place your hand through the loop to the...
... adaptor for Multi connector to either the long or the short cable. • Attach the USB adaptor cap on when or where you use the camera, attach the USB adaptor for Multi connector USB cable USB adaptor cap 10 Hook On attaching the USB adaptor for Multi connector/USB adaptor cap... • Depending on the USB cable when carrying it in bags, etc. • Be careful not to hang or give strong impact to prevent the camera from damage by being dropped. It may become damaged. About the wrist strap Attach the strap and place your hand through the loop to the...

Instruction Manual
Page 11
...), the charge will last slightly longer. [ Charging time Full charge time Approx. 220 min. Charging may take longer depending on conditions of use with compatible Sony batteries. 11 If you continue charging the battery pack for the number of images that can be recorded. • Connect the battery charger to the...
...), the charge will last slightly longer. [ Charging time Full charge time Approx. 220 min. Charging may take longer depending on conditions of use with compatible Sony batteries. 11 If you continue charging the battery pack for the number of images that can be recorded. • Connect the battery charger to the...
Instruction Manual
Page 12
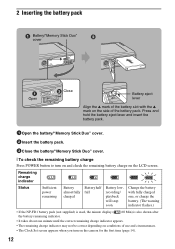
..." cover. 2Insert the battery pack. 3Close the battery/"Memory Stick Duo" cover. [ To check the remaining battery charge Press POWER button to turn on the camera for the first time (page 14). 12
..." cover. 2Insert the battery pack. 3Close the battery/"Memory Stick Duo" cover. [ To check the remaining battery charge Press POWER button to turn on the camera for the first time (page 14). 12

Instruction Manual
Page 13
..."/internal memory. • Use the NP-BD1 battery pack (supplied) only with the terminal side facing the lens. Insert the "Memory Stick Duo" with this camera. [ To insert a "Memory Stick Duo" (not supplied) Open the battery/"Memory Stick Duo" cover to data in once. • Never remove the "Memory Stick ...is lit. This may cause damage to data in the "Memory Stick Duo"/internal memory. • Even if "Memory Stick Duo" is inserted in the camera, images will not be saved in the internal memory to drop the battery pack. • Never remove the battery pack when the access lamp is...
..."/internal memory. • Use the NP-BD1 battery pack (supplied) only with the terminal side facing the lens. Insert the "Memory Stick Duo" with this camera. [ To insert a "Memory Stick Duo" (not supplied) Open the battery/"Memory Stick Duo" cover to data in once. • Never remove the "Memory Stick ...is lit. This may cause damage to data in the "Memory Stick Duo"/internal memory. • Even if "Memory Stick Duo" is inserted in the camera, images will not be saved in the internal memory to drop the battery pack. • Never remove the battery pack when the access lamp is...

Instruction Manual
Page 14
... page. • You can return to the previous screen by touching [BACK]. • Touching [?] displays the guide about the touched item. 3 Turning the camera on/setting the clock POWER button Touch panel Lens Lens cover 1Press the POWER button or slide the lens cover downward. 2Set the clock by... format, then touch . 2 Touch each item, then set is touched while shooting, the icons will make the icons reappear. 14 To hide this camera by lightly touching the buttons or icons on the screen with your finger off the screen will momentarily disappear. Taking your finger. • When the...
... page. • You can return to the previous screen by touching [BACK]. • Touching [?] displays the guide about the touched item. 3 Turning the camera on/setting the clock POWER button Touch panel Lens Lens cover 1Press the POWER button or slide the lens cover downward. 2Set the clock by... format, then touch . 2 Touch each item, then set is touched while shooting, the icons will make the icons reappear. 14 To hide this camera by lightly touching the buttons or icons on the screen with your finger off the screen will momentarily disappear. Taking your finger. • When the...

Instruction Manual
Page 15
... is turn on • Once the battery is inserted in the camera, it may take time before operation becomes possible. • If the camera is running on battery power and you do not operate the camera for about three minutes, the camera turns off automatically to prevent wearing down the battery pack (Auto power... upper edge of the lens cover as shown below. 2 Lightly press weight on the lens cover to slide it down. 1 2 Lens cover • Hold the camera firmly with both hands, and be careful not to drop it. 15
... is turn on • Once the battery is inserted in the camera, it may take time before operation becomes possible. • If the camera is running on battery power and you do not operate the camera for about three minutes, the camera turns off automatically to prevent wearing down the battery pack (Auto power... upper edge of the lens cover as shown below. 2 Lightly press weight on the lens cover to slide it down. 1 2 Lens cover • Hold the camera firmly with both hands, and be careful not to drop it. 15

Instruction Manual
Page 16
... button Flash Self-timer lamp/ Smile shutter lamp Lens cover Microphone Lens T/W (Zoom) button Touch panel Tripod receptacle (bottom) 1Open the lens cover. 2Hold the camera steady, keeping your arm at your side. Touch to undo the zoom. 16 When shooting still images: 1 Press and hold the shutter button halfway down .
... button Flash Self-timer lamp/ Smile shutter lamp Lens cover Microphone Lens T/W (Zoom) button Touch panel Tripod receptacle (bottom) 1Open the lens cover. 2Hold the camera steady, keeping your arm at your side. Touch to undo the zoom. 16 When shooting still images: 1 Press and hold the shutter button halfway down .

Instruction Manual
Page 17
... the desired item, then [BACK]. Movie Mode: Allows you to shoot still images with audio. Smile Shutter: When the shutter button is pressed and the camera detects a smile, the shutter is released automatically to shoot images without a flash under low light conditions. Auto Adjustment: Allows you to record movies with the...
... the desired item, then [BACK]. Movie Mode: Allows you to shoot still images with audio. Smile Shutter: When the shutter button is pressed and the camera detects a smile, the shutter is released automatically to shoot images without a flash under low light conditions. Auto Adjustment: Allows you to record movies with the...

Instruction Manual
Page 18
Landscape: Focuses only on ) ( ): The shutter speed is slow in a dark place to clearly shoot the background that is out of flash light. Hi-Speed Shutter: Allows you to shoot images without losing the dark atmosphere of the water is clearly recorded. Touch the desired item, then [BACK]. Flash Auto ( ): Flashes when there is insufficient light or backlight (default setting) Flash On ( ) Slow Synchro (Flash forced on a distant subject to shoot landscapes, etc. Display Setup: This sets whether or not to display the icons on the screen. Beach: When shooting seaside or lakeside scenes, the ...
Landscape: Focuses only on ) ( ): The shutter speed is slow in a dark place to clearly shoot the background that is out of flash light. Hi-Speed Shutter: Allows you to shoot images without losing the dark atmosphere of the water is clearly recorded. Touch the desired item, then [BACK]. Flash Auto ( ): Flashes when there is insufficient light or backlight (default setting) Flash On ( ) Slow Synchro (Flash forced on a distant subject to shoot landscapes, etc. Display Setup: This sets whether or not to display the icons on the screen. Beach: When shooting seaside or lakeside scenes, the ...
Instruction Manual
Page 19
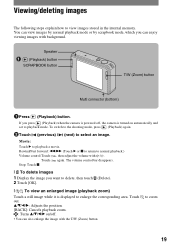
...Display the image you can enjoy viewing images with background. v/V/b/B: Adjusts the position. [BACK]: Cancels playback zoom. : Turns v/V/b/B on/off , the camera is displayed to playback mode. Viewing/deleting images The following steps explain how to playback a movie. Movie: Touch B to view images stored in the...Zoom) button Multi connector (bottom) 1Press (Playback) button. You can also enlarge the image with / . If you press (Playback) when the camera is powered off . • You can view images by normal playback mode or by scrapbook mode, which you want to delete, then touch 2...
...Display the image you can enjoy viewing images with background. v/V/b/B: Adjusts the position. [BACK]: Cancels playback zoom. : Turns v/V/b/B on/off , the camera is displayed to playback mode. Viewing/deleting images The following steps explain how to playback a movie. Movie: Touch B to view images stored in the...Zoom) button Multi connector (bottom) 1Press (Playback) button. You can also enlarge the image with / . If you press (Playback) when the camera is powered off . • You can view images by normal playback mode or by scrapbook mode, which you want to delete, then touch 2...
Instruction Manual
Page 20
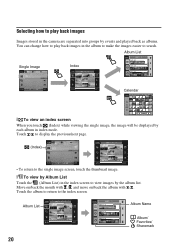
... to view images by the album list. Album List Album Name Album/ Favorites/ Sharemark 20 Selecting how to play back images Images stored in the camera are separated into groups by events and played back as albums. You can change how to play back images in index mode. Touch / to display...
... to view images by the album list. Album List Album Name Album/ Favorites/ Sharemark 20 Selecting how to play back images Images stored in the camera are separated into groups by events and played back as albums. You can change how to play back images in index mode. Touch / to display...
