

Instruction Manual
Page 1
2-895-784-23(1) Wireless Surround Kit Operating Instructions GB Mode d'emploi FR WAHT-SD1 ©2007 Sony Corporation
2-895-784-23(1) Wireless Surround Kit Operating Instructions GB Mode d'emploi FR WAHT-SD1 ©2007 Sony Corporation
Instruction Manual
Page 2
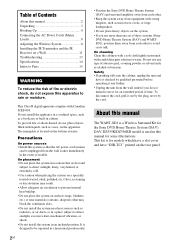
... near materials (curtains, draperies) that the AC power cord (mains) can be operated in this manual for the Sony DVD Home Theatre System (DAV). 3 Table of Contents About this manual 2 Unpacking 3 Hooking Up 4 Connecting the AC Power Cords (Mains Leads 8 Adjusting the Wireless System 8 Installing the IR Transmitter and the IR Receiver on a Wall 11 Troubleshooting 13 Specifications 14 Index to Parts 15 WARNING To reduce the risk of...
... near materials (curtains, draperies) that the AC power cord (mains) can be operated in this manual for the Sony DVD Home Theatre System (DAV). 3 Table of Contents About this manual 2 Unpacking 3 Hooking Up 4 Connecting the AC Power Cords (Mains Leads 8 Adjusting the Wireless System 8 Installing the IR Transmitter and the IR Receiver on a Wall 11 Troubleshooting 13 Specifications 14 Index to Parts 15 WARNING To reduce the risk of...
Instruction Manual
Page 3
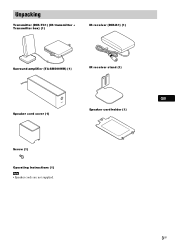
GB 3GB Unpacking Transmitter (DIR-TC1) (IR transmitter + Transmitter box) (1) IR receiver (DIR-R1) (1) Surround amplifier (TA-SB500WR) (1) IR receiver stand (1) POWER POWER/ON LINE Speaker cord cover (1) Speaker cord holder (1) Screw (1) Operating Instructions (1) Note • Speaker cords are not supplied.
GB 3GB Unpacking Transmitter (DIR-TC1) (IR transmitter + Transmitter box) (1) IR receiver (DIR-R1) (1) Surround amplifier (TA-SB500WR) (1) IR receiver stand (1) POWER POWER/ON LINE Speaker cord cover (1) Speaker cord holder (1) Screw (1) Operating Instructions (1) Note • Speaker cords are not supplied.
Instruction Manual
Page 4
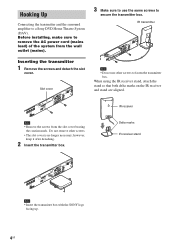
... Hooking Up Connecting the transmitter and the surround amplifier to fasten the transmitter box. Before installing, make sure to secure the transmitter box. FRONT R SPEAKESRUR R FRONT L SUR L D-LIGHT SYNC OUT Slot cover CFOMA7X5IAL AM DIR-TC1 (DVDOUOTNLY) DMPROARUTDIO IN L VITDVE/O (DVD ONLY) CYOMPONPBE/CNBT VIDEPOR/OCRUT VIDEO (DSVVDIDOMNELOOY)NITOR OUT Note • Remove the screws from the wall outlet (mains). When using the IR receiver...
... Hooking Up Connecting the transmitter and the surround amplifier to fasten the transmitter box. Before installing, make sure to secure the transmitter box. FRONT R SPEAKESRUR R FRONT L SUR L D-LIGHT SYNC OUT Slot cover CFOMA7X5IAL AM DIR-TC1 (DVDOUOTNLY) DMPROARUTDIO IN L VITDVE/O (DVD ONLY) CYOMPONPBE/CNBT VIDEPOR/OCRUT VIDEO (DSVVDIDOMNELOOY)NITOR OUT Note • Remove the screws from the wall outlet (mains). When using the IR receiver...
Instruction Manual
Page 5
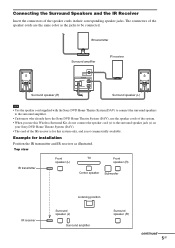
... Front speaker (R) Center speaker Subwoofer IR receiver Listening position Surround speaker (L) Surround amplifier Surround speaker (R) continued 5GB The connectors of the IR receiver is not commercially available. IR transmitter Surround amplifier IR receiver Surround speaker (R) DIR-R1 SPEAKER SURROUND L SURROUND R Surround speaker (L) Note • Use the speaker cord supplied with the Sony DVD Home Theatre System (DAV) to connect the surround speakers to the surround amplifier. • Customers who already have the Sony DVD Home Theatre System (DAV), use the speaker cords...
... Front speaker (R) Center speaker Subwoofer IR receiver Listening position Surround speaker (L) Surround amplifier Surround speaker (R) continued 5GB The connectors of the IR receiver is not commercially available. IR transmitter Surround amplifier IR receiver Surround speaker (R) DIR-R1 SPEAKER SURROUND L SURROUND R Surround speaker (L) Note • Use the speaker cord supplied with the Sony DVD Home Theatre System (DAV) to connect the surround speakers to the surround amplifier. • Customers who already have the Sony DVD Home Theatre System (DAV), use the speaker cords...
Instruction Manual
Page 6
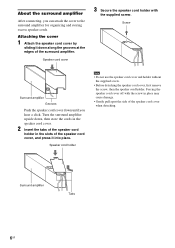
Turn the surround amplifier upside down, then store the cords in the speaker cord cover. 2 Insert the tabs of the speaker cord holder in place may cause damage. • Gently pull apart the side of the surround amplifier. Speaker cord holder Note • Do not use the speaker cord cover and holder without the supplied screw. • Before detaching the speaker cord cover, first remove the...
Turn the surround amplifier upside down, then store the cords in the speaker cord cover. 2 Insert the tabs of the speaker cord holder in place may cause damage. • Gently pull apart the side of the surround amplifier. Speaker cord holder Note • Do not use the speaker cord cover and holder without the supplied screw. • Before detaching the speaker cord cover, first remove the...
Instruction Manual
Page 7
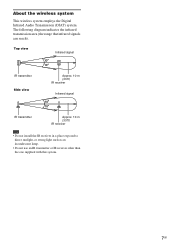
... wireless system employs the Digital Infrared Audio Transmission (DIAT) system. Top view Infrared signal 10 10 IR transmitter Side view Approx. 10 m (33 ft) IR receiver Infrared signal 10 10 IR transmitter Approx. 10 m (33 ft) IR receiver Note • Do not install the IR receiver in a place exposed to direct sunlight, or strong light such as an incandescent lamp. • Do not use...
... wireless system employs the Digital Infrared Audio Transmission (DIAT) system. Top view Infrared signal 10 10 IR transmitter Side view Approx. 10 m (33 ft) IR receiver Infrared signal 10 10 IR transmitter Approx. 10 m (33 ft) IR receiver Note • Do not install the IR receiver in a place exposed to direct sunlight, or strong light such as an incandescent lamp. • Do not use...
Instruction Manual
Page 8
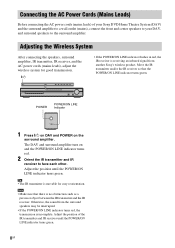
... indicator flashes in red, the IR receiver is receiving an infrared signal from the surround speakers may be interrupted. • If the POWER/ON LINE indicator turns red, the transmission is movable for good transmission. Tip • The IR transmitter is incomplete. The DAV and surround amplifier turn on the surround amplifier. Adjusting the Wireless System After connecting the speakers, surround amplifier, IR transmitter, IR receiver, and the AC power cords (mains leads), adjust...
... indicator flashes in red, the IR receiver is receiving an infrared signal from the surround speakers may be interrupted. • If the POWER/ON LINE indicator turns red, the transmission is movable for good transmission. Tip • The IR transmitter is incomplete. The DAV and surround amplifier turn on the surround amplifier. Adjusting the Wireless System After connecting the speakers, surround amplifier, IR transmitter, IR receiver, and the AC power cords (mains leads), adjust...
Instruction Manual
Page 9
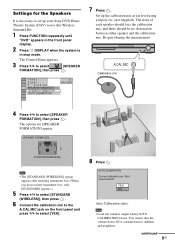
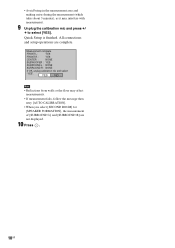
... . 6 Connect the calibration mic to the A.CAL MIC jack on the front panel and press X/x to select [SPEAKER FORMATION], then press . 1 ( 4 4 ) 3 ( 2 8 ) T 0:03:04 SPEAKER FORMATION SPEAKER FORMATION AUTO CALIBRATION DVD VIDEO 7 Press . You cannot turn the volume down. continued 9GB Be quiet during the measurement. YES NO Auto Calibration starts. Note • Loud test sound is in stop mode. Settings for [SPEAKER FORMATION] appear. The options for the Speakers It is necessary to use this Wireless Surround...
... . 6 Connect the calibration mic to the A.CAL MIC jack on the front panel and press X/x to select [SPEAKER FORMATION], then press . 1 ( 4 4 ) 3 ( 2 8 ) T 0:03:04 SPEAKER FORMATION SPEAKER FORMATION AUTO CALIBRATION DVD VIDEO 7 Press . You cannot turn the volume down. continued 9GB Be quiet during the measurement. YES NO Auto Calibration starts. Note • Loud test sound is in stop mode. Settings for [SPEAKER FORMATION] appear. The options for the Speakers It is necessary to use this Wireless Surround...
Instruction Manual
Page 10
...; If measurement fails, follow the message then retry [AUTO CALIBRATION]. • When you select [SECOND ROOM] for [SPEAKER FORMATION], the measurement of [SURROUND L] and [SURROUND R] are complete. FRONT L : YES FRONT R : YES CENTER : NONE SUBWOOFER : YES SURROUND L : NONE SURROUND R : NONE If OK, unplug calibration mic and select "YES". All connections and setup operations are not displayed. 10 Press . 10GB Quick Setup is finished. Measurement complete. YES NO...
...; If measurement fails, follow the message then retry [AUTO CALIBRATION]. • When you select [SECOND ROOM] for [SPEAKER FORMATION], the measurement of [SURROUND L] and [SURROUND R] are complete. FRONT L : YES FRONT R : YES CENTER : NONE SUBWOOFER : YES SURROUND L : NONE SURROUND R : NONE If OK, unplug calibration mic and select "YES". All connections and setup operations are not displayed. 10 Press . 10GB Quick Setup is finished. Measurement complete. YES NO...
Instruction Manual
Page 11
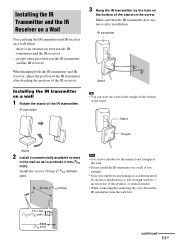
... hang the IR transmitter and IR receiver on a wall 1 Rotate the stand of the IR receiver. When hanging both the IR transmitter and IR receiver, adjust the position of the IR transmitter after installation. Stand Troughs Stand 2 Install 2 commercially available screws in the bottom of this product, or natural disaster. • When connecting/disconnecting the cord, detach the IR transmitter from the wall...
... hang the IR transmitter and IR receiver on a wall 1 Rotate the stand of the IR receiver. When hanging both the IR transmitter and IR receiver, adjust the position of the IR transmitter after installation. Stand Troughs Stand 2 Install 2 commercially available screws in the bottom of this product, or natural disaster. • When connecting/disconnecting the cord, detach the IR transmitter from the wall...

Instruction Manual
Page 12
IR receiver IR receiver stand Tip • When reattaching the IR receiver stand to 9/32 inch) 4 mm (3/16 inch) 2 Detach the IR receiver stand and hang it by the hole on the rear of the IR receiver on the IR receiver and stand are aligned. 12GB Installing the IR receiver on a wall 1 Install a commercially available screw in the wall so as to protrude 4 mm (3/16 inch). 5 to 7 mm (7/32 to the IR receiver, attach the stand so that the IR receiver does not move after installation. Make sure that both delta marks on the screw.
IR receiver IR receiver stand Tip • When reattaching the IR receiver stand to 9/32 inch) 4 mm (3/16 inch) 2 Detach the IR receiver stand and hang it by the hole on the rear of the IR receiver on the IR receiver and stand are aligned. 12GB Installing the IR receiver on a wall 1 Install a commercially available screw in the wall so as to protrude 4 mm (3/16 inch). 5 to 7 mm (7/32 to the IR receiver, attach the stand so that the IR receiver does not move after installation. Make sure that both delta marks on the screw.
Instruction Manual
Page 13
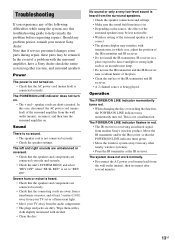
... Sony's wireless product. Note that the speakers and components are short-circuited. The left and right sounds are unbalanced or reversed. • Check that if service personnel changes some parts during repair, these parts may momentarily turn on. • The + and - In the event of a problem with alcohol. • Clean the disc. Operation The POWER/ON LINE indicator momentarily turns red. • When changing the disc or switching the function, the POWER...
... Sony's wireless product. Note that the speakers and components are short-circuited. The left and right sounds are unbalanced or reversed. • Check that if service personnel changes some parts during repair, these parts may momentarily turn on. • The + and - In the event of a problem with alcohol. • Clean the disc. Operation The POWER/ON LINE indicator momentarily turns red. • When changing the disc or switching the function, the POWER...
Instruction Manual
Page 14
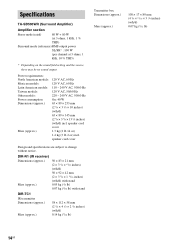
.../16 × 3 1/4 inches) (w/h/d) 0.07 kg (5/32 lb) 14GB Specifications TA-SB500WR (Surround Amplifier) Amplifier section Stereo mode (rated) 80 W + 80 W (at 3 ohms, 1 kHz, 1 % THD) Surround mode (reference) RMS output power SL/SR* : 100 W (per channel at 3 ohms, 1 kHz, 10 % THD) * Depending on the sound field setting and the source, there may be no sound output. speaker cord cover 1.3 kg (2 lb 14 oz) 1.4 kg (3 lb 2 oz...
.../16 × 3 1/4 inches) (w/h/d) 0.07 kg (5/32 lb) 14GB Specifications TA-SB500WR (Surround Amplifier) Amplifier section Stereo mode (rated) 80 W + 80 W (at 3 ohms, 1 kHz, 1 % THD) Surround mode (reference) RMS output power SL/SR* : 100 W (per channel at 3 ohms, 1 kHz, 10 % THD) * Depending on the sound field setting and the source, there may be no sound output. speaker cord cover 1.3 kg (2 lb 14 oz) 1.4 kg (3 lb 2 oz...
Instruction Manual
Page 15
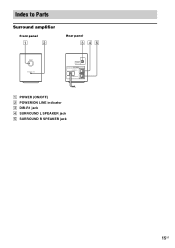
Index to Parts Surround amplifier Front panel Rear panel POWER POWER ON-LINE DIR-R1 SPEAKER SURROUND L SURROUND R A POWER (ON/OFF) B POWER/ON LINE indicator C DIR-R1 jack D SURROUND L SPEAKER jack E SURROUND R SPEAKER jack 15GB
Index to Parts Surround amplifier Front panel Rear panel POWER POWER ON-LINE DIR-R1 SPEAKER SURROUND L SURROUND R A POWER (ON/OFF) B POWER/ON LINE indicator C DIR-R1 jack D SURROUND L SPEAKER jack E SURROUND R SPEAKER jack 15GB

Instruction Manual
Page 32
(1) Sony Corporation Printed in China
(1) Sony Corporation Printed in China


