Operating Guide
Page 11
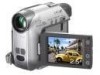
... the wall outlet by making the same connections as the AC Adaptor is connected to the DC IN jack of your camcorder. • Times measured with viewfinder LCD panel closed NP-FP30 (supplied) 95 120 NP-FP50 135 170 NP-FP70 280 350 NP-FP90 500 620 On the battery... in low temperatures. • The recording and playback time will not be shorter when you do when charging the battery pack. Bottom: Recording with the camcorder at 25°C (77°F). (10 - 30 °C (50 - 86°F) is not attached correctly. - To use an outside power source You can operate your...
... the wall outlet by making the same connections as the AC Adaptor is connected to the DC IN jack of your camcorder. • Times measured with viewfinder LCD panel closed NP-FP30 (supplied) 95 120 NP-FP50 135 170 NP-FP70 280 350 NP-FP90 500 620 On the battery... in low temperatures. • The recording and playback time will not be shorter when you do when charging the battery pack. Bottom: Recording with the camcorder at 25°C (77°F). (10 - 30 °C (50 - 86°F) is not attached correctly. - To use an outside power source You can operate your...
Operating Guide
Page 14
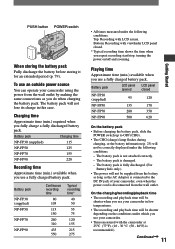
...LCD panel. • If you rotate the LCD panel 180 degrees to the lens side, you close the LCD panel with the LCD screen facing out. Step 4: Adjusting the LCD panel and view&#...64257;nder The LCD panel Open the LCD panel 90 degrees to the camcorder (), then rotate it until the picture is convenient during playback operations. • If you rotate...; You can adjust the [FADER] and the [EXPOSURE] setting using the viewfinder when you can close the LCD panel to avoid wearing down the battery, etc. This is clear. • You can adjust the brightness ...
...LCD panel. • If you rotate the LCD panel 180 degrees to the lens side, you close the LCD panel with the LCD screen facing out. Step 4: Adjusting the LCD panel and view&#...64257;nder The LCD panel Open the LCD panel 90 degrees to the camcorder (), then rotate it until the picture is convenient during playback operations. • If you rotate...; You can adjust the [FADER] and the [EXPOSURE] setting using the viewfinder when you can close the LCD panel to avoid wearing down the battery, etc. This is clear. • You can adjust the brightness ...

Operating Guide
Page 17
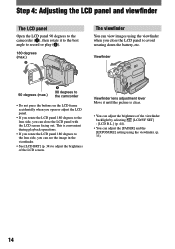
... slides back in. lever OPEN/EJECT lever Lid Getting Started The cassette compartment automatically comes out and opens up , then press . This may cause a malfunction. 3 Close the lid. 17 Do not force the cassette into the compartment. Window-side Push the center of the back of the cassette lightly. Step 7: Inserting...
... slides back in. lever OPEN/EJECT lever Lid Getting Started The cassette compartment automatically comes out and opens up , then press . This may cause a malfunction. 3 Close the lid. 17 Do not force the cassette into the compartment. Window-side Push the center of the back of the cassette lightly. Step 7: Inserting...
Operating Guide
Page 22
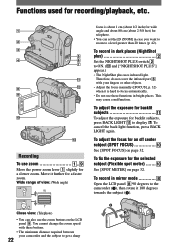
...58165; to ON. ( and ["NIGHTSHOT PLUS"] appear.) • The NightShot plus uses infrared light. You cannot change the zoom speed with your camcorder and the subject to a level greater than 20 times (p. 42). Therefore, do not cover the infrared port with these functions in ... exposure for the selected subject (Flexible spot meter See [SPOT METER] on page 32. Wide range of view: (Wide angle) focus is hard to the camcorder (), then rotate it further for a faster zoom. Functions used for recording/playback, etc. 1 2 3 5 4 6 7 qa 8 qs 9 0 qd Recording ...
...58165; to ON. ( and ["NIGHTSHOT PLUS"] appear.) • The NightShot plus uses infrared light. You cannot change the zoom speed with your camcorder and the subject to a level greater than 20 times (p. 42). Therefore, do not cover the infrared port with these functions in ... exposure for the selected subject (Flexible spot meter See [SPOT METER] on page 32. Wide range of view: (Wide angle) focus is hard to the camcorder (), then rotate it further for a faster zoom. Functions used for recording/playback, etc. 1 2 3 5 4 6 7 qa 8 qs 9 0 qd Recording ...

Operating Guide
Page 31
...page 32. Touch . Touch the desired page. Touch the desired button. Select the desired setting, then touch (Close). • With some settings, you to the previous screen. 31 Touch / to hide the menu screen. Using the menu items Follow the instructions below to...0 HR OTHERS WORLD TIME BEEP A.SHUT OFF COMMANDER DISP OUT REC LAMP STBY ON OFF EXEC RET. After finishing the settings, touch (Close) to select the item, then touch [EXEC]. (The process in step and is the same as that in step .) &#...
...page 32. Touch . Touch the desired page. Touch the desired button. Select the desired setting, then touch (Close). • With some settings, you to the previous screen. 31 Touch / to hide the menu screen. Using the menu items Follow the instructions below to...0 HR OTHERS WORLD TIME BEEP A.SHUT OFF COMMANDER DISP OUT REC LAMP STBY ON OFF EXEC RET. After finishing the settings, touch (Close) to select the item, then touch [EXEC]. (The process in step and is the same as that in step .) &#...
Operating Guide
Page 32
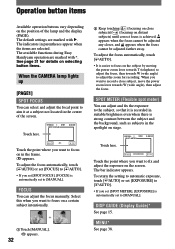
... (telephoto) to adjust the focus, then towards W (wide angle), then adjust the focus. MENU* See page 38. The available functions during Easy Handycam operation are marked with . Touch here. 60min STBY SPOT METER 0:00:00 AUTO OK Touch the point where you set [SPOT METER], [EXPOSURE.... The bar indicator appears. FOCUS You can select and adjust the focal point to [MANUAL]. Select this when you want to record a close subjects)/ (focusing on distant subjects) until correct focus is automatically set to aim it is recorded in the frame. appears. When...
... (telephoto) to adjust the focus, then towards W (wide angle), then adjust the focus. MENU* See page 38. The available functions during Easy Handycam operation are marked with . Touch here. 60min STBY SPOT METER 0:00:00 AUTO OK Touch the point where you set [SPOT METER], [EXPOSURE.... The bar indicator appears. FOCUS You can select and adjust the focal point to [MANUAL]. Select this when you want to record a close subjects)/ (focusing on distant subjects) until correct focus is automatically set to aim it is recorded in the frame. appears. When...
Operating Guide
Page 33
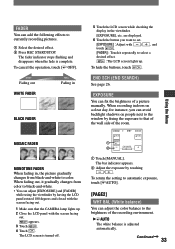
...the brightness of a picture manually. The bar indicator appears. Adjust the exposure by fixing the exposure to that the CAMERA lamp lights up. 2 Close the LCD panel with touch . / , and [FADER] : Touch it gradually changes from black-and-white to color. To cancel the operation, touch [ ...Touch . 4 Touch . EXPOSURE You can adjust [EXPOSURE] and [FADER] while using the viewfinder by having the LCD panel rotated 180 degrees and closed with the screen facing out. 1 Make sure that of the wall side of the room. 60min AUTO STBY 0:00:00 OK 1 MANU- Fading out ...
...the brightness of a picture manually. The bar indicator appears. Adjust the exposure by fixing the exposure to that the CAMERA lamp lights up. 2 Close the LCD panel with touch . / , and [FADER] : Touch it gradually changes from black-and-white to color. To cancel the operation, touch [ ...Touch . 4 Touch . EXPOSURE You can adjust [EXPOSURE] and [FADER] while using the viewfinder by having the LCD panel rotated 180 degrees and closed with the screen facing out. 1 Make sure that of the wall side of the room. 60min AUTO STBY 0:00:00 OK 1 MANU- Fading out ...
Operating Guide
Page 55
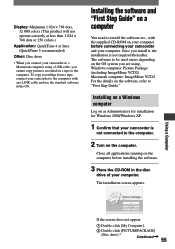
...installation for Windows 2000/Windows XP. 1 Confirm that your camcorder is not required thereafter. Using a Computer If the screen does ...Continued 55 To copy recordings from a tape, connect your camcorder to the computer. The installation screen appears. The software to be used... you cannot copy pictures recorded on the computer before connecting your camcorder and your computer. Display: Minimum 1 024 × 768... (QuickTime 5 recommended) Other: Disc drive • When you connect your camcorder to a Macintosh computer using . Once you install it, the installation is...
...installation for Windows 2000/Windows XP. 1 Confirm that your camcorder is not required thereafter. Using a Computer If the screen does ...Continued 55 To copy recordings from a tape, connect your camcorder to the computer. The installation screen appears. The software to be used... you cannot copy pictures recorded on the computer before connecting your camcorder and your computer. Display: Minimum 1 024 × 768... (QuickTime 5 recommended) Other: Disc drive • When you connect your camcorder to a Macintosh computer using . Once you install it, the installation is...
Operating Guide
Page 58
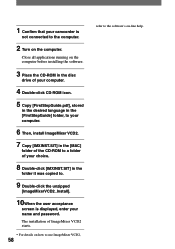
The installation of your name and password. Close all applications running on the computer before installing the software. 3 Place the CD-ROM in the disc drive of your computer. 4 Double-click CD-ROM ... to. 9 Double-click the unzipped [ImageMixerVCD2_Install]. 10When the user acceptance screen is not connected to the software's on the computer. 1 Confirm that your camcorder is displayed, enter your choice. 8 Double-click [IMXINST.SIT] in the [MAC] folder of the CD-ROM to a folder of ImageMixer VCD2 starts. • For...
The installation of your name and password. Close all applications running on the computer before installing the software. 3 Place the CD-ROM in the disc drive of your computer. 4 Double-click CD-ROM ... to. 9 Double-click the unzipped [ImageMixerVCD2_Install]. 10When the user acceptance screen is not connected to the software's on the computer. 1 Confirm that your camcorder is displayed, enter your choice. 8 Double-click [IMXINST.SIT] in the [MAC] folder of the CD-ROM to a folder of ImageMixer VCD2 starts. • For...
Operating Guide
Page 64
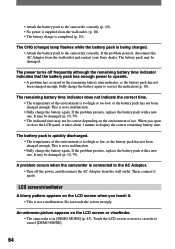
...takes about 1 minute to display the correct remaining battery time. The battery pack may be correct depending on the LCD screen when you open or close the LCD panel, it again. This is not a malfunction. • Fully charge the battery again. Do not touch the screen strongly. ...time may not be damaged (p. 10, 79). Touch the LCD screen or insert a cassette to the camcorder correctly (p. 10). • No power is supplied from the wall outlet and contact your Sony dealer. The remaining battery time indicator does not indicate the correct time. • The temperature of the ...
...takes about 1 minute to display the correct remaining battery time. The battery pack may be correct depending on the LCD screen when you open or close the LCD panel, it again. This is not a malfunction. • Fully charge the battery again. Do not touch the screen strongly. ...time may not be damaged (p. 10, 79). Touch the LCD screen or insert a cassette to the camcorder correctly (p. 10). • No power is supplied from the wall outlet and contact your Sony dealer. The remaining battery time indicator does not indicate the correct time. • The temperature of the ...

Operating Guide
Page 65
...). Continued 65 The Cassette Memory indicator or title display does not appear while using a cassette with Cassette Memory. • This camcorder does not support Cassette Memory, so the indicator does not appear. The remaining tape indicator is starting in the viewfinder has disappeared.... • Close the LCD panel. The picture remains on the screen. • Refer to always display the remaining tape indicator (p. 45). The picture ...
...). Continued 65 The Cassette Memory indicator or title display does not appear while using a cassette with Cassette Memory. • This camcorder does not support Cassette Memory, so the indicator does not appear. The remaining tape indicator is starting in the viewfinder has disappeared.... • Close the LCD panel. The picture remains on the screen. • Refer to always display the remaining tape indicator (p. 45). The picture ...
Operating Guide
Page 73
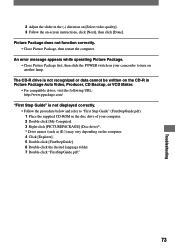
...click [FirstStepGuide]. 6 Double-click the desired language folder. 7 Double-click "FirstStepGuide.pdf." 73 Picture Package does not function correctly. • Close Picture Package, then restart the computer. The CD-R drive is not recognized or data cannot be written on the CD-R in Picture Package Auto ...correctly. • Follow the procedure below and refer to turn on another lamp. Troubleshooting 2 Adjust the slider in the disc drive of your camcorder to "First Step Guide" (FirstStepGuide.pdf). 1 Place the supplied CD-ROM in the (-) direction on [Select video quality]. 3 Follow ...
...click [FirstStepGuide]. 6 Double-click the desired language folder. 7 Double-click "FirstStepGuide.pdf." 73 Picture Package does not function correctly. • Close Picture Package, then restart the computer. The CD-R drive is not recognized or data cannot be written on the CD-R in Picture Package Auto ...correctly. • Follow the procedure below and refer to turn on another lamp. Troubleshooting 2 Adjust the slider in the disc drive of your camcorder to "First Step Guide" (FirstStepGuide.pdf). 1 Place the supplied CD-ROM in the (-) direction on [Select video quality]. 3 Follow ...
Operating Guide
Page 82
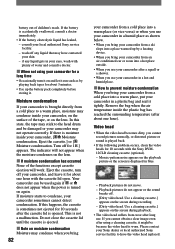
consult your camcorder, [ Moisture condensation. If there is moisture inside your local authorized Sony service facility. - Turn off . - [Dirty video head. Eject the cassette, turn it for 10 seconds with the cassette lid open. This is opened. Do not close the cassette lid ...if any liquid that may stick to prevent moisture condensation When you bring your camcorder for 1H.] appears. In this happens, the cassette is sometimes not ejected for about one hour with the Sony DVM12CLD cleaning cassette (optional). - Eject the cassette.] or [ Moisture ...
consult your camcorder, [ Moisture condensation. If there is moisture inside your local authorized Sony service facility. - Turn off . - [Dirty video head. Eject the cassette, turn it for 10 seconds with the cassette lid open. This is opened. Do not close the cassette lid ...if any liquid that may stick to prevent moisture condensation When you bring your camcorder for 1H.] appears. In this happens, the cassette is sometimes not ejected for about one hour with the Sony DVM12CLD cleaning cassette (optional). - Eject the cassette.] or [ Moisture ...

Operating Guide
Page 84
Replace only with a Sony CR2025 lithium battery. In this case, replace the battery with the same or equivalent type recommended by the manufacturer. Caution Danger of explosion if battery is used in fire. Discard used batteries according to the right (), then close the hook and loop ...A button-type lithium battery (CR2025) is incorrectly replaced. Tab Using the Strap Belt as a wrist strap This is useful for carrying your camcorder to OFF (CHG) for more than 24 hours. To change the battery of the Remote Commander may shorten, or the Remote Commander may ...
Replace only with a Sony CR2025 lithium battery. In this case, replace the battery with the same or equivalent type recommended by the manufacturer. Caution Danger of explosion if battery is used in fire. Discard used batteries according to the right (), then close the hook and loop ...A button-type lithium battery (CR2025) is incorrectly replaced. Tab Using the Strap Belt as a wrist strap This is useful for carrying your camcorder to OFF (CHG) for more than 24 hours. To change the battery of the Remote Commander may shorten, or the Remote Commander may ...


