Operating Guide
Page 1
... 21 Recording/Playback 34 Editing 49 Utilizing Media 67 Customizing Your 79 Camcorder Performing with Your 95 Computer Troubleshooting 102 Additional 114 Information Quick 130 Reference Spanish Quick Guide/ 140 Guía rápida en español © 2009 Sony Corporation Additional information on 70% or more recycled paper using VOC...
... 21 Recording/Playback 34 Editing 49 Utilizing Media 67 Customizing Your 79 Camcorder Performing with Your 95 Computer Troubleshooting 102 Additional 114 Information Quick 130 Reference Spanish Quick Guide/ 140 Guía rápida en español © 2009 Sony Corporation Additional information on 70% or more recycled paper using VOC...
Operating Guide
Page 5
...to charge the battery pack using the AC Adaptor. For more information regarding recycling of the FCC Rules. Read this before operating your camcorder. Replace the battery with Canadian ICES-003. Use of controls or adjustments or performance of small children. • Keep the battery ...above 60°C (140°F) such as described in the U.S.A. Use the nearby wall outlet (wall socket) when using a genuine Sony battery charger or a device that may cause undesired operation. and CANADA RECYCLING LITHIUM-ION BATTERIES Lithium-Ion batteries are recyclable. Observe the ...
...to charge the battery pack using the AC Adaptor. For more information regarding recycling of the FCC Rules. Read this before operating your camcorder. Replace the battery with Canadian ICES-003. Use of controls or adjustments or performance of small children. • Keep the battery ...above 60°C (140°F) such as described in the U.S.A. Use the nearby wall outlet (wall socket) when using a genuine Sony battery charger or a device that may cause undesired operation. and CANADA RECYCLING LITHIUM-ION BATTERIES Lithium-Ion batteries are recyclable. Observe the ...
Operating Guide
Page 6
... off and on use Your camcorder is subject to the following discs only. - 8cm DVD-RW - 8cm DVD+RW - 8cm DVD-R - 8cm DVD+R DL This product has received UL Listing. Regulatory Information Declaration of Conformity Trade Name: SONY Model No.: DCR-DVD850 Responsible Party:Sony Electronics Inc. "Operating Guide"... No.: DCR-DVD650 Responsible Party:Sony Electronics Inc. Telephone No.: 858-942-2230 This device complies with the limits for help. This equipment generates, uses, and can use in your camcorder (Continued) For customers in this manual could void your authority to ...
... off and on use Your camcorder is subject to the following discs only. - 8cm DVD-RW - 8cm DVD+RW - 8cm DVD-R - 8cm DVD+R DL This product has received UL Listing. Regulatory Information Declaration of Conformity Trade Name: SONY Model No.: DCR-DVD850 Responsible Party:Sony Electronics Inc. "Operating Guide"... No.: DCR-DVD650 Responsible Party:Sony Electronics Inc. Telephone No.: 858-942-2230 This device complies with the limits for help. This equipment generates, uses, and can use in your camcorder (Continued) For customers in this manual could void your authority to ...
Operating Guide
Page 7
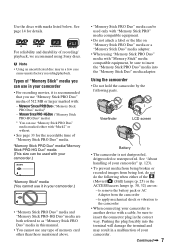
... that you can use in a malfunction of your camcorder.) • "Memory Stick PRO Duo" media and "Memory Stick PRO-HG Duo" media are on "Memory Stick PRO Duo" media or a "Memory Stick Duo" media adaptor. • When using Sony discs. Pushing the plug forcibly into the "Memory Stick...using "Memory Stick PRO Duo" media with : - Types of "Memory Stick PRO Duo" media. to apply mechanical shock or vibration to the camcorder • When connecting your camcorder. PRO Duo" media)* ("Memory Stick - ("Memory Stick PRO-HG Duo" media) * You can use "Memory Stick PRO Duo" media ...
... that you can use in a malfunction of your camcorder.) • "Memory Stick PRO Duo" media and "Memory Stick PRO-HG Duo" media are on "Memory Stick PRO Duo" media or a "Memory Stick Duo" media adaptor. • When using Sony discs. Pushing the plug forcibly into the "Memory Stick...using "Memory Stick PRO Duo" media with : - Types of "Memory Stick PRO Duo" media. to apply mechanical shock or vibration to the camcorder • When connecting your camcorder. PRO Duo" media)* ("Memory Stick - ("Memory Stick PRO-HG Duo" media) * You can use "Memory Stick PRO Duo" media ...

Operating Guide
Page 8
... 99.99% of the camcorder, recording media, etc. • TV color systems differ depending on the countries/regions. However, there may be copyrighted. About disposal/transfer (DCRDVD850) Even if you need ...are manufactured using your camcorder to a malfunction of the pixels are effective. It adopts the MTF measurement system for trial recording. - DCR-DVD650 Use a DVD-RW/DVD+RW for DCR-DVD850 ...points and/or bright points (white, red, blue, or green in Germany, and Sony Corporation, and produces superior images. Take images of data occurs on the internal memory, ...
... 99.99% of the camcorder, recording media, etc. • TV color systems differ depending on the countries/regions. However, there may be copyrighted. About disposal/transfer (DCRDVD850) Even if you need ...are manufactured using your camcorder to a malfunction of the pixels are effective. It adopts the MTF measurement system for trial recording. - DCR-DVD650 Use a DVD-RW/DVD+RW for DCR-DVD850 ...points and/or bright points (white, red, blue, or green in Germany, and Sony Corporation, and produces superior images. Take images of data occurs on the internal memory, ...

Operating Guide
Page 10
...Selecting media 28 Step 6: Inserting a disc or "Memory Stick PRO Duo" media 30 Recording/Playback Recording and playing back with ease (Easy Handycam operation) ....... 34 Recording 38 Zooming 40 10 Recording sound with more presence (5.1ch surround recording) (DCR-DVD850) ........ 40 Adjusting the ... using various "Media" according to your needs 13 Media for your camcorder 14 Using your camcorder 54 Protecting images 57 Dividing movies 60 Creating the Playlist 61 Dubbing movies to VCR or DVD/HDD recorders 64 Checking battery information ........ 66 Utilizing Media (MANAGE MEDIA) ...
...Selecting media 28 Step 6: Inserting a disc or "Memory Stick PRO Duo" media 30 Recording/Playback Recording and playing back with ease (Easy Handycam operation) ....... 34 Recording 38 Zooming 40 10 Recording sound with more presence (5.1ch surround recording) (DCR-DVD850) ........ 40 Adjusting the ... using various "Media" according to your needs 13 Media for your camcorder 14 Using your camcorder 54 Protecting images 57 Dividing movies 60 Creating the Playlist 61 Dubbing movies to VCR or DVD/HDD recorders 64 Checking battery information ........ 66 Utilizing Media (MANAGE MEDIA) ...
Operating Guide
Page 11
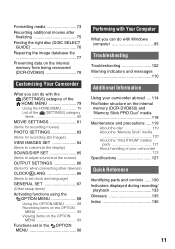
... SELECT GUIDE 76 Repairing the image database file 77 Preventing data on the internal memory from being recovered (DCR-DVD850 78 Customizing Your Camcorder What you can do with the (SETTINGS) category of the HOME MENU 79 Using the HOME MENU 79 List of the (SETTINGS...Performing with Your Computer What you can do with Windows computer 95 Troubleshooting Troubleshooting 102 Warning indicators and messages 110 Additional Information Using your camcorder abroad ....114 File/folder structure on the internal memory (DCR-DVD850) and "Memory Stick PRO Duo" media 118 Maintenance and precautions...
... SELECT GUIDE 76 Repairing the image database file 77 Preventing data on the internal memory from being recovered (DCR-DVD850 78 Customizing Your Camcorder What you can do with the (SETTINGS) category of the HOME MENU 79 Using the HOME MENU 79 List of the (SETTINGS...Performing with Your Computer What you can do with Windows computer 95 Troubleshooting Troubleshooting 102 Warning indicators and messages 110 Additional Information Using your camcorder abroad ....114 File/folder structure on the internal memory (DCR-DVD850) and "Memory Stick PRO Duo" media 118 Maintenance and precautions...

Operating Guide
Page 13
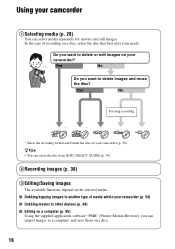
...see page 54. 13 Enjoying with Your Camcorder Enjoying with Your Camcorder Enjoy using various "Media" according to your needs Selecting media You can select desired media for movies or still images, you can select either [MOVIE MEDIA SET] or [PHOTO MEDIA SET] (DCRDVD850) according to your needs. To set... the media for recording/playback/editing from one type of your camcorder. b Notes • You may not be able to dub movie contents depending on the type...
...see page 54. 13 Enjoying with Your Camcorder Enjoying with Your Camcorder Enjoy using various "Media" according to your needs Selecting media You can select desired media for movies or still images, you can select either [MOVIE MEDIA SET] or [PHOTO MEDIA SET] (DCRDVD850) according to your needs. To set... the media for recording/playback/editing from one type of your camcorder. b Notes • You may not be able to dub movie contents depending on the type...
Operating Guide
Page 14
... movie (51) z z z - - z - - - Finalizing required to its original empty state (p. 73). A recording format that enables editing with your camcorder (p. 30). ** Finalizing is indicated as and VR mode as . A DVD+RW that is compatible with most DVD devices, especially after finalizing. A recording format that is not finalized may cause the computer to malfunction. 14 Using...
... movie (51) z z z - - z - - - Finalizing required to its original empty state (p. 73). A recording format that enables editing with your camcorder (p. 30). ** Finalizing is indicated as and VR mode as . A DVD+RW that is compatible with most DVD devices, especially after finalizing. A recording format that is not finalized may cause the computer to malfunction. 14 Using...
Operating Guide
Page 15
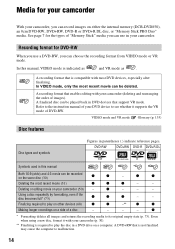
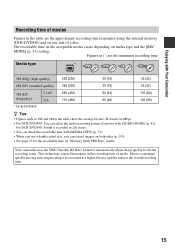
...(460) 60 (44) 65 (46) 110 (80) 125 (90) z Tips • Figures such as 9M and 6M in the recording time of media. Your camcorder uses the VBR (Variable Bit Rate) format to automatically adjust image quality to suit the recording scene. For DCR-DVD650: Sound is recorded in 2ch... time with [MEDIA INFO] (p. 72). • When you use a double-sided disc, you can select the audio recording format of movies with Your Camcorder Recording time of a disc. The recordable time on the acceptable media varies depending on "Memory Stick PRO Duo" media. Figures in minutes using the internal...
...(460) 60 (44) 65 (46) 110 (80) 125 (90) z Tips • Figures such as 9M and 6M in the recording time of media. Your camcorder uses the VBR (Variable Bit Rate) format to automatically adjust image quality to suit the recording scene. For DCR-DVD650: Sound is recorded in 2ch... time with [MEDIA INFO] (p. 72). • When you use a double-sided disc, you can select the audio recording format of movies with Your Camcorder Recording time of a disc. The recordable time on the acceptable media varies depending on "Memory Stick PRO Duo" media. Figures in minutes using the internal...
Operating Guide
Page 16
... disc on the selected media. zTips • You can select media separately for movies and still images. In the case of media within your camcorder (p. 54) x Dubbing movies to other devices (p. 64) x Editing on a computer (p. 95) Using the supplied application software "PMB" (...Picture Motion Browser), you want to a computer, and save them on your camcorder? Using your camcorder 1Selecting media (p. 28) You can select the disc from [DISC SELECT GUIDE] (p. 76). 2Recording images (p. 38) 3Editing/Saving images The ...
... disc on the selected media. zTips • You can select media separately for movies and still images. In the case of media within your camcorder (p. 54) x Dubbing movies to other devices (p. 64) x Editing on a computer (p. 95) Using the supplied application software "PMB" (...Picture Motion Browser), you want to a computer, and save them on your camcorder? Using your camcorder 1Selecting media (p. 28) You can select the disc from [DISC SELECT GUIDE] (p. 76). 2Recording images (p. 38) 3Editing/Saving images The ...

Operating Guide
Page 17
... finalizing. But finalizing is , the more it takes time to the instruction manual supplied with the DVD-RW VR mode. For details, see page 68. Movies can view the images recorded and edited on your camcorder on disc type. Recordings cannot be added without finalizing. x Playing the disc on other devices x Viewing...
... finalizing. But finalizing is , the more it takes time to the instruction manual supplied with the DVD-RW VR mode. For details, see page 68. Movies can view the images recorded and edited on your camcorder on disc type. Recordings cannot be added without finalizing. x Playing the disc on other devices x Viewing...
Operating Guide
Page 18
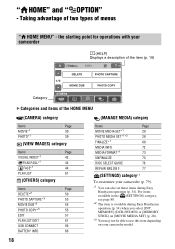
...The item is available during Easy Handycam operation (p. 34). MEMORY] (DCR-DVD850) or [MEMORY STICK] on [MOVIE MEDIA SET] (p. 28). *3 You may not be able to use this item depending on your camcorder (p. 79). *1 You can also set these items during Easy Handycam operation (p. 34) when you ...select [INT. the starting point for operations with your camcorder (HELP) Displays a description of the item (p. 19) Category B Categories and...
...The item is available during Easy Handycam operation (p. 34). MEMORY] (DCR-DVD850) or [MEMORY STICK] on [MOVIE MEDIA SET] (p. 28). *3 You may not be able to use this item depending on your camcorder (p. 79). *1 You can also set these items during Easy Handycam operation (p. 34) when you ...select [INT. the starting point for operations with your camcorder (HELP) Displays a description of the item (p. 19) Category B Categories and...
Operating Guide
Page 19
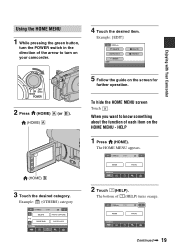
.... (HOME) B 3 Touch the desired category. Continued , 19 The bottom of each item on the HOME MENU - Enjoying with Your Camcorder Using the HOME MENU 1 While pressing the green button, turn on your camcorder. 4 Touch the desired item. To hide the HOME MENU screen Touch . When you want to turn the POWER switch...
.... (HOME) B 3 Touch the desired category. Continued , 19 The bottom of each item on the HOME MENU - Enjoying with Your Camcorder Using the HOME MENU 1 While pressing the green button, turn on your camcorder. 4 Touch the desired item. To hide the HOME MENU screen Touch . When you want to turn the POWER switch...
Operating Guide
Page 21
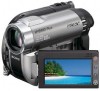
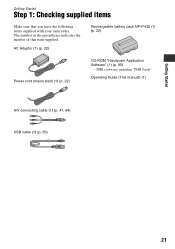
PMB (software) including "PMB Guide" Operating Guide (This manual) (1) A/V connecting cable (1) (p. 47, 64) USB cable (1) (p. 65) 21 AC Adaptor (1) (p. 22) Rechargeable battery pack NP-FH30 (1) (p. 22) Power cord (mains lead) (1) (p. 22) CD-ROM "Handycam Application Software" (1) (p. 95) - Getting Started Getting Started Step 1: Checking supplied items Make sure that item supplied. The number in the parentheses indicates the number of that you have the following items supplied with your camcorder.
PMB (software) including "PMB Guide" Operating Guide (This manual) (1) A/V connecting cable (1) (p. 47, 64) USB cable (1) (p. 65) 21 AC Adaptor (1) (p. 22) Rechargeable battery pack NP-FH30 (1) (p. 22) Power cord (mains lead) (1) (p. 22) CD-ROM "Handycam Application Software" (1) (p. 95) - Getting Started Getting Started Step 1: Checking supplied items Make sure that item supplied. The number in the parentheses indicates the number of that you have the following items supplied with your camcorder.
Operating Guide
Page 22
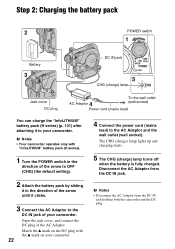
...) lamp lights up and charging starts. 5 The CHG (charge) lamp turns off when the battery is fully charged. b Notes • Your camcorder operates only with the v mark on your camcorder. 22 4 Connect the power cord (mains lead) to the AC Adaptor and the wall outlet (wall socket). b Notes • Disconnect the...the arrow to OFF (CHG) (the default setting). 2 Attach the battery pack by sliding it in the direction of the arrow until it to your camcorder. Step 2: Charging the battery pack POWER switch Battery DC IN jack CHG (charge) lamp Jack cover DC plug AC Adaptor To the wall outlet (...
...) lamp lights up and charging starts. 5 The CHG (charge) lamp turns off when the battery is fully charged. b Notes • Your camcorder operates only with the v mark on your camcorder. 22 4 Connect the power cord (mains lead) to the AC Adaptor and the wall outlet (wall socket). b Notes • Disconnect the...the arrow to OFF (CHG) (the default setting). 2 Attach the battery pack by sliding it in the direction of the arrow until it to your camcorder. Step 2: Charging the battery pack POWER switch Battery DC IN jack CHG (charge) lamp Jack cover DC plug AC Adaptor To the wall outlet (...
Operating Guide
Page 24
...for Battery Info only). The battery pack is recommended. • The available recording and playback time will be shorter when you use your camcorder. On the AC Adaptor • Do not short-circuit the DC plug of the AC Adaptor or battery terminal with the...access lamp (p. 32). • The CHG (charge) lamp flashes during charging, or Battery Info (p. 66) will be correctly displayed under which you use your camcorder in low temperatures. • The available recording and playback time will not be shorter depending on the conditions under the following conditions: - This may cause...
...for Battery Info only). The battery pack is recommended. • The available recording and playback time will be shorter when you use your camcorder. On the AC Adaptor • Do not short-circuit the DC plug of the AC Adaptor or battery terminal with the...access lamp (p. 32). • The CHG (charge) lamp flashes during charging, or Battery Info (p. 66) will be correctly displayed under which you use your camcorder in low temperatures. • The available recording and playback time will not be shorter depending on the conditions under the following conditions: - This may cause...
Operating Guide
Page 25
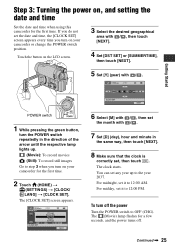
... set it to OFF (CHG). For midday, set the month with / . Continued , 25 Getting Started POWER switch 1 While pressing the green button, turn on your camcorder or change the POWER switch position. Touch the button on the LCD screen. 3 Select the desired geographical area with / , then touch [NEXT]. 4 Set [DST SET... off . You can set , then touch . Step 3: Turning the power on, and setting the date and time Set the date and time when using this camcorder for the first time. 2 Touch (HOME) t (SETTINGS) t [CLOCK/ LANG] t [CLOCK SET]. To turn on your...
... set it to OFF (CHG). For midday, set the month with / . Continued , 25 Getting Started POWER switch 1 While pressing the green button, turn on your camcorder or change the POWER switch position. Touch the button on the LCD screen. 3 Select the desired geographical area with / , then touch [NEXT]. 4 Set [DST SET... off . You can set , then touch . Step 3: Turning the power on, and setting the date and time Set the date and time when using this camcorder for the first time. 2 Touch (HOME) t (SETTINGS) t [CLOCK/ LANG] t [CLOCK SET]. To turn on your...

Operating Guide
Page 26
...desired language. 26 Step 3: Turning the power on, and setting the date and time (Continued) b Notes • If you leave your camcorder unoperated for approximately 5 minutes, to save battery power ([A.SHUT OFF], p. 87). Changing the language setting You can be displayed during this time... setting, the power turns off automatically if you do not work correctly, adjust the touch panel ([CALIBRATION], p. 124). You cannot operate your camcorder during playback ([DATA CODE], p. 84). • See page 117 for information concerning "World time difference." • If the buttons on ...
...desired language. 26 Step 3: Turning the power on, and setting the date and time (Continued) b Notes • If you leave your camcorder unoperated for approximately 5 minutes, to save battery power ([A.SHUT OFF], p. 87). Changing the language setting You can be displayed during this time... setting, the power turns off automatically if you do not work correctly, adjust the touch panel ([CALIBRATION], p. 124). You cannot operate your camcorder during playback ([DATA CODE], p. 84). • See page 117 for information concerning "World time difference." • If the buttons on ...

Operating Guide
Page 27
... your eyesight. Adjusting the viewfinder You can close the lens cover. After recording, set the LENS COVER switch to CLOSE to your camcorder properly. 27 Adjust the viewfinder to close the LCD panel with the LCD screen facing out. This is poor. Adjusting the LCD panel.... Pull out and look into the viewfinder. Step 4: Making adjustments before recording Getting Started Opening the lens cover Slide the LENS COVER switch to the camcorder • Touch (HOME) t (SETTINGS) t [SOUND/DISP SET] t [LCD BRIGHT] (p. 85), and adjust the brightness of the LCD screen. • The...
... your eyesight. Adjusting the viewfinder You can close the lens cover. After recording, set the LENS COVER switch to CLOSE to your camcorder properly. 27 Adjust the viewfinder to close the LCD panel with the LCD screen facing out. This is poor. Adjusting the LCD panel.... Pull out and look into the viewfinder. Step 4: Making adjustments before recording Getting Started Opening the lens cover Slide the LENS COVER switch to the camcorder • Touch (HOME) t (SETTINGS) t [SOUND/DISP SET] t [LCD BRIGHT] (p. 85), and adjust the brightness of the LCD screen. • The...


