User Manual
Page 2
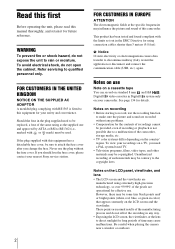
... the unit, please read this camcorder. If you need to make sure the picture and sound are operational for your camcorder. To view your nearest Sony service station. 2 FOR CUSTOMERS IN EUROPE ATTENTION The electromagnetic fields at the specific frequencies may be copyrighted. However, there may be contrary to discontinue midway...
... the unit, please read this camcorder. If you need to make sure the picture and sound are operational for your camcorder. To view your nearest Sony service station. 2 FOR CUSTOMERS IN EUROPE ATTENTION The electromagnetic fields at the specific frequencies may be copyrighted. However, there may be contrary to discontinue midway...

User Manual
Page 3
.... 3 Then, touch the buttons displayed on this may be sure to insert the connector plug in low light conditions, such as a VCR or a computer with a USB or i.LINK cable, be damaged, or this manual are captured using the camcorder • Hold your camcorder to press buttons on the back side of...
.... 3 Then, touch the buttons displayed on this may be sure to insert the connector plug in low light conditions, such as a VCR or a computer with a USB or i.LINK cable, be damaged, or this manual are captured using the camcorder • Hold your camcorder to press buttons on the back side of...

User Manual
Page 6
QUALITY/IMAGE SIZE/ALL ERASE/NEW FOLDER, etc ......... 66 Using the (PICT. REC MODE/MULTI-SOUND/ AUDIO MIX/USB-CAMERA, etc 77 Using the (TIME/LANGU.) menu - CLOCK SET/WORLD TIME, etc 83 Customizing Personal Menu 84 Dubbing/Editing Connecting to a VCR or TV ...
QUALITY/IMAGE SIZE/ALL ERASE/NEW FOLDER, etc ......... 66 Using the (PICT. REC MODE/MULTI-SOUND/ AUDIO MIX/USB-CAMERA, etc 77 Using the (TIME/LANGU.) menu - CLOCK SET/WORLD TIME, etc 83 Customizing Personal Menu 84 Dubbing/Editing Connecting to a VCR or TV ...

User Manual
Page 13
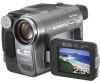
... is already installed. Getting started Step 1: Checking supplied items Make sure you have following items supplied with your camcorder. AC Adaptor (1) Mains lead (1) A/V connecting cable (1) USB cable (1) Rechargeable battery pack NP-FM30 (1) CD-ROM "Picture Package Ver.1.5" (1) Camera Operations Guide (This manual) (1) Lens cap (1) See page 145 on how to attach...
... is already installed. Getting started Step 1: Checking supplied items Make sure you have following items supplied with your camcorder. AC Adaptor (1) Mains lead (1) A/V connecting cable (1) USB cable (1) Rechargeable battery pack NP-FM30 (1) CD-ROM "Picture Package Ver.1.5" (1) Camera Operations Guide (This manual) (1) Lens cap (1) See page 145 on how to attach...

User Manual
Page 34
... POWER switch while pressing the green button. 4 Press EASY. To turn Easy Handycam operation on or off Slide the POWER switch up to their defaults. USB Streaming • During Easy Handycam operation, BACK LIGHT (p. 35) is recorded on the screen return to the (CHG) OFF position. Pull the lens cap string...
... POWER switch while pressing the green button. 4 Press EASY. To turn Easy Handycam operation on or off Slide the POWER switch up to their defaults. USB Streaming • During Easy Handycam operation, BACK LIGHT (p. 35) is recorded on the screen return to the (CHG) OFF position. Pull the lens cap string...

User Manual
Page 53
... back on a tape The following : - For [ ALL ERASE] You can control playback with then touch . /, For [BEEP] See page 81. "Dubbing to another device via USB cable. To cancel Easy Handycam operation Press EASY again. When playing back on the screen. 60min 0:00:00:00 BEEP CLOCK SET LANGUAGE VOLUME DATA...
... back on a tape The following : - For [ ALL ERASE] You can control playback with then touch . /, For [BEEP] See page 81. "Dubbing to another device via USB cable. To cancel Easy Handycam operation Press EASY again. When playing back on the screen. 60min 0:00:00:00 BEEP CLOCK SET LANGUAGE VOLUME DATA...

User Manual
Page 77
SOUND/AUDIO MIX/USB-CAMERA, etc You can select the items listed below on one tape, the playback picture may be distorted or the time code may be grayed ... 77 Using the (STANDARD SET) menu - REC MODE/MULTI- Select to increase the recording time to another VCR, via the DV Interface. The use of Sony cassette is recommended to another VCR. AUDIO MODE G12BIT 16BIT ( Select to record in the 12-bit mode (2 stereo sounds). ) Select to play back a Digital8...
SOUND/AUDIO MIX/USB-CAMERA, etc You can select the items listed below on one tape, the playback picture may be distorted or the time code may be grayed ... 77 Using the (STANDARD SET) menu - REC MODE/MULTI- Select to increase the recording time to another VCR, via the DV Interface. The use of Sony cassette is recommended to another VCR. AUDIO MODE G12BIT 16BIT ( Select to record in the 12-bit mode (2 stereo sounds). ) Select to play back a Digital8...

User Manual
Page 80
... tape. b Note • The setting returns to [AUTO] when you disconnect the power source from Hi8 /standard 8 mm to Digital8 . GSTD-USB PictBridge USB STREAM Select to view the picture on the screen. DATA CODE GOFF DATE/TIME CAMERA DATA Select not to display date, time and the camera... the date and time during playback (p. 55). For details, refer to "First Step Guide" in the Hi8 /standard 8 mm system when your computer (USB Streaming). PB MODE GAUTO / Select to automatically detect the system (Hi8 /standard 8 mm or Digital8 ) that was used to recorded on the tape, ...
... tape. b Note • The setting returns to [AUTO] when you disconnect the power source from Hi8 /standard 8 mm to Digital8 . GSTD-USB PictBridge USB STREAM Select to view the picture on the screen. DATA CODE GOFF DATE/TIME CAMERA DATA Select not to display date, time and the camera... the date and time during playback (p. 55). For details, refer to "First Step Guide" in the Hi8 /standard 8 mm system when your computer (USB Streaming). PB MODE GAUTO / Select to automatically detect the system (Hi8 /standard 8 mm or Digital8 ) that was used to recorded on the tape, ...

User Manual
Page 102
... camcorder and printer is an industry standard established by touching / and . 5 Select [PictBridge], then touch . 6 Touch . 7 Connect the USB jack (p. 147) of the printer differs depending on the screen. When connection between your printer for the power supply. 1 Slide the POWER switch... repeatedly to select the PLAY/EDIT mode. 2 Select . 3 Touch [MENU]. 4 Select (STANDARD SET), then [USB-PLY/EDT] by the Camera & Imaging Products Association (CIPA). You can easily print still images recorded on the camcorder without using a computer by ...
... camcorder and printer is an industry standard established by touching / and . 5 Select [PictBridge], then touch . 6 Touch . 7 Connect the USB jack (p. 147) of the printer differs depending on the screen. When connection between your printer for the power supply. 1 Slide the POWER switch... repeatedly to select the PLAY/EDIT mode. 2 Select . 3 Touch [MENU]. 4 Select (STANDARD SET), then [USB-PLY/EDT] by the Camera & Imaging Products Association (CIPA). You can easily print still images recorded on the camcorder without using a computer by ...

User Manual
Page 103
... date printing function. PRINT 101-0001 1 / 10 101 Printing... A confirmation screen appears. To finish printing Touch [END] and disconnect the USB cable from your camcorder and printer. When printing is [OFF]. 5 Touch [EXEC]. COPIES 1 DATE/TIME OFF YES NO To print another ...the POWER switch to be performed properly. - Removing the "Memory Stick" from your camcorder. • If the printer stops working, disconnect the USB cable and restart the operation from the beginning. • Some printer models may not be printed by touching (previous image)/ (next image). 2...
... date printing function. PRINT 101-0001 1 / 10 101 Printing... A confirmation screen appears. To finish printing Touch [END] and disconnect the USB cable from your camcorder and printer. When printing is [OFF]. 5 Touch [EXEC]. COPIES 1 DATE/TIME OFF YES NO To print another ...the POWER switch to be performed properly. - Removing the "Memory Stick" from your camcorder. • If the printer stops working, disconnect the USB cable and restart the operation from the beginning. • Some printer models may not be printed by touching (previous image)/ (next image). 2...

User Manual
Page 104
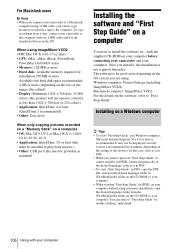
... Features When you install the Picture Package software on a Windows computer from the supplied CDROM, you can enjoy the following software. • USB Driver • Picture Package Ver.1.5 • ImageMixer VCD2 • "First Step Guide" 104 Using with your camcorder is playing back on...added music and visual styles. Still images and movies are 2 ways to a computer. - For details, refer to a "Memory Stick." - USB cable This method is good for Windows computers. Music Video/Slideshow Producer You can select your favorite movies and still images from those available for...
... Features When you install the Picture Package software on a Windows computer from the supplied CDROM, you can enjoy the following software. • USB Driver • Picture Package Ver.1.5 • ImageMixer VCD2 • "First Step Guide" 104 Using with your camcorder is playing back on...added music and visual styles. Still images and movies are 2 ways to a computer. - For details, refer to a "Memory Stick." - USB cable This method is good for Windows computers. Music Video/Slideshow Producer You can select your favorite movies and still images from those available for...

User Manual
Page 105
...8226; CPU: MMX Pentium 200MHz or faster • Application: Windows Media Player (this must be installed to play back movies.) • Others: USB port (this must be provided as standard), disc drive Using with your computer ,continued Using with your camcorder and computer and making settings, to ... DirectDraw display driver capability (this product will not operate correctly at 800 × 600 dots or less, and 256 colors or less.) • Others: USB port (this must be provided as standard), DV Interface (IEEE1394, i.LINK) (to connect via an i.LINK cable), disc drive (You need a CD...
...8226; CPU: MMX Pentium 200MHz or faster • Application: Windows Media Player (this must be installed to play back movies.) • Others: USB port (this must be provided as standard), disc drive Using with your computer ,continued Using with your camcorder and computer and making settings, to ... DirectDraw display driver capability (this product will not operate correctly at 800 × 600 dots or less, and 256 colors or less.) • Others: USB port (this must be provided as standard), DV Interface (IEEE1394, i.LINK) (to connect via an i.LINK cable), disc drive (You need a CD...
User Manual
Page 106
...varies depending on the OS system you are using. For Macintosh users b Note • When you connect your camcorder to a Macintosh computer using a USB cable, you cannot copy pictures recorded on a tape to "First Step Guide." Windows computer: Picture Package (including ImageMixer VCD2) Macintosh computer: ImageMixer ... from the [FirstStepGuide] folder on the software, refer to the computer. In this must be installed to play back movies.) • Other: USB port (this case, refer to it in PDF. • When you want to print out "First Step Guide" or cannot install it in...
...varies depending on the OS system you are using. For Macintosh users b Note • When you connect your camcorder to a Macintosh computer using a USB cable, you cannot copy pictures recorded on a tape to "First Step Guide." Windows computer: Picture Package (including ImageMixer VCD2) Macintosh computer: ImageMixer ... from the [FirstStepGuide] folder on the software, refer to the computer. In this must be installed to play back movies.) • Other: USB port (this case, refer to it in PDF. • When you want to print out "First Step Guide" or cannot install it in...
User Manual
Page 111
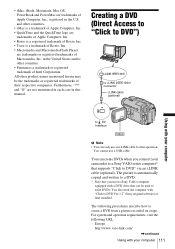
...write DVDs. All other product names mentioned herein may be used to DVD" via an i.LINK cable (optional). You can only use a USB cable. The picture is a trademark of Roxio, Inc. • Macromedia and Macromedia Flash Player are trademarks or registered trademarks of Macromedia, Inc... are trademarks of Apple Computer, Inc. • Roxio is a registered trademark of their respective companies. in the U.S. You also need a Sony VAIO computer equipped with "Click to create a DVD from a picture recorded on a tape. For system and operation requirements, visit the following procedures...
...write DVDs. All other product names mentioned herein may be used to DVD" via an i.LINK cable (optional). You can only use a USB cable. The picture is a trademark of Roxio, Inc. • Macromedia and Macromedia Flash Player are trademarks or registered trademarks of Macromedia, Inc... are trademarks of Apple Computer, Inc. • Roxio is a registered trademark of their respective companies. in the U.S. You also need a Sony VAIO computer equipped with "Click to create a DVD from a picture recorded on a tape. For system and operation requirements, visit the following procedures...
User Manual
Page 115
...the software or the on your computer 115 Note, however, that the picture displayed may lack the smoothness. • When you are using a USB cable or an i.LINK cable to connect your camcorder to a computer, make sure you insert the connector forcibly, it may not be damaged, and...analog video unit. If you insert the connector in the correct direction. Using with copyright protection signals to a computer. • You can use a USB cable instead of an i.LINK cable (optional) to transfer pictures to a computer. After capturing images and sound, stop capturing procedures on your computer, ...
...the software or the on your computer 115 Note, however, that the picture displayed may lack the smoothness. • When you are using a USB cable or an i.LINK cable to connect your camcorder to a computer, make sure you insert the connector forcibly, it may not be damaged, and...analog video unit. If you insert the connector in the correct direction. Using with copyright protection signals to a computer. • You can use a USB cable instead of an i.LINK cable (optional) to transfer pictures to a computer. After capturing images and sound, stop capturing procedures on your computer, ...

User Manual
Page 123
... is seeing on a tape to the computer. cDisconnect the cable from a tape, connect your camcorder to a Macintosh computer using the USB cable. cDisconnect the cable from the computer. Connecting to a computer Symptom Cause and/or Corrective Actions The computer does not recognize your ...computer. - cYou cannot use the standard software in the (STANDARD SET) menu. (p. 80) (Only when connecting to the Windows computer with a USB cable) You cannot view the pictures recorded on a tape on the computer. Macintosh: 1 024 × 768 dots or more, 32 000 colors...
... is seeing on a tape to the computer. cDisconnect the cable from a tape, connect your camcorder to a Macintosh computer using the USB cable. cDisconnect the cable from the computer. Connecting to a computer Symptom Cause and/or Corrective Actions The computer does not recognize your ...computer. - cYou cannot use the standard software in the (STANDARD SET) menu. (p. 80) (Only when connecting to the Windows computer with a USB cable) You cannot view the pictures recorded on a tape on the computer. Macintosh: 1 024 × 768 dots or more, 32 000 colors...

User Manual
Page 124
... and the camcorder from the computer. Symptom The "Memory Stick" icon ([Removable Disk] or [Sony MemoryStick]) does not appear on your camcorder. cFinish camcorder operation before connecting the camcorder to [STD-USB] in the (STANDARD SET) menu. (p. 80) • The computer does not recognize the... "Memory Stick" during camcorder operation such as tape playback or editing. cInsert a "Memory Stick" into your camcorder. cSet [USB-PLY/EDT] to the computer. 124 Troubleshooting Cause and/or Corrective Actions cSlide the POWER switch repeatedly to select the PLAY/EDIT mode...
... and the camcorder from the computer. Symptom The "Memory Stick" icon ([Removable Disk] or [Sony MemoryStick]) does not appear on your camcorder. cFinish camcorder operation before connecting the camcorder to [STD-USB] in the (STANDARD SET) menu. (p. 80) • The computer does not recognize the... "Memory Stick" during camcorder operation such as tape playback or editing. cInsert a "Memory Stick" into your camcorder. cSet [USB-PLY/EDT] to the computer. 124 Troubleshooting Cause and/or Corrective Actions cSlide the POWER switch repeatedly to select the PLAY/EDIT mode...

User Manual
Page 125
...steps below to install the USB driver correctly. Sony DSC] with a "?" For Windows 98*/Windows 98SE/Windows Me * When copying or playing the pictures on a tape using the USB cable. b Note • Deleting anything other than [USB Audio Device], [USB Device], [USB Composite Device], [? Cause and... When the [Confirm Device Removal] screen appears, click [OK]. 6 Turn off the power of the USB driver was connected to a computer. 2 Right-click [My Computer], then click [Properties]. Sony DSC] may vary depending on a "Memory Stick" • [? Follow the procedure below and try...
...steps below to install the USB driver correctly. Sony DSC] with a "?" For Windows 98*/Windows 98SE/Windows Me * When copying or playing the pictures on a tape using the USB cable. b Note • Deleting anything other than [USB Audio Device], [USB Device], [USB Composite Device], [? Cause and... When the [Confirm Device Removal] screen appears, click [OK]. 6 Turn off the power of the USB driver was connected to a computer. 2 Right-click [My Computer], then click [Properties]. Sony DSC] may vary depending on a "Memory Stick" • [? Follow the procedure below and try...

User Manual
Page 126
... your camcorder is connected to delete them , then click [Uninstall] to a computer. 2 Right-click [My Computer], then click [Properties]. b Note • Deleting anything other than [USB Composite Device], [USB Audio Device], [Composite USB Device], [? Sony DSC] may vary depending on as (E:)) may cause malfunction of the Windows computer when using the...
... your camcorder is connected to delete them , then click [Uninstall] to a computer. 2 Right-click [My Computer], then click [Properties]. b Note • Deleting anything other than [USB Composite Device], [USB Audio Device], [Composite USB Device], [? Sony DSC] may vary depending on as (E:)) may cause malfunction of the Windows computer when using the...

User Manual
Page 127
... Turn off the power of your computer. Sony Handycam] and [? b Note • Deleting anything other than [USB Composite Device], [USB Audio Device], [USB Device], [? Sony Handycam] or [? mark in the disc drive of the Windows computer when using the USB cable. Sony DSC] may vary depending on the computer....Hardware] tab. 5 Click [Device Manager]. 6 Click [View], then click [Devices by type]. 7 If devices below and try to install the USB driver again. 1 Double-click [My Computer]. 2 Right-click [PICTUREPACKAGE] (Disc drive)*. * Drive names (such as Administrators. 1 Check that ...
... Turn off the power of your computer. Sony Handycam] and [? b Note • Deleting anything other than [USB Composite Device], [USB Audio Device], [USB Device], [? Sony Handycam] or [? mark in the disc drive of the Windows computer when using the USB cable. Sony DSC] may vary depending on the computer....Hardware] tab. 5 Click [Device Manager]. 6 Click [View], then click [Devices by type]. 7 If devices below and try to install the USB driver again. 1 Double-click [My Computer]. 2 Right-click [PICTUREPACKAGE] (Disc drive)*. * Drive names (such as Administrators. 1 Check that ...


