
Camera Operations Guide
Page 3
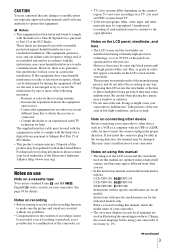
... Digital8 video cassettes on your camcorder. Take pictures of the sun only in the proper direction. Instructions with the limits for long periods of time may be copyrighted. Notes on connecting other device Before connecting your camcorder to malfunction. CCD-TRV138: TRV138 CCD-TRV338: TRV338 DCR-TRV280: TRV280...equipment into an outlet on a circuit different from what you need an NTSC system-based TV. • Television programs, films, video tapes, and other device such as a VCR or a computer with no guarantee that appear constantly on the LCD screen and the viewfinder....
... Digital8 video cassettes on your camcorder. Take pictures of the sun only in the proper direction. Instructions with the limits for long periods of time may be copyrighted. Notes on connecting other device Before connecting your camcorder to malfunction. CCD-TRV138: TRV138 CCD-TRV338: TRV338 DCR-TRV280: TRV280...equipment into an outlet on a circuit different from what you need an NTSC system-based TV. • Television programs, films, video tapes, and other device such as a VCR or a computer with no guarantee that appear constantly on the LCD screen and the viewfinder....
Camera Operations Guide
Page 5
... - FADER 30 ,continued 5 Easy Handycam 26 Adjusting the exposure 27 Adjusting the exposure for a longer time 23 Using zoom ...23 Using the built-in light 23 Recording in and out of Contents CCD-TRV138: TRV138 CCD-TRV338: DCR-TRV280: TRV280 TRV338 Read this first 2 Quick Start...viewfinder 16 Adjusting the LCD panel 16 Adjusting the viewfinder 16 Step 5: Setting the date and time 17 Step 6: Inserting a cassette tape 18 Step 7: Setting the screen language 19 Recording Recording movies 21 Recording for backlit subjects 27 Adjusting the exposure manually 28 Recording in...
... - FADER 30 ,continued 5 Easy Handycam 26 Adjusting the exposure 27 Adjusting the exposure for a longer time 23 Using zoom ...23 Using the built-in light 23 Recording in and out of Contents CCD-TRV138: TRV138 CCD-TRV338: DCR-TRV280: TRV280 TRV338 Read this first 2 Quick Start...viewfinder 16 Adjusting the LCD panel 16 Adjusting the viewfinder 16 Step 5: Setting the date and time 17 Step 6: Inserting a cassette tape 18 Step 7: Setting the screen language 19 Recording Recording movies 21 Recording for backlit subjects 27 Adjusting the exposure manually 28 Recording in...
Camera Operations Guide
Page 6
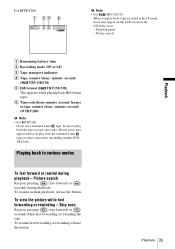
END SEARCH 33 Playback Viewing pictures recorded on a TV 39 6 Easy Handycam 36 Various playback functions 37 Displaying the screen indicators 37 Displaying the date/time and camera settings data - Data code ( TRV280) ...37 Playing the picture on a tape 34 Playing back in various modes 35 Playing back with ease - Superimposing a title 31 Searching for the last scene of the most recent recording -
END SEARCH 33 Playback Viewing pictures recorded on a TV 39 6 Easy Handycam 36 Various playback functions 37 Displaying the screen indicators 37 Displaying the date/time and camera settings data - Data code ( TRV280) ...37 Playing the picture on a tape 34 Playing back in various modes 35 Playing back with ease - Superimposing a title 31 Searching for the last scene of the most recent recording -
Camera Operations Guide
Page 7
WORLD TIME/VIDEO EDIT, etc 57 Dubbing/Editing Connecting to a VCR 59 Dubbing to DVD") ( TRV280 79 Troubleshooting Troubleshooting 82 Warning indicators and messages .....92 Additional Information Using your camcorder abroad 94 Usable cassette tapes 95 About the "InfoLITHIUM" battery pack 96 About i.LINK 97 Maintenance and precautions 98 Specification 101 Quick Reference Identifying...
WORLD TIME/VIDEO EDIT, etc 57 Dubbing/Editing Connecting to a VCR 59 Dubbing to DVD") ( TRV280 79 Troubleshooting Troubleshooting 82 Warning indicators and messages .....92 Additional Information Using your camcorder abroad 94 Usable cassette tapes 95 About the "InfoLITHIUM" battery pack 96 About i.LINK 97 Maintenance and precautions 98 Specification 101 Quick Reference Identifying...
Camera Operations Guide
Page 15
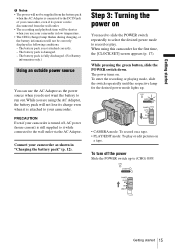
... power (house current) is still supplied to it is fully discharged. (For Battery information only.) Using an outside power source You can use your camcorder in low temperature. • The CHG (charge) lamp flashes during charging, or the battery information will not be correctly displayed in "Charging the ...until the respective lamp for the first time, the [CLOCK SET] screen appears (p. 17). Getting started 15 Step 3: Turning the power on a tape. When using the AC Adaptor, the battery pack will not lose its power cord is disconnected from the wall outlet. • The recording and ...
... power (house current) is still supplied to it is fully discharged. (For Battery information only.) Using an outside power source You can use your camcorder in low temperature. • The CHG (charge) lamp flashes during charging, or the battery information will not be correctly displayed in "Charging the ...until the respective lamp for the first time, the [CLOCK SET] screen appears (p. 17). Getting started 15 Step 3: Turning the power on a tape. When using the AC Adaptor, the battery pack will not lose its power cord is disconnected from the wall outlet. • The recording and ...
Camera Operations Guide
Page 18
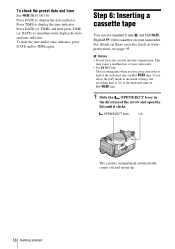
... your camcorder. • For TRV280: The recording time when you select the [LP] mode in the menu settings, the recording time is half of the indicated time on Hi8 tape. 1 Slide the OPEN/EJECT lever in the direction of the indicated time on Hi8 tape. For details on your camcorder is... 3/4 of the arrow and open the lid until it clicks. If you use standard 8 mm and Hi8 , Digital8 video cassettes on these cassettes (such as writeprotection), see page 95. b...
... your camcorder. • For TRV280: The recording time when you select the [LP] mode in the menu settings, the recording time is half of the indicated time on Hi8 tape. 1 Slide the OPEN/EJECT lever in the direction of the indicated time on Hi8 tape. For details on your camcorder is... 3/4 of the arrow and open the lid until it clicks. If you use standard 8 mm and Hi8 , Digital8 video cassettes on these cassettes (such as writeprotection), see page 95. b...

Camera Operations Guide
Page 22
... recording time, date, and the camera settings data are recorded automatically on the tape without a break even when you do not operate the camcorder for a while. G Time code/Tape counter (hour: minute: second)/Tape photo recording ( TRV280) b Notes • Before changing the battery pack, slide the POWER switch up to (CHG) ... recording The indicators will not be displayed during playback by yourself in SP mode and LP mode on the same tape. - For TRV138/338: 1 23 4 60min SP REC 0:00:00 6 5 For TRV280: Date/time and camera settings data (p. 37) will not be recorded on the...
... recording time, date, and the camera settings data are recorded automatically on the tape without a break even when you do not operate the camcorder for a while. G Time code/Tape counter (hour: minute: second)/Tape photo recording ( TRV280) b Notes • Before changing the battery pack, slide the POWER switch up to (CHG) ... recording The indicators will not be displayed during playback by yourself in SP mode and LP mode on the same tape. - For TRV138/338: 1 23 4 60min SP REC 0:00:00 6 5 For TRV280: Date/time and camera settings data (p. 37) will not be recorded on the...
Camera Operations Guide
Page 23
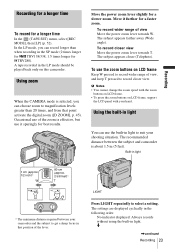
...angle). To record closer view Move the power zoom lever towards W. Recording Recording for a longer time To record for a slower zoom. A tape recorded in light You can choose zoom to record closer view. The settings are displayed cyclically in light. Move it sparingly for best results....without using the built-in the following order. Occasional use it further for TRV280). Using the built-in the LP mode should be played back only on LCD frame, support the LCD panel with your camcorder and the subject to select a setting. The recommended distance between your ...
...angle). To record closer view Move the power zoom lever towards W. Recording Recording for a longer time To record for a slower zoom. A tape recorded in light You can choose zoom to record closer view. The settings are displayed cyclically in light. Move it sparingly for best results....without using the built-in the following order. Occasional use it further for TRV280). Using the built-in the LP mode should be played back only on LCD frame, support the LCD panel with your camcorder and the subject to select a setting. The recommended distance between your ...
Camera Operations Guide
Page 25
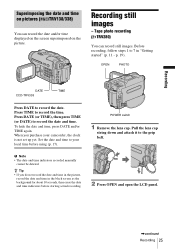
When you do not record the date and time in the picture, record the date and time in "Getting started" (p. 11 - Tape photo recording ( TRV280) You can record the date and/or time displayed on the screen superimposed on pictures ( TRV138/338) You can record still images. Set the date ...and time to the grip belt. Pull the lens cap string down and attach it to your camcorder, the clock is not set up yet...
When you do not record the date and time in the picture, record the date and time in "Getting started" (p. 11 - Tape photo recording ( TRV280) You can record the date and/or time displayed on the screen superimposed on pictures ( TRV138/338) You can record still images. Set the date ...and time to the grip belt. Pull the lens cap string down and attach it to your camcorder, the clock is not set up yet...
Camera Operations Guide
Page 26
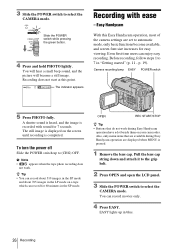
... image is pressed. 1 Remove the lens cap. b Note • appears when the tape photo recording does not work during Easy Handycam operation are set to automatic mode, only basic functions become a still image. Also, only...will become available, and screen font size increases for 7 seconds. Recording does not start at this Easy Handycam operation, most of the camera settings are displayed when MENU is recorded with ease - The still image ...OPEN REC START/STOP z Tip • Buttons that are available during Easy Handycam operation have a dot beside them on your camcorder.
... image is pressed. 1 Remove the lens cap. b Note • appears when the tape photo recording does not work during Easy Handycam operation are set to automatic mode, only basic functions become a still image. Also, only...will become available, and screen font size increases for 7 seconds. Recording does not start at this Easy Handycam operation, most of the camera settings are displayed when MENU is recorded with ease - The still image ...OPEN REC START/STOP z Tip • Buttons that are available during Easy Handycam operation have a dot beside them on your camcorder.
Camera Operations Guide
Page 31
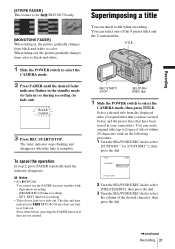
BLACK FADER 3 Press REC START/STOP. Tape photo recording - [FRAME REC] (Frame recording) - [INT. Select a desired title...8 preset titles and the 2 custom titles. REC] (Interval recording) • Titles do not fade in your camcorder). Recording [STRIPE FADER] This feature is complete. To cancel the operation In step 2, press FADER repeatedly until the .... TITLE REC START/ STOP SEL/PUSH EXEC dial 1 Slide the POWER switch to color. b Notes • For TRV280: You cannot use the FADER function together with: - You can create original titles (up to 2 types of title ...
BLACK FADER 3 Press REC START/STOP. Tape photo recording - [FRAME REC] (Frame recording) - [INT. Select a desired title...8 preset titles and the 2 custom titles. REC] (Interval recording) • Titles do not fade in your camcorder). Recording [STRIPE FADER] This feature is complete. To cancel the operation In step 2, press FADER repeatedly until the .... TITLE REC START/ STOP SEL/PUSH EXEC dial 1 Slide the POWER switch to color. b Notes • For TRV280: You cannot use the FADER function together with: - You can create original titles (up to 2 types of title ...
Camera Operations Guide
Page 33
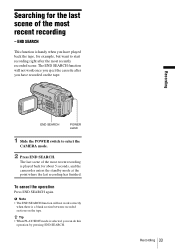
...2 Press END SEARCH. END SEARCH POWER switch 1 Slide the POWER switch to start recording right after you have played back the tape, for about 5 seconds, and the camcorder enters the standby mode at the point where the last recording has finished. The last scene of the most recent recording - z... Tip • When PLAY/EDIT mode is a blank section between recorded sections on the tape. Recording 33 Recording To cancel the...
...2 Press END SEARCH. END SEARCH POWER switch 1 Slide the POWER switch to start recording right after you have played back the tape, for about 5 seconds, and the camcorder enters the standby mode at the point where the last recording has finished. The last scene of the most recent recording - z... Tip • When PLAY/EDIT mode is a blank section between recorded sections on the tape. Recording 33 Recording To cancel the...
Camera Operations Guide
Page 34
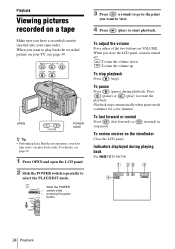
... ) to select the PLAY/EDIT mode. OPEN POWER switch z Tip • Performing Easy Handycam operation, even first time users can play ) to view. 4 Press (play back the ...the POWER switch repeatedly to start playback. To adjust the volume Press either of the two buttons on a tape Make sure you close the LCD panel, sound is turned off. :To turn the volume down :To... turn the volume up To stop playback Press (stop mode. (rewind) in To review movies on your camcorder. To pause Press (pause) during playing back For TRV138/338: 60min 0:00:00 34 Playback Indicators displayed ...
... ) to select the PLAY/EDIT mode. OPEN POWER switch z Tip • Performing Easy Handycam operation, even first time users can play ) to view. 4 Press (play back the ...the POWER switch repeatedly to start playback. To adjust the volume Press either of the two buttons on a tape Make sure you close the LCD panel, sound is turned off. :To turn the volume down :To... turn the volume up To stop playback Press (stop mode. (rewind) in To review movies on your camcorder. To pause Press (pause) during playing back For TRV138/338: 60min 0:00:00 34 Playback Indicators displayed ...
Camera Operations Guide
Page 35
For TRV280: 60min 0:00:00:00 b Note • For TRV138/338: When you play back a tape recorded in the LP mode, noise may appear when you use a standard 8 mm tape, be sure to play back the standard 8 mm tape on other camcorders (including another DCRTRV280). Playing back in the... noise may appear on your camcorder. To view the picture while fast forwarding or rewinding - Playback 35 Playback pause - F Time code (hour: minute: second: frame) or tape counter (hour: minute: second) ( TRV280) b Note • For TRV280: If you play back the tape on the LCD screen in ...
For TRV280: 60min 0:00:00:00 b Note • For TRV138/338: When you play back a tape recorded in the LP mode, noise may appear when you use a standard 8 mm tape, be sure to play back the standard 8 mm tape on other camcorders (including another DCRTRV280). Playing back in the... noise may appear on your camcorder. To view the picture while fast forwarding or rewinding - Playback 35 Playback pause - F Time code (hour: minute: second: frame) or tape counter (hour: minute: second) ( TRV280) b Note • For TRV280: If you play back the tape on the LCD screen in ...
Camera Operations Guide
Page 36
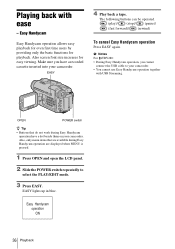
... the PLAY/EDIT mode. 3 Press EASY. EASY lights up in blue. EASY 4 Play back a tape. Also, only menu items that do not work during Easy Handycam operation are displayed when MENU is pressed. 1 Press OPEN and open the LCD panel. 2 Slide the...for playback. Easy Handycam operation ON 36 Playback OPEN POWER switch z Tip • Buttons that are available during Easy Handycam operation have a recorded cassette inserted into your camcorder. • You cannot use Easy Handycam operation together with ease - b Notes For TRV280: • During Easy Handycam operation, you ...
... the PLAY/EDIT mode. 3 Press EASY. EASY lights up in blue. EASY 4 Play back a tape. Also, only menu items that do not work during Easy Handycam operation are displayed when MENU is pressed. 1 Press OPEN and open the LCD panel. 2 Slide the...for playback. Easy Handycam operation ON 36 Playback OPEN POWER switch z Tip • Buttons that are available during Easy Handycam operation have a recorded cassette inserted into your camcorder. • You cannot use Easy Handycam operation together with ease - b Notes For TRV280: • During Easy Handycam operation, you ...
Camera Operations Guide
Page 37
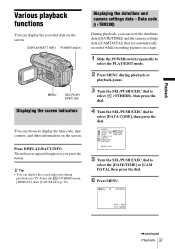
Select the (OTHERS) menu, [DISPLAY], then [V-OUT/LCD] (p. 58). Data code ( TRV280) During playback, you press the button. OTHERS DATA CODE OFF WORLD TIME DATE/TIME BEEP CAM DATA A. SHUT OFF DISPLAY VIDEO EDIT RETURN [MENU] : END 5 ... • You can view the date/time data ([DATE/TIME]) and the camera settings data ([CAM DATA]) that are automatically recorded while recording pictures on a tape. 1 Slide the POWER switch repeatedly to select the PLAY/EDIT mode. 2 Press MENU during playback on a TV. Displaying the date/time and camera settings data...
Select the (OTHERS) menu, [DISPLAY], then [V-OUT/LCD] (p. 58). Data code ( TRV280) During playback, you press the button. OTHERS DATA CODE OFF WORLD TIME DATE/TIME BEEP CAM DATA A. SHUT OFF DISPLAY VIDEO EDIT RETURN [MENU] : END 5 ... • You can view the date/time data ([DATE/TIME]) and the camera settings data ([CAM DATA]) that are automatically recorded while recording pictures on a tape. 1 Slide the POWER switch repeatedly to select the PLAY/EDIT mode. 2 Press MENU during playback on a TV. Displaying the date/time and camera settings data...
Camera Operations Guide
Page 39
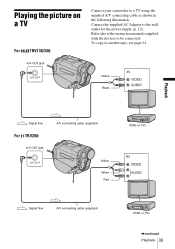
A/V OUT jack Yellow Black Playback Signal flow For TRV280: A/V OUT jack A/V connecting cable (supplied) Yellow White Red VCRs or TVs Signal flow A/V connecting cable (supplied) VCRs or TVs ,continued Playback 39 To copy to the wall outlet for the power supply (p. 12). Connect the supplied AC Adaptor to another tape, see page 61. Refer also to the instruction manuals supplied with the devices to a TV using the supplied A/V connecting cable as shown in the following illustration. Playing the picture on a TV For TRV138/338: Connect your camcorder to be connected.
A/V OUT jack Yellow Black Playback Signal flow For TRV280: A/V OUT jack A/V connecting cable (supplied) Yellow White Red VCRs or TVs Signal flow A/V connecting cable (supplied) VCRs or TVs ,continued Playback 39 To copy to the wall outlet for the power supply (p. 12). Connect the supplied AC Adaptor to another tape, see page 61. Refer also to the instruction manuals supplied with the devices to a TV using the supplied A/V connecting cable as shown in the following illustration. Playing the picture on a TV For TRV138/338: Connect your camcorder to be connected.
Camera Operations Guide
Page 41
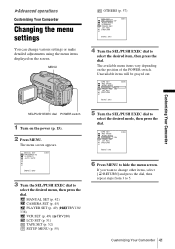
...END 4 Turn the SEL/PUSH EXEC dial to select the desired menu, then press the dial. TAPE SET REC MODE AUDIO MODE REMAIN AUTO FRAME REC ON I N T. REC RETURN STBY [MENU] : END Customizing Your Camcorder SEL/PUSH EXEC dial POWER switch 1 Turn on the screen. MANUAL SET PROGRAM AE P EFFECT ... (p. 42) CAMERA SET (p. 45) PLAYER SET (p. 49) ( TRV138/ 338) VCR SET (p. 49) ( TRV280) LCD SET (p. 51) TAPE SET (p. 52) SETUP MENU (p. 55) 5 Turn the SEL/PUSH EXEC dial to hide the menu screen. TAPE SET REC MODE AUDIO MODE REMAIN ON FRAME REC I N T. REC RETURN STBY [MENU] : END 6 Press MENU...
...END 4 Turn the SEL/PUSH EXEC dial to select the desired menu, then press the dial. TAPE SET REC MODE AUDIO MODE REMAIN AUTO FRAME REC ON I N T. REC RETURN STBY [MENU] : END Customizing Your Camcorder SEL/PUSH EXEC dial POWER switch 1 Turn on the screen. MANUAL SET PROGRAM AE P EFFECT ... (p. 42) CAMERA SET (p. 45) PLAYER SET (p. 49) ( TRV138/ 338) VCR SET (p. 49) ( TRV280) LCD SET (p. 51) TAPE SET (p. 52) SETUP MENU (p. 55) 5 Turn the SEL/PUSH EXEC dial to hide the menu screen. TAPE SET REC MODE AUDIO MODE REMAIN ON FRAME REC I N T. REC RETURN STBY [MENU] : END 6 Press MENU...

Camera Operations Guide
Page 44
AUTO SHTR GON OFF Select to automatically activate the electronic shutter to another tape (p. 61). z Tip • For TRV280: You can copy pictures edited using the electronic shutter. 44 Customizing Your Camcorder Select when recording without using picture effects to adjust the shutter speed when recording in bright conditions.
AUTO SHTR GON OFF Select to automatically activate the electronic shutter to another tape (p. 61). z Tip • For TRV280: You can copy pictures edited using the electronic shutter. 44 Customizing Your Camcorder Select when recording without using picture effects to adjust the shutter speed when recording in bright conditions.
Camera Operations Guide
Page 45
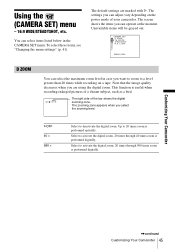
The settings you can operate at the moment. The zooming zone appears when you can adjust vary depending on a tape. The screen shows the items you select the zooming level. To select these items, see "Changing the menu settings" (p. 41). CAMERA SET D ZOOM 1 6 : 9W I... GHT [MENU] : END D ZOOM You can select items listed below in case you are marked with G. The right side of your camcorder. S. Up to 20 times zoom is useful when recording enlarged pictures of a distant subject, such as a bird. The default settings are using the digital zoom...
The settings you can operate at the moment. The zooming zone appears when you can adjust vary depending on a tape. The screen shows the items you select the zooming level. To select these items, see "Changing the menu settings" (p. 41). CAMERA SET D ZOOM 1 6 : 9W I... GHT [MENU] : END D ZOOM You can select items listed below in case you are marked with G. The right side of your camcorder. S. Up to 20 times zoom is useful when recording enlarged pictures of a distant subject, such as a bird. The default settings are using the digital zoom...


