
Handycam® Handbook
Page 11
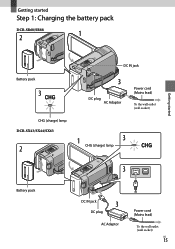
Getting started Step 1: Charging the battery pack DCR-SR68/SR88 Battery pack CHG (charge) lamp DCR-SX43/SX44/SX63 DC IN jack DC plug AC Adaptor Power cord (Mains lead) To the wall outlet (wall socket) CHG (charge) lamp Getting started Battery pack DC IN jack DC plug AC Adaptor Power cord (Mains lead) To the wall outlet (wall socket) US 11
Getting started Step 1: Charging the battery pack DCR-SR68/SR88 Battery pack CHG (charge) lamp DCR-SX43/SX44/SX63 DC IN jack DC plug AC Adaptor Power cord (Mains lead) To the wall outlet (wall socket) CHG (charge) lamp Getting started Battery pack DC IN jack DC plug AC Adaptor Power cord (Mains lead) To the wall outlet (wall socket) US 11

Handycam® Handbook
Page 12
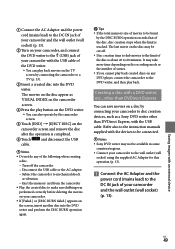
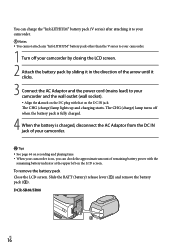
...You cannot attach any "InfoLITHIUM" battery pack other than the V series to your camcorder. 1 Turn off when the battery pack is fully charged. 4 When the battery is charged, disconnect the AC Adaptor from the DC IN jack of your camcorder. Tips See page 80 on recording and playing time. &#... LCD screen. US 12 The CHG (charge) lamp turns off your camcorder by closing the LCD screen. 2 Attach the battery pack by sliding it in the direction of the arrow until it clicks. 3 Connect the AC Adaptor and the power cord (mains lead) to 86 °F) is on, you fully charge ...
...You cannot attach any "InfoLITHIUM" battery pack other than the V series to your camcorder. 1 Turn off when the battery pack is fully charged. 4 When the battery is charged, disconnect the AC Adaptor from the DC IN jack of your camcorder. Tips See page 80 on recording and playing time. &#... LCD screen. US 12 The CHG (charge) lamp turns off your camcorder by closing the LCD screen. 2 Attach the battery pack by sliding it in the direction of the arrow until it clicks. 3 Connect the AC Adaptor and the power cord (mains lead) to 86 °F) is on, you fully charge ...
Handycam® Handbook
Page 45
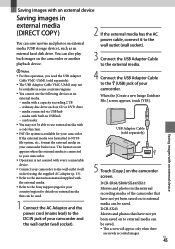
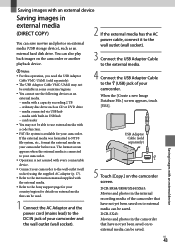
...can be used. 1 Connect the AC Adaptor and the power cord (mains lead) to the DC IN jack of your camcorder and the wall outlet (wall socket). 4 Connect the USB Adaptor Cable to the (USB) jack of the camcorder that have not yet been saved on to the external...drive such as CD or DVD drive media connected via USB hub media with built-in external media (DIRECT COPY) You can save movies and photos on external media (USB storage device), such as an external hard disk drive. DCR-SR68/SR88/SX44/SX63: Movies and photos in the internal recording media of your camcorder...
...can be used. 1 Connect the AC Adaptor and the power cord (mains lead) to the DC IN jack of your camcorder and the wall outlet (wall socket). 4 Connect the USB Adaptor Cable to the (USB) jack of the camcorder that have not yet been saved on to the external...drive such as CD or DVD drive media connected via USB hub media with built-in external media (DIRECT COPY) You can save movies and photos on external media (USB storage device), such as an external hard disk drive. DCR-SR68/SR88/SX44/SX63: Movies and photos in the internal recording media of your camcorder...

Handycam® Handbook
Page 47
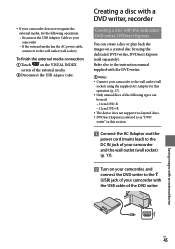
Refer also to the instruction manual supplied with the DVD writer. Notes Connect your camcorder to the (USB) jack of the external media. Disconnect the USB Adaptor Cable. Saving images with the USB cable of the following types ... referred to as "DVD writer" in this section. Connect the AC Adaptor and the power cord (mains lead) to the DC IN jack of your camcorder and the wall outlet (wall socket) (p. 13). Turn on your camcorder, and connect the DVD writer to the wall outlet (wall socket) using the supplied AC Adaptor...
Refer also to the instruction manual supplied with the DVD writer. Notes Connect your camcorder to the (USB) jack of the external media. Disconnect the USB Adaptor Cable. Saving images with the USB cable of the following types ... referred to as "DVD writer" in this section. Connect the AC Adaptor and the power cord (mains lead) to the DC IN jack of your camcorder and the wall outlet (wall socket) (p. 13). Turn on your camcorder, and connect the DVD writer to the wall outlet (wall socket) using the supplied AC Adaptor...
Handycam® Handbook
Page 49
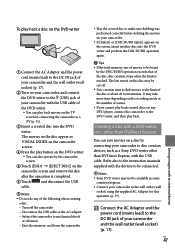
...20 to 60 minutes. Saving images with the USB cable. Connect the AC Adaptor and the power cord (mains lead) to the DC IN jack of your camcorder and the wall outlet (wall socket) (p. 13). Turn on your camcorder, and connect the DVD writer to the (USB) jack of your...the limit of your camcorder to the wall outlet (wall socket) using the supplied AC Adaptor for this operation (p. 13). Connect the AC Adaptor and the power cord (mains lead) to the DC IN jack of the disc is reached. The movies on the disc appear as a Sony DVD writer other than...
...20 to 60 minutes. Saving images with the USB cable. Connect the AC Adaptor and the power cord (mains lead) to the DC IN jack of your camcorder and the wall outlet (wall socket) (p. 13). Turn on your camcorder, and connect the DVD writer to the (USB) jack of your...the limit of your camcorder to the wall outlet (wall socket) using the supplied AC Adaptor for this operation (p. 13). Connect the AC Adaptor and the power cord (mains lead) to the DC IN jack of the disc is reached. The movies on the disc appear as a Sony DVD writer other than...

Handycam® Handbook
Page 88
...power cord (mains lead) such as it . Do not use a deformed or damaged battery pack. Keep metal contacts clean. If the battery electrolytic liquid has leaked: Consult your local authorized Sony service facility. Wash off any liquid that may cause uneven color and other damage. If your camcorder... cause heat to your camcorder. If moisture condensation has occurred Leave your camcorder for about 1 hour). Operate your camcorder on DC 6.8 V/7.2 V (battery pack) or DC 8.4 V (AC Adaptor). For DC or AC operation, use...
...power cord (mains lead) such as it . Do not use a deformed or damaged battery pack. Keep metal contacts clean. If the battery electrolytic liquid has leaked: Consult your local authorized Sony service facility. Wash off any liquid that may cause uneven color and other damage. If your camcorder... cause heat to your camcorder. If moisture condensation has occurred Leave your camcorder for about 1 hour). Operate your camcorder on DC 6.8 V/7.2 V (battery pack) or DC 8.4 V (AC Adaptor). For DC or AC operation, use...
Operating Guide
Page 15
Getting started Step 1: Charging the battery pack DCR-SR68/SR88 Battery pack CHG (charge) lamp DCR-SX43/SX44/SX63 DC IN jack DC plug AC Adaptor Power cord (Mains lead) To the wall outlet (wall socket) CHG (charge) lamp Getting started Battery pack DC IN jack DC plug AC Adaptor Power cord (Mains lead) To the wall outlet (wall socket) US 15
Getting started Step 1: Charging the battery pack DCR-SR68/SR88 Battery pack CHG (charge) lamp DCR-SX43/SX44/SX63 DC IN jack DC plug AC Adaptor Power cord (Mains lead) To the wall outlet (wall socket) CHG (charge) lamp Getting started Battery pack DC IN jack DC plug AC Adaptor Power cord (Mains lead) To the wall outlet (wall socket) US 15
Operating Guide
Page 16
... the LCD screen. DCR-SR68/SR88 US 16 The CHG (charge) lamp turns off your camcorder by closing the LCD screen. 2 Attach the battery pack by sliding it in the direction of the arrow until it clicks. 3 Connect the AC Adaptor and the power cord (mains lead) to your camcorder. 1 Turn off ...when the battery pack is fully charged. 4 When the battery is charged, disconnect the AC Adaptor from the DC IN jack of remaining battery power with that on the LCD screen. Slide the BATT (...
... the LCD screen. DCR-SR68/SR88 US 16 The CHG (charge) lamp turns off your camcorder by closing the LCD screen. 2 Attach the battery pack by sliding it in the direction of the arrow until it clicks. 3 Connect the AC Adaptor and the power cord (mains lead) to your camcorder. 1 Turn off ...when the battery pack is fully charged. 4 When the battery is charged, disconnect the AC Adaptor from the DC IN jack of remaining battery power with that on the LCD screen. Slide the BATT (...
Operating Guide
Page 43
...camcorder. DCR-SR68/SR88/SX44/SX63: Movies and photos in the internal recording media of your country/region for details on the camcorder screen. DCR-SX43: Movies and photos in the camcorder that have not yet been saved on to external media can be used. 1 Connect the AC Adaptor and the power cord (mains lead) to the DC... media can be able to the Sony support page for your camcorder before use the following devices as an external media. media with a capacity exceeding 2 TB ordinary disc drive such as an external hard disk drive. Saving images with a code function...
...camcorder. DCR-SR68/SR88/SX44/SX63: Movies and photos in the internal recording media of your country/region for details on the camcorder screen. DCR-SX43: Movies and photos in the camcorder that have not yet been saved on to external media can be used. 1 Connect the AC Adaptor and the power cord (mains lead) to the DC... media can be able to the Sony support page for your camcorder before use the following devices as an external media. media with a capacity exceeding 2 TB ordinary disc drive such as an external hard disk drive. Saving images with a code function...
Operating Guide
Page 45
... USB Adaptor Cable to your camcorder and the wall outlet (wall socket) (p. 17). Turn on a created disc by using the supplied AC Adaptor for this section. Connect the AC Adaptor and the power cord (mains lead) to the DC IN jack of your camcorder If the external media... has the AC power cable, connect it to the wall outlet (wall socket) To finish the external media connection ...
... USB Adaptor Cable to your camcorder and the wall outlet (wall socket) (p. 17). Turn on a created disc by using the supplied AC Adaptor for this section. Connect the AC Adaptor and the power cord (mains lead) to the DC IN jack of your camcorder If the external media... has the AC power cable, connect it to the wall outlet (wall socket) To finish the external media connection ...
Operating Guide
Page 47
... and perform the DISC BURN operation again. Tips If the total memory size of movies to be connected. Notes Sony DVD writer may take more time depending on the recording mode or the number of scenes. If you cannot play back created discs on... the supplied AC Adaptor for this operation (p. 17). Connect the AC Adaptor and the power cord (mains lead) to the DC IN jack of your camcorder and the wall outlet (wall socket) (p. 17). It may not be cut off the camcorder Disconnect the USB cable or the AC adaptor Subject the...
... and perform the DISC BURN operation again. Tips If the total memory size of movies to be connected. Notes Sony DVD writer may take more time depending on the recording mode or the number of scenes. If you cannot play back created discs on... the supplied AC Adaptor for this operation (p. 17). Connect the AC Adaptor and the power cord (mains lead) to the DC IN jack of your camcorder and the wall outlet (wall socket) (p. 17). It may not be cut off the camcorder Disconnect the USB cable or the AC adaptor Subject the...
Operating Guide
Page 60
...power cord (mains lead), pull it may malfunction or become deformed. Near strong magnetic fields or mechanical vibration. The camcorder may not be repaired. If any further. Avoid rough handling, disassembling, modifying, physical shock, or impact such as under [MANAGE MEDIA] category) the recording medium (DCR-SR68... as hammering, dropping or stepping on DC 6.8 V/7.2 V (battery pack) or DC 8.4 V (AC Adaptor). For DC or AC operation, use or store the camcorder and accessories in the sun. The camcorder may occur. On a ...
...power cord (mains lead), pull it may malfunction or become deformed. Near strong magnetic fields or mechanical vibration. The camcorder may not be repaired. If any further. Avoid rough handling, disassembling, modifying, physical shock, or impact such as under [MANAGE MEDIA] category) the recording medium (DCR-SR68... as hammering, dropping or stepping on DC 6.8 V/7.2 V (battery pack) or DC 8.4 V (AC Adaptor). For DC or AC operation, use or store the camcorder and accessories in the sun. The camcorder may occur. On a ...
Operating Guide
Page 63
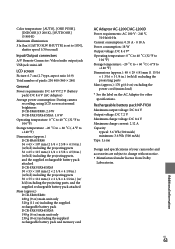
... Design and specifications of pixels: 230 400 (960 240) General Power requirements: DC 6.8 V/7.2 V (battery pack) DC 8.4 V (AC Adaptor) Average power consumption: During camera recording, using LCD screen at normal brightness: DCR-SR68/SR88: 2.0 W DCR-SX43/SX44/SX63: 1.8 W Operating temperature: 0 C to 40 &#...number of your camcorder and accessories are subject to +140 °F) Dimensions (approx.): 48 29 81 mm (1 15/16 × 1 3/16 × 3 1/4 in.) (w/h/d) excluding the projecting parts Mass (approx.): 170 g (6.0 oz) excluding the power cord (mains lead...
... Design and specifications of pixels: 230 400 (960 240) General Power requirements: DC 6.8 V/7.2 V (battery pack) DC 8.4 V (AC Adaptor) Average power consumption: During camera recording, using LCD screen at normal brightness: DCR-SR68/SR88: 2.0 W DCR-SX43/SX44/SX63: 1.8 W Operating temperature: 0 C to 40 &#...number of your camcorder and accessories are subject to +140 °F) Dimensions (approx.): 48 29 81 mm (1 15/16 × 1 3/16 × 3 1/4 in.) (w/h/d) excluding the projecting parts Mass (approx.): 170 g (6.0 oz) excluding the power cord (mains lead...


